All procedures involving sample collection have been performed in accordance with the institute's IRB guidelines.
1. Solution Preparation
- Prepare extracellular solution S1: 4-(2-Hydroxy-ethyl)piperazine-1-ethanesulfonic acid (HEPES) buffered extracellular solution containing (in mM) 145 NaCl, 5 KCl, 1 CaCl2, 1 MgCl2, 10 HEPES; pH = 7.3 (adjusted with NaOH); osmolarity = 300 mOsm (adjusted with glucose).
- Prepare extracellular solution S2: Carbogen-oxygenated (95% O2, 5% CO2) extracellular solution containing (in mM) 125 NaCl, 25 NaHCO3, 5 KCl, 1 CaCl2, 1 MgSO4, 5 bis(2-hydroxyethyl)-2-aminoethanesulfonic acid (BES); pH = 7.3; osmolarity = 300 mOsm (adjusted with glucose).
- Prepare 4% low-gelling temperature agarose solution (S3) for tissue embedding: 4% low-gelling temperature agarose. Dissolve 2 g low-gelling agarose in 50 ml of S1 in a 100 ml glass laboratory bottle together with a magnetic stirrer. To melt the agarose, put the bottle in a water bath (with lid not tightly closed) at 70 °C for approximately 20 min or until solution becomes transparent while stirring. Cool down and keep melted agarose in a second water bath at 42 °C until further use.
- Prepare intracellular solution S4: Pipette solution containing (in mM) 143 KCl, 2 KOH, 1 ethylene glycol tetraacetic acid (EGTA), 0.3 CaCl2 (free Ca2+ = 110 nM), 10 HEPES, 2 adenosine 5′-triphosphate magnesium salt (MgATP), 1 guanosine 5′-triphosphate sodium salt (NaGTP); pH = 7.1 (adjusted with KOH); osmolarity = 290 mOsm.
- Modify/adjust composition of S1, S2 and S4 according to individual experimental design (e.g., pharmacological blockers to isolate certain types of voltage-activated currents).
2. VNO Dissection and Embedding
- Sacrifice animal by brief exposure to CO2 and decapitate using sharp surgical scissors. Note: As time from sacrificing the animal to putting the VNO capsule on ice is critical, minimize the time to less than 2 min. To maintain tissue viability, embed both fully dissected VNOs in agarose in less than 30 min.
- Remove the lower jaw with large surgical scissors. Enter through the mouth cavity and cut the mandible bones and muscle of each side separately.
- Place the remaining part of the head upside down in the large Petri dish.
- Pull away the skin of the upper jaw and around the tip of the nose with medium forceps to gain better access to the incisors.
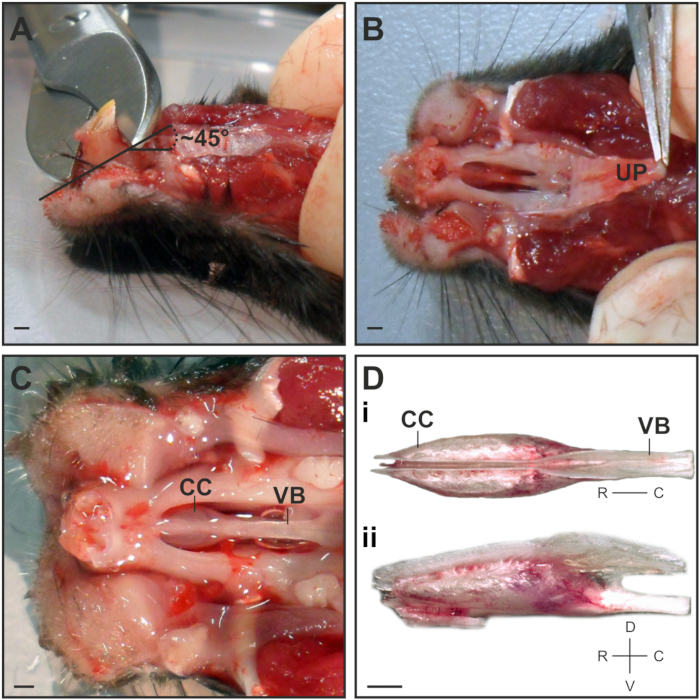
- Use bone scissors to cut away the largest part of the incisors at a ~45° angle in the rostral direction (Figure 1A). This will ease removal of the VNO capsule from the nasal cavity.
NOTE: Do not cut to the root of the tooth to prevent damage to the tip of the VNO capsule.
- Grab the rigid upper palate at its rostral part with medium forceps and carefully peel back in one piece at a flat angle (Figure 1B).
NOTE: Repeatedly rinse with ice-cold S2.
- Use micro spring scissors to cut the bony fusion between the tip of the vomer bone and the jaw. Insert the scissor tips with the curved part of the tip pointing outward away from the VNO and carefully cut the bone in small steps on both the left and right side lateral to the VNO capsule.
- To remove the VNO capsule, use micro spring scissors to cut through the vomer bone at the caudal part and carefully lift the vomer bone out of the nasal cavity using medium forceps. Immediately transfer the VNO to a small petri dish under a stereo microscope on an ice gel pack where the remaining steps of the dissection will be performed.
- Rinse the VNO in a small amount of ice-cold S2 to prevent the tissue from drying out.
- Separate the cartilaginous capsules that contain the VNO soft tissues by grabbing the back of the vomer bone with medium forceps. Position the capsule for a dorsal view so that a split between both VNOs becomes visible (Figure 1Di).
- Use the tip of fine forceps to separate both cartilage VNO capsules from the central bone while keeping the vomer bone pinned down at the rear part.
NOTE: Use forceps only at the rim of the cartilage capsule and be very careful not to pierce through the cartilage as the delicate sensory epithelium is easily damaged.
- Once the two VNOs are separated, start removing the cartilage encapsulating the first VNO.
- Grab the top rim of the capsule with one fine forceps and split away the cartilage wall that was previously attached to the vomer bone (medial side).
- To remove remaining cartilage, turn the VNO with its curved lateral side to the bottom of the dish and securely pin down the cartilage on one side using forceps. Carefully move the second fine forceps from the back side at a very flat angle between cartilage and VNO to loosen the connection between tissue and cartilage.
- Slowly peel the VNO away from the cartilage by holding it at its caudal tip, to avoid damaging the sensory epithelium.
- Once the VNO is levered from the capsule, make sure to remove all remaining small cartilage parts as any remaining pieces of cartilage will detach the tissue from surrounding agarose during the slicing process.
- Place a small drop of ice-cold S2 on the first dissected VNO to prevent tissue damage. A large blood vessel on the lateral side will become visible indicating that the organ is still intact and was not grossly damaged during the dissection (Figure 2Aii). In case the blood vessel got damaged, it will still be worthwhile to carry on with slicing the VNO as long as the overall morphology was not clearly impaired.
- Immediately dissect the second VNO.
- To embed the VNOs, fill both small petri dishes to the rim with melted S3 (stored in water bath at 42 °C; see 1.3).
- Hold the VNO on the broader caudal end with fine forceps to avoid damage to the sensory epithelium.
- Immerse the VNO in the agarose and move it horizontally back and forth several times to remove the film of extracellular solution as well as any air bubbles from its surface.
- Position the VNO vertically with the caudal tip facing the bottom of the dish. Instead of pinching the VNO with the forceps directly, adjust orientation by moving the forceps tip in close proximity to the VNO.
NOTE: Orientation during embedding is crucial as it determines slice plane and accessibility to sensory neurons during the experiment.
- Place dishes on gel ice pack and wait until agarose has solidified.
Note: Do not change VNO orientation once the agarose has started solidifying as this will detach the tissue from the surrounding agarose.
3. Coronal VNO Tissue Slicing
- Use small spatula to remove agarose block from the small dish into the lid of a large Petri dish, flip the agarose upside down leaving the caudal tip of the VNO facing upwards.
- Cut the block into a pyramidal shape using a surgical scalpel (3-4 mm at the tip, 8-10 mm at the bottom). Take care not to damage the embedded tissue.
- Use super glue to fix the pyramid-shaped block to the center of the vibratome specimen plate and wait ~1 min for the glue to dry completely.
- Transfer the specimen plate to the slicing chamber and prepare the second VNO, accordingly. Keep plate with the second specimen at 4 °C until use.
- Use a vibrating blade microtome with the following settings: thickness: 150-200 µm; speed: 3.5 a.u. = 0.15 mm/sec; frequency: 7.5 a.u. = 75 Hz. Transfer slices to oxygenating chamber until use after briefly inspecting slice morphology under the dissecting microscope. Slices can be kept for several hr.
4. Single-cell Electrophysiological Recordings
- For recordings, use an upright fixed-stage microscope equipped with water immersion objectives, Dodt or infrared differential interfering contrast (IR-DIC), and epifluorescence as well as a cooled charge-coupled device (CCD) camera. For data acquisition, use a patch-clamp amplifier, head stage, analog-to-digital / digital-to-analog (AD/DA) interface board and a computer (including recording software).
- Prepare a stock of 10-20 patch pipettes (4-7 MΩ). Pull pipettes from borosilicate glass capillaries (1.50 mm outer diameter [OD]/0.86 mm inner diameter [ID]) using a micropipette puller and fire-polish with a microforge.
NOTE: Fire polishing the pipette tips is crucial when patching the rather small VSNs. This will help to prevent rupturing the cell membrane when applying negative pressure in order to obtain a high resistance seal. After polishing the pipette opening should be approximately 1 µm.
- Keep pipettes in a pipette storage jar to prevent damage and dust accumulation until use.
- Prepare perfusion system by filling solution reservoirs and tubing according to experimental design.
NOTE: Remove air bubbles from tubing completely as they will strongly interfere with electrophysiological recordings.
- Adjust pressure to achieve ~3 ml/min flow.
NOTE: High pressures will cause movement of the tissue slice as well as termination of electrophysiological recordings.
- Transfer VNO slice to imaging chamber and fix the slice position using stainless steel anchor wired with 0.1 mm thick synthetic fibers (Figure 2B-C).
NOTE: Do not cover the tissue slice with one of the synthetic fiber threads but rather the agarose surrounding the slice.
- Transfer imaging chamber to recording setup and continuously superfuse slice with oxygenated S2 at room temperature via a bath application.
- Adjust the suction capillary to the surface of the solution to create a slow suction for constant exchange of bath solution. Adjust the 8-in-1 multi-barrel "perfusion pencil" above and close to the non-sensory part of the VNO slice that contains the blood vessel (Figure 2C, 3A). It will be beneficial to arrange perfusion pencil and recording pipette to be facing the slice from opposite directions.
- Connect reference electrode and bath solution using an L-shaped agar bridge (filled with 150 mM KCl).
- Fill patch pipette with pipette solution S4.
- Mount the pipette over the silver chloride-coated patch electrode connected to the head stage without scraping off the coating and attach firmly.
- Apply slight positive pressure (approximately 1 ml on a 10 ml plastic syringe) to the patch pipette before entering the bath.
- Lower the pipette into the bath using micro manipulators far enough to be able to submerge the objective without hitting it (Figure 2D).
- Monitor pipette resistance (Rpip, between 4-7 MΩ) using electrophysiology software connected to the head stage.
NOTE: If Rpip is <4 MΩ the glass tip is broken. If R pip is >10 MΩ, the tip is most likely clogged and the pipette must be replaced.
- Visualize the VNO slice with a CCD-camera using infrared-optimized differential interference contrast (DIC) and identify FPR-rs3-i-Venus (FPR-rs3: formyl peptide receptor-related sequence 3) expressing cells (or similarly labeled neurons) using fluorescence illumination and an appropriate filter cube.
- Focus and target fluorescent or non-fluorescent cells depending on experimental design.
- To approach the cell body, use hand wheels for maximum sensitivity. Due to positive pressure, a small dent in the cell soma membrane becomes visible once the pipette tip is in close proximity.
- Release positive pressure and apply slight negative pressure to suck in the cell membrane in order to gain a high resistance seal (1-20 GΩ). Apply short and gentle suction to disrupt the cell membrane and establish the whole-cell configuration.
- Monitor access resistance constantly during experiment.
NOTE: Only include neurons exhibiting small and stable access resistance (≤3% of Rinput; change <20% over the course of the experiment) into analysis.