All procedures involving animal models have been reviewed by the local institutional animal care committee and the JoVE veterinary review board.
1. Drugs for Microiontophoresis
NOTE: The drugs used for microiontophoresis must have an electrical charge when dissolved in water. Check the literature to see if the drug of interest is appropriate for this procedure. Here, the procedure for gabazine, an antagonist of the GABAA receptor, is described.
- Filter distilled water using a 0.2 μm syringe filter to sterilize it and ensure it contains no solutes. Using this distilled water, prepare ~1,000 μl of 20 mM gabazine.
- Adjust the pH of the dilution to 4 with 0.2 μm filtered NaOH using a fine-tip pH electrode.
- Store 100 - 200 μl aliquots at -20 ºC. Defrost on the day of the recording. That day, before the animal is restrained, fill the barrels (3 - 5 μl) of the multibarrel electrode with the drugs, using a 100 μl microsyringe fitted with a flexible plastic needle.
2. Surgery and Headpost Implantation
- Perform experiments in two male CBA/J mice (Mus musculus) with weights of 27 and 30 g.
- In the days before the surgery, handle the animals and allow them to explore freely in the recording chamber to habituate them to it. Perform three sessions per day, each lasting at least 30 minutes. This will calm them and make them comfortable during the recordings.
- Anesthetize the mouse using a mix of ketamine (50 mg/kg) and xylazine (10 mg/kg) injected intramuscularly. This dose deeply anesthetizes the animal for around 1 hr. Give supplementary doses of one-third of the initial dose as needed.
- Place the animal on a heating blanket set to maintain a temperature of 38 ± 1 ºC and stabilize the animal's head in a stereotaxic frame using two ear bars and a bite bar. Be careful not to pierce the tympanic membrane with the ear bars.
- Protect the eyes by applying a drop of ophthalmic gel.
- Shave the scalp using scissors and apply povidone-iodine to disinfect the skin.
- Using a scalpel, make an incision along the midline to expose the skull and retract the periosteum covering the parietal and the more rostral part of the occipital bones.
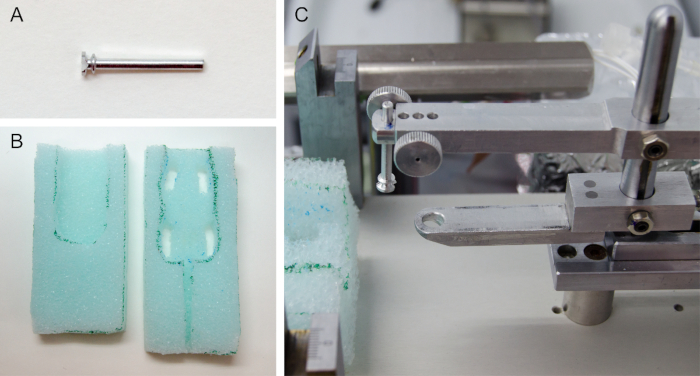
- Glue a lightweight duralumin headpost (weight ~0.65 g, length 30 mm, Figure 1A) with a round and flat base (5 mm diameter) on the skull. Glue a silver wire to the middle of the headpost leaving its ends free. The silver wire will be used as the reference electrode for the electrophysiological recording.
- Apply a thin layer of light-curable adhesive on the skull and the base of the headpost. Wait 10 sec and place the headpost over the rostral area of the parietal bones, along the midline.
- Light cure the adhesive using a blue light source for 20 sec for an effective bonding strength.
- Drill three holes around and behind the base of the headpost using an electric drill and a small drill bit.
- Place two watch screws (~2 mm length) in the drilled holes to serve as additional contact points between the skull and the headstage. The screws require 1½ turns to achieve a snug fit. Test the screws with forceps to make sure they are not loose.
- Insert the tip of the silver ground wire into the third hole, ensuring it contacts the dura. Apply a small drop of water-resistant cyanoacrylate glue to bind the wire to the skull.
- Apply light-curing composite to reinforce the bond of the headpost with the skull. Cover the base of the headpost, the low part of the silver wire, and the screws, being careful not to extend behind lambda to allow access during recording. Cure using a blue light source.
- Retract the muscle at the back of the neck near its insertion on the skull. Using a small trephine (2.35 mm diameter), drill a round window just below lambda suture and lateral to the midline, to expose the inferior colliculus (IC). Pull up the covering bone with fine tweezers when the borders are loose. If bleeding occurs, rinse with cold sterile saline to stop it.
- Use composite to make a small (~1 mm wide and ~1 mm high) wall around the window and light-cure it.
- Cover the exposed skull and muscle with antibiotic ointment. Then, wet the exposed surface of the IC with sterile saline and cover it with petroleum jelly, filling the well generated after making the wall around the recording window.
- Inject buprenorphine subcutaneously (0.03 mg/kg, diluted 1:10 in sterile saline) as an analgesic.
- Keep the animal on the heating blanket until it awakes and return it to its housing cage to recover from surgery for three days before recording sessions. House animals in individual rat´s housing cage to prevent cage mates from cleaning out the jelly and the head post touching the metal-grid cover. Place some enrichment in the cage when the animal is single housed. Also, change the sawdust daily to prevent infection and carefully check that the animal recovers properly and shows no signs of discomfort. Also, check if petroleum jelly is over the recording window protecting the exposed brain.
3. Electrophysiological Recording and Microiontophoresis
- After recovery, give the animal time to acclimate to the recording environment and have its head restrained. Acclimate the animal by fixing the headpost to the holder while the mouse sits on a custom-made cushioned foam restrainer carved to its body size (Figure 1B). This will limit the movements of the mouse and will contribute to its calmness.
- Start with 10 min sessions and progressively increase the duration up to 120 min. During the session, reward the animals with sweet liquids (condensed milk, diluted 30:70 in water) at given intervals. Later, during the recording session, give the same reward at the start and at the end of the session or while no neuron is isolated.
- If the animal is excited before the recording, inject the mild sedative acepromazine (2 mg/kg, intraperitoneal). According to the neural system of interest, the sedative can affect your results.
- Let the animal freely explore the recording chamber for 5 - 10 min.
- Place the animal's body into the foam custom-made cushioned restrainer (Figure 1B).
- Secure the headpost to a holder attached to the stereotactic frame (Figure 1C). This is a good time to give the animal a liquid reward.
- Cover the animal's body with a cotton blanket and loosely fasten it using a plastic hemicylinder and adhesive tape.
- Remove the petroleum jelly from the recording window and rinse with warm sterile saline.
- Record neural activity and iontophoretic application of gabazine.
- Place the multibarrel electrode on its holder, controlled by a microdrive and attached to a micromanipulator.
- Connect the wires for recording using small crocodile clips. Connect the positive terminal to the end of the tungsten electrode, and the ground terminal to the silver wire that contacts the dura.
- Place an uncoated silver wire inside each barrel so one end contacts the solution and the other is accessible. Connect those ends to the microiontophoresis device, following the manufacturer's instructions.
- Move the multibarrel electrode until the tip contacts the brain's surface. Apply warm sterile saline to prevent the desiccation of the brain tissue. At that point, apply a retention current (-10 nA for gabazine; check the literature for the particular drug) to avoid leakage of the drug from the barrel tip while looking for single-unit activity.
- Use standard techniques for isolating single neuron extracellular activity. Obtain the frequency response area (FRA) of the neuron, i.e., the combination of frequencies and intensities capable of evoking a response because the neuron is sensitive to these sounds.
- Choose two frequencies (f1 and f2) that evoke a similar firing rate and pattern. Present each of those frequencies as rare and repetitive stimulus under the oddball paradigm.
NOTE: Briefly, in the oddball paradigm, one frequency (f1) is presented as the repetitive stimulus with a high probability of occurrence, while the second (f2) is the rarely occurring deviant stimulus, interspersed randomly among the repetitive ones. In a second oddball sequence, the relative probabilities of the two stimuli are reversed.
- Release the gabazine by shifting the current to positive values (10 - 20 nA). Obtain the FRA again and repeat the oddball paradigm under the gabazine application. Maintain the ejection until a visible effect in the firing rate is observed; it usually takes 5 - 20 min, depending on the particular drug, its concentration, and the magnitude of the ejection current. Repeat the recording protocol to obtain the values under the drug's effect.
- Stop the injection by returning the current to retention values. Wait for the effect of the drug to wash away by monitoring whether the FRA or response to the oddball paradigm returns to control values.
NOTE: The recording sessions can last 2 - 3 hr per day and should be ended earlier if the animal shows any sign of discomfort or struggling. Give liquid reward and cover the recording chamber with petroleum jelly.