All procedures involving animal samples have been reviewed and approved by the appropriate animal ethical review committee.
1. Recording Synaptic Responses in a Submersion Slice Chamber
NOTE: See the Table of Materials.
- Pre-warm the aCSF solution in a water bath to about 28-30 °C (this will prevent bubble formation in the recording chamber).
- Start the recycling system (4-5 mL/min) and activate the inline heater to equilibrate the system for at least 1 h.
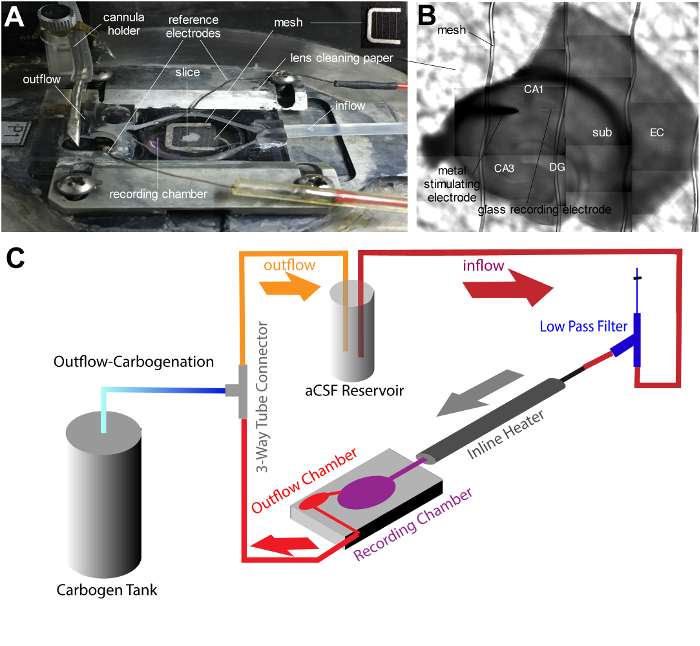
- Presoak a small piece of lens cleaning paper and a nylon mesh fixed on a U-shaped platinum wire in the submersion slice chamber for a few minutes (Figure 1).
- Remove the U-shaped platinum wire.
- Switch off the recycling and place a slice on the lens cleaning paper.
- Immediately place the slice-holding mesh on top of the slice, switch on the pump, and let the slice equilibrate for 30 min without dipping the objective into the aCSF.
- Fill the borosilicate micropipette (i.e., the recording electrode) with aCSF (tip resistance: 1-2 MΩ, filled 1/3 with aCSF) and mount it into the pipette holder.
- Place the tested epoxy-insulated tungsten stimulation electrode in the manipulator holder and the reference wires in the slice chamber.
- Add a second reference electrode to the chamber and connect it to the reference socket of the headstage of the recording electrode (Figure 1A).
- In the amplifier control software, click on the "zero clamp mode" box and proceed by double-clicking the "output gain list" box. Choose a gain of "100," double-click the "high pass filter list box (Bessel)," choose "0.1 Hz," and double-click the "low pass filter list box (AC)" to choose "3 kHz."
- In the recording software, click the on "Acquire | Open Protocol." Choose a protocol that has settings allowing for episodic stimulations and the digitalization of amplified potentials at 10-20 kHz for 50-100 ms and that automatically triggers a stimulus isolator 10 ms after the start of an episodic recording.
- Place the stimulation and recording electrodes in line and parallel to the stratum pyramidale, for example (Figure 1B and Figure 2).
- Click "Acquire | Edit Protocol" and choose the "trigger" tab (in the pop-up window). Click on the "trigger source" box and choose "space bar" as the trigger source. Click the "OK" button. Click the "record" button to start the acquisition and note the pop-up window with a trigger button.
- In the stimulus isolator software, click on the "voltage control" box and enter "0." Click the "download" button. Click on the "recording software" window and press the space bar. Repeat this cycle by sequentially entering values from 1 to 8, for example, at 1 mV steps in the "voltage control" box.
- Correlate the stimulation strength with fEPSP-slope values and determine the stimulation strength required to get 40% of the fEPSP-slope maximum. Click the "voltage control box" and enter the determined value. Click the "download" button.
NOTE: A stimulus isolator is used to apply brief voltage or current pulses to brain tissue. The biphasic pulses can have 100 µs per phase.
- In the recording software, click the stop button and then the "Acquire" menu. Click on "Edit Protocol" and choose the "trigger" tab in the pop-up window. Click on the trigger source box and choose the "internal timer" as the trigger source. Click the "OK" button. Click the record button that starts the automatic recording of field potentials every 30 s, for example. Click the "stop" button after 30-60 min.
- Click on the "Acquire" menu, click on "Open Protocol," choose the desired induction protocol of synaptic plasticity, and click the "OK" button. Click the "record" button to automatically activate the high-frequency stimulation and recording. Click the "stop" button.
NOTE: In case of studies relating to synaptic plasticity, apply one of the standard induction paradigms for long-term potentiation or long-term depression after prolonged baseline recording. Representative examples of the resulting modulation of the synaptic transmission are depicted in Figure 4 and Figure 5.
- In the recording software, click "Acquire | Open Protocol" and choose the same protocol as in step 4.12. Click the "OK" button and then click "record." Keep automatically running the field potential recordings for 2-4 h, for example. Click the "stop" button to terminate the recording.
- In the case of pharmaceutical studies, apply the compound directly to the aCSF reservoir if permanent compound administration is desired (Figure 3).