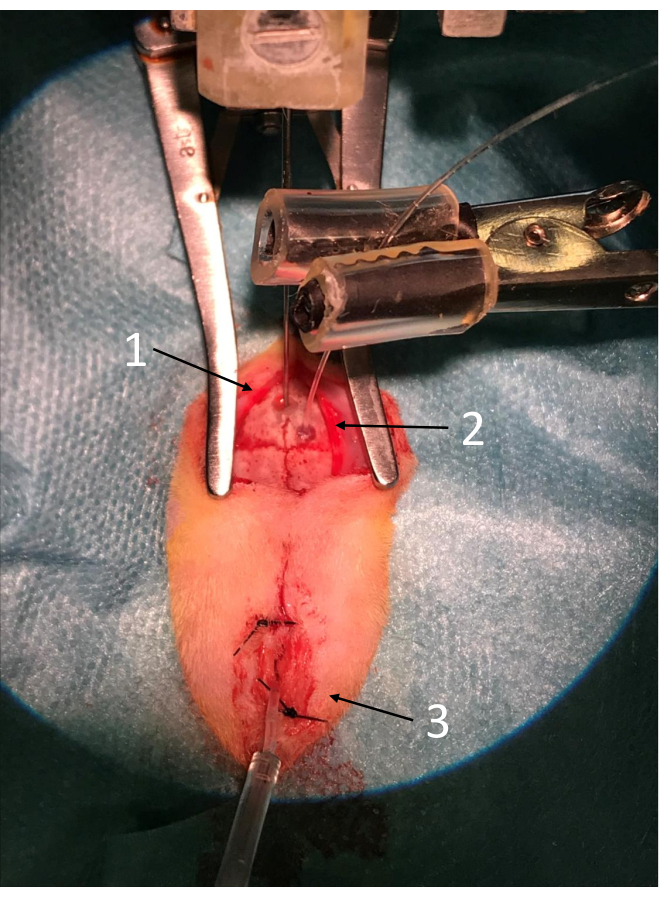
All procedures involving animal models have been reviewed by the local institutional animal care committee and the JoVE veterinary review board.
1. Preparations
- Modify a 16 G peripheral vein catheter for intubation. To modify, shorten the needle by 1 cm and bend the remaining distal 1 cm by 30° toward the injection valve. Remove the catheter wings (multiple use).
- To make an intracranial pressure or ICP probe, cut a 20 mm piece of polythene tubing (inner diameter (ID): 0.58 mm, outer diameter (OD): 0.96 mm) and burn one end to make a circular plate, keeping an open lumen. Circumvent the polythene tubing with 1 mm of silicone tubing (ID: 1.0 mm, OD: 3.0 mm) before connecting 10 mm of silicone tubing (ID: 0.76 mm, OD: 2.4 mm) to the end of the polythene tubing.
- Power on the laptop and open the data acquisition software. Calibrate the blood pressure (BP) and intracerebral pressure (ICP) transducers and the Laser-Doppler according to the manufacturer's instructions.
- Prepare the blood gas analyzer apparatus.
CAUTION: Make sure there is enough isoflurane in the vaporizer.
- Turn on the O2 and atmospheric air flow. Set the flow of O2 at 30% and atmospheric air at 70%.
- Place the heating pad and set the temperature to 37 °C.
2. Anesthesia
- Place the rat in the anesthesia chamber with a flow of 30% of O2 and 70% of atmospheric air. Administer 5% of isoflurane gas into the chamber. Adequate anesthesia will take around 4 min. Control the breathing carefully.
- When anesthetized, place the rat in supine position on a heavy plate circumvented by a rubber band. Place the front teeth of the rat below the rubber band.
- Draw the tongue out carefully with curved forceps. Clean the larynx with a cotton tip. Place an external light in the midline of the throat to visualize the vocal cords.
- Intubate during inspiration using the modified 16 G peripheral vein catheter. When correctly inserted, remove the stiletto. Connect the catheter to the ventilator.
NOTE: Correct placement of the tube is confirmed by chest movements in sync with respiration rate. If movements of the abdomen are seen, extubate and reintroduce the rat into the anesthesia bell. Do not repeat the procedure more than three times due to the risk of damaging the airways.
- When intubated, keep the animal on artificial respiration with 30% of O2 and 70% of atmospheric air. Maintain the anesthesia at 1.5%-3% of isoflurane. Adjust the isoflurane to keep the blood pressure between 80-100 mmHg.
- Keep the inspiratory volume of the respirator at 3 mL and the frequency at 40-45 inspirations/min. Adjust the inspiratory volume according to the blood gas analysis.
- Make a stitch through the inner soft tissue of the cheek with a 2-0 suture. Tie the suture around the injection tube and the injection valve of the peripheral vein catheter to fasten the catheter.
- Move the rat to the operating field and place it in supine position with the tail facing toward the surgeon.
- Apply the eye gel when needed to counter dry eyes.
- Perform a toe pinch to confirm an adequate depth of anesthesia. Assess and maintain anesthesia depth during surgery.
3. Tail catheter
- Disinfect the proximal 3-4 cm of the tail with 0.5% of chlorhexidine ethanol.
NOTE: From now on, use the surgical microscope at the surgeon's discretion.
- Make a 15-20 mm skin incision in the proximal end of the tail on the ventral side. Be careful not to incise the artery.
- Loosen the skin from the underlying connective tissue using a curved forceps.
- Carefully penetrate the fascia exposing the artery.
- Carefully release the tail artery from the underlying tissue using a curved forceps.
- Slip three black silk threads under the vessel. Place one thread as distally as possible and tie a surgical knot tightly around the artery. Hold the loose ends of the thread with a hemostat.
- Tie the two remaining threads loosely around the artery.
- Push the proximal thread as proximally as possible. Apply a hemostat to hold the ends of the proximal thread. Pull the hemostat lightly, but enough to restrict and block the blood flow. Place the hemostat on the abdomen.
- Cut the tip of the catheter at a 45° angle. Cut the sharp point to prevent arterial wall penetration.
- Using a Vannas scissor, make an artery incision 1/3 of the artery's diameter at a 30° angle, 3-5 mm from the distal knot.
- Insert the catheter into the artery using two straight forceps. Use one forceps to hold the catheter and the other to carefully pull the artery over the catheter.
- Insert the catheter up the vessel to the proximal knot and loosen the knot from the hemostat. Visualize the blood flow in the catheter. Fasten the middle thread loosely to the catheter.
- Continue insertion to, and if possible, just beyond, the point where the artery is covered again by fascia.
- Control the catheter placement and possible leak by flushing with saline.
- Fasten the two proximal threads using surgical knots.
NOTE: The blood pressure measurement needs to be pulsatile; if not, the catheter is not properly placed.
- Fasten the catheter at the end of the incision by tying a surgical knot using the distal thread.
- Stitch the skin incision loosely together with two non-resorbable monofilament 4-0 suture. Be careful not to penetrate the catheter.
NOTE: Throughout the surgery be aware of the amplitude of pulsation. If this is low, flush the catheter with saline.
- Loosen the arterial catheter from the pressure transducer to allow blood flow for blood gas sampling. Place a microcapillary tube at the end of the catheter. Let the blood flow into the tube. Re-attach the catheter to the transducer after blood collection and flush the catheter.
- Insert the capillary tube in the blood gas analyzer. Measure the pH, pCO2, and pO2 and note them down
NOTE: Depending on the blood gas and blood pressure values, change the ventilation rate. If the mean arterial pressure (MAP) is too low, try to turn down the flowrate of isoflurane. Test the reflexes to ensure proper depth of anesthesia.
4. ICP probe
- Place the rat in the stereotaxic frame. It is important to position the rat symmetrically.
- Place a cylindrical pillow under the stereotaxic frame to create anterior flexion of the neck.
- Shave the rat's scalp, neck, and the area behind the ears. Remove the superfluous hair.
- Disinfect the area with 0.5% of chlorhexidine ethanol.
- Anesthetize locally with 0.7 mL of 10 mg/5 µg/mL lidocaine with adrenaline, insert the needle at the caudal end of the skull in the midline. Inject into the musculature of the neck with 0.3-0.4 mL. Inject the rest subcutaneously around and anterior to the bregma.
- Make a skin incision from the needle puncture ~8 mm caudally in the midline.
- Dissect all the muscles bluntly in layers to identify the atlantooccipital membrane (marble-colored triangle caudally to the skull in the midline).
- Use the Alm retractor to restrain the neck musculature. Place the pronged retractor caudally if needed.
- Check whether the sterile ICP probe is connected to the ICP transducer. Flush the ICP probe with saline. Ensure no air bubbles are present in the ICP probe.
- Incise the atlantooccipital membrane using a 23 G needle. Make a hole to coax the ICP probe through the membrane.
- Coax the probe through the atlantooccipital membrane gently. Pull the probe lightly and ensure that it shows a pulsating curve ranging between 0-5 mmHg. If not, remove the probe, check the connection to the transducer, and confirm the flow through the lumen.
- Apply two drops of the tissue glue. Move the 1 mm silicone tubing forward to the membrane and apply additional glue to minimize the risk of ICP-probe displacement.
- Remove the retractor(s).
- Make one horizontal mattress suture to the cephalic end of the incision and one simple interrupted suture to the caudal end using a non-resorbable monofilament 4-0 suture.
5. Placement of the needle and the Laser-Doppler probe
- Make an incision in the midline just anterior to the eyes, 15 mm caudally.
- Remove the connective tissue and the muscles with forceps. Use the end of a sterile cotton swab as a rougine making it possible to identify the bregma and the coronal sutures.
- Place the Alm retractor.
- Place a 25 G spinal needle in the stereotaxic frame. Place the needle exactly on the bregma and note the position.
NOTE: Place the midline joint of the stereotaxic frame at 30° toward the animal in the vertical plane.
- Remove the needle from the bregma, move the frame 65 mm anteriorly, and then replace the needle in the midline to mark the site of drilling.
- Drill until the dura mater is identified below the bone. Gently remove the bone fragments using straight forceps and fill the cavity with bone wax.
- Drill another hole 3-4 mm lateral to the right of the bregma and just anterior to the coronal suture for the Laser-Doppler. It is not necessary to drill all the way through the bone. Be careful not to penetrate the dura mater.
- Look for the vessels where the laser-doppler can measure the blood flow. Place the laser-doppler and check the values. A minimum value of 100 FU is required. Remove the microscope (artificial light).
- If the values are still acceptable, add one drop of glue to fix the probe.
- Recheck to confirm whether the value is above 80 FU. If the value is below 80 FU, remove and reposition the probe to reach a value above 80 FU.
NOTE: The value, FU, is an arbitrary unit showing cerebral blood flow (CBF).
6. Induction of subarachnoid hemorrhage (SAH)
- Insert the needle gently through the skull in the midline between the hemispheres until resistance of the base of the skull is felt. Retract the needle by 1 mm to ensure correct placement just anteriorly to the optic chiasm.
- Turn the needle 90° clockwise so that the needle tip points to the right to ensure the most homogenous result when injecting the blood. Remove the stiletto (Figure 1).
- Equilibrate for 15 min and adjust the level of anesthesia to obtain a mean arterial blood pressure in the range 80-100 mmHg.
- Perform a blood gas analysis. Adjust the level of anesthesia accordingly.
- Withdraw 500 µL of blood from the tail catheter using a 1 mL syringe with a blunt 23 G needle.
- Fill the dead space of spinal needle chamber with blood to avoid injection of air. Remove the 23 G needle from the blood-filled syringe and confirm that the syringe contains 300 µL of blood.
- Connect the syringe to the spinal needle. Grasp firmly and inject the blood manually to surpass MAP.
- Observe a steep rise in ICP and a steep fall in CBF on the laptop.
NOTE: CBF should be 50% or lower compared to the baseline score for at least 5 min for the surgery to be successful, see Figure 2. Sham rats do not undergo the steps 6.1-6.7, thereby omitting the introduction of the spinal needle into the cerebrum, minimizing possible spontaneous hemorrhage, and iatrogenic brain damage.