All procedures involving sample collection have been performed in accordance with the institute's IRB guidelines.
1. Sectioning Tissue
- Cut a small piece of the tissue (~1 cm x 1 cm) for sectioning. Return the remaining tissue to dry ice/-80 °C freezer.
NOTE: Ensure that the tissue section is ~95% cerebellar cortex, where Purkinje cells are located.
- Place an approximately 3 mm high mound of OCT to cover the 'chuck'. Start by building the layers on top in a slow, circular motion until there is a small mound.
- Once the OCT is partially frozen but still has some liquid in the center, place the tissue on top of it. Do not push the tissue deeply into the OCT. Allow the tissue to sit on top of it until completely frozen, which will take 1–2 minutes.
- Place the 'chuck' with frozen OCT and the tissue into the cryostat cutting arm. Adjust the tissue so it is flush with the cutting blade.
- Allow the tissue to sit in the cutting arm for 15–20 min to adjust to the new temperature.
NOTE: Depending on the thickness of the tissue, time is needed for temperature acclimation. Allow the tissue to sit as long as required to cut cleanly. Adjust OT and CT to assist with tissue temperature acclimation.
- Slowly move the tissue closer to the blade. Once the tissue has reached the blade, start the trim process. Trim thickness should be set to 30 μm.
- Trim 2–3x until the cortex layers are visible.
- Place and align the anti-roll plate just above the cryostat blade.
NOTE: A silver line will appear from the light in the cryostat at the interface of the blade and anti-roll plate. This indicates the anti-roll plate is directly over the edge of the blade.
- Begin to cut the sections at 14 μm. Properly cut sections will be flat under the anti-roll plate.
NOTE: If the tissue is stuck, ensure that the anti-roll plate is cold enough. If necessary, placing a piece of dry ice on the outside (side not touching the stage) will rapidly chill the anti-roll plate.
- Cut 4–6 sections and align them horizontally across the cryostat stage.
- Angling the slide, pick up all the pieces of the tissue at one time.
NOTE: Using the brushes, lift up the ends of the tissue to make them more readily available for the slide upon pick up. Do not pick up one section at a time. Exposure to room-temperature air will degrade RNA integrity.
CAUTION: Do not let the membrane touch the stage of the cryostat. If the membrane touches the stage, it will begin to detach from the glass slide and will cause errors when attempting LCM.
- Immediately move to Step 6. Do not delay fixation.
2. Fixing Tissue/Stain-less Visualization
- Immediately move to the ethanol fixation protocol
- Place the slide in the slide holder with 70% ethanol for 2 min — on ice.
- Place the slide in the slide holder with 95% ethanol for 45 s — on ice.
- Place the slide in the slide holder with 100% ethanol for 2 min — at RT.
- Dip the slide 3 times in the slide holder with xylene 1 — at RT.
- Place the slide in the slide holder with xylene 2 for 5 min — at RT.
- Allow to dry in a clean area for at least 30 minutes. Longer dry times, up to 60 minutes, are optimal.
CAUTION: Use stand-up slides for drying in a fume hood. Xylene is volatile. Laying slides flat will cause xylene to pool in the tissue section, making the tissue too dark.
3. Thawing Stored Slides for Use
- Remove the tube with a single slide from the -80 °C freezer 1 h before intended use.
- Do not immediately open the tube. Allow the tube to come to room temperature. Condensation will occur on the outside of the tube only.
- Once the tube has reached room temperature and all condensation is gone (approximately 30–40 min), remove the cap and expose the slide to room-temperature air.
- Allow the slide to acclimate to room temperature for 15–20 minutes. Then, leave it inside the tube with the cap removed.
NOTE: The slide is now ready for LCM.
4. Laser Capture Microdissection of Purkinje Cells:
NOTE: This protocol section will only discuss specifics related to capturing Purkinje cells for subsequent RNA sequencing. This section assumes that the user is familiar with the UV laser capture microscope and the affiliated software.
- Clean the microscope stage and the cap collection arm with the RNase decontaminator.
- With gloved hands, place the slide on the microscope and 500 μL opaque cap in the collection arm.
NOTE: Always ensure proper RNA technique by cleaning the work area with an RNase decontaminator and using gloved hands while touching the slide or opaque cap. Gloves can be removed once the slide and cap are in place and laser capture has commenced.
- At low magnification, align the opaque cap over the cerebellar tissue, ensuring that the cap covers the entire area visualized in the eyepiece.
NOTE: Only the microscope's eyepiece will show if the opaque cap is centered. The camera will not show if the cap is centered over the tissue. Depending on the laser capture scope design, the visualization through the opaque cap will either be in the eyepiece only or visualized in both the eyepiece and camera.
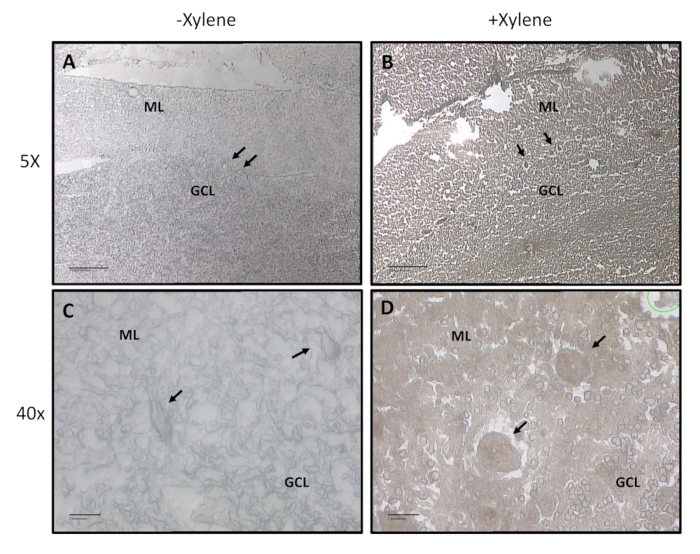
- Visualize the cerebellar layers with 5x - 10x objective lens and place the cursor over the section where molecular layer and granule cell layer intersect (the Purkinje cell layer).
- Move to 40X and visualize Purkinje cells.
NOTE: See Figure 1 and Figure 2 for example visualizations.
- Begin capturing Purkinje cells.
NOTE: At least 5 ng of RNA is required to perform RNA sequencing. Approximately 1600–2000 Purkinje cells yield enough RNA material for sequencing. RNA will be stable for up to 8 hours at the microscope. Test UV energy and UV focus before collection to ensure levels are correct. Over time, the tissue will continue to dry out, and the UV energy and UV focus may need to be changed.