This video demonstrates transcutaneous auricular vagus nerve stimulation (taVNS), a noninvasive method for modulating brain activity. Electrodes are placed on the anterior wall of the outer ear canal and the tragus, targeting the auricular branch of the vagus nerve (ABVN). When stimulated, the resulting nerve impulse travels to the brainstem, where it influences multiple brain regions and their functions
A subscription to JoVE is required to view this content. Sign in or start your free trial.
Method Article
Transcutaneous Auricular Vagus Nerve Stimulation on the Human Ear
8K views
⸱
August 7th, 2025
In This Article
Abstract
Protocol
All procedures involving human participants have been performed in compliance with the institutional, national, and international guidelines for human welfare and have been reviewed by the local institutional review board.
1. Materials
- Ensure all materials required to administer taVNS are prepared (Figure 1). The taVNS stimulator may be either a battery-driven device that meets local safety regulations or powered by a conventional electrical outlet with built-in safety mechanisms that prevent unintended electrical surges. A constant current (current-controlled) stimulator with a maximum output of 5 mA is required.
- For taVNS, use stimulation electrodes made of a round conductive metal (tin, Ag/AgCl, gold) combined with a conductive medium such as electrolyte gel or conductive paste (see Table of Materials). Alternatively, use conductive electrodes made with flexible conductive carbon electrodes and conductive gel that may or may not be adhesive. Never place electrodes directly on the skin without a conductive medium, as this may pose unnecessary risk to the participant and can cause discomfort or pain.
- Use computer-running script software (see Table of Materials) that is programmed and used to control the stimulator and initiate stimulation with specific parameters. These parameters include current intensity (mA), pulse width (μs), frequency (Hz), duty cycle (On/Off time, s), and session duration (min).
- Use alcohol preparation pads (70% isopropyl alcohol) to prepare the skin surface before attaching electrodes to the ear. This removes surface oils from the skin and reduces the resistance of the skin, ensuring stimulation is delivered at safe power levels.
2. Ear Targeting and Skin Preparation
- Use the following general inclusion criteria for conducting taVNS in the research setting: Age 18–70, no facial or ear pain, no recent ear trauma, no metal implants including pacemakers, not pregnant.
- In experiments involving healthy participants in a laboratory setting, use the following exclusion criteria: personal or family history of seizure, mood, or cardiovascular disorders, dependence on alcohol or recent illicit drug use, on any pharmacological agents known to increase seizure risk.
- Seat the participant on a comfortable bed or chair in a supine or other relaxed position with legs elevated and head supported.
- Inspect the left ear of the participant. Ensure no jewelry is attached and all make-up and lotion are removed. Confirm there are no skin-related contraindications at the site of stimulation, including sunburn, cuts, lesions, open sores.
- Find the stimulation target, landmarked by the anterior wall of the outer ear canal externally by finding the tragus. Stimulation will be delivered to the portion of the ear canal directly behind the tragus (Figure 2).
- Use an alcohol prep pad to gently scrub the target site, both internally and externally, to decrease skin resistance and increase conductance.
3. Electrode Preparation and Placement
- If using non-disposable electrodes, visually inspect electrodes to ensure a clean, corrosion-free surface is exposed. Ensure that electrodes are disinfected to prevent the spread of bacteria between subjects. This can be done using alcohol or sterilization wipes to scrub the electrodes. If using disposable electrodes, skip to step 3.2.
- Spread a thin layer of conductive paste on the surface of the electrode evenly. This will distribute electricity to the stimulation site. For an 8 mm diameter round electrode, a pea-sized amount of paste is sufficient. Spread the paste using a narrow wooden applicator to form a thin layer of paste <1 mm on both electrodes.
- Connect electrode cables to the stimulation device while the device is turned off and verify the polarity of the electrodes (red/positive electrode: anode, black/negative electrode: cathode). This is an important detail as targeting is polarity specific — the anode (red/positive terminal) is the electrode placed inside the ear canal and targeting the anterior wall of the outer ear canal. The cathode (black/negative terminal) sits on the outside of the ear, attached to the tragus. For sham stimulation, the anode is placed on the anterior side of the ear.
- Clip the spring electrode onto the tragus with the anode making contact with the anterior wall of the outer ear canal and the cathode contacting the anterior part of the tragus.
NOTE: If conducting sham stimulation, clip the electrode onto the earlobe (active control). Alternatively, sham stimulation may be delivered by attaching stimulation clips to the active site and delivering no electrical current (passive control). - As subjects will feel the pressure of the electrodes clipped to their ear, ensure this pressure is not uncomfortable or disruptive to regional blood flow as demonstrated by pale white skin at clip site or physical pain sensed by the subject. After this point, determine perceptual threshold (PT) which will be described in the next procedural step.
4. Determination of Perceptual Threshold (PT)
NOTE: Perceptual threshold is a critical value used to determine the power of taVNS stimulation. This value is defined as the minimum amount of electricity required to perceive electrical stimulation on the skin described as a pricking or tingling sensation.
- Determine the PT using a simple step-up and step-down binary parametric search. First turn on the stimulator and set the output to 3 mA. Deliver a 1 second train of taVNS stimulation at desired pulse width (typically 250–500 μs) and frequency (25 Hz, can vary based on application).
- Ask the subject whether they felt the stimulation. Sensation is generally reported as a "tickle" or "pricking" sensation.
- If YES, turn down stimulation intensity by 50% and repeat step 4.2. If NO, increase stimulation intensity by 50% and repeat step 4.2.
- Repeat the process described in step 4.2 until recording a minimum of 4 "YES" responses, in which the 4th YES response must come after a NO. The intensity (in mA) of the PT will be the value at which the subject says their fourth YES response to.
- Use the example PT threshold finding listed in Table 1 to assist in PT determination.
5. Delivering Stimulation
- Once the subject is comfortable. stimulation electrodes properly attached to the desired target, and the perceptual threshold determined at the desired pulse width and frequency, begin the stimulation.
- Use a computer running a pulse-generating graphical user interface (GUI, e.g., stimDesigner) connected to a data acquisition unit (DAQ) to drive the stimulation system. The software should output transistor-transistor logic (TTL) pulses as programmable settings (Figure 3). The TTL pulses will be sent via a Bayonet Neill-Concelman (BNC) cable to the stimulator's "trigger in" port. This interface software/stimulator interface allows modulation of frequency, duty cycle (on/off time), and session duration (Figure 4).
- Ensure that stimulation is delivered at super-threshold levels, such as 200% of PT8,9. For example, if the PT was determined to be 0.8 mA, stimulation will be delivered at 1.6 mA.
- Ensure that the guidelines for duty cycles are followed when conducting long stimulation sessions. Typical duty cycles have 30–60 s "on" periods and 60–120 s "off" periods, or 20–50% duty cycles.
- Vary the length of stimulation session (total time). Studies suggest that 30-60 min stimulation sessions at a 25% duty cycle is safe and free of any acute side effects or adverse events. These sessions can be repeated with 12–24 h between sessions safely.
NOTE: taVNS safety is unclear for longer periods of stimulation sessions, larger percentage duty cycles (>40%), accelerated paradigms, and higher stimulation current doses.
Access restricted. Please log in or start a trial to view this content.
Results
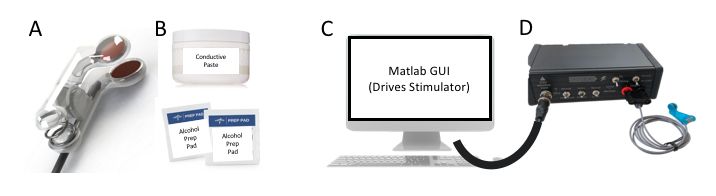
Figure 1: Key Components. The minimum required components for proper administration of taVNS are the fo...
Access restricted. Please log in or start a trial to view this content.
Materials
| Name | Company | Catalog Number | Comments |
|---|---|---|---|
| 70% Isopropyl Alcohol Wipes | Any | N/A | Any alcohol preparation pads used for skin in appropriate. |
| Constant Current Stimulator (Triggerable) | Soterix Medical | N/A | Stimulator manufactured for custom use by Soterix Medical |
| Disposable Conductive Electrodes | Custom Built | N/A | Stimulation electrodes are custom built at the City College Neural Engineering Lab (Badran/Bikson) |
| Matlab Software w/ Stimulation GUI | MathWorks | N/A | MATLAB used for programing pulse pattern |
| Ten20 Conductive Paste | Weaver and Company | N/A | Conductive paste used for administration of stimulation |
