This video demonstrates the electrophoretic delivery of gamma-aminobutyric acid (GABA) to inhibit seizure activity in an anesthetized mouse. It outlines the steps involved in probe implantation, neural activity recording, seizure induction, and controlled GABA delivery via a microfluidic ion pump to assess its therapeutic efficacy.
A subscription to JoVE is required to view this content. Sign in or start your free trial.
Method Article
Electrophoretic Delivery of GABA into the Epileptic Focus of an Anesthetized Mouse
550 views
⸱
June 17th, 2025
In This Article
Abstract
Protocol
All procedures involving animal models have been reviewed by the local institutional animal care committee and the JoVE veterinary review board.
1. Surgery/Craniotomy
- Fix the head of an anesthetized mouse in a stereotaxic frame. Using a 30 G needle, inject local analgesic ropivacaine (5 µL, 7.5 mg/mL, see Table of Materials) subcutaneously at the planned incision site. Allow 5 min for it to take effect.
- Make a straight cut midline in the skin above the skull with a scalpel. Gently pull the skin toward the sides with fine forceps and clamp it aside with bulldog serrefine clamps to leave the skull exposed for further work.
- Clean the skull of fascia with a scalpel or any similar tool. In case of superficial bleeding, remove the blood with cotton swabs or small pieces of paper towel.
- Take a poly(3,4-ethylenedioxythiophene) polystyrene sulfonate (PEDOT:PSS)-coated ground screw (size: #00, diameter: 0.047 in, length: 1/8 in, see Table of Materials) with a soldered wire and connect it with a connector to the amplifier headstage.
- Moisten the skull at the desired hole site and drill a hole at high speed using a fine, round drill bit (with a 0.4 mm diameter) on the skull above the cerebellum until the dura is visible. Put the ground screw into the hole and screw it in with a precision screwdriver until it reaches the top of the cerebellum.
NOTE: The head screw was dip-coated with a PEDOT:PSS solution containing 1% 3-glycidyloxypropyl)trimethoxysilane (GOPS) by weight followed by baking at 140 °C for 90 min. PEDOT:PSS is a conjugated polymer with a volumetric capacitance that is known to be biocompatible. GOPS is a cross-linker mixed with PEDOT:PSS to increase stability in aqueous media (Figure 1). - With the help of the stereotaxic frame, measure the stereotaxic coordinates for the desired brain region. For example, the region of interest is the hippocampus, anteroposterior (AP) -1.8 mm and mediolateral (ML) 1.8 mm from the Bregma point based on the brain atlas for mice.
NOTE: These are coordinates for the right hemisphere (Figure 1). - Thin an approximately 1 to 2 mm diameter area of the skull above the target region using a reliable dental drill (see Table of materials) set at a fast speed until a thin, well-polished, transparent bone membrane remains.
- Then, if the thickness of the bone membrane is thin enough (<200 µm), make a small hole with thin forceps and gently remove the thin layer of the bone. Use a custom-made hook-tipped needle to remove the dura. Minimize the size of craniotomy and durotomy to prevent the development of edemas and to minimize cardiac and/or respiratory pulsations of the brain.
NOTE: The craniotomy must be filled with a droplet of saline solution to prevent drying and then regularly refilled during the experiment (Figure 1).
2. Insertion of the Multichannel Silicon Probe
- Use stereotaxic arms in a slight AP angle (20°) for the silicon probe to leave ample space for the positioning of the other two implants and to have the recording and the injection sites of the electrode, ion pump, and micropipette as close as possible.
NOTE: Electrodes, syringes, and ion pumps were covered with a drop of DiI stain solution (1,1'-dioctadecyl-3,3,3',3'-tetramethylindocarbocyanine perchlorate [DiI]), for the post hoc visualization of the implantation traces (0.5 mg/ml DiI in dimethyl sulfoxide). - Place the silicon probe on the stereotaxic arm attached to a magnetic holder and place it next to the stereotaxic frame. Set the AP angle (20°) and then connect the probe to the headstage and to the ground screw.
- Slowly lower the silicon probe into the hippocampus with the help of the micron-precise stereotaxic arm or a motorized micromanipulator to avoid lateral movements (Figure 1 and Figure 2).
- Initiate the recording software and record—with the headstage, the connected amplifier, and a computer—electric neuronal signals while moving the multichannel silicon probe from the top of the cortex until the targeted dorsoventral (DV) position is reached (-1,800 µm from the cortical surface). Record and watch the local field potential signal (LFP) during penetration on the computer screen.
NOTE: Control the descent of the probe so that it is moving slowly and continuously while recording, to have better visual control for the penetration and for reaching the target zone. - Use the ripple activity in the pyramidal layer of the hippocampal formation in the recorded LFP as a marker of the target zone.
NOTE: Ripple activity is visible on one or two neighboring channels of the multichannel silicon (Si) probe having a 100 µm distance between recording sites (Figure 3). - Record LFP signals from the layers of the cortex and the hippocampus simultaneously through the multichannel amplifier’s software (see Table of Materials) with the help of the multichannel Si probes (Figure 3).
- Initiate the recording software and record—with the headstage, the connected amplifier, and a computer—electric neuronal signals while moving the multichannel silicon probe from the top of the cortex until the targeted dorsoventral (DV) position is reached (-1,800 µm from the cortical surface). Record and watch the local field potential signal (LFP) during penetration on the computer screen.
3. Insertion of microfluidic ion pump (µFIP)
- Connect tubes (see Table of Materials) to the inlet of the µFIP and fill the probe with 0.05 M gamma-aminobutyric acid (GABA) solution. Remove the tubes and close the inlet with paraffin film wrapping. Connect electrical leads to the source measurement unit.
- Insert the µFIP with the help of the stereotaxic arm at a mediolateral (MP) angle (20°). The Si probe remains inserted during the whole process.
NOTE: µFIP is very flexible and may benefit from the support of a small and clean paintbrush to keep it straight until it reaches the brain surface. After that step, µFIP can be lowered gently with axial movements. - Lower the µFIP slowly with axial movements and never let it bend during the trajectory until it reaches the dorsoventral (DV) coordinate (-1,200 µm from the cortical surface).
NOTE: Try to put the two devices (µFIP and silicon probe) as close to each other as possible, considering the 300 μm distance of the outlet from the µFIP tip.
CAUTION: Avoid any mechanical issues among the devices and their connectors during insertion (Figure 1B and Figure 2B).
4. Preparation of devices for Seizure Induction
- Change the metal needle of the syringe (10 µL) (see Table of Materials). Remove the needle-holding metal part, place and fix the micropipette (outer diameter [OD]: 1.2 mm, inner diameter [ID]: 0.75 mm, tip diameter: 20–50 µm with ± 0.5 cm of tapering of the shank), and then replace the needle-holding element.
- Position the syringe and the attached borosilicate micropipette at a 20° lateromedial (LM) angle for the injection of 4-aminopyridine (4AP) (50 mM in artificial cerebrospinal fluid [ACSF]).
CAUTION: Do not use the metal needle of the syringe or a micropipette with a tip bigger than 50 µm. - Draw 500 nL–1 µL of 50 mM 4AP with the help of an automated microinjection pump.
5. Insertion of the Glass Pipette Attached to a Syringe for 4AP Injection
- Lower the glass micropipette attached to the syringe to the aimed DV position (-1,500 µm), and then inject 250 nL of the 4AP solution (Figure 1 and Figure 2). Start recording with the recording software. Watch the screen and wait for the first interictal spike to appear.
- Start the GABA delivery by µFIP immediately with the appearance of the first interictal spike. Deliver GABA by applying 1 V between source and target for 100 s followed by 1 s off for 30 cycles. With the help of the recording software, record for a minimum of 2 h.
NOTE: The total mass of the delivered GABA is around 1 nmol (Figure 4). - At the end of the experiment, gently remove the inserted probes and the ground screw, and remove the animal from the stereotaxic equipment. Animals were euthanized using an overdose of drug (i.p.100mg/kg pentobarbital). Death was confirmed by cessation of breath and circulation.
Access restricted. Please log in or start a trial to view this content.
Results
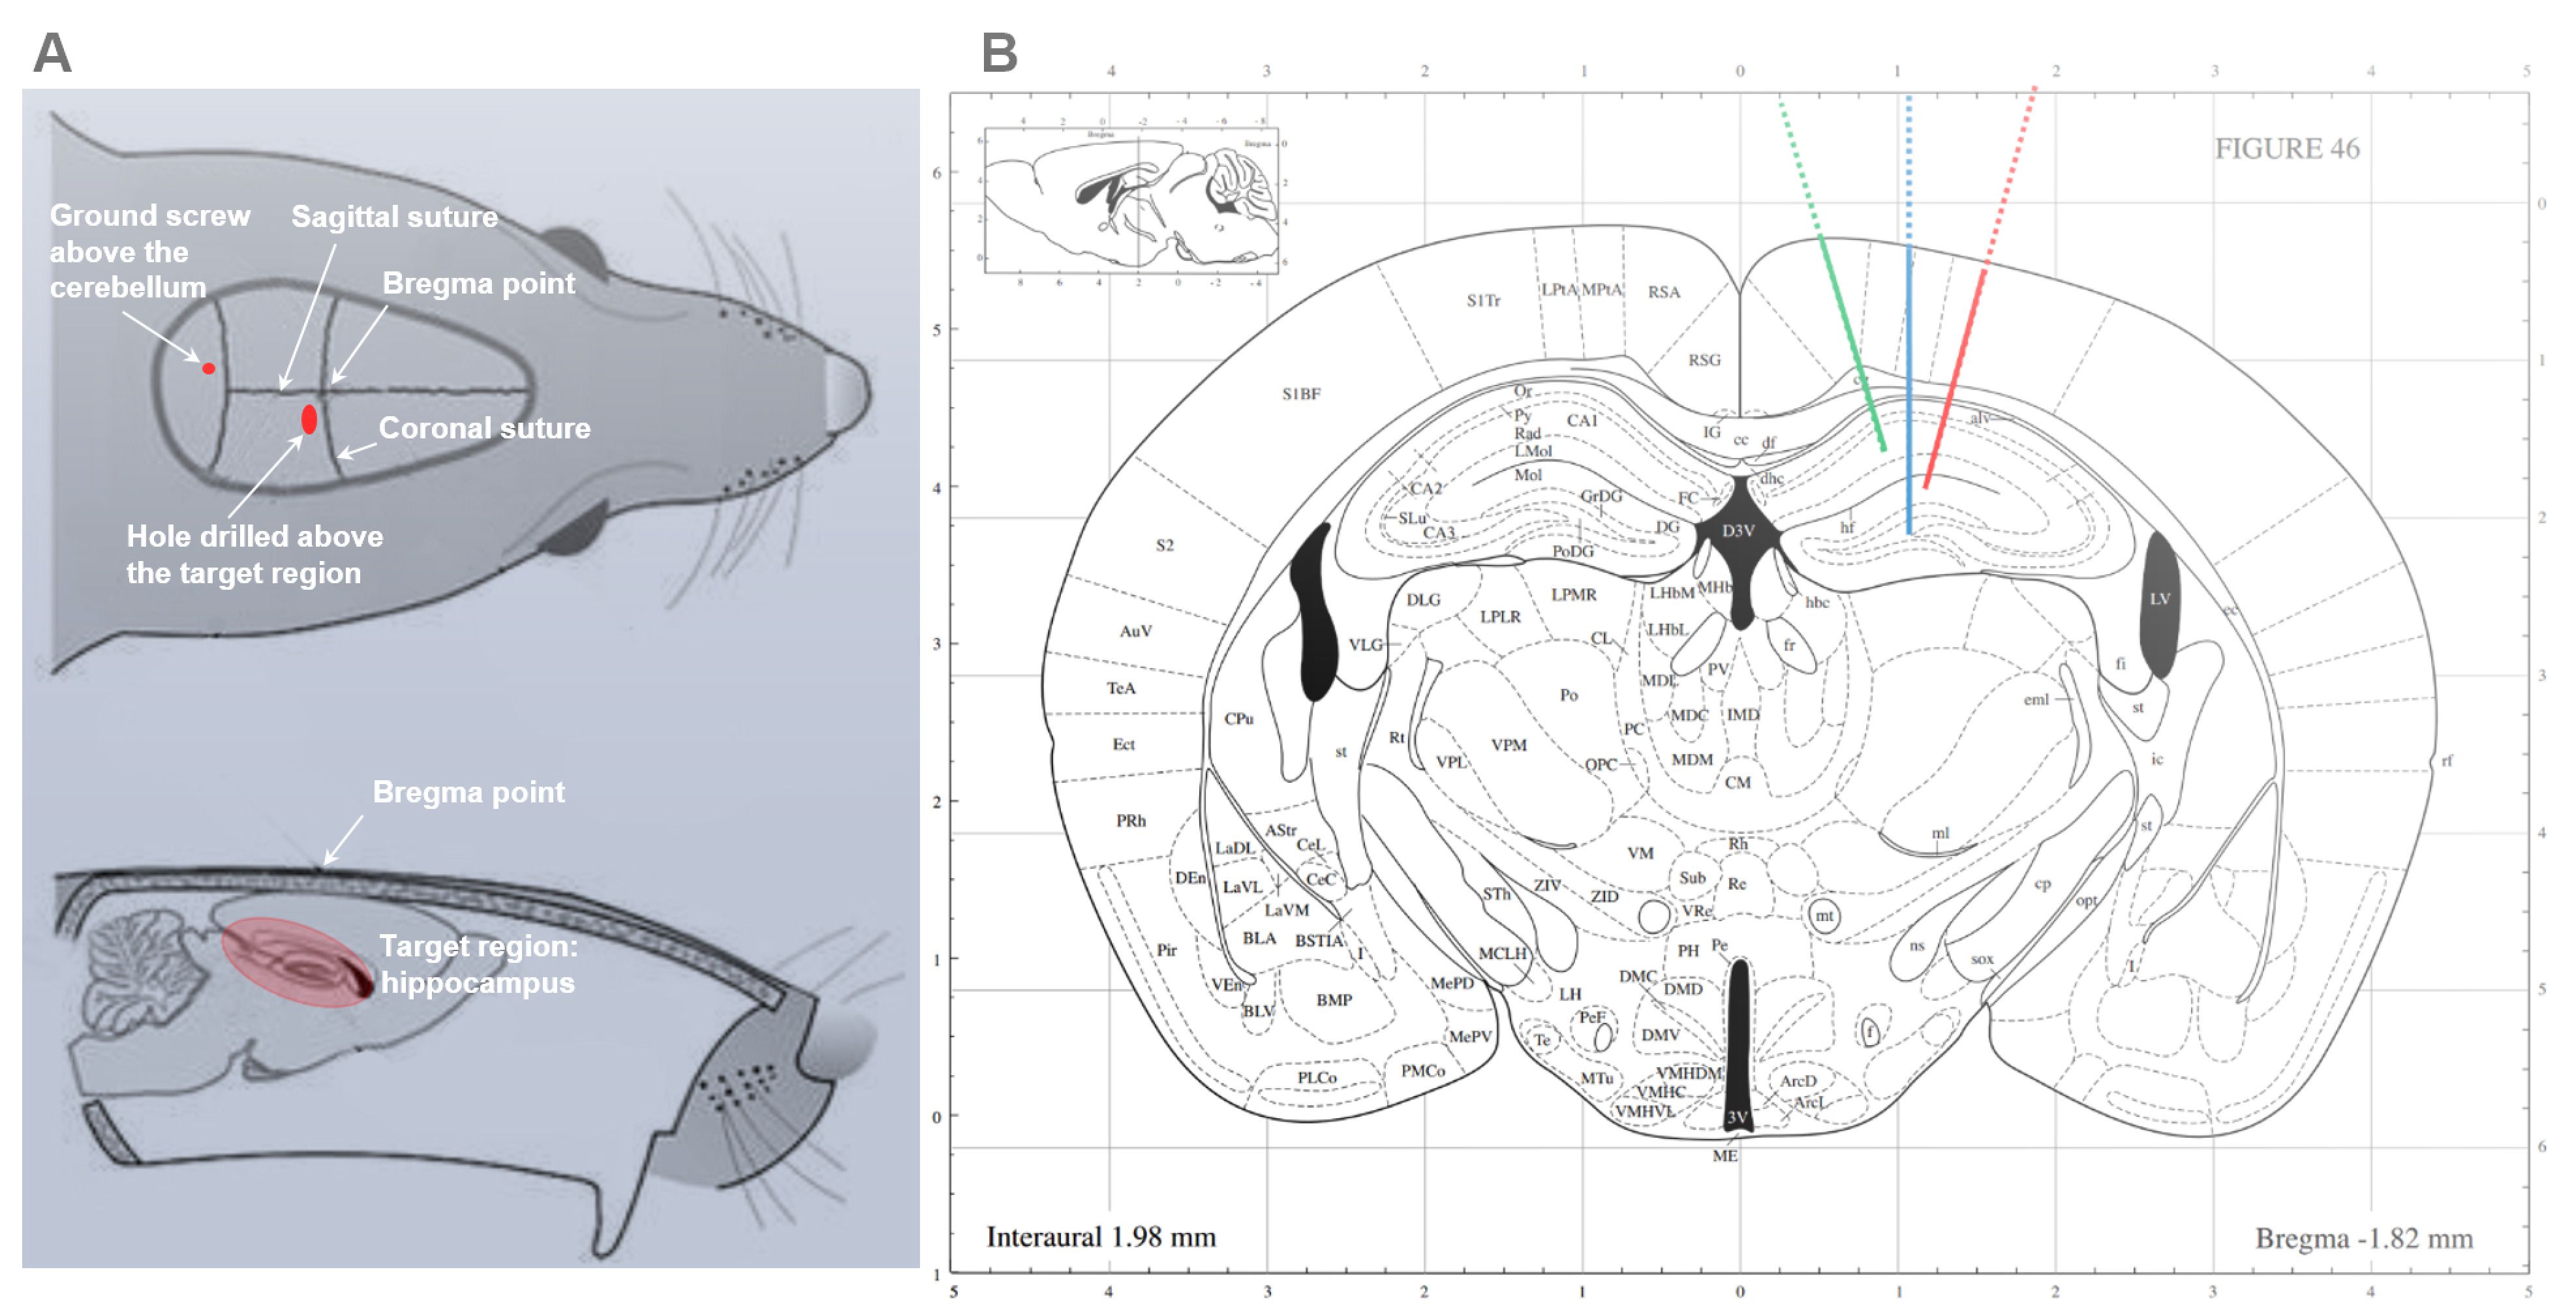
Figure 1: Cranio-durotomy and localization of the implants in the mouse brain. (A)...
Access restricted. Please log in or start a trial to view this content.
Materials
| Name | Company | Catalog Number | Comments |
|---|---|---|---|
| 4AP | Sigma | 275875 | |
| Amplifier | Neuralynx, Montana, USA | Digital Lynx 4SX | |
| Amplifier | Ampliplex | KJE-1001 | |
| Atlas Stereotaxique | Allen Atlas | 978-0470054086 | |
| Borosilica glass pipette | Sutter | BF120-69-15 | |
| Brain Matrix | WPI | RBMA-200C | |
| Bone trimmer | FST | 16109-14 | |
| Connector | INSTECH | SC20/15 | |
| Coton tige | Monoprix | EMD 6107OD | |
| Cover slip | Menzel-Glass | 15747592 | |
| DiI Stain | Thermo Fisher | D282 | |
| DMSO | Sigma | 11412-11 | |
| Drill | FOREDOM | K1070 | |
| Forceps | F.S.T. | 11412-11 | |
| GABA | Sigma | A2129 | |
| GOPS | Sigma | 440167-100M | |
| Hamilton syringe | Hamilton | 80330 | |
| Headscrew | Component Supply | TX00-2FH | |
| Heating pad | Harvard apparatus | 341446 | |
| Injection Pump | WPI | UMP3-3 | |
| Keithley | Tektoronix | 216A | |
| Ketamine | Renaudin | 5787419 | |
| Magnetic holder | Narishige | GJ-1 | |
| Mice | Charles River | 612 | |
| Motoric manipulator | Scientifica, UK | IVM | |
| Disodium hydrogen phosphate | Sigma | 255793 | |
| Monosodium dihydrogen phosphate | Sigma | 7558807 | |
| NeuroTrace DiI | Thermofisher | N22880 | |
| Paper towel | KIMBERLY CLARK | 7552000 | |
| PB | Sigma | P4417 | |
| PEDOT:PSS | CLEVIOS | 81076212 | |
| PFA | Acros Organic | 30525-89-4 | |
| Rectal temperature probe | Harvard apparatus | 521591 | |
| Ropivacaine | KABI | 1260216 | |
| Saline | Sigma | 7982 | |
| Scalpel | F.S.T | AUST R195806 | |
| Seringue | BD Medical | 324826 | |
| Serrefine clamp | F.S.T | 18050-28 | 4 is recommended |
| Silicon probe | NeuroNexus, Michigan, USA | A2x16-10mm-50-500-177 or A1x16-5mm-150-703 | |
| Stereotoxic frame | Stoelting | 51733U | |
| Xylazine | Bayer | 4007221032311 |
