All procedures involving animal models have been reviewed by the local institutional animal care committee and the JoVE veterinary review board.
1. Establishment of the lysolecithin-induced demyelination mouse model
- Prepare 1% lysolecithin (also called L-α-Lysophosphatidylcholine) solution with sterile phosphate-buffered saline (PBS).
- Sterilize scissors, forceps, curved hemostats, and other surgical instruments by autoclave sterilization. Sterilize the surgical area and lay down sterile sheets. All materials and reagents used for surgery should be prepared aseptically. It is important to keep the surgical area sterile throughout the procedure.
- Anesthetize a postnatal day 56 (P56) C57BL6 mouse as follows.
- Place the mouse in the isoflurane chamber of the small animal anesthesia machine. Adjust the O2 flow to 300-500 mL/min and isoflurane to 3%-4%. After sufficient anesthesia, when the mouse becomes immobile with a slow and stable breath, transfer the mouse to the stereotaxic apparatus with a heating pad.
- Switch the gas output from the chamber to the anesthesia mask and adjust isoflurane to 1%-1.5% to maintain the mouse in the anesthesia state. Wait until the mouse is fully anesthetized, then inject ketoprofen (3–5mg/kg) intraperitoneally to relieve pain. Before the operation, pinch the mouse's toes and check its reaction to confirm successful anesthesia.
- When the mouse is anesthetized, it cannot regulate its body temperature. Therefore, monitor and regulate the mouse's body temperature during surgery. Cover the surface of the mouse's eyeballs with erythromycin eye ointment to keep the eyeballs moist while under anesthesia.
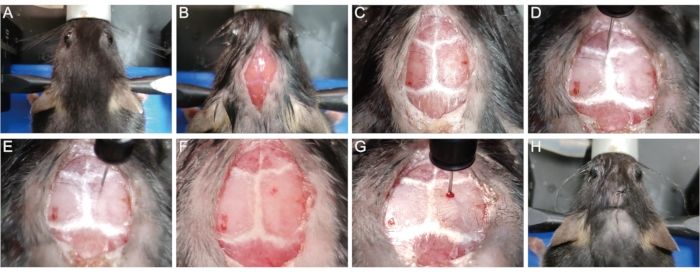
- Secure the mouse head in the stereotaxic apparatus with tooth bar and ear bars. (Figure 1A).
- Use a razor to remove hair from the top of the head. Sanitize the head skin with three cycles of betadine and 75% ethanol. For ethical concerns, cover the animal body except for the surgery site. Using a scalpel, make a 1 cm long mid-sagittal incision of the skin from the base of the neck to in between the eyes to expose the skull (Figure 1B).
- Gently wipe the surface of the skull with a sterile cotton swab containing 30% hydrogen peroxide to visualize the cranial sutures (Figure 1C). Adjust the height of the tooth bar and ear bars to place the lambda point and bregma point at the same height (i.e., with the same z-axis coordinates when the needle tip touches the points), so that the sagittal suture is horizontal.
- Gently place the tip of the microliter syringe needle (10 µL, 33 G) at the bregma point and reset the x, y, and z coordinates to 0 (Figure 1D). Move the syringe to the injection site (x: 1.04; y: 1.0, i.e., 1.04 mm lateral to the midline and 1.0 mm posterior to the bregma point) according to the prompt of the digital readout (Figure 1E).
- Slowly drill a small burr hole through the skull at the injection site without penetrating the dura with a 1 mL syringe needle (26 G, 0.45 mm) (Figure 1F). Slowly insert the microliter syringe needle into the brain tissue through the hole until a certain depth is reached (z = -1.62 mm for most P56 mice) (Figure 1G).
NOTE: Empirically, the insertion depth of -1.62 mm allows the needle tip to reach the middle of the corpus callosum of most P56 mice so that the lysolecithin can be directly delivered into the corpus callosum to induce demyelination. - Inject 1.5 µL of 1% lysolecithin at a speed of 0.3 µL/min. After the injection, wait for 5 min before slowly pulling out the microliter syringe to prevent liquid leakage along the injection needle path.
- Stitch the skin with 5-0 surgical sutures (Figure 1H).
- Place the mouse on a heating pad to avoid a drop in body temperature. Administer a subcutaneous injection of 5 mg/kg carprofen every 24 hours to relieve the pain. Apply erythromycin ointment to the incision every day to ensure that the wound heals properly. Place the mouse that has undergone surgery in a cage alone and feed it with moist food until fully recovered. Monitor the mouse daily after the operation.
2. Preparation of the osmotic pump
NOTE: Key components of the pump are shown in Figure 2A.
- Determine the depth of insertion of the brain infusion cannula into the brain. Ensure that the needle of the brain infusion cannula used is 3 mm long, and each depth-adjustment spacer is 0.5 mm. To achieve an injection depth of 1.5 mm (close to the callosum), attach three depth-adjustment spacers to the needle of the brain infusion cannula with tissue adhesive (Figure 2B, C).
- To fill the osmotic pump, attach the syringe needle that comes with the pump package to a 1 mL syringe and aspirate the drug. Hold the pump upright, insert the syringe into the opening at the top of the pump, and slowly inject the drug, being careful not to create bubbles (see Figure 2D). When the liquid flows out of the opening, slowly pull out the syringe.
- Remove the white flange from the flow regulator with scissors or pliers being careful not to bend or crush the flow moderator. Then, insert the flow moderator into the pump (Figure 2E). To determine whether there are bubbles in the osmotic pump, weigh the osmotic pump separately before and after filling.
- Trim the catheter to a certain length according to the size of the animal (20-25 mm catheters for P56 mice that weigh about 25 g). Attach the catheter to the brain infusion cannula.
- Fill the catheter with drugs using the syringe without introducing air (Figure 2F).
- Connect the catheter to the flow moderator. After attachment, ensure that the catheter covers about 4 mm of the exposed flow moderator (Figure 2G).
- To ensure that the osmotic pump can work instantly after implantation, immerse the filled pumps in sterile 0.9% saline or PBS at 37 °C for at least 4 to 6 h (preferably extend to overnight) to pre-wet the semi-permeable membrane on the pump surface with solutions that have the same osmotic pressure as the tissue environment (Figure 2H).
- All solutions loaded into the pumps should be sterile. ALZET pumps are supplied sterile, having been exposed to a sterilizing dose of cobalt-60. However, if exterior contamination occurs, the surface of the pump can be cleaned by wiping it with isopropyl alcohol (70% in water).
3. Implantation of the osmotic pump
- Wait for 3 days after the establishment of the corpus callosum demyelination model. Turn on the small animal anesthesia system. Disinfect scissors, tweezers, and hemostatic pliers and soak them in 75% alcohol solution. Lay sterile sheets in the surgical area.
- Anesthetize and secure the mice on the stereotaxic apparatus again. Cover the surface of the eyeballs with an eye ointment to prevent dryness.
- Disinfect the original wound with 75% alcohol. Open the surgical incision that was previously stitched (Figure 3A) and expand the incision to the shoulder blades (Figure 3B).
- Separate the skin from the subcutaneous connective tissue with hemostatic pliers or tweezers at the scapula to open a cavity (Figure 3C). Place the osmotic pump into the cavity (Figure 3D, E).
- With a cotton swab, gently wipe and expose the pinhole on the surface of the skull created when establishing the demyelination model (see step 1.8). Insert the brain infusion cannula through this pinhole perpendicularly and secure it on the skull quickly with tissue adhesive (Figure 3F).
- Remove the removable tab above the brain infusion cannula with a pair of scissors (Figure 3G, H). Alternatively, remove the tab first before inserting the cannula to avoid shaking during this process.
- Stitch the incision or attach it with tissue adhesive (Figure 3I).
- After surgery, place the mouse on a heating pad to avoid a body temperature drop. Administer a subcutaneous injection of 5 mg/kg carprofen every 24 hours to relieve the pain. Apply erythromycin ointment to the incision every day to ensure that the wound heals properly. Place the animal in a cage alone and feed it with moist food until fully recovered.