This video demonstrates a rodent brain microneedle injection using a quartz microneedle with holes. The microneedle is attached to a syringe and micropump to control the delivery rate. The needle with the injection solution is inserted into the brain with the delivery speed set at low. Once positioned, the delivery speed is increased. The needle is withdrawn after a brief pause.
A subscription to JoVE is required to view this content. Sign in or start your free trial.
Method Article
Rodent Brain Microinjection Using a Quartz Microneedle
847 views
⸱
August 7th, 2025
In This Article
Abstract
Protocol
All procedures involving animal models have been reviewed by the local institutional animal care committee and the JoVE veterinary review board.
1. Preparation of Quartz Needles
- Clean and sterilize the quartz capillaries (see Table of Materials) by placing them for 5 min in distilled water, 5 min in ethanol 99%, and 5 min in diethyl-ether.
- Leave capillaries under the hood for at least 1 h to let them dry completely.
- Prepare the needles using a laser puller according to parameters that allow the production of a sufficiently long, sufficiently thin needle, depending on the individual needs.
NOTE: We use a laser puller (see Table of Materials). Use a two-line program for pulling. The first line uses high power, the largest scanning length (corresponding to FILAMENT'S VALUE), and no pulling force. This combination of parameters leads to the melting of the largest portion of the capillary with the lowest extension speed, allowing for the shaping of a long needle with a large inner/external size and reduced shank. In this way, the needle preserves a high mechanical resistance and a wide inner diameter that allows the passage of stem cells or viral particles without clogging. The velocity and delay of this program line should stop the capillary extension before the tip becomes too small and long, missing the required mechanical and shape characteristics. The second line of the pulling program is executed automatically once the quartz cools down (5 s). Parameters of power, filament, and pulling force are functional for cutting a tip with the shortest possible tip length and steep shank, avoiding the separation of the two needles with a tip rupture. Routinely, with our equipment, we use the following: (a) Line 1 = power 990, filament 5, velocity 130, delay 110, pull 0; (b) Line 2 = power 970, filament 3, velocity 0, delay 70, pull 0. - Put the needles in a Petri dish previously cleaned with 70% ethanol.
- Cover the dish with a plastic paraffin film.
- Cut the capillaries with the micro-dissector.
- At the start-up, let the laser run an autocalibration process to verify the power and energy delivered. Then, set the cutting parameters.
NOTE: We use a micro-dissector (see Table of Materials) and the following parameters: laser power pulse energy (63 µJ), laser beam diameter of 20% of the maximal aperture (maximal aperture: 1.0 µm), and cutting speed of 10% of the maximal speed (maximal speed: 30 µm/s). - Firmly fix the needle on the microscope table and position its tip at the center of the computer screen.
- On the menu bar, click on the pencil icon and use it to draw a mark for the laser cutting of the needle.
NOTE: The cut should be at an angle of about 45° with respect to the needle surface. - On the sidebar function, select the flag containing the "START CUT" button to allow the laser to cut the previously marked spot.
- If needed, cut side hole(s) by repeating the procedures described in 1.5.2-3; there is no need to reposition the needle (Figure 1).
- At the start-up, let the laser run an autocalibration process to verify the power and energy delivered. Then, set the cutting parameters.
- Post-cut cleaning.
- Connect the needle to a void pump through a plastic tube.
- Turn the pump on and manually set the forward flow rate at a moderate speed (3 µL/min).
- Aspirate the 99% ethanol first and then the distilled water to remove impurities due to cutting.
- Aspirate the 99% ethanol again to ease drying.
NOTE: Each step should last at least 3 min.
- Store the needles in a properly covered Petri dish until the day of surgery.
- Needles may be reused; at the end of the experiment, clean with bleach and ethanol to remove the solution and possible tissue residue. For a more complete cleaning, put the needles in a micropipette storage jar with the tip pointing downwards, fill the jar with distilled water until the tips are covered, boil for 1.5 min to remove any leftover tissue, then wash with ethanol.
2. Procedure
- Following the instructions provided by the pump user manual, select the settings menu to calibrate the pump according to the diameter/volume of the microinjection syringe and set the flow rate at 0.3 µL/min.
- Fill a 10-mL syringe equipped with a blunt needle (e.g., Hamilton needle, 30 G) and a short polytetrafluoroethylene tube with sterile water and use it to fill the microinjection syringe (after having very cautiously removed the piston) and the injection assembly parts kit for the manual microinjection pump (MMP).
NOTE: The MMP kit is used to securely mount the needle in the stereotactic frame (Figure 2). The kit includes a polytetrafluoroethylene tubing, a luer-to-tubing coupler, a pipette holder, and gaskets for pipettes with different outer diameters. - Connect the needle to the MMP kit.
- Flush more water across the system through the 10-mL syringe, and check whether the water comes out of the needle.
NOTE: Make sure to remove any air bubbles inside the system by repeating the filling steps.
- Flush more water across the system through the 10-mL syringe, and check whether the water comes out of the needle.
- Disconnect the 10-mL syringe from the microinjection syringe while slowly pushing the piston in order to leave a drop of water at the top of the microinjection syringe. Insert the piston in the microinjection syringe.
- Connect the microinjection syringe to the pump and set the flow rate at 0.3 µL/min.
NOTE: Wait until there is a drop leaking from the tip of the needle, and then let it go for another 3 min. - Set the flow at 0.1 µL/min and start the surgery procedure. The pump should be running while performing the surgery.
NOTE: For the experiments reported in this article, we use male Sprague Dawley rats of 300 g (3 months of age). However, the procedure is applicable to other species, mice in particular. - Induce general anesthesia using a method approved by local regulations.
NOTE: We use a mix of intraperitoneal injection (i.p.) of 85 mg/kg ketamine and 8 mg/kg xylazine for 20-50 min of anesthesia. It is important that tail and/or toe pinches are used to ensure the animal is fully sedated. The level of anesthesia and basic vitals are assessed before surgery begins and monitored every 10 minutes while performing the surgery. Animal body temperature is maintained constant before, during, and after surgical procedures using a water-re-circulating heating pad. Animals are monitored until fully recovered (e.g., they are upright and ambulatory). In addition, animals receive analgesics (tramadol, 5–7 mg/kg i.p.) post-operatively every 24 hours for three days.- Shave the animal's head and adequately prepare the surgical site for aseptic surgery. Perform a two-stage scrub with iodine-based solution (Betadine) followed by 70% ethanol. Furthermore, to maintain asepsis, wrap the surgical site with a surgical drape (in the video has been omitted for demonstration purposes).
- Position the rat in the stereotaxic frame over a water-re-circulating heating blanket. To provide additional pain relief, at the site of surgery, apply 0.5% lidocaine solution (do not exceed 7 mg/kg). Pre-sterilize all surgical instruments using a bead sterilizer or liquid cold disinfection by immersing the equipment in either 2% glutaraldehyde plus 7.05% phenol (Sporodicin or Cidex), followed by a rinse with sterile water or saline. The disinfection must be performed even between procedures. Make a longitudinal cut over the skull by using a sterilized scalpel. Be gentle to avoid excessive bleeding. Open the scalp using a flat spatula and apply surgical clips on the flaps of skin to keep it open. Very gently, detach the periosteum to expose the bregma and the area of the skull through which the needle will be inserted.
- Mount the arm on the stereotaxic frame (while the flow is ongoing) and move the tip of the needle exactly on top of bregma, paying attention not to break its tip. Annotate the antero-posterior and medio-lateral coordinates of the bregma and translate to the desired coordinates. Guided by a stereomicroscope, lower the needle until its tip almost touches the skull, mark the drilling spot after raising a little the stereotaxic arm.
- Drill (drill tip Ø: 0.8 mm; drill speed: 1,000 rpm) the skull on the marked spot. Care must be taken not to penetrate the dura during the drilling procedures. During drilling, drip sterile saline to avoid bone damage and necrosis.
- Cut a small piece of plastic paraffin film and place it on the skull. Using the 10 µL pipet, make a drop of the solution to inject on the plastic paraffin film. Stop the pump, slightly retrieve the pusher of the pump and create a little air bubble in the capillary by gently pulling the piston of the microinjection syringe.
- Lower the stereotactic arm until the tip of the needle reaches the drop. Draw the sample by pulling (very slowly) the piston of the microinjection syringe, avoiding any bubble formation. Replace the pump pusher in contact with the piston and turn on the pump at a flow rate of 0.3 µL/min. Wait for the formation of a drop (a few minutes) before proceeding to the next step.
NOTE: In the present example experiment, artificial cerebrospinal fluid (aCSF) was infused in the striatum [AP (Anteroposterior): +1.5, ML (Mediolateral): ±2.7; DV (Dorsoventral): -5.0] and in the dorsal hippocampus (AP: -3.5, ML: ±2.1; DV: -3.5; in mm from dura), 2 µL/site. To facilitate the comparison between the two injection methods, each brain area was infused using a quartz needle in one hemisphere and a 26 G blunt tip or a 30 G bevel-tip stainless steel needle in the other. - Lower the flow to 0.1 µL/min, nick the dura with a stainless steel bevel-tip needle and slowly lower the stereotactic arm on the dorso-ventral axe, entering the brain tissue. When the desired position is reached, go down an additional 0.1 mm, stop the pump, raise the stereotactic arm by 0.1 mm and start again the pump at the flow to 0.3 µL/min.
NOTE: The reason for maintaining a slow flow while lowering the needle is to ensure a positive pressure that avoids penetration of small fragments of tissue in the needle itself. Such an event would obstruct the tip, impairing the delivery of the solution. Since the flow rate is very slow while lowering the needle and the speed of lowering is about 10 s/mm, this implies that the amounts of solution that remain along the needle track are negligible compared to those injected at the target site. This precaution may be avoided when using needles with side holes. - Start the timer and wait the needed time depending on the desired volume to inject (for example, 6 min 40 s if injecting 2 µL). Monitor the bubble movement while injecting. At the end, stop the pump and wait 5 minutes before slowly retrieving the needle. When the quartz needle is completely extracted, start the pump again and check for the formation of a drop at the tip of the needle.
- Seal the opening in the skull surface with bone wax, remove the hemostatic clips and suture the scalp, coat the area around the wound with an antibiotic cream (e.g., neosporin) and return the animal to the home cage.
Access restricted. Please log in or start a trial to view this content.
Results
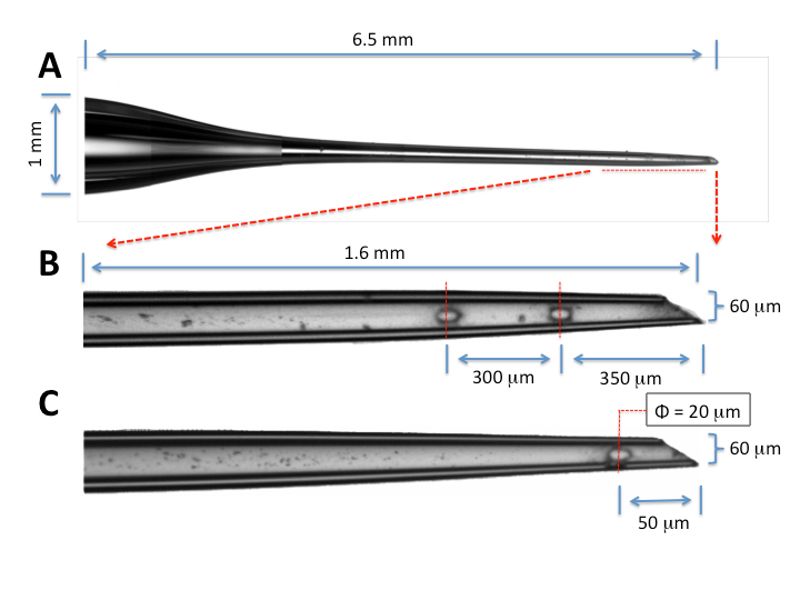
Figure 1: Microscopic image of a quartz needle tip, showing different diameters of the tip and holes emp...
Access restricted. Please log in or start a trial to view this content.
Materials
| Name | Company | Catalog Number | Comments |
|---|---|---|---|
| Quartz capillaries | Sutter Instruments, Novato, CA USA | Q100-50-10 | Without filament |
| Puller | Sutter | P2000 | |
| Micropipette storage jar | World Precision Instruments (WPI), Sarasota, FL, USA | E210 | |
| Laser microdissector | Leica Microsystems, Wetzlar, Germany | LMD6500 | |
| Hamilton syringe | Hamilton ILS Innovative Labor Systeme GmbH, StŸtzerbach, Germany | 19138-U | |
| Microinfusion pump | Univentor, Zejtun, Malta | Model 864 | |
| Manual microinjection pump kit | WPI | Item#: MMP-KIT | Kit allowing for micropipettes to be securely mounted to the stereotactic frame |
| Precision Drill | Proxxon | 28510 MicroMot 50/E | Ball bearing drive shaft with variable speed |
| Artficial Cerebral Spinal Fluid | Tocris | 3525 | |
| Needles 26 G Blunt and 30 G Bevel | Hamilton | 26 G Blunt: 19138-U30 G Bevel: 20757 |
