This video demonstrates the use of a minimally invasive resection system (MIRS) to excise tumor tissue from an anesthetized mouse implanted with a tumor. The procedure involves securing the mouse onto a stereotactic frame, reopening the previous surgical site to access the brain, and inserting a specialized cannula that utilizes suction and a rotating blade to remove tumor sections. After resection, the excised tissue is collected through sterile tubing, and the wound is closed to allow for recovery.
A subscription to JoVE is required to view this content. Sign in or start your free trial.
Method Article
Brain Tumor Resection in a Mouse Using a Minimally Invasive Resection System
1.4K views
⸱
August 7th, 2025
In This Article
Abstract
Protocol
All procedures involving animal models have been reviewed by the local institutional animal care committee and the JoVE veterinary review board.
1. Initial intracranial tumor implantation
- At the initial phase of the study, intracranially inject each mouse with 100,000 cells (GL261 murine glioma cell line) suspended in 4 µL of phosphate-buffered saline (1x PBS) to a depth of 2.5 mm following the previously published report.
- Quantify the tumor signal in each mouse using the in vivo imaging system 9 days following tumor implantation.
NOTE: If needed, stratify the mice into two groups based on tumor burden. In the present study, the two groups were: (1) mice with relatively small tumor burden (mean bioluminescent signal = 5.5e+006 ± 0.1e+006 photons/s, n = 10) and (2) mice with relatively large tumor burden (mean bioluminescent signal = 1.69e+007 ± 0.2e+007 photons/s, n = 10), (p < 0.05, Mann-Whitney test). - Divide each group into two comparable subgroups.
NOTE: In this study, the two subgroups were: untreated mice (n = 5) and mice with tumors undergoing surgical resection using the MIRS (n = 5), (p > 0.05, Mann-Whitney test). - Starting from the day of the resection, track the tumor progression using the in vivo imaging system at a frequency based on the tumor growth pattern.
NOTE: For the GL261 cell line, track the tumor progression on the day of the resection and then every 3-6 days.
2. Tumor resection using MIRS
- Anesthetize the mouse using an isoflurane-O2 gas mixture in an induction chamber or intraperitoneal injection of xylazine/ketamine solution.
- If using the gas anesthetic, set the gas flow rate to 1.0 mL/min and the vaporizer to 2.0% for anesthesia induction, typically requiring 3-5 min in the chamber (see Table of Materials).
- If using the injectable anesthetic, anesthetize the mice by injecting 0.2 mL of anesthetic solution (80-100 mg/kg of ketamine and 10-12.5 mg/kg of xylazine, see Table of Materials) intraperitoneally.
- Assess the animal for adequate sedation by pinching the toe. Apply ophthalmic ointment to the eyes to avoid dryness of the cornea. Administer an analgesic (0.03-0.06 mg/kg buprenorphine subcutaneously) prior to the procedure.
- Place the mouse onto the stereotactic frame (see Table of Materials) once full sedation has been confirmed.
NOTE: If using the gas anesthetic, place the nose of the mouse in a nose cone where it will continue to receive the isoflurane-O2 mixture during the procedure (1.5%). - Remove the previous staple, then remove the hair either with a depilatory cream or by shaving. Disinfect the skin with alternating cycles of a chlorhexidine/betadine-based scrub and alcohol. Then, using a sterile scalpel, create a 1 cm longitudinal midline incision along the previous surgical scar.
- Attach the MIRS handpiece to the stereotactic arm through the stage adapter/handpiece holder for enhanced stability and precision.
- Set up the MIRS machine (see Table of Materials) using the following settings (Figure 1).
- Insert the power cord set on the rear panel into the power cord receptacle. Turn the power to the system on or off by toggling (1 = ON, 0 = OFF).
- Insert one end of the nitrogen hose (supplied with the console) into the male fitting on the console's rear panel. Rotate the connection nut clockwise to tighten the connection.
NOTE: The opposite end of the hose needs to be connected to the nitrogen supply. - Before attaching the hose to the nitrogen supply, confirm that the supply pressure does not exceed 100 psig, which is the input supply pressure recommended for the console.
NOTE: The console will generate its own aspiration when activated by the foot pedal once the nitrogen has been supplied to the console. - Secure the lid of the vacuum port and seal it to avoid any leakage in the vacuum system. Any leaks in the aspiration system will affect the performance of the MIRS console.
- If the aspiration is below 17 during setup or priming, check that the aspiration knob on the front of the console is set at the maximum level (100), ensure there is no leakage in the aspiration system, and confirm that the nitrogen input supply pressure is correct.
- To connect the foot pedal to the console, insert the gray foot pedal connector into its gray receptacle until it clicks and fits into position.
NOTE: The foot pedal connector connects to the console in one orientation, and it is keyed. - To connect the handpiece to the console, insert the blue handpiece connector into its blue receptacle until it clicks and fits into position.
NOTE: The handpiece connector connects to the console in one orientation, and it is keyed. - Prime each handpiece before using the system by aspirating sterile fluid from a small bowl into the aperture, through the tubing and handpiece, and then into the canister to ensure that the inside of the tubing and handpiece are lubricated to reduce tissue occlusions.
- Prepare for aspiration alone or aspiration with cutting by selecting the appropriate mode on the console's front panel. Initiate using the foot pedal.
- Insert the 23 G MIRS cannula into the burr hole to a depth of 2.5 mm.
- Initiate the resection process by depressing the foot pedal connected to the cannula. Perform one full cycle (360°) or more of resection using the control knob in the handpiece.
NOTE: The more cycles performed, the more volume of tumor tissue resected. - Once the resection process is complete, withdraw the 23 G MIRS cannula from the burr hole and use 5 mL of 1x PBS to flush the tubing and dislodge any residual debris.
- Remove the mouse from the stereotactic frame and close the wound with a stapler or 4-0 suturing material (see Table of Materials).
- Place the mouse on a heating pad or under a warming light during recovery from anesthesia before returning it to its cage.
- After the experiment is complete, purge the cannula via flushing. Alternate with chilled media and air to "push" all of the resected tissue back to the collection canister. Remove the collection canister from the system and cap off with the provided cap.
- After completing step 2.12, place the distal tip of the cannula into 3% H2O2 and apply suction at 24-25 in Hg to fill the suction line back to the suction collection canister and let stand for 60-90 s. Flush with sterile media pulsing air and media intermittently.
- Monitor the mice for any neurological signs (abnormal erratic movements or seizures) following the procedure.
Access restricted. Please log in or start a trial to view this content.
Results
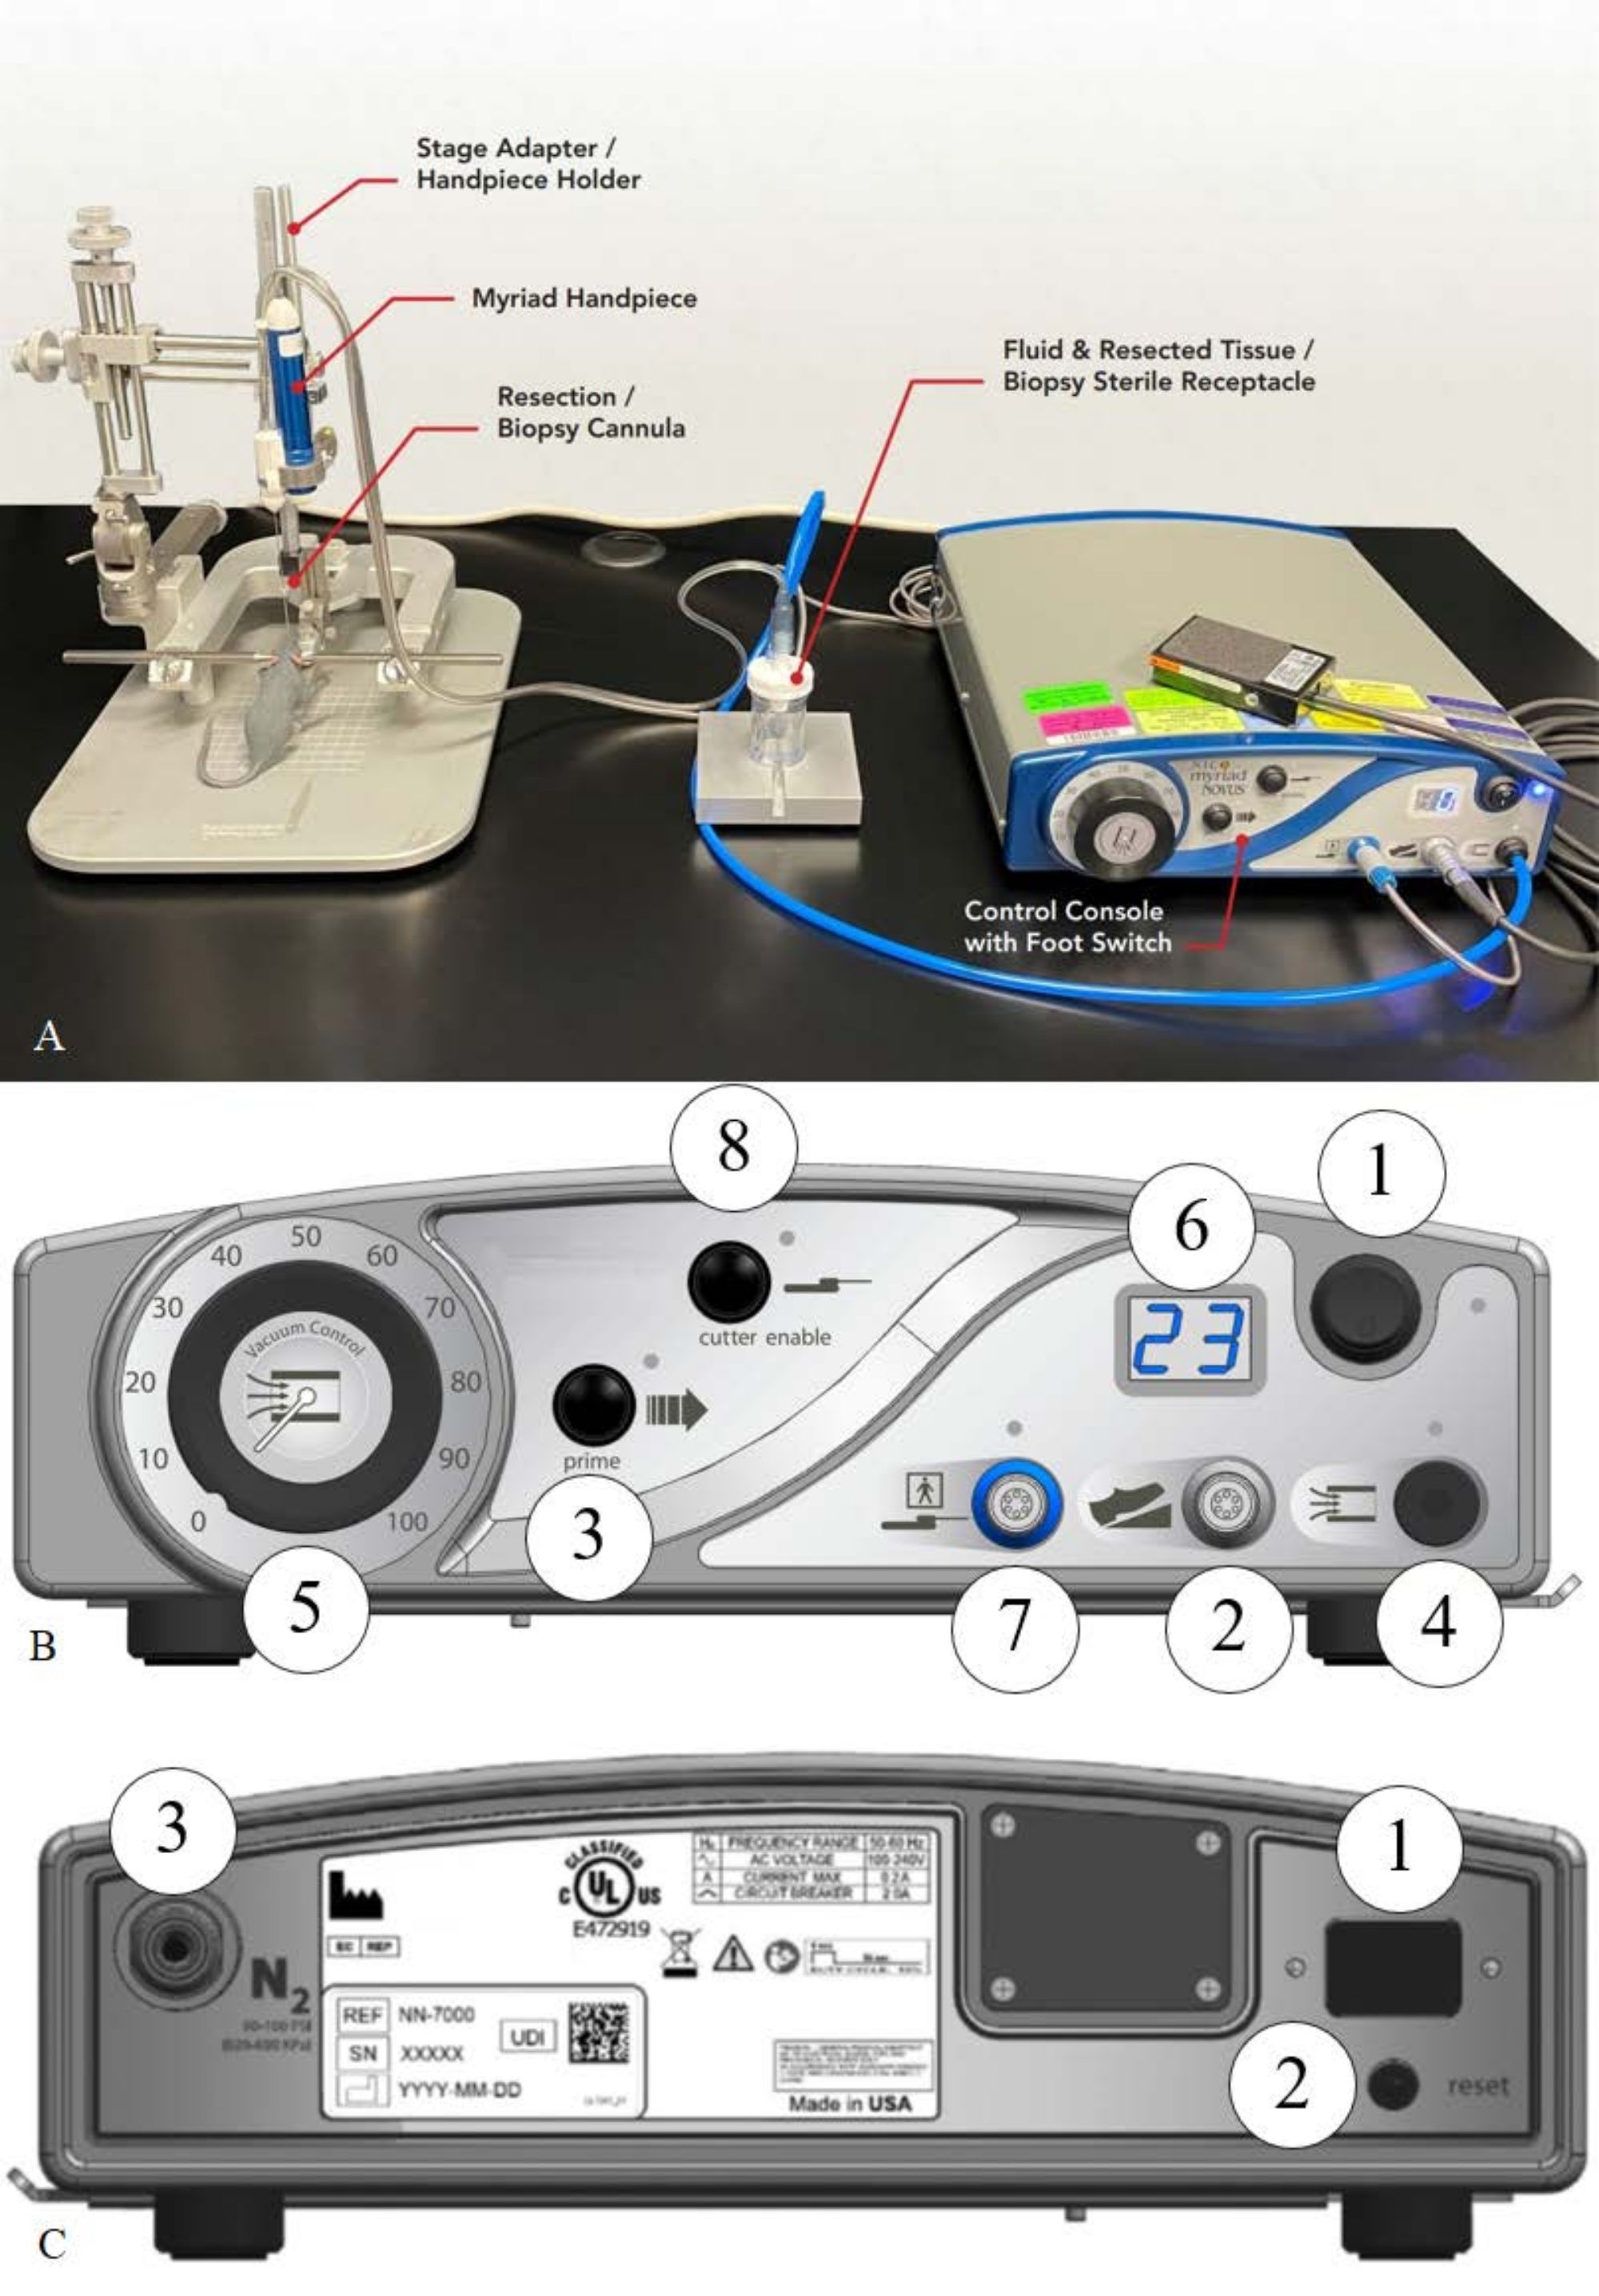
Figure 1: MIRS system setup. (A) Minimally invasive resection system (MIRS...
Access restricted. Please log in or start a trial to view this content.
Materials
| Name | Company | Catalog Number | Comments |
|---|---|---|---|
| Anased (Xylazine injection, 100 mg/mL) | Covetrus | 33198 | |
| Anesthesia System | Patterson Scientific | 78935903 | |
| Anesthesic Gas Waste Container | Patterson Scientific | 78909457 | |
| C57Bl/6, 6-8 week old mice | Charles River Laboratories | Strain Code 027 | |
| Isoflurane | Covetrus | 11695-6777-2 | |
| Isoflurane Vaporizer | Patterson Scientific | 78916954 | |
| Ketamine | Covetrus | 11695-0703-1 | |
| Kopf Stereotactic frame | Kopf Instruments | 5001 | |
| Lightfield Microscope | BioTek | Cytation 5 | |
| Microinjection Unit | Kopf | 5001 | |
| Micromotor drill | Foredom | F210418 | |
| MRI system | Bruker | 7T Biospec Avance III MRI Scanner | |
| NICO Myriad System | NICO Corporation | ||
| Ophthalmic ointment | Puralube vet ointment | ||
| Papain | Sigma Aldrich | #P4762 | |
| PBS | Invitrogen | #14190250 | |
| PenStrep | Millipore Sigma | N1638 | |
| Percoll solution | Sigma Aldrich | #P4937 | |
| Pipette controller | Falcon | A07260 | |
| Povidone-iodine solution | Aplicare | 52380-1905-08 | |
| RPMI Media | Invitrogen | INV-72400120 | |
| Scalpel blade | Covetrus | 7319 | |
| Scalpel handle | Fine Science Tools | 91003-12 | |
| Skin marker | Time Out | D538,851 | |
| Staple remover | MikRon | ACR9MM | |
| Stapler | MikRon | ACA9MM | |
| Staples | Clay Adams | 427631 | |
| Stereotactic Frame | Kopf Instruments | 5000 | |
| Sucrose | Sigma Aldrich | S9378 | |
| Suture, vicryl 4-0 | Ethicon | J494H |
