This video demonstrates the development of micro-tissue-engineered neural networks using a hydrogel micro-column with an extracellular matrix core. Seeded neuronal aggregates adhere, extend projections, and form structured neural networks, contributing to advancements in neurodevelopment and neurotherapeutic research.
A subscription to JoVE is required to view this content. Sign in or start your free trial.
Method Article
Developing a Micro-Tissue-Engineered Neural Network Using a Hydrogel-Based Micro-column
608 views
⸱
August 7th, 2025
In This Article
Abstract
Protocol
All procedures involving animal models have been reviewed by the local institutional animal care committee and the JoVE veterinary review board.
1. Development of the Agarose Hydrogel (Acellular Component of micro-tissue engineered neural networks (micro-TENNs))
- Agarose solution preparation
- Within a biosafety cabinet, prepare reservoirs for the micro-columns by transferring 20 mL of Dulbecco's phosphate-buffered saline (DPBS) to each of two 10-cm Petri dishes. Sterilize fine forceps and microscalpels with a hot bead sterilizer.
- Weigh 3 g of agarose and transfer it to a sterile beaker inside the biosafety cabinet. Add 100 mL of DPBS for a final concentration of 3% weight/volume (w/v). Include a clean magnetic bar and cover the beaker with aluminum foil.
- With a hot plate/stirrer, warm the beaker at 100 °C and stir at 120-200 rpm to completely dissolve the agarose (the solution will turn from cloudy to clear). Maintain the heating and stirring afterward to prevent gelation and change the heating temperature as necessary to avoid burning the agarose.
NOTE: Fabrication with both the laser-cut device and capillary tubes is presented below in sub-sections 1.2 and 1.3, respectively. Proceed to sub-section 1.4 after finishing the steps described in either sub-section. For both micro-column fabrication methods, add the liquid agarose quickly, as agarose solidifies rapidly as it cools. When sterilizing with an autoclave in any of the following steps, use the standard conditions applied to glassware.
- Micro-column preparation using a laser-cut device
NOTE: The laser-cut device is cut from transparent acrylic using a commercial CO2 laser cutter. The fabrication of structures and devices through laser cutting is well-documented for a range of engineering and research applications. This mold (Figure 1) consists of an array of five cylindrical channels, each with a diameter of 398 µm and a length of 6.35 mm. These cylindrical arrays are formed along their length by two pieces: a bottom half (length: 25.4 mm, width: 6.35 mm, height: 6.0 mm) and a top half (length: 31.5 mm, width: 6.35 mm, height: 12.7 mm), as shown in Figures 1A and 1B, respectively. The two halves can be clamped together by the anterior and posterior caps observed in Figure 1C (length: 31.5 mm, width: 6.35 mm, height: 12.7 mm), which feature four alignment holes that coincide with two holes each on the top and bottom pieces and that help secure all the parts together when screwed. These caps also include five holes, concentric to the cylindrical channels, into which the acupuncture needles can be inserted to form the lumen of the micro-columns.- Sterilize the device shown in Figure 1 by covering it with aluminum foil and autoclaving. Assemble the device as shown in Figure 1D by aligning the anterior and posterior caps with only the bottom-half piece and securing the three parts with two #4-40 screws and nuts (thread diameter: 3.05 mm) in the bottom alignment holes.
- Fully introduce an acupuncture needle (diameter: 180 µm, length: 30 mm) into the needle holes on either the anterior or posterior cap of the device (Figure 1D). With a micropipette, pour enough liquid agarose (~1 mL for the five channels) on the bottom half piece to completely fill each of the cylindrical channel halves.
- Immediately place the top-half piece of the device over the bottom half and apply pressure until it is firmly in place to complete the cylindrical channels (friction between the caps and the top piece will keep the latter in place). Wait ~5 min at room temperature after agarose addition to permit its gelation inside the channels of the device.
- Manually extract the needle from each of the holes on the caps of the device. Remove the screws and manually separate the two caps and the top half from the bottom-half piece, where the latter will be holding the hydrogel micro-columns.
- Use fine forceps to gently remove the micro-columns from the channels on the bottom-half piece and place them into the previously prepared Petri dish containing DPBS (step 1.1.1). Reutilize the device for another round of micro-column fabrication. Proceed to sub-section 1.4.
- Micro-column fabrication using capillary tubes
- Transfer glass capillary tubes (diameter: 398.78 µm, length: 32 mm) to the inside of the biosafety cabinet. Manually break the long tubes into 2.0–2.5 cm fragments and fully insert one acupuncture needle (diameter: 180 µm, length: 30 mm) into each fragment (Figure 2A).
- Transfer 1 mL of liquid agarose from the beaker to the surface of an empty Petri dish. Holding the capillary tube and the introduced needle, place one end of the tube in contact with the liquid agarose pool to fill it by capillary action. Agitate the tube to promote capillary rise.
NOTE: Fill the capillary tubes with liquid agarose as high as the capillary action permits; afterward, these micro-columns can be cut into smaller constructs depending on the desired length. The 1-mL agarose pool is typically used for only one tube since the agarose cools and gels rapidly, preventing further capillary action. - When the liquid ceases to rise, remove the capillary tube from the pool and place it horizontally on the surface of a Petri dish. Wait for 5 minutes to let the agarose gel settle inside the tubes.
- Situate the thumb and index finger on either side of the tube and press against it. Use the other hand to quickly pull the needle out while using the thumb and index finger to prevent the micro-column itself from sliding out of the tube. Insert a 30-gauge needle into the capillary tube to slowly push the micro-column out into a dish containing DPBS (step 1.1.1).
- Micro-column trimming and sterilization
- Delicately transfer one micro-column from DPBS to an empty dish using fine forceps. Add 10 µL of DBPS to the top of the micro-column with a micropipette to prevent drying. Place the latter dish below a stereoscope for visual guidance.
NOTE: Throughout the protocol, micro-column drying or dehydration refers to the acquisition of a crumpled structure that is visually distinguishable from the typical, hydrated appearance of these constructs. Dehydrated micro-columns firmly attach to the surface of Petri dishes and cannot be easily moved, whereas hydrated constructs tend to slide across the surface after being manipulated with forceps. A phase-contrast image of a completely dried micro-column is shown in Figure 3A. - Trim the micro-column with a micro-scalpel to shorten it to the desired length (here, 2-5 mm). Transport the trimmed micro-column with fine forceps to the other DPBS Petri dish prepared in step 1.1.1.
- Repeat steps 1.4.1 and 1.4.2 for each fabricated micro-column.
- Sterilize the micro-columns in the DPBS-containing Petri dishes under ultraviolet (UV) light for 1 h. Store the Petri dishes at 4 °C prior to extracellular matrix (ECM) addition and cell plating.
- Delicately transfer one micro-column from DPBS to an empty dish using fine forceps. Add 10 µL of DBPS to the top of the micro-column with a micropipette to prevent drying. Place the latter dish below a stereoscope for visual guidance.
2. Primary Neuron Culture and Forced Cell Aggregation Method
- Preparation of the pyramidal micro-well array
NOTE: This section employs a 3D-printed mold consisting of a cylindrical base (diameter: 2.2 cm, height: 7.0 mm) and nine square pyramids on top (side length: 4.0 mm, slant angle: 60°), organized in a 3 x 3 array, as shown in Figure 1E. The additive manufacturing process using commercially available 3D printers is well-documented. Computer-aided design software can be used to design the mold. The resultant design file can then be digitally converted into a tool path for a 3D printer. Each printer has different specifications, and the instructions for setting up and operating a 3D printer vary accordingly.- Use a 3/32" drill bit to puncture 16 holes in a 4 x 4 array (side length: 4 cm, hole separation: 1 cm), centered in the lid of a 10 cm Petri dish. Inside a chemical fume hood, use the bottom piece of the Petri dish to weigh 27 g of polydimethylsiloxane (PDMS) and 3 g of curing agent (for a 1:10 ratio). Stir with a micro-spatula to distribute the agent evenly.
- Cover the PDMS/curing agent with the punctured lid. Connect one end of a hose to the vacuum port of the fume hood and insert the other end into the stem of a funnel (mouth diameter: 10 cm, stem length: 3 cm, stem diameter: 1.5 cm).
- Make an opening with a 3/32" drill bit at the top of a 1 mL pipette bulb and insert and secure a 1,000 µL micropipette tip into the opening (with the pointed end upwards). Place the bulb and tip into the hose and pull the hose upwards until the bulb seals the hose into the stem of the funnel.
- Place the funnel on the punctured dish lid and secure the hose with an available sturdy support. Open the vacuum valve for 5 min to suction and bring the air bubbles to the surface.
- Close the valve, remove the funnel, and hit the Petri dish against the surface of the fume hood ~3 times to burst any remaining air bubbles.
- Place a pyramidal-well 3D-printed mold into each of the wells in a 12-well culture plate, with the pyramids pointing up. Pour the PDMS/curing agent on top of the molds until each well of the plate is filled. Cover the 12-well plate with its lid and transfer it to an oven for 1 hour at 60 °C to dry.
- Carefully remove each PDMS micro-well array (Figure 1F) from the plate with a micro-spatula. Cover the PDMS arrays with aluminum foil and sterilize them by autoclaving. Inside a biosafety cabinet, insert one micro-well array into each well of a 12-well plate (Figure 2B).
- Cortical neuron isolation from rat fetuses
- Add ~20 mL of Hank's balanced salt solution (HBSS) to each of four to six 10 cm Petri dishes (one for each dissected tissue) inside a biosafety cabinet. Transfer these dishes to a dissection hood and place them on ice. Sterilize dissection instruments, such as micro scalpels, scissors, and forceps, with a hot bead sterilizer.
- Pre-warm embryonic neuron basal medium + 2% serum-free supplement + 0.4 mM L-glutamine (referred to as "culture medium" hereafter) and 0.25% trypsin + 1 mM ethylenediaminetetraacetic acid (EDTA) at 37 °C. Thaw deoxyribonuclease (DNase) I by placing it at room temperature. Prepare 1.5 mL of a 0.15 mg/mL DNAse I solution in HBSS and maintain the solution on ice.
- Euthanize a timed-pregnant embryonic-day-18 rat by carbon dioxide inhalation and confirm death by decapitation. Transfer the carcass to a sterile dissection hood and lay it ventral-side up. Rinse the abdomen thoroughly with 70% ethanol.
- Open the uterus and remove the fetuses (usually ~11) from the amniotic sacs with scissors and transfer them with forceps to a Petri dish containing cold HBSS, as described. Place a chilled (-20 °C) granite block below the stereoscope. Place the Petri dish on the surface of this cold block to conserve the low temperature of the HBSS throughout the dissection procedure.
- Rinse the pups by swishing the HBSS around and then transfer them to the next clean dish containing HBSS. With the aid of the stereoscope and the dissection instruments, sequentially remove the heads, cerebral hemispheres, and cortices of the fetuses and transfer each tissue with forceps to a new HBSS-filled dish after each dissection.
- Aspirate only the cortices with a Pasteur pipette and place the tissue into a sterile 15 mL centrifuge tube. Discard the other dissected tissues. Rinse the cortices three times by sequentially adding and removing ~5 mL of HBSS with a serological pipette. Place the tube on ice when not in use.
- Transfer the cortices with a Pasteur pipette to a 15 mL tube containing pre-warmed trypsin-EDTA (4-6 cortices per 5 mL of trypsin-EDTA). Manually agitate the tube once and place it at 37 °C. Invert the tube every 3 min to prevent the tissue from clumping.
- Stop the exposure to trypsin after ~10 min by removing the tissue with a Pasteur pipette and transferring it to a clean 15 mL centrifuge tube. Add the 0.15 mg/mL DNase I solution (1.5 mL) to the tube with a pipette.
- Use a Pasteur pipette to manually break up tissue clumps and then vortex (~30 s) until the solution appears homogeneous and there are no remaining tissue fragments in the liquid. If it is not possible to completely homogenize the solution, extract the insoluble fragments by pulling them into the tip of a Pasteur pipette.
- Centrifuge the homogeneous cell solution obtained in step 2.2.9 at 200 x g for 3 min. Remove the supernatant with a Pasteur pipette, taking care not to disturb the pelleted cells. Add 2 mL of culture medium with a serological pipette and vortex to resuspend the cells.
- Count the number of cells in the solution prepared in step 2.2.10 using a hemocytometer; the expected yield is 3.0-5.0 x 10⁶ cells/cortical hemisphere. Prepare 1 mL or more of cell suspension in culture medium, with a density of 1.0-2.0 x 10⁶ cells/mL.
- Formation of neuronal cell aggregates
- With a micropipette, add 12 µL of the 1.0-2.0 x 10⁶/mL cell suspension into each micro-well of the PDMS array (that was placed in the plate in step 2.1.7).
NOTE: The cell concentration can be adjusted depending on micro-column inner diameter and the desired cell aggregate size, as higher concentrations yield larger aggregates. - Centrifuge the plate at 200 x g for 5 min to force the aggregation of cells at the bottom of the micro-wells (Figure 2B). Carefully add ~2 mL of culture medium to the top of each PDMS array to cover all the seeded micro-wells, taking care not to disturb the aggregated cells.
- Incubate the plate for 12-24 h at 37 °C and 5% CO2.
- With a micropipette, add 12 µL of the 1.0-2.0 x 10⁶/mL cell suspension into each micro-well of the PDMS array (that was placed in the plate in step 2.1.7).
3. Development of the Cellular Component of micro-TENNs
- ECM core fabrication
- After aggregate incubation, add type I collagen and laminin to the culture medium (for a concentration of 1 mg/mL each) in a microcentrifuge tube to prepare the ECM solution. Perform steps 3.1.2-3.1.4 at room temperature, but maintain the tube with ECM on ice when not in use to prevent premature gelation.
NOTE: The typical expenditure is 4 µL of ECM solution for each micro-column (length: 5 mm, ID: 180 µm). - Adjust the pH of the ECM solution by transferring 1-2 µL to litmus paper to verify the initial pH, adding 1 µL of 1 N sodium hydroxide (NaOH) and/or 1 N hydrochloric acid (HCl) to the ECM, as needed, and repeating until the pH is 7.2-7.4. Ensure homogenization of the ECM solution by pipetting up and down while avoiding the formation of air bubbles.
- Transfer the micro-columns with sterilized forceps from the dishes in step 1.4.3 to empty 35- or 60-mm Petri dishes. Work on 4-5 micro-columns at a time to prevent dehydration. Attach a 10-µL tip to a 1,000-µL tip to a micropipette. Using the stereoscope for visual guidance, place the tip at one end of the micro-columns and suction to extract residual DPBS and air bubbles from the lumen.
- Quickly draw up 4-5 µL of ECM in a micropipette. Observing under a stereoscope, place the tip of the micropipette at one of the ends of the micro-columns and discharge enough ECM to fill the lumen. Confirm the absence of air bubbles in the lumen, as these may inhibit axonal outgrowth through the ECM. If air bubbles exist, remove the ECM, as explained in step 3.1.3, and add the ECM again.
- To prevent dehydration, add ~2 µL of ECM around each micro-column. Incubate the hydrogel/ECM micro-columns in the Petri dishes at 37 °C and 5% CO2 for 25 min. Proceed to cell seeding immediately after incubation.
NOTE: The incubation period in step 3.1.5 is intended to allow time for the polymerization of collagen and laminin inside the micro-columns.
- After aggregate incubation, add type I collagen and laminin to the culture medium (for a concentration of 1 mg/mL each) in a microcentrifuge tube to prepare the ECM solution. Perform steps 3.1.2-3.1.4 at room temperature, but maintain the tube with ECM on ice when not in use to prevent premature gelation.
- Neuronal cell seeding in the micro-columns
NOTE: To change the culture medium of the transduced aggregates, tilt the plate, use a micropipette to remove the medium that pools on the wall of the well, and then slowly add ~1 mL against the wall (to avoid disturbing the aggregates in the pyramidal micro-wells). Repeat this medium change a second time.- Following the incubation period in step 3.1.5, transfer approximately 10-20 µL of culture medium to two free areas in the Petri dishes holding the micro-columns. Use a micropipette to individually transfer the aggregates to the Petri dish containing the constructs and move them with forceps to one of the small pools of culture medium to preserve cell health.
- While observing under a stereoscope, insert an aggregate at each end of the micro-columns for bidirectional micro-TENNs or at one end for a unidirectional architecture (as desired) using forceps. Confirm the placement of the aggregates inside the micro-columns using the stereoscope. Use forceps to move the seeded micro-columns to the other small pool of culture medium to avoid dehydration and to preserve aggregate health.
- Incubate at 37 °C and 5% CO2 for 45 min to allow the aggregates to adhere to the ECM. Verify that the aggregates remain at the ends of the micro-columns using the stereoscope; reintroduce the cell aggregates and repeat the incubation step as necessary.
- Carefully flood the Petri dishes containing the micro-TENNs with culture medium (3 or 6 mL for a 35 or 60 mm Petri dish, respectively) using a serological pipette. Place the dishes in an incubator at 37 °C and 5% CO2 for long-term culture.
- Perform half-media changes every 2 days with culture medium. Carefully remove half of the old medium with a pipette and use the stereoscope for visual guidance to avoid suctioning the micro-TENNs. Replace with slowly adding fresh, pre-warmed medium with a pipette.
Access restricted. Please log in or start a trial to view this content.
Results
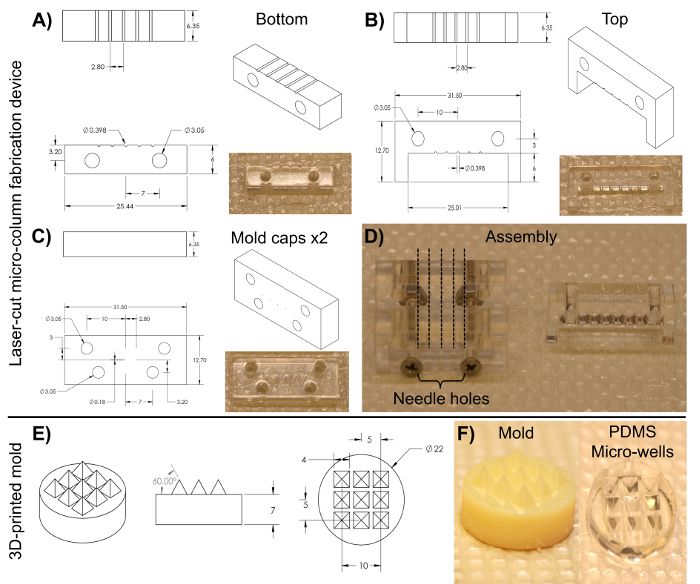
Figure 1: Blueprints of the laser-cut micro-column fabrication device and the 3D-printed pyramidal micro-well mold...
Access restricted. Please log in or start a trial to view this content.
Materials
| Name | Company | Catalog Number | Comments |
|---|---|---|---|
| Laser cutter | Universal laser systems | PLS4.75 | Used to fabricate the laser-cut micro-channel mold. |
| Laser-cut micro-column fabrication device | Custom-made | -------------- | Contact our research group if interested. Dimensions and blueprints provided in the manuscript. |
| Screws | -------------- | -------------- | #4-40 with a thread diameter of 3.05 mm |
| Nuts | -------------- | -------------- | #4-40 with a thread diameter of 3.05 mm |
| Acupuncture needle (180 µm diameter) | Lhasa medical | sj.16X40 | The diameter may be varied according to the desired size for the micro-column lumen. |
| Petri dish | Fisher | 08772B | |
| Dulbecco's phosphate buffered saline (DPBS) | Invitrogen | 14200075 | |
| Polystyrene disposable serological pipet | Fisher | 13-678-11D | |
| Agarose | Sigma | A9539-50G | |
| Capillary tube (398 µm diameter) | Fisher | 21170D | The diameter may be varied according to the desired size for the micro-column shell. |
| Hot plate | Fisher | SP88857200 | |
| Magnetic bar | Fisher | 1451352 | |
| Micropipette | Sigma | Z683884-1EA | |
| 25 mm gauge needle | Fisher | 14-826-49 | |
| Microscalpel | Roboz surgical | RS-6270 | |
| Scissors | Fine science tools | 14081-09 | |
| Forceps | World precision instruments | 501985 | |
| Hot bead sterilizer | Sigma | Z378550-1EA | |
| Stereoscope | Nikon | SMZ800N | Used for all dissection steps and for micro-TENN fabrication. |
| Rat tail type I collagen | Corning | 354236 | Maintain at 4 ºC and remove only when needed. Use ice to preserve its temperature when in use. |
| Microcentrifuge tube | Fisher | 02-681-256 | |
| Mouse laminin | Corning | 354232 | Maintain at 4 ºC and remove only when needed. Use ice to preserve its temperature when in use. |
| Neurobasal medium | Invitrogen | 21103049 | Basal medium for the culture of pre-natal and embryonic neuronal cells. Store at 4ºC and warm at 37 ºC before use. |
| Sodium hydroxide (NaOH) | Fisher | SS2661 | |
| Hydrochloric acid (HCl) | Fisher | SA48-1 | |
| Litmus paper | Fisher | 09-876-18 | |
| Hank's balanced salt solution (HBSS) | Invitrogen | 14170112 | Store at 4 ºC. |
| 0.25% Trypsin-EDTA | Invitrogen | 25200056 | Store at -20 ºC and warm at 37 ºC before use. |
| Bovine pancreatic deoxyribonuclease (DNase) I | Sigma | 10104159001 | Store at -20 ºC and warm at 37 ºC before use. |
| B-27 Supplement | Invitrogen | 12587010 | Supplement added to neurobasal medium for the culture of hippocampal and cortical neurons. Store at -20 ºC and warm at 37 ºC before use. |
| L-glutamine | Invitrogen | 35050061 | Store at -20 ºC and warm at 37 ºC before use. |
| Sprague Dawley embryonic day 18 rats | Charles River | Strain 001 | |
| Pasteur pipette | Fisher | 22-042816 | |
| 15 mL centrifuge tube | EMESCO | 1194-352099 | |
| Vortex | Fisher | 02-215-414 | |
| Centrifuge | Fisher | 05-413-115 | |
| Hemocytometer | Fisher | 02-671-6 | |
| Objet30 3D-Printer | Stratasys | -------------- | Used to fabricate the pyramidal micro-well molds. |
| 3D-printed pyramidal well mold | Custom-made | -------------- | Contact our research group if interested. Dimensions and blueprints provided in the manuscript. |
| Polydimethylsiloxane (PDMS) and curing agent | Fisher | NC9285739 | Comes as kit with elastomer and curing agent. Use inside a chemical fume hood. |
| Funnel | Fisher | 10-348C | |
| 1 ml pipette bulb | Sigma | Z509035 | |
| Micro-spatula | Fisher | S50821 | |
| 12-well culture plate | EMESCO | 1194-353043 | |
| Oven | Fisher | 11-475-154 | |
| Incubator | Fisher | 13 998 076 | |
| Eclipse Ti-S Microscope | Nikon | -------------- | Used for taking the phase-contrast images. With digital image acquisition using a QiClick camera interfaced with Nikon elements basic research software (4.10.01). |
