Recent advances in 2-photon microscopy have enabled real-time in situ imaging of live tissues in animal models, thereby enhancing our ability to investigate cellular behavior in both physiologic and pathologic conditions. Here, we outline the preparations required to perform intravital imaging of the mouse popliteal lymph node.
Method Article
Intravital Imaging of the Mouse Popliteal Lymph Node
Opens in a new tab
In This Article
Summary
Loading...
$$\rightleftharpoonup{xx}$$
$$\longleftharp{xx}$$,
$$\longrightharp{xx}$$,
Abstract
Loading...
$$\rightleftharpoonup{xx}$$
$$\longleftharp{xx}$$,
$$\longrightharp{xx}$$,
Lymph nodes (LNs) are secondary lymphoid organs, which are strategically located throughout the body to allow for trapping and presentation of foreign antigens from peripheral tissues to prime the adaptive immune response. Juxtaposed between innate and adaptive immune responses, the LN is an ideal site to study immune cell interactions1,2. Lymphocytes (T cells, B cells and NK cells), dendritic cells (DCs), and macrophages comprise the bulk of bone marrow-derived cellular elements of the LN. These cells are strategically positioned in the LN to allow efficient surveillance of self antigens and potential foreign antigens3-5. The process by which lymphocytes successfully encounter cognate antigens is a subject of intense investigation in recent years, and involves an integration of molecular contacts including antigen receptors, adhesion molecules, chemokines, and stromal structures such as the fibro-reticular network2,6-12.
Prior to the development of high-resolution real-time fluorescent in vivo imaging, investigators relied on static imaging, which only offers answers regarding morphology, position, and architecture. While these questions are fundamental in our understanding of immune cell behavior, the limitations intrinsic with this technique does not permit analysis to decipher lymphocyte trafficking and environmental clues that affect dynamic cell behavior. Recently, the development of intravital two-photon laser scanning microscopy (2P-LSM) has allowed investigators to view the dynamic movements and interactions of individual cells within live LNs in situ12-16. In particular, we and others have applied this technique to image cellular behavior and interactions within the popliteal LN, where its compact, dense nature offers the advantage of multiplex data acquisition over a large tissue area with diverse tissue sub-structures11,17-18. It is important to note that this technique offers added benefits over explanted tissue imaging techniques, which require disruption of blood, lymph flow, and ultimately the cellular dynamics of the system. Additionally, explanted tissues have a very limited window of time in which the tissue remains viable for imaging after explant. With proper hydration and monitoring of the animal's environmental conditions, the imaging time can be significantly extended with this intravital technique. Here, we present a detailed method of preparing mouse popliteal LN for the purpose of performing intravital imaging.
Protocol
Loading...
$$\rightleftharpoonup{xx}$$
$$\longleftharp{xx}$$,
$$\longrightharp{xx}$$,
1. Mouse Holder Assembly
- Overlay the cover of a 100-mm glass Petri dish on top of a 100-mm plastic Petri dish lid facing down. The glass should be barely touching the center point of the plastic dish. Using the glass as a stencil, trace a mark onto the plastic dish.
- Use a hand drill (i.e. Dremel) to remove a portion of a 100-mm plastic dish lid to create a crescent-shaped platform. This crescent-shaped plastic lid will serve as a support for the upper torso of the mouse (Figure 1a). Drill two holes on the crescent-shaped lid to secure the gas mask with a metal twist tie. Secure the plastic lid to the edge of the glass Petri dish using super glue or an equivalently strong adhesive (Figure 1b).
- Glue the lids of two domed-cap PCR tubes (cut at the hinge) 1 cm apart to the center of the bottom dish for the purpose of anchoring popliteal skin flaps.
2. Mouse Preparation
Note: With sufficient practice, one should be able to perform the mouse preparation and surgical steps in 20-30 minutes.
- Anesthetize the mouse with isoflurane (2 to 2.5% for induction, 1.5 to 2% for surgery / imaging) admixed in 1:1 O2 : air mixture at a flow rate of 1L/min using an IACUC- approved procedure. Once the mouse is anesthetized, secure a gas mask over the nose with tape. Determine if the mouse is fully anesthetized by the lack of response to toe and/or tail pinches. The level of isoflurane may be adjusted accordingly to ensure the animal is fully sedated, with a steady, non-labored respiratory rate between 60-80 breaths/min.
- Use an electric trimmer to remove hair on the right hind leg and inguinal area of the mouse.
- Brush away loose hair and gently apply a modest coat of Nair lotion onto the shaven area with a cotton swab. After one minute of initial application, remove the Nair and clean the exposed skin with a damp paper towel. Make sure the mouse is clean and dry before proceeding.
- Make a small 2 to 3 mm incision with scissors at the right knee to expose the extensor tendon.
- Apply Vetbond along the center of the mouse holder where the mouse body and leg will be positioned. Carefully secure the mouse onto the holder, with the right knee down, to expose the right popliteal fossa. Secure the right knee tendon with Vetbond in between the 2 skin flap holders to help stabilize the imaging field.
- Stretch and tape the arms and left leg to the upper platform of the holder.
- Use a twist tie to secure the gas mask in place.
- Place the holder under the dissection microscope. The LN must remain absolutely still, independent of the breathing motion of the mouse. Therefore, precautions must be taken while performing the surgery to optimize the stability of the leg. Determine the position of the tail (typically above the head) that will contribute to the greatest stability to the right leg and tape the tail down.
3. Surgery
- While under the dissection scope, maintain mouse body temperature using a space heater or a heating pad. For successful imaging of the popliteal LN, it is critical to sustain proper body temperature throughout the surgery as well as to preserve tissue moisture by constantly applying warm PBS to the exposed tissue.
- Sterilize the skin with Betadine. Using sterile scissors, make a midline incision through the skin at the right mid-calf, and continue cutting vertically up to the superior portion of the right thigh.
- Make two horizontal skin incisions at the top of the vertical incision line to create skin flaps on either side.
- Retract and glue down both skin flaps with Vetbond. Pulling the skin taut prior to applying Vetbond will further promote leg stability; however, make sure that the skin tension does not occlude blood flow (i.e. changes in the vessel color or diameter). Continue to glue down other areas of the skin to ensure stability of the leg before exposing the LN. The size of the mouse will determine how much extra skin is needed to glue down. Typically, bigger mice will require more skin to be glued to the holder.
- The LN should lie within the popliteal fossa either to the right or left of the popliteal vein, depending on the placement of the mouse on the holder. Carefully separate the LN from surrounding adipose tissues and muscles using micro-dissecting tweezers and forceps. To minimize bleeding and trauma, use the splaying techniques with micro-dissecting tweezers to separate tissues. Carefully expose the popliteal LN without jeopardizing the integrity of the afferent and efferent blood vessels and the afferent lymphatic vessels.
- For added tissue stability, a square cover glass may be positioned over the moist LN, just barely touching the LN while avoiding vessel occlusion. The cover glass may be secured with modeling clay on either side of the mouse.
- Fluorescent vessel dyes of various sizes (e.g. TRITC-dextran, minimum of 70kDa) may be introduced intravenously at this point to help highlight the structural relationship and integrity of the LN during imaging.
4. 2-Photon Imaging Acquisition**
- Once the LN is adequately exposed and the stability is achieved, promptly transfer the entire mouse holder assembly onto the microscope stage fitted with a programmable temperature feedback controlled heating pad in an environmental microscope chamber kept at 37°C. Add enough sterile warm (37°C) PBS or HBSS to submerge the LN. The volume will change depending on the size and placement of the mouse. Alternatively, warm PBS or HBSS may be applied directly to the dissected LN through a fine glass pipette fitted to a peristaltic pump and taped to the column of the immersion lens objective. The flow of the liquid should be such that a stable water column can be maintained between the lens and the tissue.
- Maintain the PBS or HBSS temperature at 37°C using a heating pad with a feedback probe. A separate temperature probe should be placed in the mouse holder to confirm the temperature of the PBS in the range of 36.5 to 37.5°C. A rectal probe may also be used to monitor core body temperature of the experimental mouse throughout the imaging session.
- Use an epi-fluorescent lamp to help guide LN placement under the objective. Acquire fluorescent image stacks using time intervals that are appropriate for the desired cellular interaction (typically 10 seconds to 1 minute in between each xyz image stack).
- Monitor the status of the animal in the microscope chamber frequently by visual inspection or by using an animal monitoring system. Determine if the mouse is fully anesthetized by the lack of response to toe and/or nail pinches, and a steady, non-labored respiratory rate between 60-80 breaths/min. The level of isoflurane may be adjusted accordingly to ensure that the animal is fully sedated. With proper monitoring and hydration, animals can be imaged for 4-6 hours, or possibly longer.
- After the imaging experiment, euthanize the animal in a CO2 chamber using IACUC-approved euthanasia protocol. The animal should not be allowed to emerge from anesthesia prior to euthanasia.
** This surgical procedure may also be useful for other forms of intravital imaging other than 2P-LSM.
5. Representative Results
Various circulating immune cells are recruited to the LN at different rates following adoptive transfer. For CD4+ and CD8+ lymphocytes, these cells begin to arrive in the LN through the high endothelial venule (HEV) minutes after i.v. transfer with substantial numbers arriving in the popliteal LN after 2 to 4 hours6,17-18. For B cells, a substantial number will accumulate after 8 to 24 hours19. Activated DCs should start to appear in the draining popliteal LN 8 to 16 hours following footpad injection3,11,16-17. Figure 2a shows that even without other landmarks, structures such as B cell follicles can be discerned easily by the round spherical cell accumulation visible under 2P-LSM19. Using an endogenous fluorescent reporter such as the ubiquitin-GFP splenocytes (Figure 2, Supplemental Videos 1 and 2), one can track these lymphocyte migrations and behaviors for days up to a week under non-stimulatory physiologic conditions. With multi-channel high sensitivity detectors, it is possible to acquire a multiplex imaging dataset that encompasses structural information as well as interaction dynamics among multiple cellular partners17,19.
When the surgical techniques are properly executed and the environmental conditions carefully monitored, lymphocytes should exhibit characteristic migration speed, as demonstrated in Figure 2c, 2d and elsewhere13-14,16. Lymphocytes may also exhibit differences in migration speed depending on the sub-regions of the LN undergoing imaging, so additional landmarks such as blood vessels (as highlighted by the introduction of vessel dyes) will help to determine the overall imaging quality (i.e. proper temperature control, minimal trauma to LN, etc.)3,6,20.

Figure 1. Construction of a mouse holder for mouse popliteal LN Imaging. a) Schematics of mouse holder assembly; b) Representative intravital mouse preparation; c) Completed mouse holder assembly; d) Close-up views of the popliteal LN after surgical exposure.
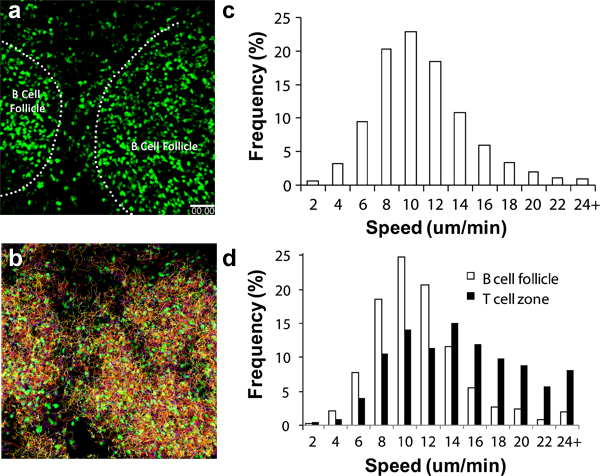
Figure 2. Migration analysis of GFP+ lymphocytes in the popliteal LN. (a) 3D snapshot taken from 2P-LSM imaging sequence of the popliteal LN in a C57BL/6 recipient mouse adoptively transferred with 1x10⁷ GFP+ lymphocytes 1 day prior to imaging. Dash line denotes the border of B cell follicles; (b) Tracks of lymphocyte migration during 1 hour of continuous imaging; c) Distribution of overall lymphocyte migration speed. Mean speed = 10.04 ± 4.26 μm/min (total of 15,125 tracks analyzed); d) Differential cellular migration speed distribution of cells found in the B cell follicle (open bars; mean speed = 8.79 ± 3.90 μm/min; total 1,525 tracks analyzed) and T cell zone (closed bars; mean speed = 13.77 ± 5.93 μm/min; total of 1,250 tracks analyzed). Scale bar = 50 μm.
Supplemental Video 1. Time-lapse intravital 2P-LSM imaging of a mouse popliteal LN as described in Figure 2. A total of 1x10⁷ lymphocytes were isolated from an ubiquitin-GFP+ donor mouse and adoptively transferred intravenously into a C57BL/6 recipient mouse 24 hours before imaging. A series of xy (750 μm x 750 μm) fluorescence images were taken through fixed z stacks (5 μm steps, 13 steps) to yield an xyz imaging stack (750 μm x 750 μm x 65 μm), which was repeated every 20 seconds for a total of 60 minutes, resulting in an xyzt imaging sequence for speed analysis (Figures 2c, 2d). Playback speed = 450x. Scale bar = 50 μm. Time stamp = min:sec. Click here to watch supplemental video.
Supplemental Video 2. Zoomed-in view of the imaging sequence in Supplemental Video 1 at the B cell follicle - T cell zone border. Playback speed = 450x. Scale bar = 25 μm. Time stamp = min: sec. Click here to watch supplemental video.
Discussion
Loading...
$$\rightleftharpoonup{xx}$$
$$\longleftharp{xx}$$,
$$\longrightharp{xx}$$,
Recent advances in high-resolution in situ imaging techniques, especially 2P-LSM, have been accompanied by a growing interest in the study of dynamic cellular behavior in vivo. The 4D imaging technique on the popliteal LN of a live mouse allows such analyses in the dynamic behavior of immune cells within the undisrupted tissue micro-environment. The use of 2P-LSM with multiple detectors spanning the entire visible spectrum permits simultaneous imaging data collection of multiple cell populations. This can now be achieved through the use of in vivo cell-specific fluorescent reporter mice (e.g. Ubiquitin-eGFP, -RFP, or -eCFP) combined with the use of adoptive transfer of differentially labeled cell populations using organic fluorescent cell dyes (e.g. CFSE, SNARF-1, and Cell Tracker Orange) to examine cellular mechanisms and function within the LN. In addition to the direct observation of interactions between differentially tracked cell populations, the multiplex imaging dataset can undergo further analysis with commercially available imaging processing software programs (e.g. Imaris, BitPlane Inc.) to further elucidate cell behavior and function. A broad array of possibilities exists to study cellular interaction mechanisms using these in vivo and in silico techniques.
The main limitation of the experimental approach described here is the technical complexity inherent in the surgery approach. This technique requires rigorous training to become familiar with the relevant anatomy and the precise technical procedures and skills as required by this protocol. Further complicating factors include the difficulty in minimizing tissue damage during LN exploration, optimizing tissue stability during imaging, and preventing thermal and laser injury to the LN before and during imaging experimentation. Perturbation to any of these factors will result in less-than-optimal lymphocyte motility and will therefore interfere with proper interpretation of resulting imaging data analyses.
Disclosures
Loading...
$$\rightleftharpoonup{xx}$$
$$\longleftharp{xx}$$,
$$\longrightharp{xx}$$,
The authors do not have anything to disclose.
Acknowledgements
Loading...
$$\rightleftharpoonup{xx}$$
$$\longleftharp{xx}$$,
$$\longrightharp{xx}$$,
This work is supported by grants from NCI 1R01CA154656 , NIAID 1R21AI092299, Cancer Research Institute, St. Baldrick's Foundation, Dana Foundation, Gabrielle's Angel Foundation, and Hyundai Motors of America "Hope-on-Wheels" Program.
Materials
| Name | Company | Catalog Number | Comments |
|---|---|---|---|
| Isoflurane, USP | Baxter Internationl Inc. | NDC 10019-773-60 | |
| Vetbond | 3M | 1469SB | |
| Nair - hair removal lotion | Nair | ||
| PBS, 1X | Cellgro | 21-040-CV | |
| Heating pad | Watlow | ||
| Heating Pad Controller | Watlow | ||
| Air and O2 | Airgas | ||
| Temperature probe | Harvard Apparatus | ||
| Tweezers Dumont #5 | World Precision Instruments, Inc. | 14101 | |
| Forceps, Graefe Iris, 7 cm curved | World Precision Instruments, Inc. | 14141 | |
| Scissors | Roboz Surgical Instruments Co. | RS-5880 | |
| Cover of 100x20 mm glass cell culture dish | Corning | 70165-102 | |
| Cover of 100x20 mm polystyrene cell culture dish | Corning | 430167 | |
| Betadine Solution (10% Povidine-Iodine Topical Solution) | Purdue Products L.P. | NDC 67618-150-08 |
References
Loading...
$$\rightleftharpoonup{xx}$$
$$\longleftharp{xx}$$,
$$\longrightharp{xx}$$,
- Bousso, P. T-Cell activation by dendritic cells in the lymph node: lessons from the movies. Nat. Rev. Immunol. 8, 675-684 (2008).
- Germain, R. N. Making friends in out-of-the-way places: how cells of the immune system get together and how they conduct their business as revealed by intravital imaging. Immunol. Rev. 221, 163-181 (2008).
- Huang, A. Illuminating the landscape of in vivo immunity: insights from dynamic in situ imaging of secondary lymphoid tissues. Immunity. 21, 331-339 (2004).
- Stefanova, I. Self-recognition promotes the foreign antigen sensitivity of naive T lymphocytes. Nature. 420, 429-434 (2002).
- Stefanova, I. On the role of self-recognition in T cell responses to foreign antigen. Immunol. Rev. 191, 97-106 (2003).
- Bajenoff, M. Fibroblastic reticular cells guide T lymphocyte entry into and migration within the splenic T cell zone. J. Immunol. 181, 3947-3954 (2008).
- Celli, S. Decoding the dynamics of T cell-dendritic cell interactions in vivo. Immunol. Rev. 221, 182-187 (2008).
- Mempel, T. R., Junt, T., von Andrian, U. H. Rulers over randomness: stroma cells guide lymphocyte migration in lymph nodes. Immunity. 25, 867-869 (2006).
- Worbs, T. CCR7 ligands stimulate the intranodal motility of T lymphocytes in vivo. J. Exp. Med. 204 (3), 489-495 (2007).
- Bajenoff, M. byways and breadcrumbs: directing lymphocyte traffic in the lymph node. Trends Immunol. 28, 346-352 (2007).
- Mempel, T. R. T-cell priming by dendritic cells in lymph nodes occurs in three distinct phases. Nature. 427, 154-159 (2004).
- Mempel, T. R. In vivo imaging of leukocyte trafficking in blood vessels and tissues. Curr. Opin. Immunol. 16, 406-417 (2004).
- Miller, M. J. Autonomous T cell trafficking examined in vivo with intravital two-photon microscopy. Proc. Natl. Acad. Sci. U. S. A. 100, 2604-2609 (2003).
- Sumen, C., Mempel, T. R., Mazo, I. B., von Andrian, U. H. Intravital microscopy: visualizing immunity in context. Immunity. 21, 315-329 (2004).
- von Andrian, U. H., Mempel, T. R. Homing and cellular traffic in lymph nodes. Nat. Rev. Immunol. 3, 867-878 (2003).
- Bousso, P., Robey, E. Dynamics of CD8+ T cell priming by dendritic cells in intact lymph nodes. Nat. Immunol. 4, 579-585 (2003).
- Castellino, F. Chemokines enhance immunity by guiding naive CD8+ T cells to sites of CD4+ T cell-dendritic cell interaction. Nature. 440, 890-895 (2006).
- Halin, C. In vivo imaging of lymphocyte trafficking. Annu. Rev. Cell Dev. Biol. 21, 581-603 (2005).
- Qi, H. Extrafollicular activation of lymph node B cells by antigen-bearing dendritic cells. Science. 312, 1672-1676 (2006).
- Germain, R. N. An extended vision for dynamic high-resolution intravital immune imaging. Semin. Immunol. 17, 431-441 (2005).
Reprints and Permissions
Request permission to reuse the text or figures of this JoVE article
Request Permission