

Summary
Intravital microscopy is a powerful tool that enables imaging various biological processes in live animals. In this article, we present a detailed method for imaging the dynamics of subcellular structures, such as the secretory granules, in the salivary glands of live mice.
Abstract
Here we describe a procedure to image subcellular structures in live rodents that is based on the use of confocal intravital microscopy. As a model organ, we use the salivary glands of live mice since they provide several advantages. First, they can be easily exposed to enable access to the optics, and stabilized to facilitate the reduction of the motion artifacts due to heartbeat and respiration. This significantly facilitates imaging and tracking small subcellular structures. Second, most of the cell populations of the salivary glands are accessible from the surface of the organ. This permits the use of confocal microscopy that has a higher spatial resolution than other techniques that have been used for in vivo imaging, such as two-photon microscopy. Finally, salivary glands can be easily manipulated pharmacologically and genetically, thus providing a robust system to investigate biological processes at a molecular level.
In this study we focus on a protocol designed to follow the kinetics of the exocytosis of secretory granules in acinar cells and the dynamics of the apical plasma membrane where the secretory granules fuse upon stimulation of the beta-adrenergic receptors. Specifically, we used a transgenic mouse that co-expresses cytosolic GFP and a membrane-targeted peptide fused with the fluorescent protein tandem-Tomato. However, the procedures that we used to stabilize and image the salivary glands can be extended to other mouse models and coupled to other approaches to label in vivo cellular components, enabling the visualization of various subcellular structures, such as endosomes, lysosomes, mitochondria, and the actin cytoskeleton.
Introduction
In the past two decades the advent of live microscopy and the use of fluorescent proteins have led to major breakthroughs on every cellular process imaginable, thus advancing our understanding of cell biology 1. This field has benefited tremendously from the use of mammalian cell cultures that are extremely powerful model systems, particularly when it comes to experimental manipulations. However, they do not often provide a true representation of the biology of complex multicellular organisms 2. This issue has begun to be addressed by the development of intravital microscopy (IVM) that has opened the door to investigating key biological questions in fields such as neurobiology, immunology and tumor biology 3. So far, most of the studies based on IVM have been performed at the levels of tissues and individual cells, without providing any information about the dynamics of subcellular compartments. Recently, our laboratory and others have developed IVM techniques capable of imaging subcellular structures in live rodents 4-7, 13-15 and allowing pharmacological and genetic manipulations in vivo. This approach has been used by us to study membrane trafficking in vivo, and more specifically endocytosis and regulated exocytosis 6,7.
Our experimental model system is based on exposing, stabilizing and imaging the submandibular salivary glands (SGs) of anesthetized rodents. The choice of the SGs as a model organ for IVM is due to the fact that the glands are easily accessible by performing a minor surgery, can be externalized without compromising their physiology, and stabilized to reduce the motion artifacts due to heartbeat and respiration. In addition, SGs can be selectively manipulated genetically by injecting either viral or non-viral based vectors through the salivary duct 8,9. Finally, SGs are exocrine glands composed of polarized epithelial cells, which form the acini and the ducts, myoepithelial cells, and a complex population of stromal cells. For this reason, they are an excellent model to study exocytosis, endocytosis, gene delivery, and actin cytoskeleton, as highlighted in our recent studies 10, and offer the opportunity to study aspects of cell biology such as cell polarity, cell division, cell-cell junctions, and ion channels.
In this paper we describe in detail an imaging protocol for achieving subcellular resolution in the epithelium of the SGs of a live mouse. Specifically, we show how to image the secretory granules in the acinar cells of the SGs during regulated exocytosis. As previously shown, upon stimulation with agonists of the beta-adrenergic receptor, the secretory granules fuse with the apical plasma membrane and gradually collapse, releasing their content into the acinar canaliculi 6. Our goal is to provide the basic tools to investigators with minimal experience in surgical procedures and animal handling, so that they can successfully perform IVM at a subcellular resolution. Since the most challenging part in IVM is the preparation of the animal, here we focus on the description of the basic surgical procedures that are utilized to expose and immobilize the SGs without compromising their function. As for the procedures to label subcellular structures, several strategies, such as systemic delivery of fluorescent probes, use of transgenic animals, or a combination of both, have been described elsewhere 7,11.
Subscription Required. Please recommend JoVE to your librarian.
Protocol
Part 1: Microscope and Preparation of the Imaging Setup
- Any inverted confocal microscope should be suitable for IVM. In this study an Olympus IX81 inverted microscope, equipped with a Fluoview-1000 laser scanning confocal unit was used. To achieve the best possible resolution, the use of high NA objectives, such as the water-immersion UPLSAPO 60x/1.20 NA, and the oil immersion Plan-Apo 60x/1.42 NA is recommended. Oil immersion objectives have higher collection efficiencies and although they require the use of a coverslip between the tissue and the objective, they provide a better imaging quality when used to image areas within 15-20 μm from the surface. Additionally, the use of oil eliminates the concern for water evaporation during longer imaging sessions. In order to maintain the temperature and humidity, the microscope should be fully enclosed and supplied with warm and humidified air. Alternatively, the animal, the microscope stage, and the objective must be warmed by other means. For example, chemical heat pads can be used for the animal and the stage, and specifically designed objective heaters can be used for the objective (Figure 1A). The objective heater should be switched on 30 min before starting the procedure. Note: when the heat pads are use to keep the animal warm a gauze has to place in between the pad and the skin. The skin has to be monitored for burns.
- The standard stages in most of the commercially available confocal microscopes have an opening that is used to insert various holders that are used to fit slides, Petri dishes, and plates of different sizes. In order to perform IVM, a standard stage insert for 35 mm Petri dishes is inverted upside down, covered with a 40 mm glass slide, which is then secured by high vacuum silicone grease or masking tape (Figure 1A). A custom insert can also be manufactured from 3 mm thick aluminum plate. The glass surface is then cleaned with 70% ethanol and swiped with a Kimwipe.
- Manufacture a customized holder for the SGs immobilization (stabilizer). The purpose of the holder is to stabilize the SGs in place and rigidly couple them to the stage and the coverslip. The holder can be made from a 60 mm plastic Petri dish. First, the bottom of the dish is broken away from the walls and cut into rectangles of about 15 x 10 mm. Then, the edges are rounded and polished by using fine sandpaper. Four spacers (1.5-2 mm) are built by removing the rubber tips of 1 ml syringe plungers. By using fine sandpaper, the surface of the spacers and the four corners of the plastic piece are polished. The spacers are then glued by using gelatinous superglue, and later smoothed using fine sandpaper on a flat surface. Note, that for older animals, the size of the holders and the spacers may have to be increased to accommodate slightly larger glands.
- Preparation of the optical coupling gel. 0.3% Carbomer-940 (Table 2) gel is prepared by warming up 100 ml of ultra-pure water and dissolving 5.47 g of D-Sorbitol. Then, 0.3 g of Carbomer-940 are added. The beaker should be covered and placed on a stirring hot plate (lowest heat setting) for several hours or until all the carbomer clumps are completely dissolved. Lastly, Trietanolamine is added drop-wise while gently stirring, until a pH of about 7.4 is reached. The gel is stored at 4 °C 13.
Part 2: Animals and Anesthesia
- Before conducting any experiments with animals, the protocols should be approved by your local animal care and ethics committee. Importantly, researchers should be properly trained to perform surgical procedures and should consult with their local animal care committee or institution veterinarian before proceeding with the procedure.
- In this study, a mouse model (GFP/mTomato-mouse) derived by crossing FVB mice expressing soluble GFP (GFP-mouse) with C57B6 mice expressing a membrane-targeted peptide fused with the fluorescent protein tandem-Tomato (mTomato-mouse) 6 was used. Note: it usually take 20-30 min for the animal to become fully anesthetized and prepped for imaging
- Mice are housed in a controlled environment in the animal facility and are allowed to acclimate for one week prior to the experiment. This step is necessary for imaging the SGs since any distress results in enhanced secretory activity12. Water and food are provided ad libitum. Males from 2 -5 months old are used for imaging experiments (20-30 g).
- Prior to anesthesia, weigh the animals to determine the proper dose of anesthetic.
- Since the stress induced by administration of injectable anesthetics may impair the secretory activity of the SGs, induce pre-anesthesia by isoflurane inhalation, followed by the injection of anesthetics. To this aim, place the mice very gently into the vaporizer chamber, and turn on the oxygen flow (800-900 mmHg). Set the isoflurane levels to 3% to start the pre-anesthesia induction.
- Once the animals are unconscious, inject a mixture of 100 mg/kg ketamine and 20 mg/kg xylazine into the peritoneal cavity (25 G needle). Anesthetics are freshly prepared by diluting 100 mg/ml xylazine to 20 mg/ml in saline and then mixing it with the ketamine. This mixture is further diluted 1:1 with saline and an appropriate amount is injected based on the animal weight. This dilution helps in preventing accidental overdose. Note that the mixture loses its effectiveness after 20 min.
- Observe the animals for signs of wakefulness and inject more anesthetic mixture if they are coming out of anesthesia (approximately 75% of the initial dose within 45 min after the first injection, and 50% every hour thereafter). Check the depth of the anesthesia every 15 min by pinching the paw and observing the response. Note: Always administer ophthalmic ointment to prevent eye dryness.
- Anesthetics induce hypothermia, which can affect the reproducibility of the experiments and the health of the animal. Therefore, mice should be kept under the heat lamp or on a heated pad for the entire duration of the experiment. Note: the heat lamp should be at least 12-18 inches from the animal to prevent burning
- The body temperature of the animals has to be monitored with a thermometer equipped with a rectal temperature probe.
Part 3: Animal Surgery and Positioning for Intravital Microscopy
- Prepare the workspace with all the surgical instruments (Table 1) that should be clean and sterile.
- Shave the neck area of the mouse with an electric clipper. Wipe down the ventral side of the neck area of the anesthetized mouse with a gauze sponge soaked in 70% ethanol. Dry the excess with a Kimwipe.
- With dull curved tweezers lift up a small piece of skin at the midline (approximately at the lower end of the masseter muscles), and make a small incision (Figure 1B).
- Insert the scissors into the opening and separate the skin away from the underlying tissue by opening the scissor blades. Avoid damaging the underlying glandular tissue by pointing the scissors up towards the underside of the skin. Repeat this step several times until the skin is separated from the deeper tissues (Figure 1B).
- Using scissors, cut out a strip of loosened skin about 3 mm wide and 10 mm long. The skin should be cut so that the opening starts near the base of the SGs where the nerve, the duct and the blood vessels connect the gland to the rest of the body. After cleaning the wound area, the resultant opening will be oval in shape and measure roughly 8 x 12 mm. Both SGs will be visible after the opening (Figure 1B).
- With a syringe apply the optical coupling gel into the middle of the cut and wipe it towards the outside with sterile gauze. Clean pieces of gauze should be used for each wipe to prevent introduction of hair or blood into the exposed tissue. Repeat this step until all blood and loose hair is removed.
- Using #7 tweezers, separate the connective tissue away from right submandibular gland all the way to the base of the gland (alternatively this protocol can be used on the left SGs). First, find the tip of the SG and grab the connective tissue a few millimeters above the tip of the gland. Tear the connective tissue around the gland without injuring the parenchyma. (Figure 1B). Once the gland is exposed, gently separate the connective tissue from the gland. If bleeding occurs, wash the blood away with saline. Make sure that all the connective tissues are separated and the gland is fully exposed. Keep the gland moist by applying optical coupling gel regularly.
- Prior to bringing the animal to the microscope, place a thick piece of gauze and the heat pack onto the microscope stage to maintain a temperature of 38 ± 2 °C. The temperature of the chemical heat pack can be adjusted by the size of the cuts that expose the inner pouch to the atmosphere. Gauze provides some insulation of the heat pack from the metal stage. Cover the top of the heat pack with a thin piece of gauze as well.
- Place the animal on its side (right side for the right gland) and onto the gauze. Position the animal with the submandibular salivary gland placed in the middle of the coverslip (Figure 1C).
- The animal should be secured and stabilized in this position before immobilizing the gland. Place a piece of masking tape on the ventral side of the front right paw of the mouse. Hook the incisors of the mouse by a silk suture (Figure 1C, inset). Create some tension between the silk thread and the paw and attach them onto the stage by masking tape. The SG should be resting naturally in the middle of the coverslip. The head and the thorax should be additionally stabilized by plastic wedges that can be coupled to the stage.
- Place a small piece of lens cleaning tissue over the gland (Figure 1C). Extend the gland slightly and place a customized holder over the gland. Tightly couple the stabilizer to the stage with masking tape. Coupling can be improved by a metal clamp connected to the stage (Figure 1C). Tension and sharp angles should be avoided as they may compromise the blood flow. Immediately after the stabilization inspect the blood flow either by examining the gland visually (it should retain pink coloration) or by epifluorescence. In the GFP/m-tomato mouse, gross alterations of the blood flow can be easily evaluated since both the blood vessels and several of the blood cells are labeled with the m-Tomato.
- Cover the animal with gauze and a heated pad. Measure the temperature of the exposed gland by using a thermometer equipped with a small flexible thermocouple probe placed in contact with one side of the exposed gland.
Part 4: Imaging Parameters
- Using epifluorescence illumination focus on the surface of the gland by either using the GFP or the RFP filter set. Find the surface of the SG, and assess the blood flow in the capillaries and the overall morphology of the tissue. Signs of tissue damage include membrane blebbing or the appearance of large vacuoles.
- Assess the stability of the tissue either via epifluorescence or by pre-scanning the selected area. A stable preparation is essential, since most of the motion artifacts cannot be removed or corrected for in post-processing data analysis. If the preparation is not stable, adjustments are required.
- To find the proper focal plane image the glands in pre-scanning mode (1X zoom), and gradually move the objective towards the coverslip until the acinar structures, the secretory granules and the plasma membrane become clearly visible (Figure 2).
- The imaging parameters for the time-lapse depend on the individual experiment. To image the dynamics of the secretory granules use a scan speed of 0.5-2 sec/frame, and 256 x 256 pixels with a 0.2 μm/pixel spatial scale (field of view of approximately 50 μm x 50 μm). In order to optimally visualize the granules and the plasma membrane, the optical thickness should be set between 0.9-1.2 μm. To excite the GFP and the tandem-Tomato, one may use a wavelength of 488 nm and 561 nm, respectively. The peak power is set around 0.5 mW for the 488 nm and 1 mW for the 561 nm. This ensures minimal photobleaching.
- The detector settings have to be adjusted to maintain the signal within the dynamic range and depend on the brightness of the specimen.
- Once all the parameters are set, imaging can be started. First, take a snapshot of the field of view to be used as a reference point. While imaging in time lapse, drifting of the tissue in XY and Z may occur. This can be manually compensated by adjusting the scan area and the Z position. The adjustments should be made gradually and by small increments to avoid artifacts. Moreover, the reference image can be used to determine whether photobleaching occurs. If significant photobleaching is detected (more than 15-20% reduction in fluorescence), reduce the laser power by 0.1 mW.
- To stimulate exocytosis, inject subcutaneously 0.1 mg/kg of a freshly prepared solution of isoproterenol in saline. Exocytosis is triggered approximately 1 minute after the injection. Secretory granules fusing with the plasma membrane will be detected by an increase of GFP fluorescence around the granules and the diffusion of the tandem-Tomato peptides into their limiting membranes (Figure 3). We recommend acquiring 3-4 time-lapse sequences in the same area, 10 min each.
- After the imaging session, euthanize the anesthetized animal by CO2 inhalation in a euthanasia chamber (10-12 mmHg for 10 min).
Subscription Required. Please recommend JoVE to your librarian.
Representative Results
In the GFP/mTomato mouse, the acini appear as clearly distinct structures, which express cytosolic GFP and membrane-targeted tandem-Tomato peptide (Figure 2, broken line). In individual acini, acinar cells are delineated by the tandem-Tomato peptide. GFP is also detected in the nuclei that are clearly visible inside the acinar cells (Figure 2, arrows). Cytosolic GFP is excluded from the secretory granules that appear as dark circular vesicles of approximately 1-1.5 μm in diameter (Figure 2, inset, arrowheads). To visualize exocytic events, we focus on one area of the plasma membrane that is enriched in secretory granules (Figure 3, asterisk). After the subcutaneous injection of 0.1 mg/kg isoproterenol, we observe an increase in the levels of GFP fluorescence around some of the secretory granules that are in close proximity to the plasma membrane (Figure 3, green arrows). As previously shown, these granules are fused with the plasma membrane and recruit a thick actin meshwork that retains the cytoplasmic GFP 6. In addition, after fusion with the plasma membrane, the tandem-Tomato peptide diffuses into the limiting membranes of the secretory granules (Figure 3, red arrows). After 30-40 sec the secretory granules gradually collapse and their limiting membranes are integrated into the apical plasma membrane.

Figure 1. Microscope set up, surgical procedures, and animal positioning. A. A stage insert designed to hold 35 mm Petri dishes is covered with a 40 mm coverslip. The insert is placed in the microscope stage that is pre-warmed with heated pads (orange ovals) and a heated lamp. The objective is pre-heated with an objective heater (temperature set: 38 °C). B. Surgical procedures to expose the salivary glands. Using clean scissors, an incision is made in the skin above the neck area. The scissors are inserted in the opening to separate the skin from the underlying tissue. The skin is then removed, and the connective tissue is gently peeled from one of the glands using tweezers. C. The animal is placed on its side on the pre-heated stage and the gland is gently pulled and placed in the middle of the coverslip. The incisors are hooked to the stage with silk thread (inset). A small piece of lens cleaning tissue is sandwiched between the gland and the organ holder. The organ holder is then stabilized with a clamp that is secured on the stage with masking tape (green).
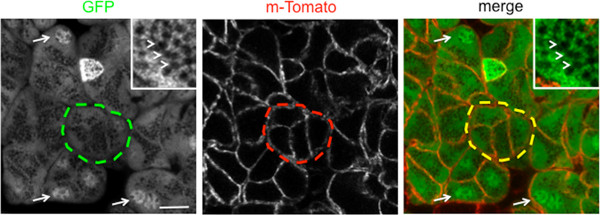
Figure 2. Representative image of an imaging area of the salivary glands of a live GFP/mTomato mouse. Acini are nicely highlighted in the GFP channel (green broken line). Single cells are delineated by the td-Tomato peptide that is localized at the plasma membrane (red broken line). The GFP is localized in the cytoplasm and the nuclei (arrows), but excluded from the secretory granules (inset, arrowheads). Bar, 10 μm.

Figure 3. Representative time sequence showing the exocytosis of secretory granules upon injection of 0.1 mg/kg of isoproterenol. Secretory granules were imaged close to the plasma membrane (asterisk). After fusion with the plasma membrane, the levels of GFP around the secretory granules significantly increase (green arrows), and the td-Tomato peptide diffuses into their limiting membranes (red arrows). The secretory granules slowly collapse and their membranes are integrated into the apical plasma membrane. Bar, 5 μm.
Table 1. Materials
Table 2. Instruments
Subscription Required. Please recommend JoVE to your librarian.
Discussion
So far subcellular structures have been imaged mostly in in vitro (i.e. cell cultures) or in ex vivo (i.e. organ-cultures, tissue slices, acinar preparations) model systems that often do not recapitulate the characteristics of intact live tissues 6. In this respect, the approach presented here represents a major breakthrough since it enables imaging the dynamics of a specific membrane trafficking step (i.e. regulated exocytosis) in living mice.
This protocol represents a significant advancement with respects to other procedures designed for the in vivo imaging of SGs or other organs in the body cavity 10,11,13-15. Some of our previous studies were performed in rats that are more resilient to surgical procedures, have bigger organs, and a reduced heart rate when compared to mice. Although, the procedures in mice are harder to set up, they provide several advantages including the possibility to use a broader spectrum of disease models, transgenic and knockout animals. In addition, this approach successfully minimized the motion artifacts, providing a better control over the pressure applied onto the exposed organs thus reducing the risks of: i) reducing the blood flow, ii) damaging the tissue architecture, and iii) impairing the normal function of the organ. This is a major concern that we solved by eliminating the constraint generated by the organ holder and introducing a stabilizer 10,11.
One of the most critical steps in this protocol is to maintain the proper temperature both in the animal and in the exposed organ. Indeed, anesthesia induces severe hypothermia and maintaining the appropriate body temperature significantly reduces the chances of death before completion of the experiment. Moreover, the exposed organ rapidly exchanges heat with the external environment during both the surgical procedures and the imaging. Since the local reduction of temperature severely slow down the kinetics of the exocytic steps, it is crucial to prevent it by using the heat lamp, the objective heater, and by keeping the gland moist with either the coupling gel or warm saline. Full enclosure of the microscope with an environmental chamber is also good solution for controlling the temperature. Another critical step is to achieve the appropriate balance between stabilization and maintenance of the blood flow. Indeed, in a preparation that is not properly stabilized, it is very difficult to follow the kinetics of the secretory granules whose sizes are in the micron range. On the other hand, the reduction of the blood supply results in the formation of large vacuoles or a significant inhibition of regulated exocytosis. To achieve this balance it is important to constantly monitor the blood flow and check for signs of cellular damage while applying the pressure to stabilize the organ.
The two main limitations of this protocol are the speed of acquisition and the depth of imaging. Although galvanometer-based confocal microscopes have enough temporal resolution to visualize the gradual collapse of the secretory granules, they do not allow following pre-fusion and fusion events that occur on the order of milliseconds. This aspect can be improved with the use of spinning disk microscopes or laser scanning microscopes equipped with resonant scanners. In terms of depth, confocal microscopy limits the acquisition to the first 30-50 μm below the surface of the salivary glands. This enables imaging 1 layer of acinar structures, and does not allow imaging the salivary ducts. This limitation can be overcome by using two-photon microscopy that ensures imaging up to a depth of 100-150 μm, although at the expense of spatial resolution.
Although for this study we have selected a transgenic mouse that enables simultaneous imaging of the secretory granules and the apical plasma membrane, the procedures described here can be extended to study several other intracellular processes. This can be achieved by using fluorescently tagged molecules that label specific cellular structures and can be administered either systemically or directly onto the SGs. Alternatively, new transgenic mouse models expressing fluorescently tagged-molecules have been developed, such as the glucose transport Glut4, the F-actin marker LifeAct, the nuclear marker histone 2B mouse, and the autophagy marker LC3-GFP. Finally, the basic strategy we have developed to immobilize and image the SGs at high resolution can be potentially extended to other organs (e.g. pancreas, liver, kidney, and mammary glands) by introducing few modifications in the size or the shape of the stabilizer.
Subscription Required. Please recommend JoVE to your librarian.
Acknowledgments
This research was supported by the Intramural Research Program of the NIH, National Institute of Dental and Craniofacial Research.
Materials
| Name | Company | Catalog Number | Comments |
| Reagent | |||
| Isoflourane (Forane) | Baxter | 101936-40 | Handle under chemical hood |
| Ketamine (ketaved) | Fort Dodge Animal Health | 57457-034-10 | Stock solution 100 mg/ml |
| Xylazine (Anased) | Akorn, Decatur | 61311-481-10 | Stock solution 100 mg/ml |
| Neomycin/Polymyxin B | Bausch and Lomb | 24208-785-55 | Use to lubricate the eye of the mouse |
| Carbomer-940 | Ashalnd, Inc. | 4607-1 | |
| D-Sorbitol | Sigma-Aldrich | S1876 | |
| Triethanolamine | Sigma-Aldrich | 90279 | Add drop wise to prevent the solution to solidify |
| Isoproternol | Sigma-Aldrich | 16504 | Prepare fresh solutions in saline when needed. Stocks can be stored at -20 °C |
| Instrument | |||
| Isoflurane V 1.9 (Vaporizer) | Braintree Scientific | 190AF | |
| Portable Downdraft table equipped with HEPA filter | Hazard Technology | PDDT | |
| Heat lamp, Model HL1 | Braintree Scientific | HL-1 US | |
| MicroTherma 2T Thermometer | Braintree Scientific | TW2 | |
| Operating Scissors (11.5 cm straight | World Precision Instruments | 5003708-12 | |
| #7 curved tip tweezers | World Precision Instruments | 14187 | |
| Microscissors | World Precision Instruments | 503365 | |
| Black Braided Silk suture #4.0 | George Tiemann Co | 160-1219-4 | |
| Gauze sponges 2" x 2" | Tyco Healthcare | 9022 | |
| Lens cleaning tissue | Olympus | CL-TISSUE (M97) AX6476 | |
References
- Lippincott-Schwartz, J. Emerging in vivo analyses of cell function using fluorescence imaging (*). Annu Rev Biochem. 80, 327-332 (2011).
- Cukierman, E., Pankov, R., Stevens, D. R., Yamada, K. M. Taking cell-matrix adhesions to the third dimension. Science. 294, 1708-1712 (2001).
- Weigert, R., Sramkova, M., Parente, L., Amornphimoltham, P., Masedunskas, A. Intravital microscopy: a novel tool to study cell biology in living animals. Histochem Cell Biol. 133, 481-491 (2010).
- Dunn, K. W., et al. Functional studies of the kidney of living animals using multicolor two-photon microscopy. Am. J. Physiol. Cell Physiol. 283, C905-C916 (2002).
- Masedunskas, A., Porat-Shliom, N., Weigert, R. Regulated exocytosis: novel insights from intravital microscopy. Traffic. 13, 627-634 (2012).
- Masedunskas, A., et al. Role for the actomyosin complex in regulated exocytosis revealed by intravital microscopy. Proc. Natl. Acad. Sci. U.S.A. 108, 13552-13557 (2011).
- Masedunskas, A., Weigert, R. Intravital two-photon microscopy for studying the uptake and trafficking of fluorescently conjugated molecules in live rodents. Traffic. 9, 1801-1810 (2008).
- Sramkova, M., Masedunskas, A., Parente, L., Molinolo, A., Weigert, R. Expression of plasmid DNA in the salivary gland epithelium: novel approaches to study dynamic cellular processes in live animals. Am. J. Physiol. Cell Physiol. 297, C1347-C1357 (2009).
- Sramkova, M., et al. Current Frontiers and Perspectives in Cell Biology. Najman, S. , Intech. (2012).
- Masedunskas, A., et al. Everything you need to know about intravital microscopy: A practical guide on imaging intracellular structures in live animals. Bioarchitecture. 2, (2012).
- Masedunskas, A., Sramkova, M., Parente, L., Weigert, R. Intravital microscopy to image membrane trafficking in live rats. Methods Mol. Biol. 931, 153-167 (2013).
- Babbey, C. M., Ryan, J. C., Gill, E. M., Ghabril, M. S., Burch, C. R., Paulman, A., Dunn, K. W. Quantitative intravital microscopy of hepatic transport. Intravital. 1, 44-53 (2012).
- Rothstein, E. C., Nauman, M., Chesnick, S., Balaban, R. S. Multi-photon excitation microscopy in intact animals. J. Microsc. 222, 58-64 (2006).
- Klinger, A., Orzekowsky-Schroeder, R., von Smolinski, D., Blessenohl, M., Schueth, A., Koop, N., Huettmann, G., Gebert, A. Complex morphology and functional dynamics of vital murine intestinal mucosa revealed by autofluorescence 2-photon microscopy. Histochem. Cell Biol. 137, 269-278 (2012).
- Peter, B., Van Waarde, M. A., Vissink, A., s-Gravenmade, E. J., Konings, A. W. Degranulation of rat salivary glands following treatment with receptor-selective agonists. Clin. Exp. Pharmacol. Physiol. 22, 330-336 (1995).
