We describe the combination of focal UV-induced photo-activation of neuro-active compounds with whole-cell patch-clamp and multi-photon imaging of intracellular sodium transients in dendrites and spines of hippocampal neurons in acute tissue slices of the mouse brain.
Method Article
Multi-photon Intracellular Sodium Imaging Combined with UV-mediated Focal Uncaging of Glutamate in CA1 Pyramidal Neurons
* These authors contributed equally
In This Article
Summary
Abstract
Multi-photon fluorescence microscopy has enabled the analysis of morphological and physiological parameters of brain cells in the intact tissue with high spatial and temporal resolution. Combined with electrophysiology, it is widely used to study activity-related calcium signals in small subcellular compartments such as dendrites and dendritic spines. In addition to calcium transients, synaptic activity also induces postsynaptic sodium signals, the properties of which are only marginally understood. Here, we describe a method for combined whole-cell patch-clamp and multi-photon sodium imaging in cellular micro domains of central neurons. Furthermore, we introduce a modified procedure for ultra-violet (UV)-light-induced uncaging of glutamate, which allows reliable and focal activation of glutamate receptors in the tissue. To this end, whole-cell recordings were performed on Cornu Ammonis subdivision 1 (CA1) pyramidal neurons in acute tissue slices of the mouse hippocampus. Neurons were filled with the sodium-sensitive fluorescent dye SBFI through the patch-pipette, and multi-photon excitation of SBFI enabled the visualization of dendrites and adjacent spines. To establish UV-induced focal uncaging, several parameters including light intensity, volume affected by the UV uncaging beam, positioning of the beam as well as concentration of the caged compound were tested and optimized. Our results show that local perfusion with caged glutamate (MNI-Glutamate) and its focal UV-uncaging result in inward currents and sodium transients in dendrites and spines. Time course and amplitude of both inward currents and sodium signals correlate with the duration of the uncaging pulse. Furthermore, our results show that intracellular sodium signals are blocked in the presence of blockers for ionotropic glutamate receptors, demonstrating that they are mediated by sodium influx though this pathway. In summary, our method provides a reliable tool for the investigation of intracellular sodium signals induced by focal receptor activation in intact brain tissue.
Introduction
Recent improvements in light microscopic techniques such as multi-photon microscopy have enabled the study of morphological and physiological parameters of brain cells in the intact tissue with high spatial and temporal resolution. Combined with electrophysiology, these techniques are now widely used to analyze activity-related electrical signals on neurons as well as concomitant calcium signals in small subcellular compartments, namely in fine dendrites and dendritic spines. In addition to calcium transients, synaptic activity also induces sodium signals in dendrites and spines, the properties of which are largely unexplored. Such signals can be analyzed by two-photon imaging of intracellular sodium ([Na+]i) which enables the on-line measurement of [Na+]i transients for prolonged periods without significant dye bleaching or photo-damage1,2.
For imaging of [Na+]i, only a few chemical indicator dyes are available, e.g. CoroNa Green or Asante Natrium Green3,4. The most commonly used fluorescent probe for Na+ imaging is sodium-binding benzofuran isophthalate (SBFI). It is a ratiometric, UV-excited dye similar to the well-known calcium-sensitive dye fura-2 and has been employed for conventional Na+ imaging in many cell types (e.g.5,6). There are different possibilities of exciting the dye and collecting its fluorescence. If high temporal resolution (i.e. a high imaging frame rate) is required in combination with spatial information, SBFI can be excited with a xenon arc lamp or a high power light-emitting diode (LED) device and its emission detected with a high speed charge-coupled device (CCD) camera7,8. For maximal spatial resolution deep in the tissue, multi-photon laser scanning microscopy is the method of choice9. The relatively low quantum efficiency of SBFI necessitates relatively high dye concentrations (0.5 - 2 mM), and direct loading of the membrane-impermeable form of SBFI via a sharp microelectrode10 or patch pipette1.
Using SBFI, earlier work performed in acute tissue slices of the rodent hippocampus demonstrated activity-related sodium transients in dendrites and spines of CA1 pyramidal neurons which are mainly caused by influx of sodium through ionotropic NMDA receptors1,2. For the study of the properties of such local sodium signals in more detail, specific activation of postsynaptic receptors by application of receptor agonists is a well-suited method of choice. To mimic presynaptic activity and transmitter release, application should be relatively brief and focused to enable local stimulation. This, however, proves to be quite challenging in the intact tissue. Local pressure application of receptor agonists using a fine-tipped pipette enables very focal application, but hosts the potential risk for producing movement of the structure of interest (e.g. such as a dendrite or dendritic spines), and thus hinders high-resolution imaging. The suitability of iontophoresis of neuro-active substances depends on their electrical properties and high current amplitudes may produce cellular artifacts as well.
One way to circumvent these obstacles is the employment of photo-activated compounds and their flash photolysis. Basically, two different principles are used for photo-activation of caged substances: I) Wide-field flash photolysis11 and II) focal uncaging employing scanning modules in combination with lasers12. While wide-field flash photolysis is used to activate larger regions of interest, e.g. an entire cell, focal uncaging is employed to specifically stimulate small cellular compartments. In the present study we demonstrate a procedure for whole-cell patch-clamp and multi-photon sodium imaging in dendrites and spines of central neurons, combined with a modified procedure for UV-light-induced uncaging of glutamate, which allows reliable and focal activation of glutamate receptors in the tissue.
Protocol
This study was carried out in strict accordance with the institutional guidelines of the Heinrich Heine University Düsseldorf, Germany, as well as the European Community Council Directive (86/609/EEC). All experiments were communicated to and approved by the Animal Welfare Office at the Animal Care and Use Facility of the Heinrich Heine University Düsseldorf, Germany (institutional act number: O52/05). In accordance with the German Animal Welfare Act (Tierschutzgesetz, Articles 4 and 7), no formal additional approval for the postmortem removal of brain tissue was necessary.
For generation of acute slices, mice were anaesthetized with CO2 and quickly decapitated (following the recommendation of the European Commission published in: Euthanasia of experimental animals, Luxembourg: Office for Official Publications of the European Communities, 1997; ISBN 92–827-9694-9).
1. Preparation of Solutions
- Prepare artificial cerebrospinal fluid (ACSF) for dissection containing (in mM): 125 NaCl, 2.5 KCl, 0.5 CaCl2, 6 MgCl2, 1.25 NaH2PO4, 26 NaHCO3, and 20 glucose, bubbled with 95% O2 and 5% CO2, resulting in a pH of 7.4.
- Prepare ACSF for experiments containing (in mM): 125 NaCl, 2.5 KCl, 2 CaCl2, 1 MgCl2, 1.25 NaH2PO4, 26 NaHCO3, and 20 glucose, bubbled with 95% O2 and 5% CO2, resulting in a pH of 7.4.
- Prepare intracellular solution (ICS) containing (in mM): 150 KMeSO3, 12.5 hydroxy ethyl piperazine ethane sulfonic acid (HEPES), 40 KCl, 5 NaCl, 1.25 ethylene glycol tetraacetic acid (EGTA), 5 Mg-ATP, 0.5 Na-GTP. Adjust pH to 7.3. Store aliquots of 1 ml at -20 °C.
- Dilute sodium-binding benzofuran isophthalate (SBFI)-salt in double-distilled water and prepare aliquots of 5 µl of a 10 mM stock solution.
- Thaw ICS and add SBFI stock solution at a final concentration of 1 mM. Vortex and micro-filtrate (0.22 µm). Keep at 4 °C until used in experiment. Do not refreeze and only use for one day.
- Prepare MNI glutamate stock solution of 50 mM by dissolving the compound in double-distilled water. Dilute MNI glutamate stock solution to a final concentration of 5 mM in normal ACSF. Keep at 4 °C until used in experiment. Do not refreeze and only use for one day. Store aliquots, which are not immediately used in the experiment, at -20 °C.
2. Dissection of Tissue
NOTE: The preparation of acute hippocampal slices of the rodent brain was described in detail earlier13,14. In brief, the following protocol was employed in the present study.
- After decapitation, rapidly remove the brain from the skull.
- Immediately place the brain in a petri dish with ice-cold dissection ACSF and dissect a hemisphere by performing a sagittal cut along the midline.
- Perform a second cut in the desired orientation as a blocking surface and attach this to the cutting stage of a vibratome with superglue.
- Take cutting chamber and cooling element (both kept at -20 °C) of the vibratome out of the freezer and place cutting stage with brain section in the chamber. Then put cooling element in the chamber and submerge tissue in ice-cold dissection ACSF. To stabilize the preparation, one may want to counter the tissue block with agar gel.
- Cut 250 µm thick, parasagittal slices of the hippocampus with the vibratome. Ensure that all ACS fluids are bubbled at all times.
- After slicing, keep tissue on a mesh in a beaker with the normal ACSF and incubate at 34 °C for 30 min. Then keep at room temperature.
3. Preparation of Hardware
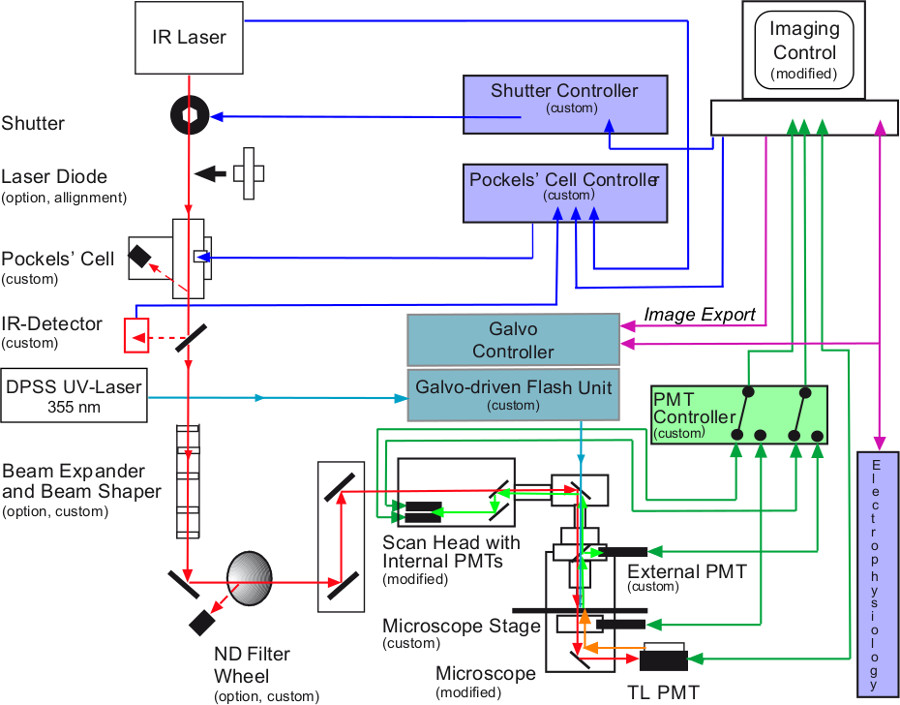
Figure 1. Scheme showing light paths and experimental control of the rig consisting of multi-photon imaging, laser-scanning UV flash photolysis, and electrophysiology. The multi-photon beam (red) is produced by a pulsed, tunable infrared (IR) laser (TiSa). It passes a mechanical shutter, a Pockels’ cell, and the IR detector (detection of beam intensity), all of which enable control of the laser power and its administration duration. The flip-in/flip-out optional laser diode is employed for basic alignment of the laser beam. The beam expander may be used in combination with objectives with an extremely wide back-focal plane. The remote-controlled ND filter wheel may be used in addition or instead of the Pockels’ cell to control laser beam power. After passing the scan head, the pulsed IR-light is guided to the specimen. Emitted fluorescence light (light green) is collected either by the external or the internal photomultiplier detectors (PMTs). The external detectors are fully synchronized with the internal PMTs via a high frequency switch (PMT controller). The uncaging beam (light blue) is produced by a UV solid-state laser (DPSS UV-Laser). It is then directed to the galvo-driven scanning unit at the top-back of the epi-fluorescence condenser by a light guide. The precise positioning (chromatic aberration between imaging and uncaging beam) of the uncaging spot or area is enabled by the image export from the imaging software. The timing management for synchronizing the imaging, the electrophysiology, and the flash photolysis is electronically controlled. The transillumination detector (TL-PMT) is of need for documentation of the positioning of the pipettes within the tissue. The control units and software of the imaging system, which has been modified, is used to control and synchronize all other devices needed to run the system. System components labeled as “custom” were designed and build/adapted by the authors. Some components were adapted to meet the requirements of the custom-build multi-photon system and are labeled as “modified”. Please click here to view a larger version of this figure.
- Switch on components of the multi-photon system. Test and adjust infrared laser beam alignment.
- Control beam positioning by flipping in the centering prism instead of an objective. If the beam is dislocated, re-adjust it by the mirrors in the periscope. Note that the centering plane of the prism must be at the same level as the back focal plane of the objective while imaging.
- Switch on the spectrometer and check for the multi-photon characteristics of the beam.
- Set parameters of the imaging software to the following values: Choose a frame size of 512 x 512 pixels for overview images of the cell (smaller clip boxes with a zoom factor of 2.5 for high frame rate and high spatial resolution, respectively). Set imaging speed to fast mode and scan mode to XYT. Z-stepping should be 1 µm for overview stacks and 0.2 µm for detailed stacks to match spatial sampling requirements for deconvolution performed later.
- Adjust multi-photon laser beam (790 nm) intensity by altering settings of the Pockels’ cell (final power under the objective: ≈ 14 - 16 µW) and the photo-multipliers (PMTs).
- Switch on and calibrate uncaging system by placing a fluorescent sample slide under the objective lens.
- Using the binoculars, adjust the focus of the UV optics and spatially limit the UV laser spot to a size of 2 µm in diameter at maximum by employing the focusing unit at the UGA scan head.
- Start the calibration routine of the uncaging unit control software.
- Set the UV laser to several points within its scan range, while the fluorescence is captured with a CCD camera. By clicking on the UV laser spot at each point, adjust the positioning of the galvanic scan mirrors to correspond to a certain coordinate in the software.
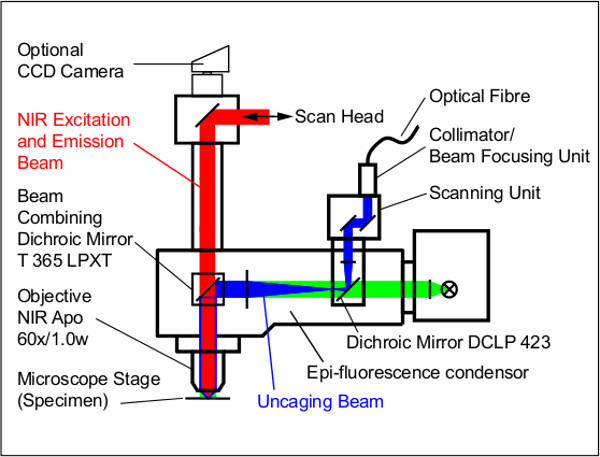
Figure 2. Detailed scheme illustrating the characteristics ofexcitation, emission and uncaging beam paths. The IR excitation beam (red) passes the beam combining dichroic mirror at the level to the filer turret in the epi-fluorescence condenser of the microscope and the objective to reach the specimen. The uncaging beam (blue) is delivered via a quartz optical light fiber to the collimation and beam focusing unit and then subsequently guided to the scanning mirrors in the scanning unit, passes a dichroic mirror to the beam combining dichroic mirror. Here it is combined with the excitation scanning beam. The emitted light from the specimen follows the path of the excitation scanning beam path in the opposite orientation towards the imaging scan head. The camera is used for visual control of the patch pipette and for positioning of the uncaging beam in combination with the confocal laser scanning microscope (not shown). The green light path represents an optional epi-fluorescence illumination which may be of use with other applications.
-
-
- Use the flash photolysis system in the spot mode to gain focal applications. Ensure that the focal adjustment of the uncaging beam (average power underneath the objective: 0.55 mW) results in a spot size of 1.5 µm in diameter (xy extension) as revealed at a fluorescent slide positioned at a z-level that corresponds to that of a tissue slice (not shown).
- The accurate positioning of the uncaging spot is achieved by the import of an image of the imaging system via a network connection between uncaging- and imaging-computers.
- Using a screen grabber software, continuously read out the frames of the imaging software (instead of the camera feed) and adjust the imaging and uncaging frames congruently. Export every 10th frame from the imaging software as a reference image into the flash unit to ensure proper adjustment during the entire experiment.
-

Figure 3. Adjustment of the uncaging spot: To precisely position the uncaging spot, a screen shot of the imaging software (yellow frame) is imported into the uncaging software (green frame). The left image within the yellow frame represents a Hi-Lo coded image (blue: black pixels, red: saturated pixels) of the entire CA1 pyramidal cell. The image is overlaid by the calibration grid of the uncaging software (green “X”s). To the right, a magnified part of the cell is shown with the overlaid uncaging spot (red cross). The yellow spot is the automatically overlaid image of the uncaging beam. Please click here to view a larger version of this figure.
- Turn on micromanipulators, electrophysiology components, and pressure application device for delivery of the caged compound to the target region.
- Install a focal pressure application device for local perfusion of caged compounds. This will reduce costs enormously as compared to bath perfusion of these substances. Adjust the holding pressure to the given atmospheric pressure to prevent a drag of ACSF into or a leakage of caged substances from the application pipette.
NOTE: The pressure application device hosts a highly precise and ultrafast micro-valve in the pipette holder. This enables to employ minimal application pressures and therefore reduces movement artifacts to a minimum during the local perfusion with the caged compound. - Pull pipettes for whole-cell patch-clamp and local perfusion using fire-polished borosilicate glass capillaries. Pipettes should have a tip diameter of ~1 µm and a resistance of R ≈ 3 MΩ (values determined with K-MeSO3-based ICS).
- Place slice in the experimental bath and affix it with a grid (platinum frame 250 µM thick, spanned with surgical filaments, o.d. 40 µm) (Figure 4A, B). Use an inverted, tip-broken, and fire-polished Pasteur pipette (suction ball at the side of the broken tip) for slice transfer. Avoid bending and any other harsh handling of the slice.
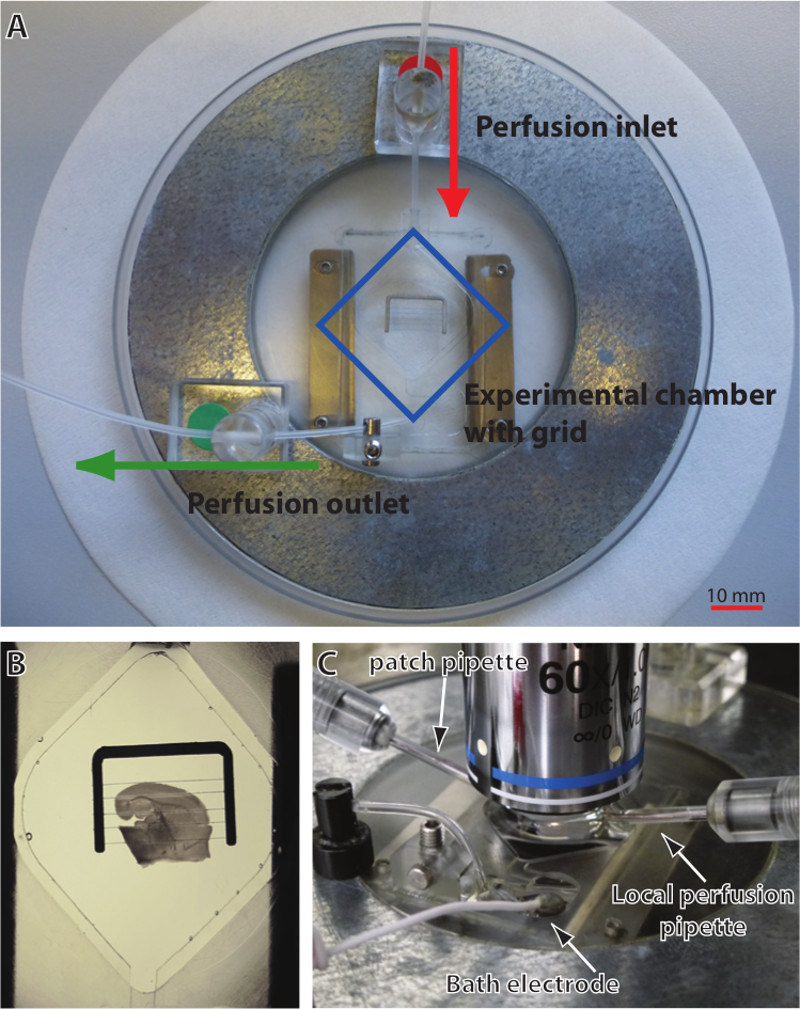
Figure 4. Components of the experimental bath and positioning of the bath at the microscope stage. (A) The experimental bath consists of the bath chamber itself (blue square), which is surrounded by a magnetic metal ring. The tubing ensures continuous perfusion of the bath with saline (ACSF). The grid to hold down and fix the slice is put into the bath chamber. (B) Acute slice preparation positioned within the bath chamber. The slice is fixed by the threads of the grid. (C) Positioning and geometry of the experimental bath at the microscope stage during the experiments.
- Place bath at the microscope stage and permanently perfuse slice with ACSF.
4. Whole-cell Patch-clamping
- Load patch pipette with ICS containing SBFI and load local perfusion pipette with caged compound. Attach pipettes to corresponding micromanipulators. Place reference electrode in bath. Make sure that you are grounded permanently to avoid damage to the head stage (c.f. Figure 4C).
- Lower both pipettes into bath and place them above the hippocampal CA1 region. Apply gentle pressure to patch pipette (+40 mbar) to avoid dilution of the ICS with ACSF.
- Compensate the offset potential of the patch pipette using the electrophysiology software.
- Approach a CA1 pyramidal cell with patch pipette employing IR-DIC video microscopy. Apply gentle suction until a Giga-seal is obtained. Choose a cell the soma of which is located 30 -70 µm below the surface of the slice to ensure intact cell morphology on the one hand side and low scattering and attenuation of the uncaging beam on the other hand side.
- Compensate for fast capacity. Break membrane and open cell to gain whole-cell configuration.
- Compensate for slow capacity and series resistance.
- Allow the cell to be dialyzed with the SBFI-ICS for at least 30 min before starting the imaging experiments.
5. Multi-photon imaging and stimulation
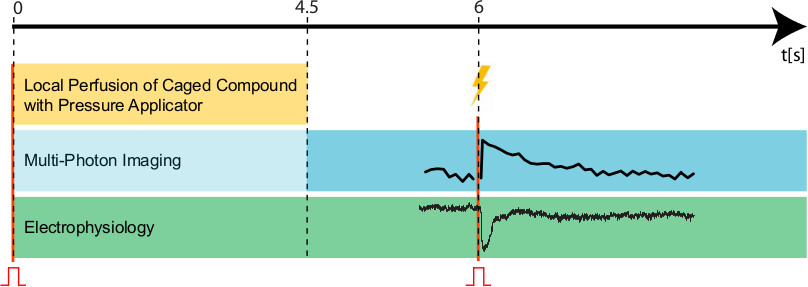
Figure 5. Experimental protocol. To initialize an experiment, a trigger pulse (indicated by red sign (ᴨ)and the red line) is set to simultaneously start the imaging (blue), the electrophysiology (green), and the administration of the caged compound (yellow) at time point 0 sec. During this first period, the imaging beam should be entirely dimmed (light blue). After 4.5 sec (dashed line), the local perfusion of the caged compound is terminated and the imaging beam should be set to its working intensity for data acquisition (blue). 1.5 sec afterwards (time point 6 sec), a second trigger pulse is given (indicated by red sign (ᴨ) and the red line), which initializes the UV flash unit (duration of the flash: 300 msec; indicated by the yellow flash) and sets markers in the electrophysiology and the imaging protocol.
- Add tetrodotoxin (TTX, 500 nM) to ACSF to prevent activation of voltage-gated sodium channels and generation of action potentials.
- Visualize cellular morphology using multi-photon excitation and resulting SBFI fluorescence and choose a spiny dendrite for experiment. Zoom in for images at a higher resolution and place a clip box around the dendrite.
- Fill a standard patch pipette with 10 µl ACSF containing caged glutamate. Connect the pipette to the pressure application system and attach it to the micromanipulator.
- Place pipette with caged compound near the dendrite (~30 µm). Position the pipette to allow efficient local perfusion of the dendrite of choice. Adjust the uncaging laser: position the uncaging spot close (~1 - 2 µm) to the structure of interest.
- Set regions of interest on the chosen dendrite and adjacent spines using imaging software.
- Approach the region of interest and focally inject the caged compound for several sec with low pressure (<3 PSI). Start patch clamp and fluorescence recordings (at 790 nm multi-photon excitation) via trigger signal.
NOTE: During the local perfusion of the caged compound, the excitation beam is completely dimmed to prevent bleaching. - Stop local perfusion of the caged compound. Increase intensity of the two-photon laser to enable efficient excitation of SBFI and apply a UV flash to initialize uncaging (uncaging duration 300 msec).
- Monitor changes in SBFI fluorescence. Stop recording after SBFI fluorescence has recovered back to baseline.
6. Pharmacology
- To test the involvement of ionotropic glutamate receptors in the generation of the currents and/or sodium signals evoked by UV flash photolysis of caged glutamate, employ receptor blockers.
- Switch to ACSF containing the AMPA-receptor blocker cyano-nitroquinoxaline-dione (CNQX, 10 µM) and the NMDA-receptor blocker amino-phosphonopentanoate (APV, 50 µM) in addition to TTX (see above) and perfuse slice for at least 10 min.
- Repeat stimulation procedure (see 5.4 and 5.5.)
- Reversibility of the inhibitors’ effects
- Switch back to normal ACSF containing only TTX.
- Perfuse slice for 20 min.
- Repeat stimulation procedure (see 5.4 and 5.5.).
7. Morphology
- Record a XYZ-stack of the clip box-region set for the performed measurements. Ensure that this stack is oversampled spatially (at least 0.2 µm per pixel) to enable optimal image deconvolution and to increase image quality and resolution.
- Record a XYZ-stack of the entire cell to assess cell morphology.
- Run deconvolution algorithm.
Results
In the present study, we demonstrate a procedure for multi-photon microscopy of cellular sodium dynamics with the sodium-dependent fluorescent dye SBFI in CA1 pyramidal neurons of acute mouse hippocampal tissue slices. Moreover, we show how to combine this imaging technique with laser-scanning-based uncaging of neuro-active compounds (e.g. caged glutamate) and its precise targeting to cellular micro-domains.
Loading neurons with SBFI through the patch-pipette enabled the visualization of the entire cell including fine dendrites and adjacent spines by employing multi-photon excitation (Figure 6A, B, D and Figure 7A).

Figure 6. Sodium signals and synaptic currents induced by flash photolysis of caged glutamate. (A) Maximal projection image of a CA1 pyramidal neuron loaded with SBFI via the patch pipette (PP). The box indicates the area shown enlarged in B. LP indicates the position and orientation of the pipette for local perfusion of caged glutamate. (B) High power maximum projection of a stack of optical sections of a dendrite with adjacent dendritic spines. The stacks of optical sections underwent z-alignment and deconvolution. The red cross indicates the target region of the uncaging beam. The orange dotted line delineates the region of interest from which the fluorescence emission was recorded. The box indicates the area shown enlarged in D. (C) Left: Sodium signal (upper row) and somatic inward current (lower row) induced by flash photolysis of caged glutamate (indicated by yellow flash). The red line represents a fit of the experimental data. The grey area represents the period in which the uncaging flash (300 msec) obstructed the imaging of SBFI fluorescence. Right: Without pre-perfusion with caged glutamate, the same UV-flash neither evoked a change in SBFI emission, nor an inward current. (D) Left: High power image of the dendrite and adjacent spines as delineated in B. Alongside, the same image with inverted grey values. The dotted lines indicate the regions of interest in which the fluorescence emission was recorded. The red cross indicates the localization of the uncaging beam. Right: Sodium transients induced by UV-flash photolysis of caged glutamate. Blue trace: sodium signals in the dendrite; red trace: averaged response from three spines adjacent to the uncaging spot; green trace: averaged response from three distant spines. Please click here for a larger version of this figure.
After local perfusion with caged glutamate, applying a UV-flash close to a dendrite resulted in a transient decrease in fluorescence emission of SBFI, reflecting an increase in the intracellular sodium concentration (Figure 6C, D and Figure 7B). At the same time, an inward current was recorded at the soma (Figure 6C and Figure 7B). Increasing the duration of the UV flash resulted in increasing amplitudes of both the elicited inward currents and the sodium signals (data not shown), indicating that the system was well within its dynamic range and that neither uncaging nor cellular responses were saturated. Application of a UV-flash of identical or longer duration to slices which had not been pre-perfused with caged glutamate, never elicited changes in SBFI fluorescence nor inward currents, indicating that these signals are due to the uncaging of glutamate (Figure 6C). Moreover, these results show that no interdependency of imaging- and uncaging components is observed under our experimental conditions. Sodium signals could also be detected in dendritic spines (Figure 6D). While we did not attempt to achieve stimulation of a single spine only with glutamate uncaging, peak amplitudes tended to be slightly higher in spines close to the uncaging spot, whereas spines further away showed virtually identical fluorescence changes as the parent dendrite (Figure 6D).
Finally, we studied the pathway for sodium influx into dendrites and spines in response to uncaging of glutamate. To this end, we employed CNQX and APV, which are selective blockers for the sodium-permeable, ionotropic glutamate receptors of the AMPA- and NMDA-subtype, respectively. Our results show that glutamate-induced intracellular sodium signals and the elicited somatic currents were omitted in the presence of these blockers (Figure 7B). Upon wash-out of the blockers, the signals are regained. This demonstrates that uncaging of glutamate activates ionotropic glutamate receptors on CA1 pyramidal neurons, which mediate the influx of sodium into dendrites and spines, resulting in intracellular sodium transients and inward currents.
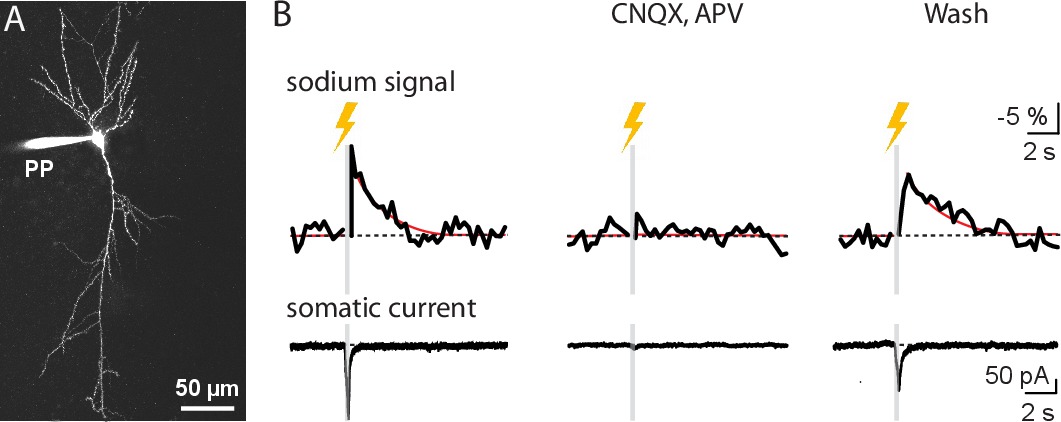
Figure 7. Pharmacological profile of evoked sodium signals and inward currents. (A) SBFI-filled CA1 pyramidal neuron with patch pipette (PP) attached to the soma. (B) Left: Sodium transient and somatic current induced by photo-activation of caged glutamate in a dendrite and attached spines. Center: Perfusion with the ionotropic glutamate receptor blockers CNQX and APV inhibits both the sodium signal and the inward current induced by uncaging. Right: Upon wash-out of the blockers, the signals are restored. The red line represents a fit of the experimental data. The grey area represents the period in which the uncaging flash (300 msec) obstructed the imaging of SBFI fluorescence. Please click here for a larger version of this figure.
Discussion
The present study shows that SBFI is well suited for two-photon imaging of intracellular sodium transients in small cellular compartments. It has to be kept in mind, however, that the quantum efficiency of SBFI is rather low15 and relative changes in the sodium concentration are quite small with physiological activity. Thus, high-resolution measurement of Na+ transients in fine processes is a relatively tedious task, and binning or averaging of several trials may be necessary to obtain satisfactory signals. In addition, the kinetics of sodium transients are surprisingly slow, making it obligatory to record for extended time periods. This observation corresponds to those in earlier studies, where monoexponential decay of sodium transients in neuronal dendrites and in astrocytes was characterized by large decay time constants in the range of 10 sec at room temperature1,2,6. Sodium transients thus seem to exert a much slower time course and much larger decay time constants as compared to calcium transients16.
Set aside these drawbacks, sodium imaging proves to be a valuable tool for the investigation of physiological properties of neuronal subdomains. For example, sodium imaging can serve to monitor excitatory synaptic activity at or close to active synapses. Because sodium is essentially not buffered8,17, activity-induced sodium transients are linearly related to a wide range of synaptic glutamate release or exogenously applied glutamate. They hence represent direct and unbiased indicators of neuronal glutamatergic activity. Moreover, sodium indicator dyes exhibit high Kd’s (SBFI’s Kd is in the range of 25 mM1). Even at the relatively high intracellular dye concentrations used to achieve sufficient brightness (usually 0.5 - 1 mM), the high Kd’s imply that the dyes themselves do not act as buffers for sodium. Consequently, they do not distort the amplitude nor time course of sodium transients, which is always a concern when calcium-sensitive dyes are introduced into the cells18. It can thus be assumed that the detected signals represent a good measure of the “real” changes in intracellular sodium. Their slow time course then implies that the velocity for intracellular diffusion for sodium in neurons is much smaller than previously assumed19.
A critical requirement for the successful execution of experiments addressing the properties of excitatory synaptic transmission and sodium influx pathways into spines and dendrites is the induction of a fast and highly localized activation of postsynaptic structures. This can be obtained by fast and local application of glutamate or glutamate agonists in the direct vicinity of a spine or a dendrite by the flash photolysis of caged compounds. Flash photolysis does not mechanically damage the tissue, is free of movement artifacts and is well established for the investigation of related questions (e.g. local calcium signaling). The diameter of the uncaging spot was 1.5 µm in the xy-plane. Uncaging close to a spiny dendrite induced sodium signals in both spines and the parent dendrite. Whereas the signals tended to be largest in spines closest to the uncaging spot, the amplitudes in the parent dendrite and spines further away were still rather similar to those in direct vicinity of the uncaging spot. Uncaging was performed for 300 msec during which inward currents increased in amplitude. Uncaged glutamate might have diffused in the tissue during the same time period, activating ionotropic glutamate receptors and sodium influx on dendritic regions and spines further away from the uncaging spot.
An intrinsic problem that occurs when using a UV laser for photolysis of caged compounds administered through the cell bathing solution is ‘inner filtering’. Because of the high absorption rate of the cage, UV light is attenuated strongly along the way from the objective to the stimulation site20,21. A feasible way to avoid this is local perfusion with the cage that is restricted only to the stimulation site, which furthermore decreases the amount of caged compound needed to a minimum. As compared to UV laser-scanning-mediated uncaging, near-infra-red two-photon uncaging22 is spatially more precise, mainly because the accuracy of the stimulation is increased in the z-axis. On the other hand, due to the small cross-section of commonly used cages for longer wavelengths as employed with two-photon excitation, either a high concentration of the caged compound or very high, potentially phototoxic light intensities are needed. Also, two-photon uncaging necessitates a much higher investment in the equipment; among others, an additional IR laser plus the required optical components, are needed.
Both SBFI and MNI-glutamate are excitable in the identical wavelength range. This may lead to an unintended interdependency of UV uncaging laser and SBFI or IR imaging laser and MNI-glutamate, resulting in bleaching of SBFI by the uncaging flash and /or a continuous uncaging of glutamate by the IR beam. However, as shown in Figure 6C, neither a UV flash by itself nor the multi photon imaging caused such reciprocal effects under our experimental conditions.
UV-flash systems similar to the one described here are used routinely in many other laboratories and can relatively easily be incorporated into any existing multi-photon imaging microscope. It offers the advantage that the laser beam for photolysis can be positioned freely in the field of view. In addition, the system enables a fast and automated repositioning of the laser beam and the release volume, respectively, in the field of view during an experiment. Our modification simplifies and improves the accurate positioning of the uncaging spot, so that the frames of the imaging software can serve to adjust imaging and uncaging frames congruently.
Taken together, whole-cell patch-clamp and multi-photon sodium imaging in dendrites and spines of central neurons, combined with a modified procedure for UV-light-induced uncaging of glutamate, allows reliable and focal activation of glutamate receptors in the tissue. It can thus serve to analyze the properties of excitatory synaptic transmission and of postsynaptic sodium signals in neurons in the intact tissue.
Disclosures
The authors declare no competing interests. The authors received financial support enabling Open Access Publication by Rapp OptoElectronic (Wedel, Germany), which produces an instrument used in the video article. The company was neither involved in the experiments nor in the data handling nor in the manuscript writing.
Acknowledgements
This study was supported by a grant of the German Science Foundation (DFG, Ro2327/6-1) to C.R.R. The authors wish to thank S. Durry and C. Roderigo for expert technical assistance, and M. Dübbert (Electronics Laboratory, Zoological Institute, University of Cologne, Germany) for help in implementing the Pockels cell controller and the HF switch.
Materials
| Name | Company | Catalog Number | Comments |
|---|---|---|---|
| Borosilicate-glass capillaries | Hilgenberg | 1405059 | 75 x 2 mm, wall thickness 0.3 mm |
| Camera | Jenoptik | ProgRes MF | IR-DIC compatible camera |
| Deconvolution software | SVI | Huygens Pofessional X11 | |
| Fiber optic spectrometer | Ocean Optics | USB 4000 | Miniature fiber optic spectrometer |
| Filter tubes | VWR | cenrifugal filter, 0.2 µm | |
| Imaging software | Olympus Europe | Flowview Ver 5.0c, Tiempo | |
| IR beam power controller | Custom built | Laser beam intensity control + fast switch to zero on flyback via pockels cell | |
| IR laser | SpectraPhysics | Mai-Tai | fs-pulsed Ti:Sa tunable laser (710 - 990 nm); CAUTION |
| IR power monitor | Custom built | ||
| Micromanipulator | Burleigh | PCS 5000 | |
| Microscope/Imaging System | Olympus Europe | BX51WI/FV300 | Both, the microscope and the imaging systems were strongly modified |
| ND filter wheel | Newport | 50Q04AV.2 | UV fused silica, optical density 0.05 - 2.0 |
| Objective | Nikon Instruments Europe | NIR Apo 60x/1.0w | |
| Patch clamp amplifier | HEKA | EPC-10 | |
| Pipette puller | Narishige | Model PP-830 | |
| Pneumatic drug ejection system | NPI Electronic | PDES-DXH | |
| Pockels cell | Conoptics | 350-80 LA-BK | EOM, used as fast switch and for power adjustment |
| Pockels cell driver | Conoptics | M302-RM | High voltage differential amplifier |
| Shutter | Vincent Associates | LS6ZM2 | ALMgF2-coated BeCu blades |
| Shutter controller | Custom built | ||
| Shutter driver | Vincent Associates | Uniblitz VCM D1 | |
| Slicer/Vibratome | Thermo Scientific | Microm HM 650 V | |
| Uncaging software | Rapp OptoElectronic | UGA40 1.1.2.6 + NetCam | |
| UV laser | Rapp OptoElectronic | DL-355/10 | cw DPSSL Laser, 355 nm; 10 mW; CAUTION |
| UV laser scanning system | Rapp OptoElectronic | UGA 40 | Galvanometric scanning system |
| Name of Compound | Company | Catalog Number | Comments/ Description |
| CNQX | Sigma Aldrich | C-127 | AMPA receptor antagonist; CAUTION |
| DL-AP5 | Alfa Aesar | J64210 | NMDA receptor antagonist; CAUTION |
| SBFI K+ salt | Teflabs | OO32 | |
| TTX | Ascent Scientific | Asc-055 | Inhibitor of voltage-dependent Na+ channels; CAUTION |
| NMI-caged-L-Glutamate | Torcis | 1490 | Caged glutamate released upon UV absobtion |
References
- Rose, C. R., Kovalchuk, Y., Eilers, J., Konnerth, A. Two-photon Na+ imaging in spines and fine dendrites of central neurons. Pflueg. Arch., Eur. J. Phy. 439, 201-207 (1999).
- Rose, C. R., Konnerth, A. NMDA receptor-mediated Na+ signals in spines and dendrites. J. Neurosci. 21, 4207-4214 (2001).
- Meier, S. D., Kovalchuk, Y., Rose, C. R. Properties of the new fluorescent Na+ indicator CoroNa Green: comparison with SBFI and confocal Na+ imaging. J. Neurosci. Meth. 155, 251-259 (2006).
- Lamy, C., Chatton, J. Y. Optical probing of sodium dynamics in neurons and astrocytes. NeuroImage. 58, 572-578 (2011).
- Lasser-Ross, N., Ross, W. Imaging voltage and synaptically activated sodium transients in cerebellar Purkinje cells. Proc. Roy. Soc. B-Biol. Sci. 247, 35-39 (1992).
- Bennay, M., Langer, J., Meier, S. D., Kafitz, K. W., Rose, C. R. Sodium signals in cerebellar Purkinje neurons and Bergmann glial cells evoked by glutamatergic synaptic transmission. Glia. 56, 1138-1149 (2008).
- Baranauskas, G., David, Y., Fleidervish, I. Spatial mismatch between the Na+ flux and spike initiation in axon initial segment. Proc. Natl. Acad. Sci. 110, 4051-4056 (2013).
- Fleidervish, I., Lasser-Ross, N., Gutnick, M., Ross, W. Na+ imaging reveals little difference in action potential-evoked Na+ influx between axon and soma. Nat. Neurosci. , 852-860 (2010).
- Denk, W., Piston, D., Webb, W. Handbook of Biological Confocal Microscopy. Pawley, J. B. , Plenum Press. 445-458 (1995).
- Jaffe, D., et al. The spread of Na+ spikes determines the pattern of dendritic Ca2+ entry into hippocampal neurons. Nature. 357, 244-246 (1992).
- Boccaccio, A., Sagheddu, C., Menini, A. Flash photolysis of caged compounds in the cilia of olfactory sensory neurons. J. Vis. Exp. , (2011).
- Ikrar, T., Olivas, N., Shi, Y., Xu, X. Mapping inhibitory neuronal circuits by laser scanning photostimulation. J. Vis. Exp. , (2011).
- Mathis, D. M., Furman, J. L., Norris, C. M. Preparation of acute hippocampal slices from rats and transgenic mice for the study of synaptic alterations during aging and amyloid. J. Vis. Exp. , (2011).
- Pannasch, U., Sibille, J., Rouach, N. Dual electrophysiological recordings of synaptically-evoked astroglial and neuronal responses in acute hippocampal slices. J. Vis. Exp. , (2012).
- Minta, A., Tsien, R. Fluorescent indicators for cytosolic sodium. J. Biol. Chem. 264, 19449-19457 (1989).
- Kuruma, A., Inoue, T., Mikoshiba, K. Dynamics of Ca(2+) and Na(+) in the dendrites of mouse cerebellar Purkinje cells evoked by parallel fibre stimulation. Eur. J. Neurosci. 18, 2677-2689 (2003).
- Despa, S., Bers, D. M. Na/K pump current and [Na](i) in rabbit ventricular myocytes: Local [Na](i) depletion and Na buffering. Biophys. 84, 4157-4166 (2003).
- Regehr, W., Tank, D. Calcium concentration dynamics produced by synaptic activation of CA1 hippocampal pyramidal cells. J. Neurosci. 12, 4202-4223 (1992).
- Kushmerick, M. J., Podolsky, R. J. Ionic mobility in muscle cells. Science. 166, 1297-1298 (1969).
- Palma-Cerda, F., et al. New caged neurotransmitter analogs selective for glutamate receptor sub-types based on methoxynitroindoline and nitrophenylethoxycarbonyl caging groups. Neuropharmacology. 63, 624-634 (2012).
- Trigo, F., Corrie, J., Ogden, D. Laser photolysis of caged compounds at 405 nm: photochemical advantages, localisation, phototoxicity and methods for calibration. J. Neurosci. Meth. 180, 9-21 (2009).
- Nikolenko, V., Peterka, D., Araya, R., Woodruff, A., Yuste, R. Spatial light modulator microscopy. Cold Spring Harbor protocols. , 1132-1141 (2013).
Reprints and Permissions
