Physical models of biomolecules can facilitate an understanding of their structure-function for the researcher, aid in communication between researchers, and serve as an educational tool in pedagogical endeavors. Here, we provide detailed guidance for the 3D printing of accurate models of biomolecules using fused filament fabrication desktop 3D printers.
Method Article
3D Printing of Biomolecular Models for Research and Pedagogy
In This Article
Summary
Abstract
The construction of physical three-dimensional (3D) models of biomolecules can uniquely contribute to the study of the structure-function relationship. 3D structures are most often perceived using the two-dimensional and exclusively visual medium of the computer screen. Converting digital 3D molecular data into real objects enables information to be perceived through an expanded range of human senses, including direct stereoscopic vision, touch, and interaction. Such tangible models facilitate new insights, enable hypothesis testing, and serve as psychological or sensory anchors for conceptual information about the functions of biomolecules. Recent advances in consumer 3D printing technology enable, for the first time, the cost-effective fabrication of high-quality and scientifically accurate models of biomolecules in a variety of molecular representations. However, the optimization of the virtual model and its printing parameters is difficult and time consuming without detailed guidance. Here, we provide a guide on the digital design and physical fabrication of biomolecule models for research and pedagogy using open source or low-cost software and low-cost 3D printers that use fused filament fabrication technology.
Introduction
A thorough understanding of the function and activity of a biomolecule requires the determination of its three-dimensional (3D) structure. This is routinely achieved using X-ray crystallography, NMR, or electron microscopy. 3D structures can be understood through the perception of models, or accurate objects resembling the structures that they represent1. Historically, the construction of physical 3D models was necessary for investigators to validate, explore, and communicate the resulting hypotheses regarding function of biomolecules. These models, such as Watson-Crick's DNA double helix and Pauling's alpha helix, provided unique insight into structure-function relationships and were pivotal to our early understanding of nucleic acid and protein structure-function2,3,4. Although complex protein and nucleic acid models can be created, the time and cost of building a physical model was eventually outweighed by the relative ease of computer-aided molecular visualization.
The development of 3D printing, also known as additive manufacturing, has again enabled the construction of physical models of biomolecules5. 3D printing is the process of fabricating a physical, 3D object from a digital file through the sequential addition of layers of a material(s). A variety of mechanisms are used in this process. Until recently, the machines used to produce physical models of biomolecules were too expensive to be widely used. However, in the last decade, 3D printing technology, fused filament fabrication (FFF) in particular, has advanced significantly, making it accessible for consumer use6. FFF printers are now commonly available in high schools, libraries, universities, and laboratories. The greater affordability and accessibility of 3D printing technology has made it possible to convert digital 3D biomolecular models into accurate, physical 3D biomolecular models7,8,9. Such models include not only simple representations of single biomolecules, but also complex macromolecular assemblies, such as the ribosome and virus capsid structures. However, the process of printing individual biomolecules and macromolecular assemblies poses several challenges, particularly when using thermoplastic extrusion methods. In particular, representations of biomolecules often have complex geometries that are difficult for printers to produce, and creating and processing digital models that will print successfully requires skill with molecular modelling, 3D modelling, and 3D printer software.
The 3D workflow for printing a biomolecule broadly occurs in four steps: (1) preparing a biomolecular model from its coordinate file for 3D printing; (2) importing the biomolecular model into a "slicing" software to segment the model for the printer and to generate a support structure that will physically prop up the biomolecular model; (3) selecting the correct filament and printing the 3D model; and (4) post-production processing steps, including removing support material from the model (Figures 1 and 2). The first step in this process, computationally manipulating the coordinate file of the biomolecule, is critical. At this stage, the user may build model reinforcements in the form of struts, as well as remove structures that are extraneous to what the user chooses to display. In addition, the choice of representation is made at this stage: whether to display all or part of the biomolecule as a surface representation, ribbons, and/or individual atoms. Once the necessary additions and/or subtractions of content are made and the representation is selected, the structure is saved as a 3D model file. Next, the file is opened in a second software program to convert the model into a 3D print file that can be printed, layer by layer, into a plastic replica of the biomolecule.
The goal of our protocol is to make the fabrication of molecular models accessible to the large numbers of users who have access to FFF printers but not to more expensive 3D printing technologies. Here, we provide a guide for the 3D printing of biomolecules from 3D molecular data, with methods that are optimized for FFF printing. We detail how to maximize the printability of complex biomolecular structures and ensure the simple post-processing of physical models. The properties of several common printing materials or filaments are compared, and recommendations on their use to create flexible prints are provided. Finally, we showcase a series of examples of 3D-printed biomolecular models that demonstrate the use of different molecular representations.
Protocol
1. Preparing 3D Model Files for Printing
NOTE: 3D model files of biomolecules can be generated through two methods: (1) online using the automated tools of the NIH 3D Print Exchange10, or (2) locally using molecular modelling software. Automatically generated models will use the processes detailed in this protocol to create printable representations, but details of the representation cannot be chosen by the user. In contrast, custom model generation allows the user control over the visual properties of the biomolecule. Individual atoms, residues, and bonds can be displayed, and the scale of ribbons, bonds, and struts can be specified. The NIH 3D Print Exchange automated tools and the protocol below both use UCSF Chimera, a free and open source molecular modelling software package11 that is well suited to exporting 3D files of biomolecules. All 3D files exported by Chimera use angstroms for the distance unit. When these files are imported into a slicing software at 1 mm/distance unit, the models will be scaled at 10 million times magnification.
- Automatically generate a 3D printable model with the NIH 3D Print Exchange
NOTE: The NIH 3D Print Exchange runs Chimera scripts, which are similar to the steps described in steps 1.2-1.3.- Locate the molecular data file of the biomolecular structure to print from a database-either the PDB, EMDB, or PubChem (supplement 1.1). Record the accession number for the biomolecule of interest.
- Navigate to the NIH 3D Print Exchange (3dprint.nih.gov) and create a new user account, if a first-time user.
- Navigate to the "Quick Submit" feature, enter the biomolecule accession code, and click submit.
- After generating the model of the biomolecule, navigate to the model page and download the biomolecule STL file in "ribbon" or "surface" representation. Proceed to section 2 of the protocol.
- Generate a custom molecular model with UCSF Chimera
NOTE: Greater detail on using Chimera for making 3D models, including command line equivalents for many steps, can be found in supplement 1.2.- Download and install UCSF Chimera (https://www.cgl.ucsf.edu/chimera/download.html).
- Using Chimera, retrieve the molecular data file by doing one of the following:
- Using the toolbar command File > Fetch by ID, enter a Pubchem, PDB, or EMDB accession code to retrieve the file directly from the database.
- Using the toolbar command File > Open, retrieve a local molecular data file; by default, the molecule will display ribbons for protein and nucleic acid, atoms and bonds for ligands, and residues within 5 Å of a ligand.
- Using the Chimera command line, accessed by going to Favorites > Command Line, use the Open command and enter the accession code.
- Preparing a 3D-printable representation of a biomolecule
NOTE: There are several ways that a biomolecular structure may be displayed or represented. The selection of a particular representation for printing should be made based on how best to provide the greatest insight into the biomolecule structure-function. Commonly used representations include "ribbons," "surface," and "atoms/bonds." However, it is best to explore using a combination of these representations to display select side chains or ligands. In addition, the 3D-printed structure should be robust enough to be printed and to not break when handled. Thus, it is important to consider this when selecting a representation or displaying a side chain. Also consider introducing supporting structures, or "struts." Finally, when printing the model, it will be important to scale it so that all features will print correctly. Thus, for larger biomolecules, printing entirely in ribbons or atom representations might not be feasible due to the scale at which these would need to be printed.- Generating a 3D-printable representation in "ribbons"
Note: More detail can be found in supplement 1.2.1.- Select the visible "solvent," which includes ions, by using Select > Structure > solvent.
- Hide the selected "solvent" using Actions > Atoms/Bonds > Hide.
- Thicken the diameter of the ribbon so that it can be successfully printed. Use the Ribbon Style Editor menu under Tools > Depiction.
NOTE: Suggested parameters for an initial attempt: under the Scaling tab, change the Height of every item to at least 0.7 and the width of each setting to at least the following: Coil 0.7; Helix 1.4; Sheet:1.4; Arrow (base): 2.1; Arrow (tip) 0.7; Nucleic 1.0. - If a nucleic acid is present, alter the base representation with Actions > Atoms/Bonds > nucleotide objects > settings. Change the sugar/base display to ladder and the rung radius to 0.6.
- Optional: Proceed to step 1.3.3 to introduce support structures.
- Generate a 3D-printable "surface" representation of the molecule
NOTE: More detail can be found in supplement 1.2.2.- Hide all previous representations. Use Actions > Atoms/Bonds > hide, and Actions > Ribbons > hide.
- When rendering atoms as spheres, adjust the radius by selecting the desired atom(s) and going to the Actions > Inspect menu.
NOTE: Changing the default atomic radius can make it easier to distinguish different atom types in the printed model. - Hide any displayed ribbons, atoms, bonds, and pseudobonds by using Actions > Atoms/Bonds > Hide and Actions > Ribbons > Hide.
- If surface detail is desired, add hydrogen atoms so that the surface calculation is more accurate. Use Tools > Structure Editing > AddH.
- Generate a surface by entering surf #0 grid 0.5 in the command line.
- Generate a 3D-printable representation in "atoms/bonds."
NOTE: More detail can be found in supplement 1.2.3.- Hide the solvent. Use Select > Structure > solvent and then Actions > Atoms/Bonds > hide.
- Display specific residues and/or ligands in the representation as atoms and bonds by selecting and showing them with Actions > Atoms/Bonds > show. The way atoms are represented can be altered in the Actions > Atoms/Bonds dropdown by selecting stick, ball & stick, or sphere.
- After making a selection, increase the radius of the stick or ball and stick representations with the Actions > Inspect menu.
- Optional: Proceed to step 1.3.4 to introduce support structures.
- Generating a 3D-printable representation in "ribbons"
- Adding structural support to a 3D-printable representation
NOTE: More detail can be found in supplements 1.2.4 and 1.2.5. At this stage, struts can be added to the 3D model. It is recommended for alpha-helices and beta-sheet secondary structures to include backbone hydrogen bonds for stability, although small proteins (i.e., less than 50 residues) are often represented as a ribbon with a typical thickness and may print well without such support. However, for larger proteins, even with the addition of hydrogen bonds, many ribbon models are still too delicate to be successfully printed. Struts are physical connections within the model that do not reflect any molecular property but add to the mechanical strength, thus facilitating printing and handling. Chimera offers a quick way to automatically add struts to a model with the strut command via the command line, and individual struts may also be manually displayed using the Distances tool.- Display hydrogen bonds to prepare a sturdier print. Use the menu Tools > Structure Analysis > FindHBond.
- Use Tools > General Controls > PseudoBond Panel to modify the hydrogen bonds. Select the "hydrogen bond" pseudobonds, click the attributes button and check the "Component PseudoBond Attributes" box. In the bottom panel, change the bond style from wire to stick and the radius value from 0.2 to 0.6.
- Optional: Add support structure(s), or "struts," using the struts command. To create blue struts with a radius of 1.0 Å in the carbon alpha of every 70 residues no further than 8 Å apart, use the command: struts @ca length 8 loop 70 color blue rad 1.0 fattenRibbon false.
- Optional: To create individual struts with the Distances tool, select two atoms by shift-ctrl-clicking on each of them, use Tools > Structure Analysis > Distances, and click create to add a pseudobond. Navigate to the PseudoBond Panel, select the "distance monitor" pseudobonds, click the attributes button, and check the "Component PseudoBond Attributes" box. In the bottom panel, change the bond style from wire to stick and the radius value from 0.2 to 0.01.
- Exporting the Chimera rendering as an STL 3D model file
- Once the desired representation has been obtained, use File > Export Scene to export the 3D file. Select STL as the file type and name and save the model. Note: This STL file can be repaired, oriented, and printed as described in section 2 of the protocol.
2. Process STL Files for Printing
- Repair STL files with Autodesk Netfabb
NOTE: A model may require repair when it contains multiple overlapping pieces with intersecting geometries, which is generally the case with ribbon models and atomic models. Overlapping geometry may cause errors when the file is read by some slicing software, as intersecting regions can be interpreted as the exterior of the model. More detail can be found in supplement 2.1.- Download and install the Standard version of the software.
- Open the program and import the STL file to be repaired. If there are problems with the mesh, a warning sign will be displayed.
- Use Extras > Automatic Part Repair, select Extended Repair, and wait while the file is processed; for small models, this will take seconds, but for large models, it may take minutes.
- Right-click on the model and select Export Part > As STL or use Project > Export Project as STL to save the repaired model; the program will add "repaired" to the filename to distinguish it from the original file.
- Orient models for printing with Autodesk Meshmixer
NOTE: Optimal orientation of a model prior to slicing will reduce the number of overhangs and therefore the number of supports required during the printing process. An optimally oriented model will print faster, use less material, and be less likely to fail during printing. More detail can be found in supplement 2.2.- Download and install software
- Import the repaired STL file into the program.
- Select Analysis > Orientation.
- Adjust the Strength Weight value to 100, Support Vol Weight value to 0, Support Area Weight to 0, and then update the model. This will rotate the model to minimize the number of overhangs. Accept the resulting orientation.
- Use File > Export and choose binary STL file from the dropdown menu. Save the file.
3. Slicing and Printing
- Select a filament material
NOTE: The selection of a printing material should be done before using a slicing software, as printing settings will differ for the selected material. The three materials that are widely used are polylactic acid (PLA), thermoplastic elastomers (TPE), and acrylonitrile butadiene styrene (ABS). PLA is generally the most effective material for printing detailed molecular models, as it cools quickly, adheres well to the build plate, and rarely warps. TPE is a material similar to PLA and can be used to produce flexible models. It is recommended for complementary protein surface models or protein ribbon models. ABS is stronger and more flexible than PLA, but it produces potentially hazardous particulates while printing12. It is generally not recommended for printing molecular models, as the higher material temperature results in less precise production of small features. More detail can be found in supplement 3.1.- Printing with polylactic acid (PLA).
- Set the nozzle temperature to 210 °C. To ensure the adhesion of the part to the bed, set the bed temperature to 70 °C. If using an unheated bed, cover it with painters' tape. Use active cooling.
- Printing with thermoplastic elastomers (TPE)
- Repeat step 3.1.1.1. Set the printing speed to 1,200 mm/min or less.
- Printing with acrylonitrile butadiene styrene (ABS)
- Do not use cooling. Set the nozzle temperature to 240 °C. To ensure the adhesion of the part to the bed, set the bed temperature to 110 °C.
- Printing with polylactic acid (PLA).
- Generate G-code
NOTE: The model will be imported at 10 million times magnification by default. Ribbon models should be scaled to 20 million times (200%) or greater. Surface models print well at 100% or greater. More detail can be found in supplement 3.2.- Download and install printing slicing software.
- Use File > Import Model and select the repaired and oriented STL file.
- Scale the model by double-clicking on the model and entering the scaling factor in the window on the right-hand side of the screen.
- Generate support structures for the model. Select the support icon and use normal supports, with a pillar resolution of 1 and a max overhang angle of 50°.
- Click generate all supports. Add or remove support structure features to customize support placement.
- Select a process and click edit process settings.
- Configure the profile for the printer and material that is being used.
NOTE: A raft and brim should be included, and ribbon models should be printed at 100% infill. Detailed profile settings can be found in supplement 3.2. - Convert the model into a G-code file that can be read by the printer. Click the "prepare to print" button and select the process containing the printer/material profile. Observe the path of the printer nozzle and inspect it for errors that could cause a print to fail.
NOTE: Errors that can cause the print to fail include the absence of supports under overhangs, undesired cavities, missing layers, or areas that are too thin to print. - Save the G-code file to the desktop or directly to an SD card.
- Operate the printer
NOTE: Each printer make or model is unique, and its preparation and calibration for printing will vary accordingly. Refer to the manual for the printer.- Ensure that the workstation is connected to the printer or that the SD card with GCODE is in the printer.
- Prepare the printer by loading the filament and ensuring that the bed is level; for instructions on these procedures, refer to the manual of the printer.
- Start the print from the computer or locally from an SD card via the printer menu.
- Watch the print until a first layer has been successfully completed. If there are any errors in the first layer, abort and restart the print.
4. Post-production Processing
NOTE: Care of course should be taken at this, the final, stage. Supporting structures on the model should be removed. This is generally done manually, although alternative approaches, such as use of a dissolvable support, can be used; see supplement 4.
- Detach the print from the build plate by gently pulling it sideways. If the raft adheres strongly to the build plate, separate it by inserting a sharp edge between them.
- Remove the support structures from the model. Many supports can be removed by hand, by breaking them off of the part and the raft. Flexible models can be detached by pulling them away from the part. For supports that are difficult to reach or are connected to delicate structures, use cutting pliers to clip the point where the support connects to the part.
Results
Stable and informative 3D printable models of biomolecules can be prepared by: (i) thickening bonds to provide stability, (ii) carefully selecting the secondary structure representation type or style that would provide the greatest insight and stability, (iii) printing the biomolecule in more than one molecular representation, (iv) using a filament that will render all or part of a biomolecule flexible, or (v) generating a complex assembly that is modular (i.e., in connectable pieces).
To illustrate how to print such informative and stable models, we focused on the components of chromatin and on producing a hypothetical model of chromatin. Chromatin is a highly complex protein-DNA assembly. The fundamental protein subunit of chromatin is the histone protein. There are four histone proteins, each consisting of a helix-loop-helix (a "histone fold") followed by an extended alpha helix and a second "histone fold." Histone protein structure can easily be produced by using a "ribbon" representation (Figure 3A). Alternatively, the histone protein structure can be displayed using only its surface (Figure 3B). There are two copies of each of the four histone proteins, which assemble to form a globular histone octamer. The histone octamer is too big to print entirely as a ribbon or stick representation, due to the larger scale at which these features need to be printed. Thus, such a large protein assembly is best displayed using surface representation (Figure 3C). DNA will chart a path around the histone octamer to form a 10 nm-diameter nucleosome core particle. The path of DNA can best be displayed by printing two separate models and using a flexible filament for the DNA (Figure 3D). Nucleosome core particles stack upon each other to form a higher-order assembly, a 30 nm-diameter "fiber," a left-handed suprahelical structure. To best illustrate how the 10-nm nucleosome core particles may stack to form a 30-nm chromatin assembly, print individual "di-nucleosome" particles (Figure 3E) and then stack them after printing (Figure 3F).
Once mastered the single extrusion surface and ribbon workflow described above, explore making a range of atomic, molecular, and composite models, as illustrated in Figure 4. For example, combine surface and ribbon representations to set apart different parts of a complex (see DNA polymerase, Figure 4B). Make more instructive and appealing models by using a dual extrusion printer that can melt two filaments simultaneously into a single 3D object (see Figure 4C). Alternatively, paint parts of the models (see guanine and the alpha helix, Figure 4A). Print and assemble the subunits of a protein complex, like the sodium channel, or take it even further by printing distinct parts of a complex and assembling them later into a larger, multi-color model (see the HIV-antibody and ribosomal complexes, Figure 4C). Such composite models are better able to show functional features compared to single-filament prints. Different colors can highlight, for example, glycosylation versus protein (HIV model) or RNA versus protein (see ribosome model, Figure 4C). They also allow for the creation of educational 3D puzzles, like the antibody binding to the HIV surface (see gp120 bound by antibody, Figure 4C), where just one 3D configuration gives a close fit of both parts. Instructions on printing these models can be found in supplement 5. In addition, we have provided a supplemental video illustrating the construction of a 3D model of the Fo/F1 proton ATP synthase which was printed in pieces and assembled in such a manner so that it can recapitulate the rotary mechanism that occurs during this enzymes catalytic mechanism.

Figure 1. Workflow to prepare and print a 3D model. Illustrated are the stages in producing a physical 3D biomolecular print: (i) preparing the model, including selecting the representation; (ii) opening a saved .stl file of the model and processing the file using slicing software; (iii) printing the model and choosing the material or filament; and finally, (iv) performing the post-production steps. Please click here to view a larger version of this figure.

Figure 2. Visuals of different representations of models at various stages of preparation. Top row: Common representations of two models (ubiquitin (PDB 1UBQ) and arginine) visualized using the program Chimera. Middle row: The printing toolpath generated from the Chimera STL models, colored by the feature type of ubiquitin and arginine (orange: infill pattern; dark blue: outer shell; light blue: inner shell). Bottom row: Final prints of ubiquitin and arginine. Surface and two ribbon models of ubiquitin printed at 300% of the default Chimera STL output (Chimera default is 1 nm in the model and 1 cm in print), while the arginine model was printed at 1,000%. The Chimera default ribbon or stick models are too thin to print properly, but thickened versions will print reliably. Please click here to view a larger version of this figure.
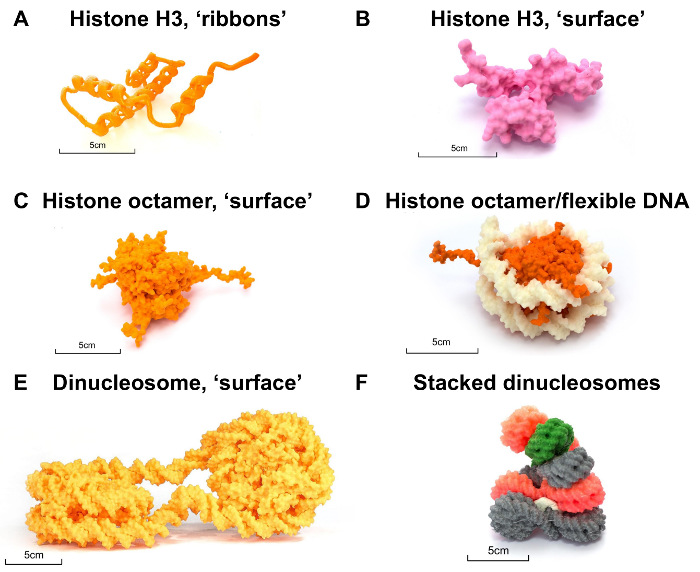
Figure 3. Nucleosome case study. (A) Single-histone H3 protein rendered by thickening "ribbons," printed at 300%. (B) Histone H3 protein "surface" representation, printed at 200%. (C) Histone protein octamer printed at 100%. (D) Histone protein octamer (orange) in complex with flexible DNA (white) printed at 100%. (E) Dinucleosome surface model printed with a default probe radius and printed at 100% scale. (F) A model of the chromatin "30-nm fiber" created by manually stacking individually printed models of the "10-nm" dinucleosome, where the surface was rendered with a probe radius of 3 Å, printed at 50% and 25% sizes, and held together with Play-Doh. 3D prints were generated from a model of the dinucleosome (PDB 1ZBB). All models are freely available for download at the NIH 3D Print Exchange11. Please click here to view a larger version of this figure.

Figure 4. Examples of 3D-printed models produced using filament printers. (A) Left, a ball-and-stick model of water molecules in hexagonal ice crystals (dual-filament print). Middle, model of a nucleotide (guanine). Right, a protein alpha helix backbone-only model showing hydrogen bonds (black). Guanine and the alpha helix were colored manually with sharpies. (B) Left, sodium channel, composed of 4 subunits that can be joined together (PDB 3E89). Middle, Plasmodium falciparum L-lactate dehydrogenase (PDB 1T2D) printed as ribbons. Right, model of the DNA polymerase active site (PDB 1KLN), showing DNA as surface and protein as ribbons. (C) Left, HIV lipid envelope with glycoprotein (PDB 5FUU) bound by antibodies (PDB 1IGT), printed at 15%. Middle, detail of the glycoprotein antigen surface at 150%, with the variable region of the antibody shown as ribbons (PDB 5FYJ). Right, models of the bacterial 70S Ribosome (PDB 4V5D) at 40% and 20%. Percentages refer to standard Chimera output, where 100% means 1 nm in the molecule prints as 1 mm. All models are freely available for download at the NIH 3D Print Exchange11. Please click here to view a larger version of this figure.
Discussion
Physical 3D models of biomolecules provide a powerful complement to more common computer-based methods of visualization. The additional properties of a physical 3D representation contribute to the intuitive understanding of biomolecular structure. The construction of physical 3D models of biomolecules can facilitate their study through the use of a medium that takes advantage of well-developed modes of human sensation. 3D models serve not only as an aid to the researcher, but may be used to facilitate pedagogical activities and can increase the achievement of learning outcomes13,14,15. Magnets can be added to plastic models to allow for assembly and disassembly, as shown with a model of polypeptides16. Also, 3D-printed objects can be used in research, both in the manufacturing of lab equipment17, as well as to make microfluidic devices for cells18 and models of crystals19 or neurons20. The manipulation of physical models can serve to promote collaborative discussions that can inspire new insights.
Recent developments in 3D printing technologies and reductions in the cost of printers enables the creation of complex, physical 3D models of biomolecules by an individual user. Although FFF printing technology is more common and less expensive than other methods, it poses a number of limitations. The 3D printing process is time consuming, and mechanical failures do occur. FFF printers can usually only print one material per part, restricting the display of color information. The resolution of models made on FFF printers is low, around 100 µm per layer. We advise the reader to work with these limitations and to develop an approach for their printer and biomolecule(s) of interest. We have presented the processes required for a user to develop a custom 3D representation of their biomolecule of interest that is accurate, informative, and printable. As with any new technology, there are often "growing pains" that must be overcome during its usage. We provide several examples where problems may be encountered in the process of 3D printing biomolecules (see supplement 6).
Finally, through this article, it is our objective to contribute to the growth of a community of users engaged in the 3D printing of biomolecules. Importantly, the NIH has established a database for the public to share 3D models and the methods used to print them10. We strongly encourage participation in this unique resource (see supplement 7 for instructions on how to upload a 3D model print and background information to the NIH 3D Print Exchange).
Disclosures
The authors have nothing to disclose.
Acknowledgements
The authors are grateful for the support of Deis3D, the Brandeis 3D Printing Club, and members of Brandeis Library/LTS/Makerlab. This work was funded in part by a grant awarded to Pomeranz Krummel by the NSF, Award No. 1157892; an ESIT grant of the BMBF, awarded to the University of Tübingen; and US Federal funds from the National Institutes of Health, Department of Health and Human Services, under Contract No. GS35F0373X. Molecular graphics and analyses were performed with the UCSF Chimera package. Chimera was developed by the Resource for Biocomputing, Visualization, and Informatics at the University of California, San Francisco (supported by NIGMS P41-GM103311).
Materials
| Name | Company | Catalog Number | Comments |
|---|---|---|---|
| Filament | |||
| PLA 3D Printing Filament (1.0 kg Roll) | Quantum3D Printing | http://quantum3dprinting.com/ | Very good quality PLA filament, strongly recomended |
| NinjaFlex Flexible 3D Printing Filament | Ninjatek | https://ninjatek.com/ | High quality flexible filament |
| PLA Filaments PrimaValue & PrimaSelect | 3DPrima | http://3dprima.com/ | High quality European supplier of filament |
| Printers | |||
| Prusa I3 MK2 3D Printer | Prusa Research | http://www.prusa3d.com/ | A popular 3D printer |
| MakerGear M2 Revision E (M2e) | MakerGear | http://www.makergear.com/ | Closed source, very high quality printer |
| Ultimaker 2 | Ultimaker | https://ultimaker.com/ | Very reliable, easy to use printer, highest rating on 3Dhubs.com |
| Flashforge Creator Pro | Flashforge | http://www.flashforge-usa.com | Reliable, dual extrusion printer, highest rating on 3Dhubs.com |
| Software | |||
| Simplify3D Slicer | Simplify3D | https://www.simplify3d.com/ | Excellent slicing software |
| Netfabb | Autodesk | http://www.autodesk.com/education/free-software/netfabb | Mesh repair software, available free of cost for educational purposes |
| Chimera | University of California, San Francisco | https://www.cgl.ucsf.edu/chimera/ | Chimera molecular vizualizer |
| Meshmixer | Autodesk | http://www.meshmixer.com/ | Used for orienting models, but has other features |
References
- Del Re, G. Models and analogies in science. HYLE - International Journal for Philosophy of Chemistry. 6 (1), 5-15 (2000).
- Pauling, L., Corey, R. B., Branson, H. R. The structure of proteins: two hydrogen-bonded helical configurations of the polypeptide chain. Proceedings of the National Academy of Science U.S.A. 37 (4), 205-211 (1951).
- Corey, R. B., Pauling, L. Molecular models of amino acids, peptides, and proteins. The Review of Scientific Instruments. 24 (8), 621-627 (1953).
- Watson, J. D., Crick, F. H. C. A structure for deoxyribose nucleic acid. Nature. 171, 737-738 (1953).
- Stone-Sundberg, J., Kaminsky, W., Snyder, T., Moeck, P. 3D printed models of small and large molecules, structures and morphologies of crystals, as well as their anisotropic physical properties. Crystal Research and Technology. 50 (6), 432-441 (2015).
- Berman, B. 3-D printing: The new industrial revolution. Business Horizons. 55 (2), 155-162 (2011).
- Meyer, S. 3D printing of protein models in an undergraduate laboratory: leucine zippers. Journal of Chemical Education. 92 (12), 2120-2125 (2015).
- Gillet, A., Sanner, M., Stoffler, D., Olson, A. Tangible Interfaces for Structural Molecular Biology. Structure. 13 (3), 483-491 (2005).
- Rossi, S., Benaglia, M., Brenna, D., Porta, R., Orlandi, M. Three dimensional (3D) printing: a straightforward, user-friendly protocol to convert virtual chemical models to real-life objects. Journal of Chemical Education. 92 (8), 1398-1401 (2015).
- Coakley, M., Hurt, D., Weber, N., et al. The NIH 3D print exchange: a public resource for bioscientific and biomedical 3D prints. 3D Printing and Additive Manufacturing. 1 (3), 137-140 (2014).
- Pettersen, E. F., Goddard, T. D., Huang, C. C., Couch, G. S., Greenblatt, D. M., Meng, E. C., Ferrin, T. E. UCSF Chimera--a visualization system for exploratory research and analysis. Journal of Computational Chemistry. 25 (13), 1605-1612 (2004).
- Azimi, P., Zhao, D., Pouzet, C., Crain, N. E., Stephens, B. Emissions of ultrafine particles and volatile organic compounds from commercially available desktop three-dimensional printers with multiple filaments. Environmental Science & Technology. 50 (3), 1260-1268 (2016).
- Roberts, J., Hagedorn, E., Dillenburg, P., Patrick, M., Herman, T. Physical models enhance molecular 3D literacy in an introductory biochemistry course, Biochem. Biochemistry and Molecular Biology Education. 33 (2), 105-110 (2005).
- Jittivadhna, K., Ruenwongsa, P., Panijpan, B. Beyond textbook illustrations: Hand-held models of ordered DNA and protein structures as 3D supplements to enhance student learning of helical biopolymers. Biochemistry and Molecular Biology Education. 38 (6), 359-364 (2010).
- Herman, T., Morris, J., Colton, S., Batiza, A., Patrick, M., Franzen, M., Goodsell, D. S. Tactile teaching - Exploring protein structure/function using physical models. Biochem. Biochemistry and Molecular Biology Education. 34 (4), 247-254 (2006).
- Chakraborty, P., Zuckermann, R. Coarse-grained, foldable, physical model of the polypeptide chain. Proceedings of the National Academy of Science U.S.A. 110 (33), 13368-13373 (2013).
- Baden, T., Chagas, A. M., Gage, G. J., Marzullo, T. C., Prieto-Godino, L. L., Euler, T. Open Labware: 3-D printing your own lab equipment. PLoS Biology. 13 (3), e1002086(2015).
- Morgan, A. J., et al. Simple and versatile 3D printed microfluidics using fused filament fabrication. PLoS ONE. 11 (4), e0152023(2016).
- Chen, T., Lee, S., Flood, A., Miljanić, O. How to print a crystal structure model in 3D. Cryst. Eng. Comm. 16 (25), 5488-5493 (2014).
- McDougal, R. A., Shepherd, G. M. 3D-printer visualization of neuron models. Frontiers in Neuroinformatics. 9, 1-9 (2015).
Reprints and Permissions
