The mucus plugged airways of cystic fibrosis (CF) patients are an ideal environment for microbial pathogens to thrive. The manuscript describes a novel method for studying the CF lung microbiome in an environment that mimics where they cause disease and how alterations of chemical conditions can drive microbial dynamics.
A subscription to JoVE is required to view this content. Sign in or start your free trial.
Method Article
The WinCF Model - An Inexpensive and Tractable Microcosm of a Mucus Plugged Bronchiole to Study the Microbiology of Lung Infections
In This Article
Summary
Abstract
Many chronic airway diseases result in mucus plugging of the airways. Lungs of an individual with cystic fibrosis are an exemplary case where their mucus-plugged bronchioles create a favorable habitat for microbial colonization. Various pathogens thrive in this environment interacting with each other and driving many of the symptoms associated with CF disease. Like any microbial community, the chemical conditions of their habitat have a significant impact on the community structure and dynamics. For example, different microorganisms thrive in differing levels of oxygen or other solute concentrations. This is also true in the CF lung, where oxygen concentrations are believed to drive community physiology and structure. The methods described here are designed to mimic the lung environment and grow pathogens in a manner more similar to that from which they cause disease. Manipulation of the chemical surroundings of these microbes is then used to study how the chemistry of lung infections governs its microbial ecology. The method, called the WinCF system, is based on artificial sputum medium and narrow capillary tubes meant to provide an oxygen gradient similar to that which exists in mucus-plugged bronchioles. Manipulating chemical conditions, such as the media pH of the sputum or antibiotics pressure, allows for visualization of the microbiological differences in those samples using colored indicators, watching for gas or biofilm production, or extracting and sequencing the nucleic acid contents of each sample.
Introduction
The method described in this manuscript is called the WinCF system1. The overall goal of WinCF is to provide an experimental setup capable of simulating the environment of a mucus-filled lung bronchiole. This will allow for a tractable system to study microbial pathogens of lung diseases with a mucus hypersecretion phenotype including cystic fibrosis (CF), chronic obstructive pulmonary disease (COPD), asthma and others. The procedure was designed specifically for the study of CF, which is characterized by mutations that cause lung secretions to become thick and hard to clear, eventually filling bronchioles and other small passageways with mucus2. Such blockages in the lung inhibit gas exchange because inhaled air is no longer able to reach many alveoli and also provide a habitat for bacterial colonization3,4. The inability to prevent microbial growth in the excessive lung mucus eventually leads to the development of complex chronic infections of the airway. These communities contain a variety of organisms, including viruses, fungi, and bacteria like Pseudomonas aeruginosa, all interacting with one another5,6,7,8. The activity of the CF lung microbiome is believed to be involved in flares of symptoms called pulmonary exacerbations1,9,10,11. WinCF enables study of the microbial community behavior around these exacerbations and is now being expanded to act as a base experimental system to study lung microbial ecology. Traditionally, exacerbations have been studied through direct analysis of samples taken from the lung. Many confounding factors make direct analysis of microbial behavior in lungs challenging, with the WinCF system, many of these factors are removed and the behavior of the lung microbiome can be studied more directly, allowing for finer analysis of bacterial activity in a mucus-plugged bronchiole.
The WinCF system provides a method to grow and analyze bacteria in a manner that effectively mimics the lung environment. Traditional methods for growing lung bacteria often involved culturing samples on traditional agar plates. These methods leave the samples open to atmospheric oxygen, neglecting to account for the hypoxic and often anoxic conditions found in lung bronchioles plugged with mucus12,13. Culturing on agar under aerobic conditions is nothing like the environment of the CF lung and can mislead clinicians and researchers concerning the behavior of the pathogens that they are trying to treat. Additionally, the nutrients available to bacteria on agar plates are dissimilar to those available in actual sputum, which is accounted for in WinCF by utilizing artificial sputum media (ASM). As shown by the Pseudomonas cultures in Sriramulu et al.14, ASM includes a specific set of components that mimics the resources available to sputum microbes and also replicates the physical consistency of sputum. Because a diseased lung has a specific microbiome, the study of such microorganisms should ideally take place in the specific conditions of the lung as well.
The WinCF system enables rapid analysis and easy manipulation of the experimental conditions to observe microbial changes similar to how they would occur in an actual lung bronchiole. This technique allows for the inoculation of a myriad of related sample types including sputum, saliva, other body secretions and pure or mixed bacterial cultures. The nature of the experimental setup allows for immediate visual interpretation of the microbial community behavior and is designed to enable easy downstream application of a multitude of microbiological and omics procedures. Such studies are important because bacterial community composition changes based upon the physiochemical conditions of their environment. With WinCF the chemical conditions of the media can be manipulated to analyze the effects on bacterial activity. For example, the acidity of the media can be altered prior to inoculation with a sample. After incubation, the bacterial activity in each of these conditions can be directly compared, and conclusions can be drawn about how bacteria in those sputum samples behave in response to varying pH. Here, we outline the procedures for applying the WinCF system and examples of how the media chemistry can be manipulated to study the effects on the lung microbiome.
Access restricted. Please log in or start a trial to view this content.
Protocol
1. Preparation of Stocks for the Artificial Sputum Media
- Create a 5% mucin solution. Add 1.0 g of dehydrated pig stomach mucin to 20 mL of deionized water. Autoclave the resulting solution.
NOTE: The mucin sterilization will destroy its inherent structure; other methods to sterilize the mucin in its dry form include UV sterilization and irradiation. These methods have not been extensively used for the WinCF system however. - Add 2.2 g of KCl to 50 mL of deionized water and allow for dissolution. Add 5.0 g of NaCl to 50 mL of deionized water and allow for dissolution. Autoclave these two solutions.
- Add 100 mg of salmon sperm DNA to 10 mL of sterile deionized water. Heat this solution to about 85 °C in a water bath for a few hours to ensure dissolution.
- Add 5.0 mg of ferritin to 5.0 mL of sterile deionized water.
2. Preparation of the Artificial Sputum Medium
- Combine the following components: 16 mL of mucin stock solution, 2.0 mL of KCl stock solution, 2.0 mL of NaCl stock solution, 200 µL of egg yolk emulsion, 5.6 mL of DNA stock solution, 120 µL of ferritin stock solution, 5.78 mL of essential amino acid solution, 5.78 mL of non-essential amino acid solution, and 2.44 mL of sterile water.
- If small amounts of sediment appear, shake gently to mix.
- Pipet 5.0 mL of media into eight sterile 15 mL centrifuge tubes.
NOTE: The chemical conditions of each tube can be manipulated as desired. For example, buffer solutions and pH indicators can be added to each tube for the purpose of comparing microbial behavior at distinct pH levels. A demonstration of this is shown in the representative results section with 8 distinct pH levels, from 5.0 to 8.5 in 0.5 pH increments.
- Once the chemical conditions of the media are successfully manipulated, freeze for later use. The media will remain stable frozen at -20 °C for several months. Vortex upon thawing.
3. Preparation of a Control Run of the Capillary Tubes
- In a sterile biohood, fill eight sterile microcentrifuge tubes with 250 µL of media each.
- Acquire eight more sterile 15 mL centrifuge tubes, each tube corresponding to a microcentrifuge tube mentioned in step 3.1.
- Sterilize a paper towel with 70% ethanol solution and allow to dry. Once dry, tear the towel into pieces about four square inches each, and crumple each piece in the bottom of a 15 mL centrifuge tube. For additional tubes, spray and dry additional paper towels as needed.
- With one clump of paper at the bottom of each centrifuge tube, slightly dampen each paper clump with about 1.0 mL of sterile water to create a humid environment.
- Obtain three glass capillary tubes for every microcentrifuge tube prepared in step 3.1 and a block of capillary tube putty sealant.
- For each microcentrifuge tube, fill three capillary tubes with media to about 5 mm away from the blue marker near the top of the tube.
- Fill by holding one end of the tube in the microcentrifuge tube and tilting towards horizontal orientation, allowing capillary action to guide the medium into the tube (See Figure 1).
- Stop the filling by gently placing a gloved finger over the open end of the tube, and then seal the other end of the tube by pressing it down into the sealant block.
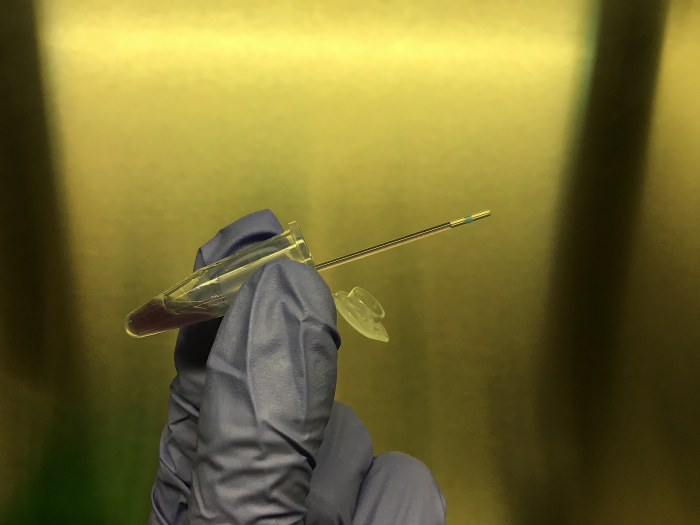
Figure 1: Example pH Gradient, Filling Capillary Tube with Artificial Sputum Medium. The medium is added by inserting one end of the tube into the liquid and tilting to facilitate capillary action. The medium coloration in this example is due to pH indicator added to help demonstrate potential changes in acidity after incubation. Please click here to view a larger version of this figure.
- Place each set of three capillary tubes into 15 mL centrifuge tubes filled with paper towels completely moistened with sterile water, putty-sealed side down. Cap the tube and label. These three capillary tubes are for replication of each control condition.
- When all 15 mL centrifuge tubes are filled with their designated capillary tubes, place the tubes in a holding rack. Place the rack such that the tubes will be incubated horizontally (to catch gas bubbles) (See Figure 2). Incubate the capillary tubes inside the centrifuge tubes (containing the moistened paper clumps) at 37 °C for 48 h.
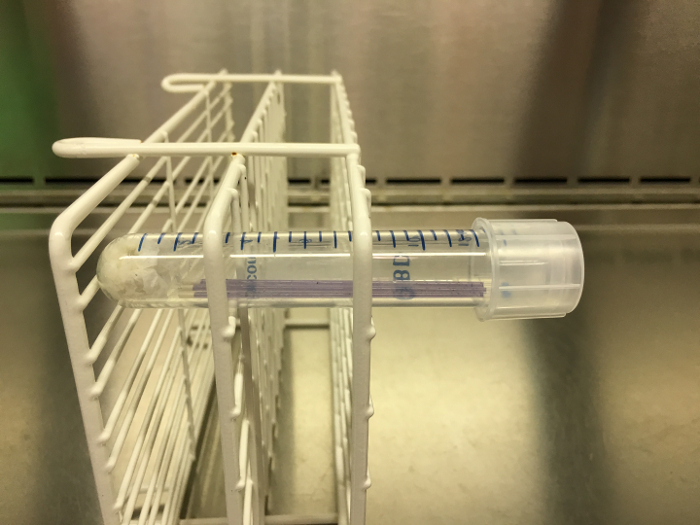
Figure 2: Example pH Gradient, Capillary Tubes Ready for Incubation. Once three capillary tubes have been filled and sealed, they are placed in a centrifuge tube with damp paper towel at the bottom. This tube is then capped and put into a rack. The rack must be oriented sideways during incubation, as pictured here, so that gas production can be observed once incubation is complete. Please click here to view a larger version of this figure.
4. Imaging of the Control Capillary Tubes after Incubation
- Remove the rack of centrifuge tubes from the incubator, making sure to keep the tubes horizontal. Carefully slide the capillary tubes out of the centrifuge tubes, keeping each set of three separate from other sets.
- Arrange the capillary tubes next to each other on a lightbox, all lined up so that the contents of the tubes are visible and illuminated. Leave a gap every three tubes to separate different chemical conditions.
- With the tubes aligned and lightbox turned on, photograph from directly above. (See Figure 3)
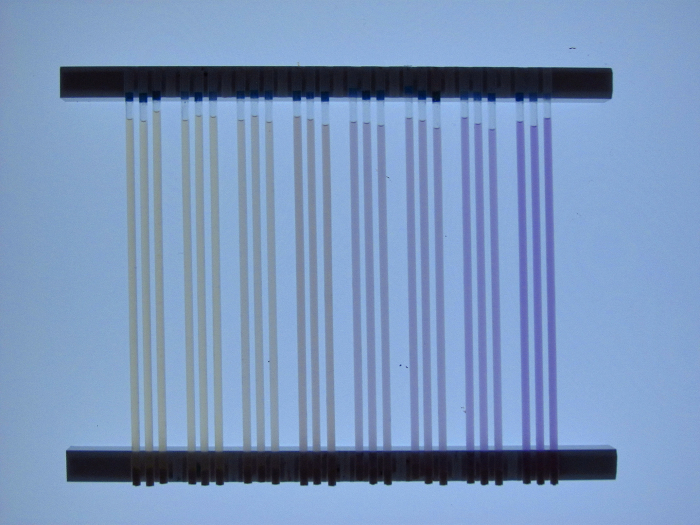
Figure 3: Example pH Gradient, Control Run, Pre-incubation, No Sputum Added. Artificial sputum medium after being added to capillary tubes in sets of three, increasing in pH from left to right. The combination of indicators added to the medium result in more acidic tubes appearing more yellow, while less acidic tubes become more purple. The tubes are arranged horizontally and are illuminated from below, photographed from above. Please click here to view a larger version of this figure.
- Dispose of the control materials in biohazardous waste.
5. Inoculating the WinCF Capillary Tubes with a Sputum Sample
- In a sterile biohood, fill eight sterile microcentrifuge tubes with 225 µL of media each.
- Homogenize the sputum sample by withdrawing and ejecting the sputum repeatedly with a 3 mL syringe (a plastic syringe without the needle). Do this until the sputum is of smooth consistency.
- Add 25 µL of homogenized sputum to each microcentrifuge tube (1/10 dilution in ASM media) prepared in step 5.1. Then vortex the tubes for 30 s to mix sufficiently.
- Add the media to capillary tubes following the same procedure as steps 3.2 through 3.5.
6. Imaging of Sample Capillary Tubes after Incubation
- After the 48-h incubation time, remove and image the capillary tubes following the same procedure as steps 4.1 through 4.3.
- If bubbles are present in the tubes, make sure the photographs taken clearly depict the delineation between the bubbles and media in the tubes. If biofilm is present, make sure the photographs can clearly depict its presence as well.
7. Removal of Media for Downstream Applications
- To facilitate downstream analysis, remove the media from the capillary tubes after imaging. Potential applications include culturing and DNA/RNA sequencing and metabolomic profiling.
Caution: The glass capillary tubes filled with pathogens are a significant biohazard, thus, these steps must be done very carefully with specific equipment. If capillary tubes break, dispose in proper biohazard sharps container. - Use blunt ended needles of 25 gauge and 0.5 inch in length to remove the media. Insert the blunt ended needle into the plugged end of the tube to break the seal.
- After breaking the seal, turn the capillary tube upside down and the media will drip out from the top portion. If the media does not drip out easily, use a pipette with a 200 µL tip and expel the media out of the tube by pressing down on the pipette plunger when inserted into the end of the capillary tube. Collect the expelled tube media in an appropriate container (1.5 mL centrifuge tube).
NOTE: For transcriptomic or other RNA analysis, the media can be expelled directly into RNA stabilizing buffers.
8. The WinCF FLUD System
NOTE: The WinCF Fluid Loading Utility Device (FLUD) System is an optional suite of complementary devices designed to optimize the throughput of the WinCF System. The WinCF FLUD System is comprised primarily of 3D printable materials. 3D printed manufacturing allows for quick and easy replacement of materials to ensure minimal downtime for researchers as well as minimal manufacturing requirements. Designs, stl files, 3D printing instructions and the WinCF FLUD manual are available in the online supplement.
- Preparing media for capillary tube loading
- In a sterile biohood, fill eight sterile 2 mL microcentrifuge tubes with 900 µL of medium each.
- Homogenize any sputum samples by withdrawing and ejecting the sputum repeatedly with a 3 mL syringe (a plastic syringe without the needle). Do this until the sputum is of smooth consistency.
- Add 100 µL of homogenized sputum to each microcentrifuge tube (1/10 dilution in medium) prepared in step 8.1.1. Then vortex the tubes for 30 s to mix sufficiently.
- Slot the filled and open microcentrifuge tubes into the rotator tube holder oriented so that the tubes are vertical.
- Placement of capillary tubes
- Retrieve three capillary tubes for every microcentrifuge tube in step 8.1.
- Slot three tubes into the rubber cradle so that they are aligned with the microcentrifuge tubes at the other end of the apparatus. Make sure the marked ends of the tubes face away from the microcentrifuge tubes. Fit the three holes on the bottom of the cradle properly over the three studs on the cradle stand.
- With the placed capillary tubes resting in their guide channels on the apparatus, place the rubber tamp over their midsections securely to prevent shifting. (See Figure 4)
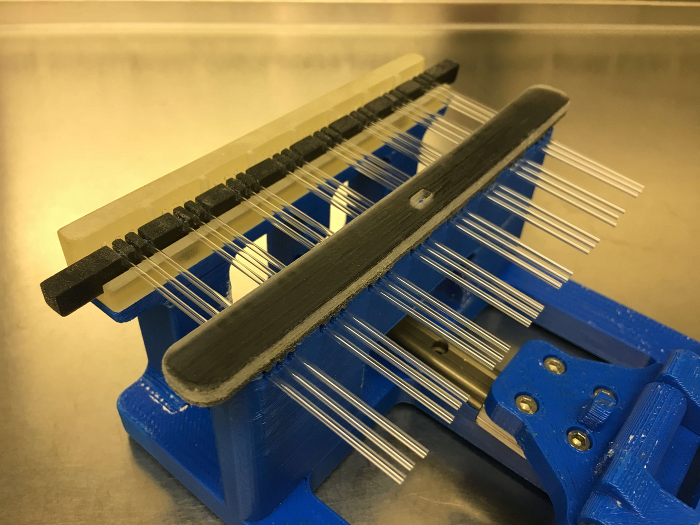
Figure 4: The FLUD System Fully Loaded with Capillary Tubes Secured by the Rubber Tamp Over Their Midsections. Please click here to view a larger version of this figure.
- Loading media into the capillary tubes
- Carefully use one hand to grasp the end of the apparatus where the capillary tubes are loaded, and use the other hand to hold the rotator rack in which the microcentrifuge tubes are loaded.
- Delicately rotate the microcentrifuge rack so that the microcentrifuge tubes are nearly horizontal and proceed to slowly push the rack towards the capillary tubes. (See Figure 5)
- When the ends of the capillary tubes make contact with the media in the microcentrifuge tubes, ensure that capillary action immediately begins filling the capillary tubes. To adjust fill rate and fill level, gently rotate the apparatus as a whole. While doing this, be careful not to spill media out of the microcentrifuge tubes. (See Figure 6)
- When the capillary tubes are filled to desired levels, place the apparatus level on a surface and carefully yet quickly pull the rack of microcentrifuge tubes off the ends of the capillary tubes to cease filling. The microcentrifuge tubes can now be retracted all the way back to vertical position and closed.
- Seal the protruding ends of the capillary tubes by pressing a sealant block onto each triplicate set, sealing one set at a time until all sets are sealed. To reduce risk of contamination, press a different part of the sealant block onto each triplicate set (See Figure 7).
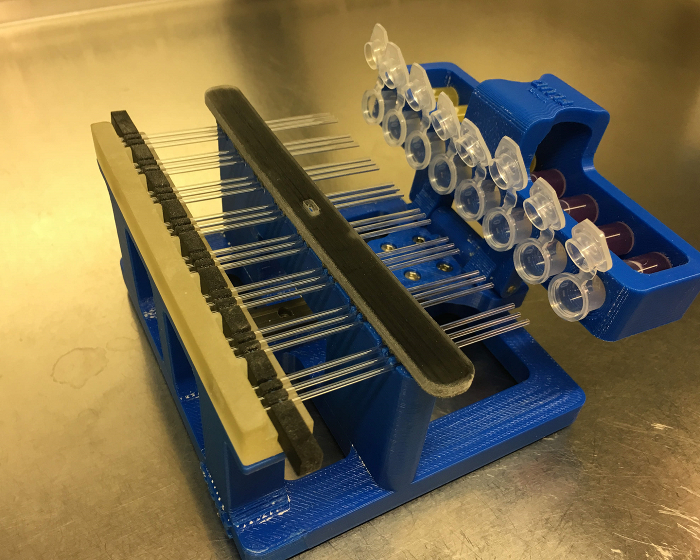
Figure 5: The FLUD System with Medium Tubes Deployed to a Horizontal Orientation, Ready to Make Contact with Capillary Tubes. Please click here to view a larger version of this figure.
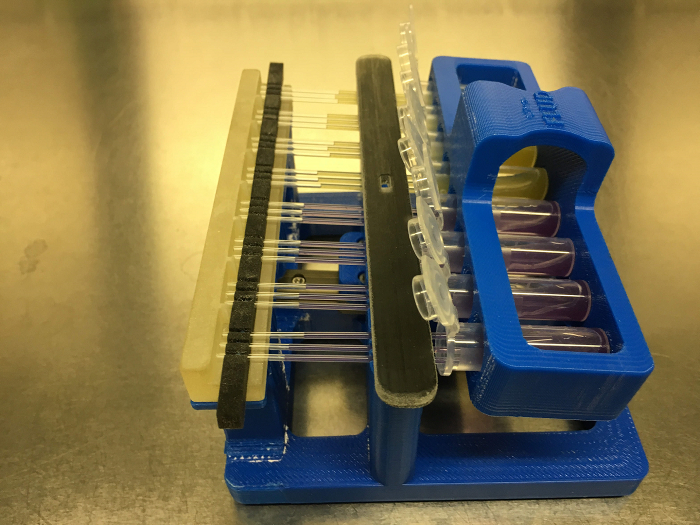
Figure 6: The FLUD System with Capillary Tubes Loading with Media via Capillary Action. Please click here to view a larger version of this figure.
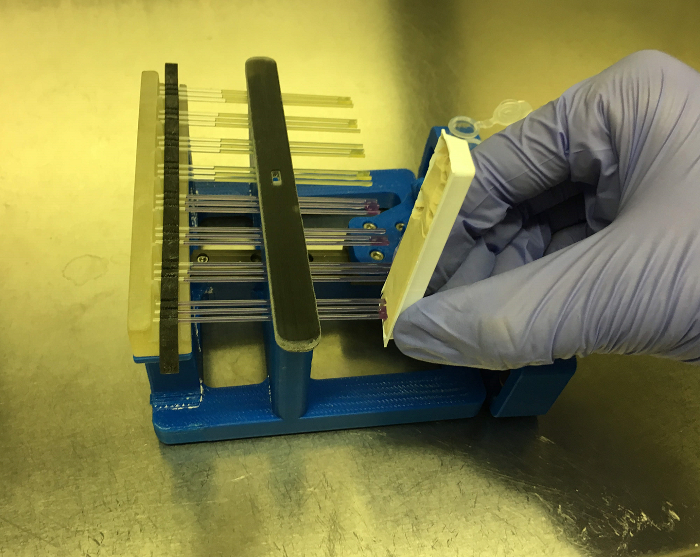
Figure 7: Sealing Filled Capillary Tubes on the FLUD System One Triplicate Set at a Time Using a Sealant Block. This sealant block had plastic along the edges that was cut off to prevent contact with neighboring triplicate sets during sealing. Please click here to view a larger version of this figure.
- Incubation
- Remove the rubber tamp over the tube midsections and lift the rubber cradle off the main apparatus. This should take all the capillary tubes with it. Now set the cradle and the tubes being held onto the imaging rack. This rack has three stubs that fit into the cradle, as well as small guide channels to set the tubes into.
- Set the imaging rack as a whole into the clear plastic incubation box. Soak small amounts of sterile paper towels in sterile water and place along the two shorter sides of the box to provide humidity during incubation. (See Figure 8)
- Close the box completely and set inside a 37 °C incubator, making sure to keep the tubes horizontal. Incubate for 48 h.
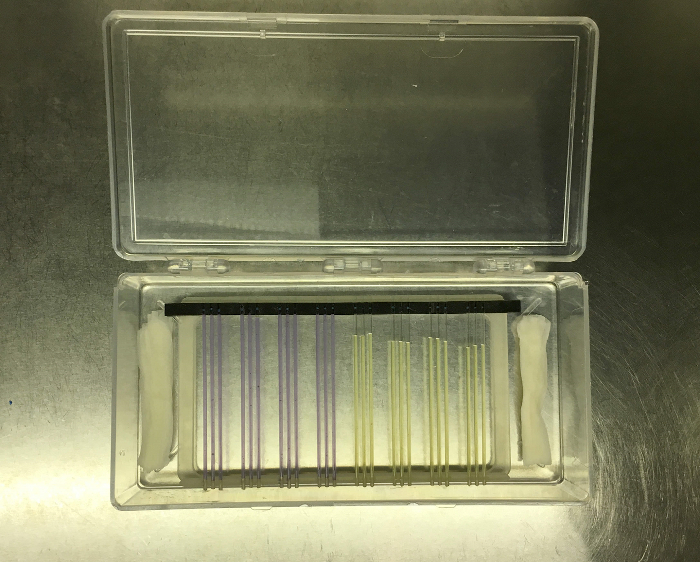
Figure 8: Capillary Tubes in Rubber Cradle Transferred from FLUD System to an Imaging Rack, Which has been Placed in a Clear Incubation Box Alongside Damp Paper Towels to Provide Humidity. Please click here to view a larger version of this figure.
- Imaging and extraction
- Remove the imaging rack holding the tubes from the incubation box and set it on a lightbox, illuminated from below. With the tubes already in the imaging rack, the triplicate sets will be properly spaced and ready to image immediately.
- Focus the camera on the tubes such that all are visible in the field of view and light from the light box provides sufficient contrast and visualization of the color in the tube dyes. Photograph from directly above.
- To extract the contents of the tubes, remove the capillary tubes from the rubber cradle one set of triplicates at a time. Gently lift the tubes up and out of the cradle or slide them out.
- For each set of triplicates, follow the extraction procedure detailed in steps 7.1 through 7.3.
Access restricted. Please log in or start a trial to view this content.
Results
Microbiological growth across the various chemical conditions induced within the samples varied dramatically in some cases and more subtly in others. Many changes in activity were visual in nature, being readily apparent as soon as the incubation period ended. In the example of pH manipulation, the samples across the pH spectrum varied greatly as shown by multiple factors that became apparent after incubation. When no sputum samples were added to the media, the only change exhibited acros...
Access restricted. Please log in or start a trial to view this content.
Discussion
The microbiological makeup of a lung with CF contains a great variety of organisms, but the conditions within the lung likely have a significant influence on what kinds of microbes can survive and thrive13,15. Specific mechanisms through which these conditions change and the exact effects they have on the lung microbiome are generally unclear at present. In this experimental method, we present an analysis of microbiological changes based upon manipulated chemical...
Access restricted. Please log in or start a trial to view this content.
Disclosures
The authors have nothing to disclose.
Acknowledgements
The authors would like to acknowledge Vertex Pharmaceuticals and the Cystic Fibrosis Research Innovation Award for funding R. Quinn and the NIH/NIAID for funding grant 1 U01 AI124316-01, a systems biology approach to treatment of multi-drug resistant pathogens. We would also like to thank the Department of Mechanical and Aerospace Engineering at UCSD's undergraduate mechanical engineering senior design course for facilitating the collaboration with the engineering aspects of this work.
Access restricted. Please log in or start a trial to view this content.
Materials
| Name | Company | Catalog Number | Comments |
|---|---|---|---|
| Color-Coded Capillary Tubes | Fisher Scientific | 22-260943 | |
| Cha-seal Tube Sealing Compound | Kimble-Chase | 43510 | |
| Mucin from porcine stomach | Sigma | M1778 | |
| Ferritin, cationized from horse spleen | Sigma | F7879 | |
| Salmon sperm DNA Sodium salt (sonified) | AppliChem Panreac | A2159 | |
| MEM Nonessential Amino Acids | Corning cellgro | 25-025-CI | |
| MEM Amino Acids | Cellgro | 25-030-CI | |
| Egg Yolk Emulsion, 50% | Dalynn Biologicals | VE30-100 | |
| Potassium Chloride | Fisher Scientific | P2157500 | |
| Sodium Chloride | Fisher Scientific | S271500 | |
| 15 mL centriguge tubes with Printed Graduations and Flat Caps | VWR | 89039-666 | |
| 50 mL centrifuge tubes with Printed Graduations and Flat Caps | VWR | 89039-656 | |
| 1.5 mL microcentrifuge tubes | Corning | MCT-150-R | |
| 2.0 mL microcentrifuge tubes | Corning | MCT-200-C |
References
- Quinn, R. A., et al. A Winogradsky-based culture system shows an association between microbial fermentation and cystic fibrosis exacerbation. ISME J . 9, 1024-1038 (2015).
- Quinton, P. M. Cystic fibrosis: impaired bicarbonate secretion and mucoviscidosis. Lancet. 372 (9636), 415-417 (2008).
- Harrison, F. Microbial ecology of the cystic fibrosis lung. Microbiology. 153 (Pt 4), 917-923 (2007).
- Caverly, L. J., Zhao, J., LiPuma, J. J. Cystic fibrosis lung microbiome: Opportunities to reconsider management of airway infection. Pediatr pulmonol. 50, Suppl 4. S31-S38 (2015).
- Blainey, P. C., Milla, C. E., Cornfield, D. N., Quake, S. R. Quantitative analysis of the human airway microbial ecology reveals a pervasive signature for cystic fibrosis. Sci Transl Med. 4 (153), 153ra130(2012).
- Willner, D., et al. Spatial distribution of microbial communities in the cystic fibrosis lung. ISME J. 6 (2), 471-474 (2012).
- Delhaes, L., et al. The airway microbiota in cystic fibrosis: a complex fungal and bacterial community--implications for therapeutic management. PloS one. 7 (4), e36313(2012).
- Rogers, G. B., et al. D. Bacterial diversity in cases of lung infection in cystic fibrosis patients: 16S ribosomal DNA (rDNA) length heterogeneity PCR and 16S rDNA terminal restriction fragment length polymorphism profiling. J clin microbiol. 41 (8), 3548-3558 (2003).
- Stenbit, A. E., Flume, P. A. Pulmonary exacerbations in cystic fibrosis. Curr Opin Pulm Med. 17 (6), 442-447 (2011).
- Twomey, K. B., et al. Microbiota and metabolite profiling reveal specific alterations in bacterial community structure and environment in the cystic fibrosis airway during exacerbation. PloS one. 8 (12), e82432(2013).
- Carmody, L. A., et al. Changes in cystic fibrosis airway microbiota at pulmonary exacerbation. Ann. Am. Thorac. Soc. 10 (3), 179-187 (2013).
- Worlitzsch, D., et al. Effects of reduced mucus oxygen concentration in airway Pseudomonas infections of cystic fibrosis patients. J. Clin. Invest. 109 (3), 317-325 (2002).
- Cowley, E. S., Kopf, S. H., LaRiviere, A., Ziebis, W., Newman, D. K. Pediatric Cystic Fibrosis Sputum Can Be Chemically Dynamic, Anoxic, and Extremely Reduced Due to Hydrogen Sulfide Formation. mBio. 6 (4), e00767-e00715 (2015).
- Sriramulu, D. D., Lünsdorf, H., Lam, J. S., Römling, U. Microcolony formation: a novel biofilm model of Pseudomonas aeruginosa for the cystic fibrosis lung. J. Med. Microbiol. 54 (Pt 7), 667-676 (2005).
- Quinn, R. A., et al. Biogeochemical forces shape the composition and physiology of polymicrobial communities in the cystic fibrosis lung. mBio. 5 (2), (2014).
Access restricted. Please log in or start a trial to view this content.
Reprints and Permissions
