Maternal infection is a risk factor for neurodevelopmental disorders. Mouse models of maternal immune activation (MIA) may elucidate infection's impact on brain development and function. Here, general guidelines and a procedure are provided to produce reliably resilient and susceptible offspring exposed to MIA.
Method Article
Generating a Reproducible Model of Mid-Gestational Maternal Immune Activation using Poly(I:C) to Study Susceptibility and Resilience in Offspring
In This Article
Summary
Abstract
Maternal immune activation (MIA) during pregnancy is consistently linked to increased risk of neurodevelopmental and neuropsychiatric disorders in offspring. Animal models of MIA are used to test causality, investigate mechanisms, and develop diagnostics and treatments for these disorders. Despite their widespread use, many MIA models suffer from a lack of reproducibility and almost all ignore two important aspects of this risk factor: (i) many offspring are resilient to MIA, and (ii) susceptible offspring can exhibit distinct combinations of phenotypes. To increase reproducibility and model both susceptibility and resilience to MIA, the baseline immunoreactivity (BIR) of female mice before pregnancy is used to predict which pregnancies will result in either resilient offspring or offspring with defined behavioral and molecular abnormalities after exposure to MIA. Here, a detailed method of inducing MIA via intraperitoneal (i.p.) injection of the double stranded RNA (dsRNA) viral mimic poly(I:C) at 12.5 days of gestation is provided. This method induces an acute inflammatory response in the dam, which results in perturbations in brain development in mice that map onto similarly impacted domains in human psychiatric and neurodevelopmental disorders (NDDs).
Introduction
Epidemiological evidence links maternal infection to increased risk of psychiatric and NDDs, including schizophrenia (SZ) and autism spectrum disorder (ASD)1,2,3,4,5,6,7. The MIA mouse model was developed to test causality and the mechanistic role of MIA in the etiology of these disorders, as well as to identify molecular biomarkers and develop both diagnostic and therapeutic tools4,6. Despite the utility of this model and its increasing popularity, there is considerable variability in MIA induction protocols within the field, making it difficult to compare results across studies and replicate findings8,9. In addition, most iterations of the model do not investigate two important translational aspects of MIA: (i) many offspring are resilient to MIA, and (ii) susceptible offspring can exhibit distinct combinations of phenotypes8.
To generate a reproducible MIA model, investigators should report at least one quantitative measure of the magnitude of MIA induced in dams. To induce MIA during gestation, our lab performs intraperitoneal (i.p.) injections of the double stranded RNA viral mimic polyinositic: polycytidilic acid [poly(I:C)]. Poly(I:C) induces an immune cascade similar to influenza viruses as it is recognized by toll-like receptor 3 (TLR3)10. As a result, poly(I:C) activates the acute phase response that results in rapid elevation of proinflammatory cytokines8,11,12. Previous studies have demonstrated that the elevation of proinflammatory cytokines, including interleukin-6 (IL-6), is necessary to produce behavioral abnormalities and neuropathology in offspring as a result of MIA11,12,13. Thus, the level of IL-6 in maternal serum collected during its peak at 2.5 h following poly(I:C) injection is a compelling quantitative measure of MIA that can be used to compare results across laboratories within the field.
In order to generate an MIA model that addresses the translationally essential elements of resilience and susceptibility with a single induction protocol8,14, researchers can combine typical induction approaches with characterization of the dam's baseline immunoreactivity (BIR) before pregnancy8. Recently, it was discovered that virgin female C57BL/6 mice show a wide range of IL-6 responses to a low-dose exposure to poly(I:C) before pregnancy8. It is only a subset of these females that go on to produce susceptible offspring, and only at certain magnitudes of immune activation as dictated by the combination of BIR and poly(I:C) dose8. MIA induces phenotypes in an inverted U pattern; offspring show the greatest behavioral and molecular aberrations when dams are moderately immunoreactive, and the magnitude of maternal inflammation reaches, but does not exceed, a critical range8. Here, a detailed method of how to reliably create both resilient and susceptible offspring with divergent behavioral phenotypes as a result of mid-gestational injection of poly(I:C) is provided.
Access restricted. Please log in or start a trial to view this content.
Protocol
All protocols are performed under the approval of the University of California-Davis Institutional Animal Care and Use Committee (IACUC).
1. Animal preparation
- When acquiring animals, keep the following parameters consistent to ensure maximal reproducibility.
- Vendor and vendor location: as previously reported, wild type C57BL/6J mice exhibit different responses to the same dose of poly(I:C) depending on the vendor8. Choose a vendor and mouse strain which show a consistent response. For the experiments here, C57BL/6 mice obtained from Charles River exhibited consistent changes in behavior after exposure to mid-gestational MIA, while those purchased from Taconic show a greater magnitude response, with some differences across treatment groups compared to Charles River mice8.
- Strain: C57BL/6J mice are the most commonly utilized, but BTBR mice and other strains show differential responses to mid-gestational MIA9. Note these differential responses, as these enhance reproducibility of the method and can be a potential variable in contributing to differential outcomes in offspring.
- To ensure minimal variability, use only virgin females for MIA studies8 and clearly note details in methods.
- Age at shipping and acclimation period: mice shipped before 7 weeks show dysregulated endocrine systems15. Allow animals to acclimate for a minimum of 48 h16,17. Order mice to be shipped at 7 weeks (± 2 days) and inject for BIR at 8 weeks (± 2 days).
- Age at mating: animals' immune systems are dynamic over their lifespan. Take care to minimize variability by keeping age at mating/injection as consistent as possible18,19,20. Mate female mice at 9 weeks (± 2 days). Do not use males over 6 months of age for mating.
2. Poly(I:C) lot testing and preparation
- Prepare high molecular weight poly(I:C) as described below.
- Autoclave 1.5 mL microcentrifuge tubes for storage. Resuspended poly(I:C) can be stored at -20 °C, but repeated freeze thaws can impact potency. Heat water bath to 70 °C.
- Using sterile technique, add 10 mL of sterile physiological saline (NaCl 0.9%) to lyophilized poly(I:C) using a syringe. Heat in 70 °C water bath for 15 min to allow full annealing. Remove and allow to cool to room temperature.
- In a sterile hood, add an additional 40 mL of physiological saline to the bottle and invert several times to mix. Remove the top of the poly(I:C) bottle or use a syringe to aliquot into 1.5 mL microcentrifuge tubes. Store at -20 °C.
- Prepare mixed molecular weight poly(I:C) as described below.
- Autoclave 1.5 mL microcentrifuge tubes for storage. Resuspended poly(I:C) can be stored at -20 °C but repeated freeze thaws can impact potency. Set water bath to 50 °C.
- Using sterile technique, add 10 mL of sterile 0.9% NaCl to lyophilized poly(I:C) and secure the lid. Heat in 50 °C water bath for 25 min to allow full annealing. Remove and allow to cool to room temperature.
- Using sterile technique, aliquot into 1.5 mL microcentrifuge tubes and store at -20 °C.
- Administer poly(I:C) through intraperitoneal (i.p.) injections as described below.
- Weigh the mouse to determine accurate dosing. Utilizing a 0.5 cc insulin needle, draw up resuspended poly(I:C). Scruff the mouse and flip so the abdomen is exposed.
- Using the other hand, insert the needle to a depth of approximately 0.5 cm between the anterior two nipples at an angle of about 45°.
- Draw up to determine that no blood or urine enters the syringe before injecting. If either occurs, reposition the needle and try again. Inject slowly. If the poly(I:C) bubbles out, the injection was likely subcutaneous. A successful injection placement will result in nothing being drawn up once the needle is inserted, and no leaking once it is removed.
- Test MMW poly(I:C) lot potency as described below8.
- Obtain desired form of poly(I:C). Some manufacturers will allow researchers to place a hold on a full or partial lot while potency is tested so that multiple bottles can be obtained later simultaneously. Typically, these can be stored lyophilized at -20 °C for several years if freeze-thaw is avoided.
- Obtain or breed 30 pregnant dams for testing. At E12.5, perform i.p. injections of 20, 30, and 40 mg/kg in a minimum of 10 mice per dose.
- At 2.5 h post-injection, collect blood via tail bleed. Note that peripheral blood and trunk blood can differ in cytokine levels, so keep the collection method consistent within a study.
- Allow blood to clot overnight at room temperature. After 12-24 h, spin down blood samples at 3,768 x g at 4 °C for 8 min. Collect serum and store at -80 °C until analyzed.
- Isolate serum and measure IL-6 levels via ELISA or Luminex. Keep measurement tools consistent as there is significant variability in the total concentration measured with different modalities and manufacturers. Determine magnitude of IL-6 response needed to induce phenotypes utilizing a pilot cohort.
3. Baseline immunoreactivity (BIR) testing
NOTE: Figure 1 shows the schematic of the steps. Use a different molecular weight poly(I:C) for BIR testing as compared to gestational to lower the likelihood of adaptive immune responses to the compound.
- Order virgin female mice to be shipped at 7 weeks old. Upon arrival, group and house four to five mice in a cage and keep group housed until mated. Use ear notch or any another identification system.
- Inject females intraperitoneally with 5 mg/kg of poly(I:C) 1 week after arrival. At 2.5 h post-injection, when circulating IL-6 is highest6, collect whole blood from injected animals via tail snip.
- Allow blood to clot overnight at room temperature. After 12-24 h, spin down blood samples at 3,768 x g at 4 °C for 8 min.
- Collect a minimum of 32 µL of serum from each sample. Freeze at -80 °C until ready to test for cytokines. To measure IL-6 levels most consistently, utilize a multiplex assay such as Luminex. Keep measurement tools consistent as there is significant variability in the total concentration measured with different modalities and manufacturers.
- For Luminex assay protocol, refer to Bruce et al.21.
- Using relative IL-6 levels, divide animals into low (bottom quartile), medium (middle two quartiles), and high (highest quartile) BIR groups.
4. Tail bleed method for blood collection
NOTE: To avoid use of potentially immunomodulatory sedatives, use the tail bleed method of blood collection.
- To set up, place a soldering stand and restraint cup on a surface on the side of the non-dominant hand. In a 35 mm Petri dish, add 1-2 mL of food-grade, edible oil. Remove the cap from the quick blood stopper and place near the setup.
- Place a few layers of paper towel on the soldering stand and the first capillary tube in a clip, positioning it near where the mouse's tail tip will be held and kept parallel to the table's surface. Have a razor blade handy.
- To collect the blood, perform the following steps.
- At the required time, remove the mouse from the cage and place under the cup with its tail coming out of the notch at the base. Using a fresh razor blade, clip the very end (1-2 mm) of the tail off and collect the first drop of blood in the capillary tube clipped to the soldering stand.
- Dip fingers of dominant hand into the edible oil and use to squeeze from the base of the tail to the tip, guiding the tail tip to the capillary tube to collect resulting drops of blood. Continue until ~200 µL of blood has been collected.
- Put a small end cap on the tapered end of capillary tube before the top cap. If the top cap is put on first, sample will be expelled from the tapered end of the tube. Put tube in protective outer shell.
- Allow to clot overnight at room temperature. Cool a microcentrifuge to 4 °C and spin down blood as stated in step 3.3.
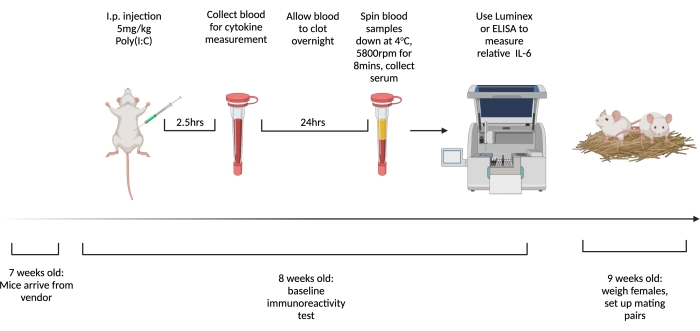
Figure 1. The timeline for testing virgin females' baseline immunoreactivity and mating. Order mice to arrive at 7 weeks old and allow to acclimate to facility for 1 week. Inject animals with 5 mg/kg of poly(I:C) and 2.5 h later draw blood. Allow blood to clot overnight, then centrifuge at 3,768 x g, 4 °C for 8 min. Collect serum and assess relative IL-6 levels via ELISA or Multiplex. At 9 weeks old, set up mating pairs. Created using BioRender.com Please click here to view a larger version of this figure.
5. Weight based method for mating and gestational E12.5 injection
NOTE: Figure 2 shows the schematic of the steps. Two methods can be used to set up mating pairs and determine the E12.5 time point. The first, timed-mating, is described elsewhere22. Weight-based calculations can also be used to assess for an E12.5 pregnancy23. The benefit of this approach is that it allows time-locking of the dam's age at mating, decreasing variability in the immune response. This procedure is used here.
- Place males in clean cages and allow them to acclimate for a minimum of 2 h. This decreases the likelihood of female aggression as males will already form a dominant scent in the cage.
- Set up single male, single female breeding pairs by adding the female to the male's cage. Before placing her in the cage, weigh her and record the weight. Add a small handful of sunflower seeds to each cage to increase mating efficiency.
- To determine weight gain range, perform the following steps.
- Obtain a test group of females and set up mating pairs, recording weight at time of mating.
- When females begin to appear visibly pregnant, weigh them and divide in subsets of 8.5 g, 9.5 g, 10.5 g, and 11.5 g of weight gained. Fetuses at E12.5 have just begun to develop distinct digits in their paws. Use fetal morphology to determine average weight gain to reach E12.5.
- At 12 days after mating, weigh females and determine weight gain. In a test facility, females consistently gain 9.5-10.5 g from time of mating to E12.5. Inject via i.p. the dose of solubilized poly(I:C) determined in step 2.3.2 when the female's weight gain falls within the predetermined range.
- Observe the response to MIA in dams using the following parameters.
- Sickness behavior: Collect subjective scores on a scale of 1-3 for how active dams become in response to being handled, where 1 is little or no movement in response to being handled and 3 is a normal response to capture and restraint. Animals with greater immune responses will show less resistance to handling8.
- Febrile response: Using an IR thermometer, collect pre-injection and 2.5 h post-injection temperatures. Animals with greater magnitude immune responses often display hypothermia in response to greater immune activity8.
- Weight change: Weigh animals at 24 h post-injection. Animals with greater magnitude immune responses generally lose more weight8.
- Measure gestational IL-6 levels as follow8.
- At 2.5 h post-injection, collect blood with the preferred method. Allow blood to clot overnight at room temperature. After 12-24 h, spin down blood samples at 3,768 x g at 4 °C for 8 min.
- Collect serum and store at -80 °C until analyzed. Isolate serum and measure IL-6 levels via ELISA or Luminex. Keep measurement tools consistent as there is significant variability in the total concentration measured with different modalities and manufacturers.
- Singly house the dam after injection with appropriate enrichment like nestlets and enrichment devices. Keep all enrichment consistent as alterations in enrichment can have significant impacts on rodent behavior24,25,26,27,28,29.
- Gestation time for C57 mice ranges from 18.5-20.5 days. Perform litter checks to determine if animals were born within this range to ensure injection was performed at the correct time point. When checking for litters, disturb the cage as little as possible. Stress immediately after the litter is born can increase the risk of cannibalization.
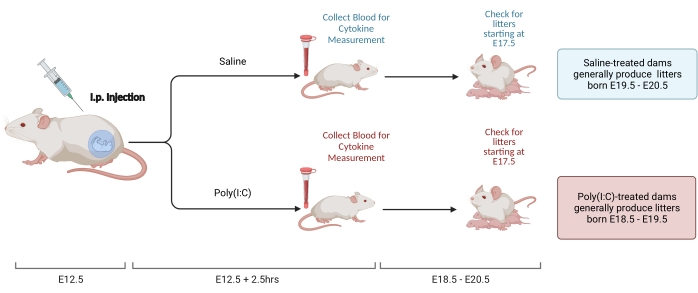
Figure 2. MIA induction. MIA induction requires assessment of pregnancy, i.p. injection of poly(I:C), and litter checks to ensure correct timing of maternal inflammation. After assessing gestational day either via timed mating or the weight-gain method, deliver an i.p. injection of poly(I:C) at E12.5. Collect a blood sample at 2.5 h after injection to confirm immune activation and determine level of IL-6 activation. Litters will be born at approximately E18.5-E20.5. Created using BioRender.com Please click here to view a larger version of this figure.
6. Investigation of alterations in behavior in adult MIA and control offspring (optional)
- Starting at P60 and before conducting behavioral tests, acclimate animals to human contact with gentle handling for 1 min a day for 3 consecutive days. Make sure that cage change days do not occur on the same day that behavioral tests are performed.
- Always allow mice to acclimate to the testing room for 30-60 min before starting behavioral tests. Use dimly lit (15-20 lux) rooms to minimize anxiety.
- For repetitive grooming, place mice alone in clean, bedding-free cages with lids. Using a camera, record the mice in these cages for 20 min. The first 10 min function as an acclimation period, the latter 10 min are the test period.
- Using saved videos and a stopwatch, score cumulative grooming time for each mouse during the 10 min test period. Other behaviors that can be scored from these videos include rearing (standing on hind legs), freezing, and jumping8.
- Use other common tests for the MIA model such as prepulse inhibition (PPI) 14,30,31,32, open field12,33,34, 3-chamber social approach13,35,36, novel object recognition37, y-maze30, elevated plus maze33, and context/cued fear conditioning38.
- Postnatal immunoblotting8 (optional)
- At P0, decapitate rapidly and dissect fetal brain tissue in HBSS, freeze in liquid nitrogen, and store at −80 °C.
- Disrupt samples using a probe sonicator with an amplitude of 20% for 5 s in 2x Laemmli buffer, then denature at 85 °C for 5 min. Centrifuge lysate at 16,000 x g for 10 min at room temperature. Collect supernatant and store at -80 °C.
- Measure total protein content using a commercial BCA protein assay kit, following manufacturer's instruction, and use bovine serum albumin as the calibration standard.
- Add dithiothreitol as a reducing agent to the samples as a final concentration of 100 mM. Heat to 85 °C for 2 min before loading onto a gel.
- Run 5 µg/lane of protein under reducing conditions on 7.5% TGS gels and transfer electrophoretically onto PVDF membranes. Block membranes with blocking buffer and incubate with chosen antibodies.
- Wash three times with TBS + 0.05% Tween 20 and incubate membranes for 45 min with fluorescent-tagged secondary antibodies.
- Wash an additional four times in TBS/Tween 20 and image results. Standardize results using β-tubulin, detected using anti-β-tubulin.
Access restricted. Please log in or start a trial to view this content.
Results
Not all animals exposed to 30 mg/kg of poly(I:C) at E12.5 produce offspring with consistent behavioral abnormalities8,31. Though both 30 mg/kg and 40 mg/kg of poly(I:C) reliably produce sickness behaviors in dams, including decreased activity levels, hypothermic responses, and weight loss, and also cause significant elevations in IL-6, only a subset of litters exposed to MIA will go on to develop behavioral abnormalities in domains similar to those observed in hu...
Access restricted. Please log in or start a trial to view this content.
Discussion
Maternal infection alters the course of brain development in humans and in both rodents and nonhuman primates4,5,7. Here, a procedure to induce MIA in mice at a mid-gestational time point using poly(I:C) is outlined. This method incorporates assessment of BIR before pregnancy, which increases reproducibility and offers the chance to mechanistically investigate mechanisms that lead to resilience and susceptibility of offspring to...
Access restricted. Please log in or start a trial to view this content.
Disclosures
The authors have no conflicts of interest to disclose.
Acknowledgements
We thank Dr. Myka Estes for her persistence in addressing variability in the mouse MIA model and all of the contributors in Estes et al.8 for their work that led to the development of the methods protocol described here. The research reported here was supported by NIMH 2P50 MH106438-06 (A.K.M.) and NIMH T32MH112507 (K.P.).
Access restricted. Please log in or start a trial to view this content.
Materials
| Name | Company | Catalog Number | Comments |
|---|---|---|---|
| 0.9% NaCl physiological endotoxin free saline | Sigma-Aldrich | 7647-14-5 | Control and vehicle for Poly(I:C) |
| 35mm petri dish | Thomas Scientific | 1219Z45 | Used to hold oil during tail bleed |
| 7.5% TGX gels | Bio-rad | 4561084 | Optional |
| Ancare Nestlets | Fisher Scientific | NC9365966 | Optional |
| anti-β-tubulin | Millipore | MAB3408 | Optional |
| Bio-Plex Pro Mouse Cytokine Standards Group I | Bio-rad | 171I50001 | |
| Bio-Plex Pro Reagent Kit with Flat Plate | Bio-rad | 171304070M | |
| Bovine Serum Albumin | ThermoFisher | 23209 | Optional |
| Centrifuge | Eppendorf | 5810R | Optional |
| Covidien Monoject 1/2 mL Insulin Syringe with 28G x 1/2 in. Needle | Spectrum | 552-58457-083 | |
| Dithiothreitol | Sigma-Aldrich | D9779-10G | Optional |
| Environmental enrichment | Bio-serv | K3327 and K3322 | Optional |
| Ethovision | Noldus | Ethovision | Optional |
| Fluorsecent-tagged seondary ntibodies | Li-cor | 925-32213 and 925-68072 | Optional |
| Food-grade edible oil (like olive, canola or grapeseed) | Various vendors | Use to lubricate tail during tail bleeds | |
| HBSS | ThermoFisher | 14060040 | Optional |
| High molecular weight polyinositic:polycytidilic acid | Invivogen | #tlrl-pic-5 | Used to establish females' BIR |
| Humane Mouse Restrainer | AIMS | 1000 | Used to restrain mouse during tail bleeds |
| Image Studio Software | Licor | 5.2 | Optional |
| Laemmli buffer | Bio-rad | 1610737EDU | Optional |
| Luminex200 | ThermoFisher | APX10031 | |
| Microvette CB300 300μl Serum capillary tube | Sarstedt | 16.440.100 | |
| Mixed molecular weight polyinositic:polycytidilic acid | Sigma-Aldrich | #P0913 | Gestational induction of MIA |
| monoclonal anti-MEF2A | AbCam | ab76063 | Optional |
| monoclonal anti-STAT3 | Cell signaling | 12640S | Optional |
| Observer | Noldus | Observer | Optional |
| Odyssey blocking buffer (TBS) | Li-cor | 927-50003 | Optional |
| Odyssey CLx imaging system | Li-cor | 9140 | Optional |
| Omnipure PBS | Millipore | 65054L | Optional |
| Pierce BCA Protein Assay Kit | ThermoFisher | 23227 | Optional |
| polyclonal anti_TH | Pel-Freez | P4101-150 | Optional |
| PVDF membrane | Bio-rad | 162-0177 | Optional |
| Qsonica Sonicator Q500 | Fisher Scientific | 15-338-282 | Optional |
| Quick blood stopper | Petco | 17140 | |
| Seal-Rite 1.5 ml microcentrifuge tube, natural non-sterile | USA Scientific | 1615-5500 | |
| Soldering stand | Amazon | B08Y12QC73 | Used to hold capillary tube during tail bleeds |
| Sunflower seeds | Bio-serv | S5137-1 | Use to increase breeding efficiency |
| The Bio-Plex Pro Mouse IL-6 set, | Bio-rad | 171G5007M | |
| Tris base | Fisher Scientific | BP152-1 | Optional |
| Tween 20 | Bio-rad | 23209 | Optional |
References
- Adams, W., Kendell, R. E., Hare, E. H., Munk-Jørgensen, P. Epidemiological evidence that maternal influenza contributes to the aetiology of schizophrenia. An analysis of Scottish, English, and Danish data. The British Journal of Psychiatry: The Journal of Mental Science. 163 (4), 522-534 (1993).
- Brown, A. S., et al. Serologic evidence of prenatal influenza in the etiology of schizophrenia. Archives of General Psychiatry. 61 (8), 774-780 (2004).
- Brown, A. S., Derkits, E. J. Prenatal infection and schizophrenia: a review of epidemiologic and translational studies. The American Journal of Psychiatry. 167 (3), 261-280 (2010).
- Patterson, P. H. Immune involvement in schizophrenia and autism: etiology, pathology and animal models. Behavioural Brain Research. 204 (2), 313-321 (2009).
- Patterson, P. H. Maternal infection and immune involvement in autism. Trends in Molecular Medicine. 17 (7), 389-394 (2011).
- Estes, M. L., McAllister, A. K. Immune mediators in the brain and peripheral tissues in autism spectrum disorder. Nature Reviews. Neuroscience. 16 (8), 469-486 (2015).
- Estes, M. L., McAllister, A. K. Maternal immune activation: Implications for neuropsychiatric disorders. Science. 353 (6301), 772-777 (2016).
- Estes, M. L., et al. Baseline immunoreactivity before pregnancy and poly(I:C) dose combine to dictate susceptibility and resilience of offspring to maternal immune activation. Brain, Behavior and Immunity. 88, 619-630 (2020).
- Kentner, A. C., et al. Maternal immune activation: reporting guidelines to improve the rigor, reproducibility, and transparency of the model. Neuropsychopharmacology. 44 (2), 245-258 (2019).
- Zhou, Y., et al. TLR3 activation efficiency by high or low molecular mass poly I:C. Innate Immunity. 19 (2), 184-192 (2013).
- Hsiao, E. Y., Patterson, P. H. Activation of the maternal immune system induces endocrine changes in the placenta via IL-6. Brain, Behavior and Immunity. 25 (4), 604-615 (2011).
- Smith, S. E., Li, J., Garbett, K., Mirnics, K., Patterson, P. H. Maternal immune activation alters fetal brain development through interleukin-6. The Journal of Neuroscience. 27 (40), 10695-10702 (2007).
- Choi, G. B., et al. The maternal interleukin-17a pathway in mice promotes autism-like phenotypes in offspring. Science. 351 (6276), 933-939 (2016).
- Meyer, U. Neurodevelopmental resilience and susceptibility to maternal immune activation. Trends in Neurosciences. 42 (11), 793-806 (2019).
- Laroche, J., Gasbarro, L., Herman, J. P., Blaustein, J. D. Reduced behavioral response to gonadal hormones in mice shipped during the peripubertal/adolescent period. Endocrinology. 150 (5), 2351-2358 (2009).
- Aguila, H. N., Pakes, S. P., Lai, W. C., Lu, Y. S. The effect of transportation stress on splenic natural killer cell activity in C57BL/6J mice. Laboratory Animal Science. 38 (2), 148-151 (1988).
- Landi, M. S., Kreider, J. W., Lang, C. M., Bullock, L. P. Effects of shipping on the immune function in mice. American Journal of Veterinary Research. 43 (9), 1654-1657 (1982).
- Menees, K. B., et al. Sex- and age-dependent alterations of splenic immune cell profile and NK cell phenotypes and function in C57BL/6J mice. Immunity & Ageing. 18 (1), 3(2021).
- Shaw, A. C., Goldstein, D. R., Montgomery, R. R. Age-dependent dysregulation of innate immunity. Nature Reviews Immunology. 13 (12), 875-887 (2013).
- Starr, M. E., Saito, M., Evers, B. M., Saito, H. Age-associated increase in Cytokine production during systemic inflammation-II: the role of IL-1beta in age-dependent IL-6 upregulation in adipose tissue. The Journals of Gerontology. Series A, Biological Sciences and Medical Sciences. 70 (12), 1508-1515 (2015).
- Bruce, M., et al. Acute peripheral immune activation alters cytokine expression and glial activation in the early postnatal rat brain. Journal of Neuroinflammation. 16 (1), 200(2019).
- Mader, S. L., Libal, N. L., Pritchett-Corning, K., Yang, R., Murphy, S. J. Refining timed pregnancies in two strains of genetically engineered mice. Lab Animal. 38 (9), 305-310 (2009).
- Heyne, G. W., et al. A simple and reliable method for early pregnancy detection in inbred mice. Journal of the American Association for Laboratory Animal Science. 54 (4), 368-371 (2015).
- Hutchinson, E., Avery, A., VandeWoude, S. Environmental enrichment for laboratory rodents. ILAR Journal. 46 (2), 148-161 (2005).
- Bayne, K. Environmental enrichment and mouse models: Current perspectives. Animal Models and Experimental Medicine. 1 (2), 82-90 (2018).
- Toth, L. A., Kregel, K., Leon, L., Musch, T. I. Environmental enrichment of laboratory rodents: the answer depends on the question. Comparative Medicine. 61 (4), 314-321 (2011).
- Sparling, J. E., Barbeau, K., Boileau, K., Konkle, A. T. M. Environmental enrichment and its influence on rodent offspring and maternal behaviours, a scoping style review of indices of depression and anxiety. Pharmacology Biochemistry and Behavior. 197, 172997(2020).
- Xiao, R., Ali, S., Caligiuri, M. A., Cao, L. Enhancing effects of environmental enrichment on the functions of natural killer cells in mice. Frontiers in Immunology. 12, 695859(2021).
- Girbovan, C., Plamondon, H. Environmental enrichment in female rodents: considerations in the effects on behavior and biochemical markers. Behavioural Brain Research. 253, 178-190 (2013).
- Mueller, F. S., Polesel, M., Richetto, J., Meyer, U., Weber-Stadlbauer, U. Mouse models of maternal immune activation: Mind your caging system. Brain, Behavior, and Immunity. 73, 643-660 (2018).
- Mueller, F. S., et al. neuroanatomical, and molecular correlates of resilience and susceptibility to maternal immune activation. Molecular Psychiatry. 26 (2), 396-410 (2021).
- Nyffeler, M., Meyer, U., Yee, B. K., Feldon, J., Knuesel, I. Maternal immune activation during pregnancy increases limbic GABAA receptor immunoreactivity in the adult offspring: implications for schizophrenia. Neuroscience. 143 (1), 51-62 (2006).
- Babri, S., Doosti, M. H., Salari, A. A. Strain-dependent effects of prenatal maternal immune activation on anxiety- and depression-like behaviors in offspring. Brain, Behavior, and Immunity. 37, 164-176 (2014).
- Vigli, D., et al. Maternal immune activation in mice only partially recapitulates the autism spectrum disorders symptomatology. Neuroscience. 445, 109-119 (2020).
- Malkova, N. V., Yu, C. Z., Hsiao, E. Y., Moore, M. J., Patterson, P. H. Maternal immune activation yields offspring displaying mouse versions of the three core symptoms of autism. Brain, Behavior, and Immunity. 26 (4), 607-616 (2012).
- Shin Yim, Y., et al. Reversing behavioural abnormalities in mice exposed to maternal inflammation. Nature. 549 (7673), 482-487 (2017).
- Ito, H. T., Smith, S. E., Hsiao, E., Patterson, P. H. Maternal immune activation alters nonspatial information processing in the hippocampus of the adult offspring. Brain, Behavior, and Immunity. 24 (6), 930-941 (2010).
- Zuckerman, L., Weiner, I. Maternal immune activation leads to behavioral and pharmacological changes in the adult offspring. Journal of Psychiatric Research. 39 (3), 311-323 (2005).
- Mueller, F. S., Polesel, M., Richetto, J., Meyer, U., Weber-Stadlbauer, U. Mouse models of maternal immune activation: Mind your caging system. Brain, Behavior, and Immunity. 73, 643-660 (2018).
- Careaga, M., Murai, T., Bauman, M. D. Maternal immune activation and autism spectrum disorder: from rodents to nonhuman and human primates. Biological Psychiatry. 81 (5), 391-401 (2017).
- Lazic, S. E., Essioux, L. Improving basic and translational science by accounting for litter-to-litter variation in animal models. BMC Neuroscience. 14, 37(2013).
- Spencer, S. J., Meyer, U. Perinatal programming by inflammation. Brain, Behavior, and Immunity. 63, 1-7 (2017).
- Mouihate, A., Kalakh, S. Maternal Interleukin-6 hampers hippocampal neurogenesis in adult rat offspring in a sex-dependent manner. Developmental Neuroscience. 43 (2), 106-115 (2021).
- Zhang, Z., van Praag, H. Maternal immune activation differentially impacts mature and adult-born hippocampal neurons in male mice. Brain, Behavior, and Immunity. 45, 60-70 (2015).
Access restricted. Please log in or start a trial to view this content.
Reprints and Permissions
Request permission to reuse the text or figures of this JoVE article
Request Permission