Despite considerable efforts to treat chronic wounds, success has been limited. The cellular and molecular processes that disrupt normal healing and contribute to the initiation and development of chronic wounds are not well understood. As a result, developing effective treatments for these wounds has proven challenging. This is primarily because of the lack of animal models that mimic chronic wounds in humans and because experimentation in humans with chronic wounds is limited. Previously, we have published a mouse model to study chronic wounds that share many characteristics with diabetic chronic wounds in humans. This model includes the presence of biofilms formed naturally from bacteria found in skin microbiota and the environment without the need to introduce external bacteria into the wounds. Therefore, this model can potentially advance the fundamental understanding of how wounds become chronic. Here, we present an update to the original protocol for developing this mouse model. We have concentrated on decreasing the mortality of mice from ~30% to ~5%. We also describe how this model has been used to understand the initiation and progression of wound chronicity by using next-generation transcriptomic approaches, elucidating bacterial population dynamics during infection and biofilm development, and demonstrating the value of testing the efficacy of treatments, including small molecules. So far, this is the only chronic wound model that does not heal without intervention.
A subscription to JoVE is required to view this content. Sign in or start your free trial.
Method Article
Protocol to Create Chronic Wounds in Diabetic Mice - an Update to the Published Protocol
In This Article
Abstract
Introduction
This is an update to an existing article. Please click here to see the original version.
Access restricted. Please log in or start a trial to view this content.
Protocol
UPDATES:
This is an update to the protocol presented previously1
All experiments were completed in accordance and compliance with federal regulations and University of California policy and procedures have been approved by the University of California, Riverside IACUC.
1. Animal
Add the following Note to Step 1.1:
NOTE: If homozygous diabetic mice are directly purchased from suppliers, house the mice in a conventional vivarium to allow colonization of the skin with normal skin flora. Both males and females can be used.
Add the following Section after Step 1.3:
1.4.Perform genotyping
NOTE: Perform genotyping after breeding the animal as described previously up to step 1.31. The following protocol was modified from a previously published procedure2. Both male and female mice can be genotyped as early as 14-21 days when weaning.
1.4.1. Crude DNA extraction
1.4.1.1. Collect ear punch biopsy from the mouse and place the tissue sample in a microcentrifuge tube.
1.4.1.2. Add 180 µL of 50 mM NaOH, ensuring the sample is submerged.
1.4.1.3. Incubate the sample at 95 °C for 10 min, depressurizing and vortexing the tube every 5 min.
1.4.1.4. Cool down the sample on ice for at least 1 min.
1.4.1.5. Add 20 µL of 1 M Tris HCl at pH 8.0 and vortex.
1.4.1.6. Store samples at -20 °C until use.
1.4.2. Polymerase chain reaction
1.4.2.1 Assemble the following primer mix in a microcentrifuge tube (Table of Primers).
NOTE: The primers amplify the region around the point mutation of LepR.
1.4.2.2. Set up 20 µL of polymerase chain reactions in PCR tubes. Add 10 µL of 2x Taq polymerase master mix (which contains Taq DNA Polymerase, dNTPs, MgCl2, and KCI), 1 µL of primer mix (see Table of Primers), 4 µL of crude DNA extract, and 5 µL of H2O.
1.4.2.3. Set up the thermocycling parameters as follows: 94 °C for 2 min; 40 cycles of 97 °C for 30 s, 52 °C for 45 s, and 72 °C for 45 s; followed by 72 °C for 2 min and 10 °C for infinite hold.
1.4.2.4. After PCR is completed, add 4 µL of 6x DNA Loading Dye to the PCR products and separate on a 2% agarose gel (Figure 1).
NOTE: Each PCR reaction generates 3 PCR products: 610 bp common product, 406 bp mutant T allele product, and 264 bp wild-type G allele. Wild-type genotype consists of the 610 bp and 264 bp products, heterozygote genotype consists of all three products, and the db/db genotype consists of the 610 bp and 406 bp products.
2. Vivarium and husbandry
Replace Step 2.1 with the following step and the note:
2.1 House db/db mice in a conventional vivarium (not a barrier/specific pathogen-free facility) so that a microflora can establish itself on the skin of db/db mice. To specifically model humans who suffer from chronic wounds, do not take special precautions to prevent exposure to natural pathogens found in mouse environment, as essential pathogens of the study may be lost with stricter vivarium clean conditions.
NOTE: As these mice are very large and diabetic, it is best to house up to 3 db/db mice per cage before using them for chronic wound experiments.
3. Requirements for the development of chronic wounds
Add the following step after Step 3.2
3.3. Keep the wound covered with transparent film dressing at all times to avoid drying of the wound tissue.
5. Reagent Setup
Add the following note after 5.2
NOTE: Only use ATZ from the company listed in the Table of Materials. ATZ from other companies is not compatible with this model and will increase mortality.
6. Surgery
6.1. Treatment and anesthesia
NOTE: An updated anesthesia regime is described below.
6.1.5. In an open system, administer 5% isoflurane delivered with O2 to the mouse at a flow rate (2-3.5 L/min) to induce anesthesia. Continuously monitor the status of the mouse.
NOTE: Once the mouse is unconscious or no longer moving, place it on a white surgical pad and fit the head with a nose cone that is secured to the vaporizer to allow continuous administration of isoflurane during surgery.
6.1.6. In an open system, administer 1% isoflurane at the same flow rate during surgery and adjust the flow of isoflurane to maintain the depth of anesthesia.
6.3. Wounding
6.3.5. Stop the administration of 1% isoflurane to the mouse at the end of the procedure.
7. Post-surgery treatment and recovery
Replace Step 7.1 in the original protocol with the following step and note:
7.1. After applying the transparent film dressing right after the surgery, using an insulin syringe, deposit MSA topically on the top of the wound created on the dorsum of the mouse by penetrating the transparent film dressing with the needle. Use 150 mg/kg of MSA in sterile PBS solution within 10 min after surgery. This concentration was determined after an extensive literature search, as explained previously3,4.
NOTE: MSA tends to precipitate if not constantly agitated. Ensure MSA is completely dissolved in the solution before applying it to the wound to deliver the calculated dose to the mouse.
Replace step 7.4 in the original protocol with the following step:
7.4. Administer the second dose of Buprenex 6 h after surgery. Then, dose the mice periodically according to the local IACUC rules for the first 48 h.
NOTE: It is not recommended to use extended-release formulations of analgesics that are required to be administered subcutaneously in this mouse model. The lipid-bound buprenorphine may be suspended in the medium-chain fatty acid triglyceride (MCT) oil. While the effect of MCT oil has been tested in very young db/db mice, the effects of MCT on older or geriatric obese db/db mice have not been tested5,6. Given the weight of the mice, large volumes of analgesics injected subcutaneously near the wound may significantly affect the cellular and molecular processes of wound healing and chronic wound initiation and development. Also,this painkiller will dissolve in the high levels of fat in these mice and, therefore, might not be effective in killing the pain and could become toxic.
8. Data collection, handling the mice after wounding, survival strategies and additional tips
8.1 Data collection
Add the following steps after Step 8.1.3.
8.1.4. Ensure that the tissue collected for analysis should include only tissue that is 2 mm away from the wound margin in both control and chronic wounds. Wounds can be collected via excision as early as 1-2 h after application of MSA.
8.1.5. Collect excess fluid building up from the wound, or wound exudate, with a sterile syringe by piercing through the transparent film dressing. Store at -20 °C for bacterial studies or -80 °C for chemistry and molecular studies.
8.1.6 To collect whole wound tissues, including biofilm, after 10 days, apply 4% PFA in PBS to the wound, topically for 10 min before excising with forceps and scissors. When removing the tissue, add an additional 5-10 mm wound margin so the wound tissue is supported with additional normal tissue. Continue fixation in 4% PFA in PBS and subsequent washes and preparation for embedding.
NOTE: Chronic wounds 10 days post-surgery may become too fragile to be collected for histology.
8.5. Survival strategies
8.5.1. Provide extra hydration support: Check if mice become lethargic and do not actively eat or drink because the surgery and generation of chronicity are stressful. Administer warm (35-38 °C) saline subcutaneously or intraperitoneally at a volume of 0.25 mL per 10 g of body weight during the first 48-72 h post-surgery. Hydration support may be needed up to 2-3 times a day, depending on how lethargic the mice are. Also, food pellets and water gels may be placed in the bedding for easy access, though more frequent cage changes may be required.
8.5.2. Provide extra warmth support: Survival post-surgery is significantly increased if mice are placed in cages on a pad warmed by circulating water (93 oC) immediately after surgery and when in the vivarium. Place the cage 1/2 on and 1/2 off the pad to allow the animal to move away from the heat if they get too hot and move on top of the pad if they get cold.
Access restricted. Please log in or start a trial to view this content.
Results
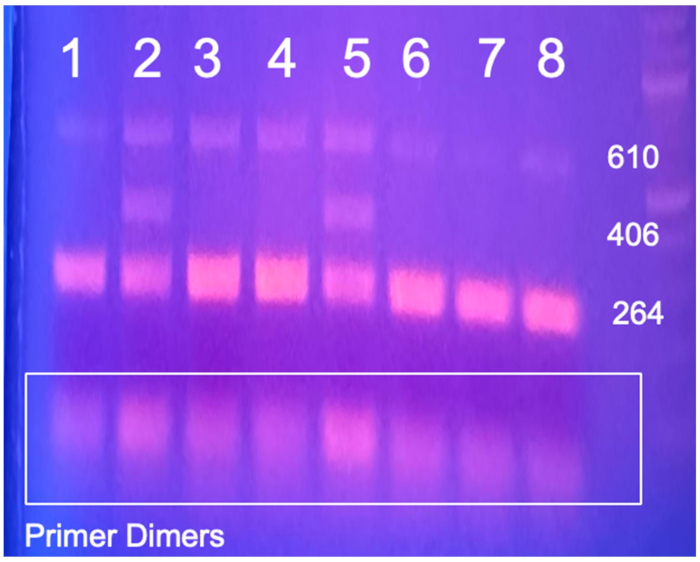
Figure 1: Genotyping for identifying heterozygotes to create breeders. An example gel shows the results of 8 unknown mouse samples. Sample 2 and 5 are heterozygotes as they contain 3 bands (610 bp, 406 bp, and 264 bp). Samples 1, 3, 4, ...
Access restricted. Please log in or start a trial to view this content.
Discussion
Findings using this model of chronic wounds:
This model has been used to perform several studies in an attempt to understand the cell and molecular mechanisms of chronic wound initiation and progression. It has been shown that by inhibiting antioxidant enzymes, chronic wounds can be created in the db/db mice. The wounds initially contained a polymicrobial community that, with time, was selected for specific biofilm-forming bacteria. The chronicity was rev...
Access restricted. Please log in or start a trial to view this content.
Materials
| Name | Company | Catalog Number | Comments |
|---|---|---|---|
| 1 mm ear punch | Fisherbrand | 13812201 | 2mm hole diameter |
| 3-Amino-1,2,4-triazole (ATZ) | TCI | A0432 | |
| 70% ethanol | |||
| Acu Punch 7mm skin biopsy punches | Acuderm Inc. | P750 | |
| agarose | |||
| B6.BKS(D)-Leprdb/J | The Jackson Laboratory | 00697 | Homozygotes and heterozygotes available |
| Buprenex (buprenorphine HCl) | Henry Stein Animal Health | 059122 | 0.3 mg/ml, Class 3 |
| Gel Loading Dye, Purple (6X) | New England Biolabs | B7024S | |
| Gloves | |||
| Hair Remover Lotion with Soothing Aloe and Lanolin | Nair | a chemical depilatory | |
| Heat Therapy (water) Pump HTP-1500 | Adroit MedicalSystems | ||
| Heating pad | Conair | Moist Dry Heating Pad | |
| Hose Adapters | Adroit MedicalSystems | ||
| Insulin syringes | BD | 329461 | 0.35 mm (28G) x 12.7 mm (1/2") |
| Isoflurane | Henry Schein Animal Health | 029405 | NDC 11695-6776-2 |
| Isoflurane vaporizer | JA Baulch & Associates | ||
| Kimwipes | |||
| Maxi-Therm Hyper-Hypothermia Blanket | Cincinnati Sub-Zero | Cat No. 247 | 22”x30” Re-usable HeavyDuty Pad |
| Mercaptosuccinic acid (MSA) | Aldrich | 88460 | |
| Mouse nose cone | |||
| Oxygen | Tank must be compatible with vaporizing system | ||
| Phosphate buffer solution (PBS) | autoclave steriled | ||
| Sharp surgical scissors | |||
| small plastic containers | |||
| Sodium hydroxide | |||
| Taq 2X Master Mix | New England Biolabs | M0270L | |
| Tegaderm | 3M | Ref: 1624W | Transparent film dressing (6 cm x 7 cm) |
| Thin metal spatula | |||
| Tri-HCl | |||
| Tubing | |||
| Tweezers | |||
| Wahl hair clipper | Wahl | Lithium Ion Pro |
References
- Kim, J. H., Martins-Green, M. Protocol to create chronic wounds in diabetic mice. J Vis Exp. (151), e57656(2019).
- He, J. -F., Tan, T., Zhu, H. A novel and quick PCR-based method to genotype mice with a leptin receptor mutation (db/db mice). Acta Pharmacol Sin. 39 (1), 117-123 (2018).
- Dhall, S., et al. Generating and reversing chronic wounds in diabetic mice by manipulating wound redox parameters. J Diabetes Res. 2014 (562625), (2014).
- Kim, J., Martins-Green, M. Protocol to create chronic wounds in diabetic mice. Nat Protoc Exch. , (2016).
- Martínez-Carrillo, B. E., et al. Changes in metabolic regulation and the microbiota composition after supplementation with different fatty acids in db/db mice. Int J Food Sci. , (2022).
- Zhang, Y., et al. Medium-chain triglyceride activated brown adipose tissue and induced reduction of fat mass in C57BL/6J mice fed high-fat diet. Biomed Environ Sci. 28 (2), 97-104 (2015).
- Basu, P., Kim, J. H., Saeed, S., Martins-Green, M. Using systems biology approaches to identify signalling pathways activated during chronic wound initiation. Wound Repair Regen. 29 (6), 881-898 (2021).
- Basu, P., Martins-Green, M. Signaling pathways associated with chronic wound progression: a systems biology approach. Antioxidants. 11 (8), 1506(2022).
- Kim, J. H., et al. High levels of OS and skin microbiome are critical for initiation and development of chronic wounds in diabetic mice. Sci Rep. 9 (1), 19318(2019).
- Kim, J. H., et al. High levels of OS create a microenvironment that significantly decreases the diversity of the microbiota in diabetic chronic wounds and promotes biofilm formation. Front Cell Infect Microbiol. 10 (259), (2020).
- Kim, J. H., et al. Pseudomonas aeruginosa activates quorum sensing, antioxidant enzymes and type VI secretion in response to OS to initiate biofilm formation and wound chronicity. Antioxidants. 13 (6), 655(2024).
- Kim, J. H., et al. Skin microbiota and its role in health and disease with an emphasis on wound healing and chronic wound development. , Elsevier eBooks. 297-311 (2022).
- Kim, J. H., et al. Targeting anaerobic respiration in Pseudomonas aeruginosa with chlorate improves healing of chronic wounds. Adv Wound Care. 13 (2), 53-69 (2024).
- Jabbari, P., et al. Chronic wound initiation: single-cell RNAseq of cutaneous wound tissue during initiation of chronic wound development. Antioxidants. 14 (2), 214(2025).
Access restricted. Please log in or start a trial to view this content.
Reprints and Permissions
This article has been published
Video Coming Soon