This protocol describes a survival procedure for safe and well-tolerated murine bilateral renal lymphadenectomy.
A subscription to JoVE is required to view this content. Sign in or start your free trial.
Method Article
Murine Bilateral Renal Lymphadenectomy
* These authors contributed equally
In This Article
Summary
Abstract
Autoimmune diseases are the result of immune cells inappropriately targeting self-tissue, leading to pathology and damage to vital organs. Secondary lymphoid organs serve as a site for B and T cell activation and peripheral immune tolerance, consequent to antigen drainage and antigen-presenting cell (APC) trafficking through local lymphatics. The role of local draining lymph nodes as the initial site of lymphocyte activation has been described in settings of tumors, infection, and organ-specific autoimmune diseases, but not in systemic autoimmunity. Systemic lupus erythematosus, one such disease, is a widespread autoimmune disease with common kidney involvement leading to kidney injury and eventual failure. Further understanding of the role of renal lymph nodes, which are the primary site of antigen draining and APC trafficking from the kidneys, is limited by an inability to selectively perturb this tissue. Described here is a survival procedure for safe and well-tolerated murine bilateral renal lymphadenectomy. Included are detailed instructions, visual aids, helpful tips for improved success, and troubleshooting procedural pitfalls. Long-term survival is excellent and has been observed for at least 4 months postoperatively. Resected renal lymph nodes are intact and immediately ready for downstream processing. This procedure is best suited for studies of the local effect of renal lymph nodes.
Introduction
Autoimmune diseases span every organ in the human body from relatively organ-restricted diseases like autoimmune hepatitis, uveitis, and type 1 diabetes to widespread diseases like systemic sclerosis and sjögrens1,2,3,4,5. Immunologic tolerance is a critical stage in B and T cell development to prevent self-reactivity6. While central tolerance via clonal deletion in the thymus is necessary and effective, this alone leaves gaps in the defense against autoimmunity7,8. Peripheral tolerance is a secondary barrier to self-reactivity via B and T cell anergy, deletion, or T cell exhaustion, which takes place in secondary lymphoid organs, including regional tissue-draining lymph nodes following antigen drainage9,10. However, it is also becoming increasingly clear that autoreactive cells may reside within and migrate from these lymph nodes in individuals who are genetically and/or environmentally susceptible following inappropriate activation11,12.
Systemic lupus erythematosus is one such autoimmune disease, with clear B and T cell involvement in multiple organ systems13. A particularly common and morbid manifestation of which is lupus nephritis and progression to end-stage renal disease14. The ability to understand the direct effect of the locally residing B and T cells in autoimmune-driven kidney disease, in contrast to circulating systemic pathophysiology, is currently limited by an inability to selectively perturb these nodes. With this gap in mind, a survival procedure for the murine bilateral renal lymphadenectomy was developed and is described here.
The overall goal of this protocol is to achieve safe and reliable excision of bilateral renal lymph nodes in mice with high postoperative survival and tolerance. This procedure would be best suited for studies of the local effect of renal lymph nodes on priming, activating, and tolerizing immune cells associated with kidney disease. This procedure is ideal when combined with autoimmune or oncologic models affecting the kidney.
Access restricted. Please log in or start a trial to view this content.
Protocol
All procedures are performed in compliance with Yale Institutional Animal Care and Use Committee protocols. To develop this procedure, 8-12-week-old Balb/c strain, Lupus-prone mice (MRL/MpJ-Faslpr/J /J) and age/sex/genotype matched sham controls were utilized15. In addition, 8-12-week-old wild type C57BL/6 strain mice were also tested, and nodes were safely resected. Both male and female mice were included. The reagents and the equipment used are listed in the Table of Materials.
1. Preparation of instruments, animals, and the operating room
- Sterilize all surgical instruments. Ensure the operating surface and anesthetic nose cone are cleansed with 70% ethanol.
- Set up the operating microscope, ensuring comfortable ergonomics for the operating surgeon.
- Set up an inhaled anesthetic vaporizer machine with a nose cone and suction for excess anesthetic scavenging. Set up an operating surface with a warm-water circulating pad to maintain animal body temperature and supplies in a convenient, sterile location.
- Induce anesthesia by administering 2%-3% inhaled isoflurane with an oxygen flow rate of 2 L/min via nose cone from inhaled anesthetic vaporizer machine (following institutionally approved protocols).
- Ensure appropriate plane of anesthesia by confirming a respiratory rate of approximately 30-40 breaths/min and lack of response to hind foot pinch. Periodically recheck for appropriate plane of anesthesia and adjust isoflurane flow rate accordingly.
NOTE: Alternatively, an injectable anesthetic is also appropriate.
- Ensure appropriate plane of anesthesia by confirming a respiratory rate of approximately 30-40 breaths/min and lack of response to hind foot pinch. Periodically recheck for appropriate plane of anesthesia and adjust isoflurane flow rate accordingly.
- Follow one's institute guidelines for appropriate analgesia and local anesthesia. For example, one can administer a long-acting analgesic such as 3.25 mg/kg buprenorphine XR subcutaneously and administer up to 0.04 mL/5 g body weight of 1mg/mL lidocaine solution subcutaneously at planned incision sites.
- Prepare the animal for procedure by applying eye lubricant, plucking or clipping back fur bilaterally, sterilizing the back with povodine/iodine solution, followed by 70% ethanol, and positioning right lateral decubitus (right side down).
- Use tape to secure the animal's left arm superiorly and tail inferiorly to create a relaxed, but elongated posture (Figure 1A). This will displace the kidney more inferiorly, resulting in improved visualization and exposure.
- Wear sterile gloves and apply sterile drapes over the animal with a window to the operative field. Maintain sterility throughout procedure.
- OPTIONAL: Inject 10-20 μL of sterile, filtered 5% Evans Blue in phosphate-buffered saline in bilateral hindfoot pads prior to animal positioning for improved identification of renal lymph nodes via drainage along the iliac lymphatic tract16 (Figure 1D-G).
NOTE: Beware that this dye can interfere with stains and flow cytometric analyses. In addition, over time, Evans Blue will also infiltrate the cisterna chyli, see "troubleshooting" for tips (Table 1).
- OPTIONAL: Inject 10-20 μL of sterile, filtered 5% Evans Blue in phosphate-buffered saline in bilateral hindfoot pads prior to animal positioning for improved identification of renal lymph nodes via drainage along the iliac lymphatic tract16 (Figure 1D-G).
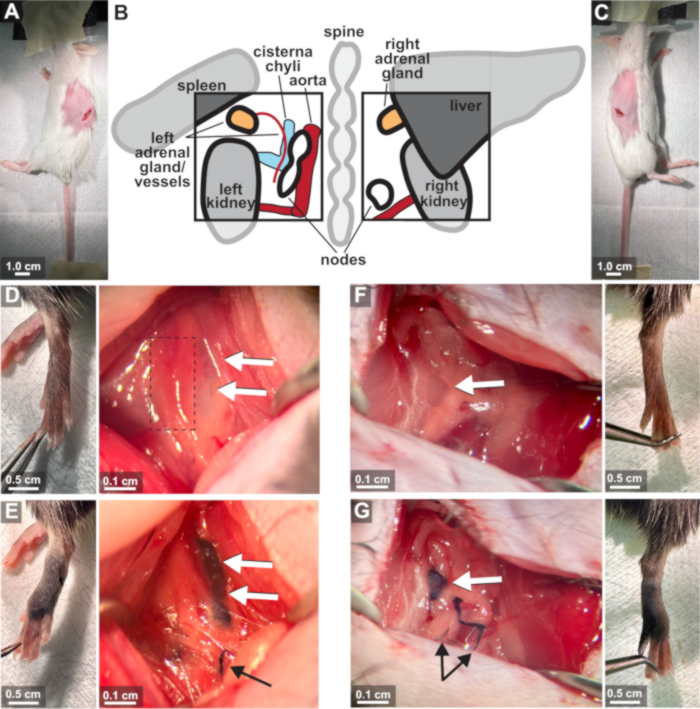
Figure 1: Anatomical positioning of mouse and organs and optional Evans Blue injection. (A) Animal positioning and securing for left renal exposure. (B) Anatomical orientation within operative windows. The left renal lymph node chain can be found adjacent to the adrenal vessels and aorta, superior to the renal vessels. The right renal lymph node can be found just superior to the renal vessels. (C) Animal positioning and securing for right renal exposure. (D-G) Implementation of 20 μL 5% Evans Blue injection. (D) Left hindfoot and left renal lymph node chain (white arrow) prior to dye. Note the general location of the cisterna chyli (dashed box), which is often transparent and/or difficult to identify unless plump with lymph. (E) Left hindfoot and left renal lymph node chain (white arrow) 5 min after dye injection. Note afferent lymphatic vessels (black arrow). (F) Right hindfoot and right renal lymph node (white arrow) prior to dye. G) Right hindfoot and right renal lymph node (white arrow) 5 min after dye injection. Note afferent lymphatic vessels (black arrows). Scale bars: A,C = 1.0 cm; D-G (hindfoot views) = 0.5 cm; D-G (internal views) = 0.1 cm. Please click here to view a larger version of this figure.
2. Left renal lymphadenectomy
- Make a 1 cm oblique incision through the skin just inferior to the spleen (approximately 1 cm inferior to the ultimate rib). Bluntly dissect skin away from the abdominal/chest wall and identify the spleen within the abdomen.
- Make a 1 cm incision through the abdominal wall musculature just inferior to the spleen to gain access to the peritoneal cavity (Figure 2A,B).
NOTE: In mice with non-pigmented skin, the spleen is readily visible through the prepped skin as a dark, mobile organ residing laterally in the abdomen and just inferior to the ultimate rib.
- Make a 1 cm incision through the abdominal wall musculature just inferior to the spleen to gain access to the peritoneal cavity (Figure 2A,B).
- Identify the left kidney as a smooth organ along the posterior abdominal wall and just inferior to the spleen. The kidneys and associated renal lymph nodes reside in the retroperitoneum. Using two angled forceps, bluntly dissect posterior to the left kidney to gain access to the retroperitoneum (Figure 2C).
NOTE: Proper and safe blunt dissection technique involves applying small pressure with closed forceps at the desired tissue plane and allowing the instrument to gently open, pulling the tissue planes apart. - Reflect the left kidney anteromedially.
- Using the dissecting microscope, identify the adipose pad enveloping the left renal lymph node, which will be posterior to the left kidney and superior to the left renal vessels. Identify and avoid the adrenal gland superiorly, the aorta posteriorly, and the cisternal chyli anteromedially (Figure 1B,D).
- Using a fine-tipped forceps, bluntly dissect around the lymph node capsule (separating it from the surrounding vessels), while applying gentle counter tension with an angled forceps (Figure 2E). One can also use fine-point scissors to bluntly dissect this plane.
- Using fine-tipped straight forceps, retract the left renal lymph node cephalad while using fine-point scissors to sharply incise the posteromedial attachments of the lymph node. Take care not to disrupt the nearby blood vessels and cisterna chyli/thoracic duct (Figure 2F).
- Observe the area for hemostasis (Figure 2G).
- Return the kidney to its anatomical location and close the abdomen in two layers (abdominal wall and skin) with 6-0 monofilament polypropylene suture in a running fashion. Apply sterile surgical glue to the wound.
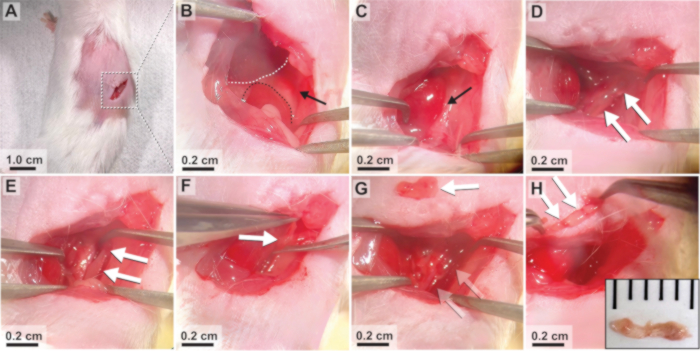
Figure 2: Left renal lymphadenectomy. (A) Left oblique incision just inferior and posterior to the splenic shadow. (B) Identifying the spleen superiorly (white line), left adrenal posteriorly (black arrow), and left kidney inferiorly (black line). (C) A plane into the retroperitoneum is created by bluntly dissecting immediately posterior to the kidney (black arrow). (D) The left renal lymph node (white arrows) is immediately visible within a sheath of adipose. (E) A plane is created between the nearby vessels and the node (white arrows). (F) The node is gently retracted and sharply excised along the plane created. (G) Hemostasis is confirmed, and the empty space (faded arrows from (D)) where the lymph node (white arrow) previously lived is noted to be free of any residual lymph node. (H) The left lymph node is often a chain of multiple nodes (white arrows). Inset is an ex vivo left lymph node chain (1 mm x 3.5 mm). Scale bars: 0.2 cm. Tick = 1 mm. Please click here to view a larger version of this figure.
3. Right renal lymphadenectomy
- Re-position animal in left lateral decubitus (left side down). Again, use tape to secure the animal's right arm superiorly and tail inferiorly to create a relaxed, but elongated posture. This is particularly important on the right, where the liver can disrupt exposure (Figure 1C).
- Make a 1 cm oblique incision through the skin just inferior to the ultimate rib (somewhat more superior than the left side). Bluntly dissect skin away from the abdominal/chest wall and make a 1 cm incision through the abdominal wall musculature to gain access to the peritoneal cavity (Figure 3A).
- Identify the right kidney as a smooth organ along the posterior abdominal wall and just inferior to the liver. One may need to use a cotton-tipped swab to retract the liver cephalad. Using two angled forceps bluntly dissect posterior to the right kidney to gain access to the retroperitoneum (Figure 3B,C).
- Reflect the right kidney anteromedially.
- Using the dissecting microscope, identify the adipose pad enveloping the right renal lymph node, which will be posterior to the right kidney and superior to the right renal vessels. Identify and avoid the adrenal gland superiorly (Figure 1B,D).
- Using a fine-tipped forceps or fine-point scissors, bluntly dissect around the lymph node capsule (separating it from the surrounding vessels), while applying gentle countertraction with an angled forceps (Figure 3E).
- Using fine-tipped straight forceps, retract the right renal lymph node cephalad while using fine-point scissors to sharply incise the posteromedial attachments of the lymph node (Figure 3F). Take care not to disrupt the renal blood vessels, which run just inferior to the lymph node.
- Observe the area for hemostasis (Figure 3G).
NOTE: In general, the right renal lymph node is found to have a larger, posterior draining blood vessel, which is more likely to bleed upon successful retrieval of the lymph node. Bleeding from this vessel can be controlled by gentle pressure with a cotton-tipped swab until hemostasis is achieved. - Return the kidney to its anatomical location and close the abdomen in two layers (abdominal wall and skin) with 6-0 monofilament polypropylene suture in a running fashion. Apply sterile surgical glue to the wound.
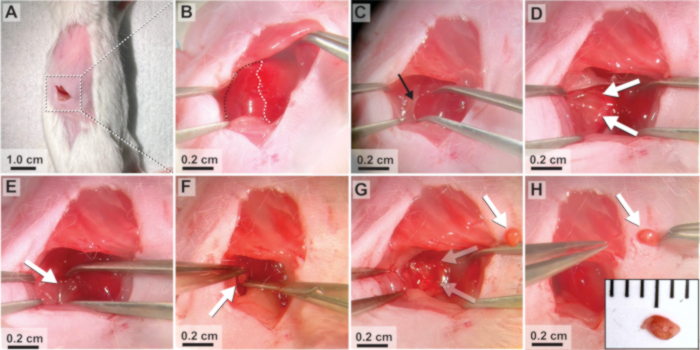
Figure 3: Right renal lymphadenectomy. (A) Right oblique incision just inferior and posterior to the ultimate rib. (b) The liver edge is identified superiorly (white line) and the left kidney inferiorly (black line). The right adrenal is hidden by the liver edge. (C) A plane into the retroperitoneum is created by bluntly dissecting immediately posterior to the kidney (black arrow). (D) The right renal lymph node (white arrows) is immediately visible within a sheath of adipose. (E) A plane is then created around the node (white arrow). (F) The node is gently retracted and sharply excised along the plane created. (G) Hemostasis is confirmed, and the empty space (faded arrows from (D)) where the lymph node (white arrow) previously lived is noted to be free of any residual lymph node. (H) The right lymph node is a single, spherical node (white arrow). Inset is an ex vivo lymph node (2 mm x 1.5 mm). Scale bars: 0.2 cm. Tick = 1 mm. Please click here to view a larger version of this figure.
4. Postoperative care
- Relocate the animal to a clean cage, which is half on and half off of a warm-water circulating pad with access to food and water ad libitum.
- Allow the animal to recover from anesthesia (~10-15 min) and monitor closely for signs of distress. If animals do not recover promptly from anesthesia with appropriate behaviors (i.e., increased respiratory rate, self-righting, ambulating, grooming), humanely euthanize the animal (following institutionally approved protocols).
- When all animals have recovered from anesthesia, return cages to the animal care facility with access to water, food, bedding, and enrichment materials ad libitum.
- Assess mice postoperatively every 12 h for 3 days for signs of pain or distress (i.e., hunched posture, decreased activity, decreased engagement, poor grooming). Humanely euthanize mice demonstrating signs of distress.
- If using permanent suture (such as 6-0 monofilament polypropylene), examine the incisions on postoperative day 10 and remove any remaining suture material.
5. Lymph node handling
NOTE: The excised lymph node is immediately ready to enter pipelines for further downstream applications.
- When first learning this procedure and anatomy, confirm the lymph node excision via histology or flow cytometry using antibody stains of one's choice.
- Place the tissue in cell culture media (e.g., DMEM, RPMI) or phosphate-buffered saline (PBS) on ice for live cell techniques or in fixative (e.g., 10% neutral buffered formalin, 4% paraformaldehyde) for planned histology.
NOTE: A quick, but less accurate, way to confirm lymph nodes is to place the resected sample in PBS. In general, a sample of predominantly lymph nodes will sink, while a sample of predominantly adipose tissue will float; however, further confirmatory tests are recommended when first optimizing this procedure.
Access restricted. Please log in or start a trial to view this content.
Results
This procedure can be performed in 15-20 min per mouse. To confirm the accuracy of this procedure, bilateral renal lymphadenectomies were performed on five 8-12 week-old, age, sex, and genotype-matched littermates. All mice tolerated the procedure well with 100% perioperative survival. Excised samples were placed in PBS on ice. All samples immediately sunk, confirming low adipose content. Excised samples (and four separate visceral adipose controls) were then crushed through a 100 µm cell strainer and washed with PBS. Ce...
Access restricted. Please log in or start a trial to view this content.
Discussion
Described here is a survival procedure for safe and well-tolerated murine bilateral renal lymphadenectomy. The major limitation of this procedure is the relatively small size of renal lymph nodes, necessitating an operating microscope. Without an operating microscope, confident resection can be difficult to achieve. Some genetic mouse models have enlarged lymph nodes, making identification and technique learning easier17. In otherwise healthy, wild-type mice, lymph nodes can be small and difficult...
Access restricted. Please log in or start a trial to view this content.
Disclosures
R.A.F. is an advisor to Glaxo Smith Kline, Plythera Inc., and Ventus Therapeutics. All other authors declare no competing interests.
Acknowledgements
We acknowledge J. Alderman, B. Cadugan, E. Hughes-Picard, and J. Horrocks for administrative assistance, and to C. Hughes for mouse colony management. H.N.B. is a fellow of the Yale Surgeon Scientist Training Program, which partially funded and supported this project. This work was also funded by the Howard Hughes Medical Institute (to R.A.F.) and the American College of Surgeons Resident Research Award (to H.N.B.).
Access restricted. Please log in or start a trial to view this content.
Materials
| Name | Company | Catalog Number | Comments |
|---|---|---|---|
| Anesthesia circuit | Any | Or injectable anesthetic | |
| BD LSRII flow cytometer (or equivalent) | BD Biosciences | Equipped with FACS Diva Software | |
| Buprenorphine XR | Any | For analgesia | |
| Cell culture media | Any | (for live cell techniques; ie. DMEM or RPMI) | |
| DAPI | Biolegend | 422801 | Working concentration: 15 ug/mL |
| Dual/twin gooseneck microscope LED lights | Any | ||
| Ethanol (70% in water) | Any | For cleaning | |
| FITC-conjugated anti-mouse CD45.2 (104) | Biolegend | 109806 | Working concentration: 5 ug/mL |
| Forceps: Angled fine-tipped forceps (x2) | Roboz | RS-5058 | Material: Dumoxel; Pattern #5, 45 degree angle; tip size 0.1 X 0.06mm |
| Forceps: Fine-tipped forceps | Roboz | RS-4960 | Material: Dumostar; Pattern #1; Tip size: 0.20 X 0.12mm |
| Forceps: Fine-tipped forceps | Roboz | RS-4966 | Material: Dumostar, Biologie tip; Pattern #3; Tip size: 0.08 x0.04mm |
| Lidocaine | Any | For analgesia | |
| Mice | Jax | For C57BL/6 strain, wild type mice: The jackson laboratories #000664 | |
| Needle drivers | Roboz | RS-6410 | Castroviejo needle holder; Straight |
| Operating microscope | Leica | MZ9.5 | Leica Mz9.5 stereo head operating microscope |
| OPTIONAL: Evans Blue dye | Sigma | E2129-10G | For lymph tracing. |
| Phosphate-buffered saline (PBS) | Any | ||
| Povidone/Iodine solution | Any | For skin preparation/sterilization | |
| Scissors: Extra fine-tipped scissors | Roboz | RS-5605 | McPherson-Vannas; 3mm cutting edge; curved |
| Scissors: Medium scissors | Roboz | RS-5676 | Noyes; 13mm cutting edge; straight |
| Surgical glue | Any | e.g. 3M Vetbond tissue adhesive | |
| Suture: 6-0 blue monofilament polypropylene | Any | ||
| Tissue fixative | Any | (for planned histology; ie. 10% neutral buffered formalin or 4% paraformaldehyde) | |
| Warm-water circulating heating pad | Any | ||
| Mice | The Jackson laboratories | For Balb/c strain, Lupus prone mice (MRL/MpJ-Fas-lpr/J): #000485 |
References
- Amador-Patarroyo, M. J., Peñaranda, A. C., Bernal, M. T. Autoimmunity. Autoimmunity: From bench to bedside. Anaya, J. -M. , El Rosario University Press. Colombia. (2013).
- Echeverri, A. F., Tobón, G. J. Systemic autoimmune diseases. Autoimmunity: From bench to bedside. Anaya, J. -M. , El Rosario University Press. Colombia. (2013).
- García-Carrasco, M., et al. Autoimmune disorders and pathogenesis. Autoimmunity: From bench to bedside. Anaya, J. -M. , El Rosario University Press. Colombia. (2013).
- Sarmiento-Monroy, J. C., Mantilla, R. D., Rojas-Villarraga, A., Anaya, J. -M., et al. Lupus and immunological profiling. Autoimmunity: From bench to bedside. Anaya, J. -M. , El Rosario University Press. In: Anaya, J.-M. (2013).
- Solari, N. F., Cherñavsky, A. C., et al. Rheumatologic autoimmune syndromes. Autoimmunity: From bench to bedside. Anaya, J. -M. , El Rosario University Press. Colombia. (2013).
- Kamradt, T., Mitchison, N. A. Tolerance and autoimmunity. N Engl J Med. 344 (9), 655-664 (2001).
- Rouiz-Argüelles, A., et al. Hematologic autoimmune conditions. Autoimmunity: From bench to bedside. Anaya, J. -M. , El Rosario University Press. Colombia. (2013).
- Venanzi, E. S., Benoist, C., Mathis, D. Good riddance: Thymocyte clonal deletion prevents autoimmunity. Curr Opin Immunol. 16 (2), 197-202 (2004).
- Meng, X., et al. Immunological mechanisms of tolerance: Central, peripheral and the role of T and B cells. Asia Pac Allergy. 13 (4), 175-186 (2023).
- Swartz, M. A., Hubbell, J. A., Reddy, S. T. Lymphatic drainage function and its immunological implications: From dendritic cell homing to vaccine design. Semin Immunol. 20 (2), 147-156 (2008).
- O'Byrne, A. M., Van Baarsen, L. G. M. Lymph nodes as gatekeepers of autoimmune diseases. RMD Open. 10 (4), e004097(2024).
- Hampton, H. R., Chtanova, T. Lymphatic migration of immune cells. Front Immunol. 10, 1168(2019).
- Fortuna, G., Brennan, M. T. Systemic lupus erythematosus: Epidemiology, pathophysiology, manifestations, and management. Dent Clin North Am. 57 (4), 631-655 (2013).
- Hanly, J. G., et al. The frequency and outcome of lupus nephritis: Results from an international inception cohort study. Rheumatology. 55 (2), 252-262 (2016).
- Andrews, B. S., et al. Spontaneous murine lupus-like syndromes: Clinical and immunopathological. J Exp Med. 148, 1198-1215 (1978).
- Harrell, M. I., Iritani, B. M., Ruddell, A. Lymph node mapping in the mouse. J Immunol Methods. 332 (1-2), 170-174 (2008).
- Morse, H. C., et al. Abnormalities induced by the mutant gene, lpr. Patterns of disease and expression of murine leukemia viruses in SJL/J mice homozygous and heterozygous for lpr. J Exp Med. 161 (3), 602-616 (1985).
- Ayalon, G., et al. Antibody semorinemab reduces tau pathology in a transgenic mouse model and engages tau in patients with Alzheimer's disease. Sci Transl Med. 13 (593), eabb2639(2021).
- Dong, X., et al. Antigen presentation by dendritic cells in renal lymph nodes is linked to systemic and local injury to the kidney. Kidney Int. 68 (3), 1096-1108 (2005).
- Lan, H. Y., Nikolic-Paterson, D. J., Atkins, R. C. Trafficking of inflammatory macrophages from the kidney lymph nodes during experimental glomerulonephritis. Clin Exp Immunol. 92, 336-341 (1993).
- Karmali, R. J., Suami, H., Wood, C. G., Karam, J. A. Lymphatic drainage in renal cell carcinoma: Back to the basics. BJU Int. 114 (6), 806-817 (2014).
Access restricted. Please log in or start a trial to view this content.
Reprints and Permissions
