Kinematic metrics of the drinking task have been recommended for use in upper limb stroke rehabilitation, but conventional approaches to kinematic studies are considered impractical. The current protocol describes a web-based guide to capture videos of the drinking task, which are compatible with computer vision to extract recommended kinematic metrics.
Method Article
Web-based Clinician Guide to Record Compatible Video of Standardized Drinking Task Kinematics for Computer Vision Analysis
In This Article
Summary
Abstract
Assessment of the upper limb is paramount to the cycle of rehabilitation. Over the last two decades, kinematic assessment of the drinking task activity has been shown to be valid and responsive to clinical change in rehabilitation populations affected by wide-ranging diseases, including stroke and musculoskeletal disease. This foundational work on drinking task kinematics has led to consensus recommendations for the adoption of upper limb kinematics in rehabilitation research. However, practical concerns have been raised, which jeopardize uptake in the research community and translation to clinical practice. Barriers to adoption include the technical complexities of conventional motion capture methods to acquire kinematics and the fidelity of activity protocols behind the kinematics. With regards to the former, breakthroughs in the AI-subfield known as computer vision are drastically reducing the technical burden of kinematic analysis. With regards to the latter, we now present a web-based application (app) designed to guide clinicians through video capture of a highly standardized drinking task activity protocol using an off-the-shelf stereo camera, a personal computer, and basic materials accessible in an outpatient clinical environment. Furthermore, we demonstrate the compatibility of this video capture with a custom-built computer vision pipeline for extracting kinematic metrics of the drinking task. Through ongoing validation and usability studies, we envision that such a tool will significantly improve access to highly standardized upper limb kinematic metrics, which are expected to advance research and clinical care in rehabilitation populations with upper limb impairment.
Introduction
The majority of our upper limb tasks during daily life require both limbs. Loss of upper limb abilities occurs frequently after neurologic injuries, with about 80% of stroke survivors experiencing upper limb deficits1. These deficits are known to reduce function and quality of life2. Rehabilitation remains a primary intervention to restore function3, and rehabilitation has been described as a cycle predicated on precise assessment4. Kinematic assessment of the upper limb has gained increased attention over the past two decades. This attention is due in part to the limits of current clinical assessments, which have recognized drawbacks including subjectivity of human raters and poor resolution for subtle change5.
Kinematics is a subfield of biomechanics that involves the study of human motion during movements of the body, limbs, and joints. Among prior research works, kinematic studies of the drinking task have garnered substantial attention from the research community6. The popularity of the drinking task in kinematic assessment has been attributed to its movement complexity, its goal-oriented task specificity, and its cyclical motion7. In addition to a cadre of studies in neurotypical adults and children, the drinking task has also been investigated in a wide variety of neurologic diseases8,9,10,11. In stroke populations, these studies have identified important kinematic metrics, which are valid, reliable, and responsive to clinical change12,13,14. However, kinematic assessment has long been deemed impractical due to the complex/expensive systems and technical knowledge needed15.
With the advent of artificial intelligence, practical barriers to kinematic assessment are being significantly reduced. For example, computer vision-a subfield of AI that extracts information from digital images-can now be leveraged to achieve marker-less motion capture systems using relatively simple cameras and computers16,17,18. To leverage these advances in computer vision, the objective of this methods paper is to describe a web-based tool developed to guide clinicians on the following: (i) implementing a standardized activity protocol for the drinking task and (ii) recording videos of the drinking task that are compatible with a computer vision workflow for extracting kinematic metrics. While these kinematic metrics are not yet part of standard clinical care, the goal of the present protocol is to engage clinicians who would like to integrate biomechanical research into their practice. The expected impact is greatly enhanced clinical access to kinematic metrics of the upper limb, which is expected to inform current rehabilitation treatment protocols and support the research and development of new treatment protocols.
Protocol
Figures presented in the representative results section correspond to two separate case studies performed in accordance with the Declaration of Helsinki. Informed consent was obtained from all participants prior to data collection. As these separate case studies involved only two participants, they did not meet the definition of clinical research as defined by the local Institutional Review Board; thus, an assigned IRB protocol number is not available.
NOTE: The protocol and the associated web-based app are divided into primarily three steps as follows: (i) workspace setup; (ii) calibration activity; and (iii) drinking task activity. An infographic (Figure 1) provides a visual illustration of these steps, including the workflows that users can expect to encounter during use of the web-based app (https://mobile-motion-lab-public.web.app).
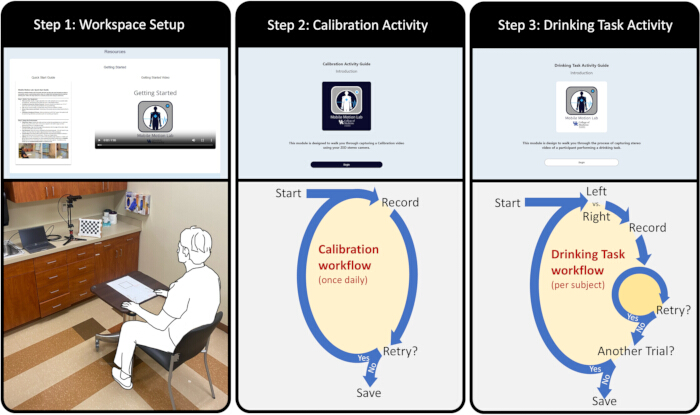
Figure 1: Infographic summarizing the protocol. Along with screenshots from the web-based app, an illustration is provided for each major step, including the workspace setup (left panel), the calibration workflow (middle panel), and the drinking task workflow (right panel). Please click here to view a larger version of this figure.
1. Workspace setup
NOTE: This step outlines how to set up the workspace correctly (Figure 2) for the subsequent calibration activity and drinking task activity. Proper setup is key to ensuring standardization and quality of video captures for reliable post-processing and extraction of kinematic measures using a computer vision workflow.
- Chair, table, and subject positioning
- Position an adjustable-height chair with a seatback so that the subject is able to sit with their palms resting face down on the table and with their wrist crease aligned to the table edge.
- Adjust seat height to ensure the subject's hips and knees are at approximately 90° flexion.
- Adjust table height to ensure arms rest comfortably at sides with upright sitting posture maintained and with 90° elbow flexion.
- Placement of the drinking task activity placemat
- Create the placemat using the printable file (Drinking Task Activity Placement) in the Resources menu of the web-app (https://mobile-motion-lab-public.web.app/resources) and tabloid-sized printer paper measuring 10 inch x 17 inch.
- Align the front edge of the placemat with the edge of the table directly in front of the subject. Ensure the target square box is centered to the subject's midline.
- Attach the placemat securely to the surface of the table with adhesive tape.
- Cup placement
- Place a 250 mL plastic cup in the square on the placemat. This locates the cup 30 cm from the table's edge and directly in front of the subject. Fill the cup with 100 mL of drinking water.
- Camera placement
- Position the stereo camera (with 4 mm focal length) to capture the subject and cup from a frontal overhead view. A stereo camera with a compatible connection to a personal computer with web access is required (e.g., USB connection to a clinic-based workstation). A stereo camera with a higher focal length is recommended to minimize the effects of lens distortion on recorded images/video. A standard camera tripod can be used.
NOTE: Once the camera is calibrated (to be performed in future steps), maintaining this calibration relies on maintaining the camera position. For this reason, a solid foundation is preferred for the camera, such as a floor-mounted tripod or a desktop-mounted tripod on a solid surface, e.g., a permanent countertop or heavyweight table. - Adjust the camera position to capture the target volume, i.e., the imaginary cube that completely contains the subject in their initial position with sufficient allowance to completely capture the proximal and distal upper limb activity (e.g., including hand movement) that will be performed by the subject during subsequent activity trials (e.g., during the drinking task).
- While the ideal placement of the stereo camera will depend on intrinsic parameters of the specific device (i.e., image sensor size, focal length, field of view), start by positioning the stereo camera about 150 cm away from the table edge (i.e., edge of table nearest to subject) and with camera height set at about 100 cm above the table surface.
- From this starting position, further adjust as needed to optimize the camera position so that the aforementioned target volume is captured. Of note, the camera calibration process will automatically account for variations in the extrinsic parameters of the camera (e.g., roll/yaw/pitch).
- Position the stereo camera (with 4 mm focal length) to capture the subject and cup from a frontal overhead view. A stereo camera with a compatible connection to a personal computer with web access is required (e.g., USB connection to a clinic-based workstation). A stereo camera with a higher focal length is recommended to minimize the effects of lens distortion on recorded images/video. A standard camera tripod can be used.
- Lighting setup
- Ensure the room is well lit with soft, even lighting if possible. Avoid strong backlighting, such as bright sunlight from a nearby window, as glare may impede the successful detection of the checkerboard grid pattern during the calibration activity.
- Avoid introducing shadows within the camera view, as shadows may degrade the success of calibration and the success of subsequent human pose estimation by computer vision. Use overhead lights or lamps positioned to reduce shadows on the subject. If glare is problematic, then consider modifying lights with light diffusers.
2. Calibration activity
NOTE: This step outlines how to successfully complete the calibration activity and ensure proper curation of images to an appropriate save destination through the web-app. The calibration may be performed once daily prior to video data collection with subjects. If the camera position is changed for any reason throughout the day, including inadvertent changes from a passerby hitting the camera/tripod, a new calibration is recommended, and all subsequent video-recorded activities need to be associated with this new calibration during any computer vision workflow.
- Calibration preparation
- Create the checkerboard grid pattern for calibration by using the printable file (Calibration Checkerboard Printout) from the Resources menu of the web-app (https://mobile-motion-lab-public.web.app/resources).
- Print out the black and white checkerboard grid pattern using standard letter-size paper measuring 8.5 inch x 11 inch. Use paper and printer options without a glossy finish.
- Attach the printout of the checkerboard grid pattern to a flat surface (e.g., back of a clipboard) and secure with tape. Ensure the tape does not occlude any portion of the checkerboard pattern, and ensure the affixed paper printout has minimal deformations. Otherwise, occlusions or deformations of the checkerboard grid pattern may reduce the chances of successful calibration by a computer vision solution.
- Capturing calibration images
- Open the calibration activity module (Calibration Activity Guide) located in the web-app dashboard menu (https://mobile-motion-lab-public.web.app/calibrationActivity). This module is designed to guide the process of calibration.
- Carry out the calibration with the following process: (i) viewing a video demonstration of the calibration activity; (ii) verifying the stereo camera identity; and (iii) previewing the stereo camera live feed before recording. Finally, carry out a recording to capture the calibration activity, which involves moving the checkerboard pattern through the workspace area while images are captured.
- Proceed through the guide until a preview of the stereo camera and the Start Recording icon are available.
- Before initiating the recording, position the checkerboard in its starting position. Based on an individual sitting at the table as previously described, the start position of the checkerboard involves holding the pattern at approximately chest level and perpendicular to the tabletop surface (Figure 3).
- Initiate recording by clicking the Start Recording icon in the web-app. When initiated, a 3-second visual/audio countdown will be provided by the app, after which a subsequent visual/audio cue will indicate when to start performing the calibration activity.
NOTE: If calibration is being performed solo, then the countdown allows the user time to initiate recording and then position the checkboard pattern prior to the recording capture starting. - When cued to begin the calibration activity, move the checkerboard pattern forward through the workspace area (toward the camera) in a smooth/controlled manner. Once moved forward fully through the workspace (the imaginary cube allotted for the subject and cup), then reverse motion to move the pattern backward (away from the camera) in a smooth/controlled manner. Repeat this forward and backward motion of the checkerboard pattern until image capture is complete. Total duration of image capture is 10 s.
- Avoid moving the checkboard pattern too quickly. Quick movements may introduce blurring of images captured by the camera, and this blurring may reduce the ability of a computer vision workflow to extract appropriate calibration parameters.
NOTE: As a reminder, the web-app includes a video demonstration during the calibration activity module. Alternatively, movement of the calibration pattern is also demonstrated in the Getting Started Video located in the web-app resource page.
- Avoid moving the checkboard pattern too quickly. Quick movements may introduce blurring of images captured by the camera, and this blurring may reduce the ability of a computer vision workflow to extract appropriate calibration parameters.
- Open the calibration activity module (Calibration Activity Guide) located in the web-app dashboard menu (https://mobile-motion-lab-public.web.app/calibrationActivity). This module is designed to guide the process of calibration.
- Review of the calibration recording
- Review the recorded calibration. Immediately after recording the calibration activity, a video playback is presented in the web-app. Review this video playback with careful attention to the following items.
- Image quality: Ensure the entire checkerboard pattern is fully visible throughout the video. Image blurring should be avoided as much as possible, and if there is substantial blurring evidence, then consider retrying the calibration recording with slower movements of the checkerboard pattern. By improving image quality, subsequent computer vision workflows will be more likely to successfully detect the checkerboard pattern, which is a necessary reference for extracting depth and position measurements.
- Clear visibility: Make sure the lighting is adequate. Avoid obvious dark shadows or white-out glares that obscure the view of the checkboard pattern. Ensure no obstructions of camera line-of-sight during the image capture (e.g., a bystander walking through the foreground).
NOTE: As a reference for gauging image quality and visibility, examples of a calibration video are available within the calibration activity module as well as within the Getting Started Video located in the Resources menu of the web-app. - Retry, if necessary. If any concerns about the performance of the calibration activity and the quality of the calibration video recording, then select the Retry option to re-initiate video recording for another attempt. Otherwise, proceed to submit/save calibration images.
- Review the recorded calibration. Immediately after recording the calibration activity, a video playback is presented in the web-app. Review this video playback with careful attention to the following items.
- Saving calibration images
- Upon successful completion of the calibration activity and recording, select the Save Calibration Images icon. This will open a window prompt allowing the choice of file save destination for calibration images. By default, the file save destination is set as the desktop with a default file name convention (i.e., calibration_[Date]_[Time]_[Camera Type]).
- Once the saving of calibration images is verified, select Confirm Save to proceed. A confirmation message will appear after saving, as well as options to either proceed to the subsequent Drinking Task Activity Guide module or restart the Calibration Task Activity Guide module.
3. Drinking task activity
NOTE: This step outlines how to guide subjects through completion of the drinking task activity, how to create video recordings of the drinking task, and how to ensure proper curation of videos to a save destination using the web-app.
- Preparation for the drinking task activity
- Position the subject in the appropriate start/end position for the drinking task activity. Adjust seat height so the subject can sit comfortably with hips and knees flexed at a 90° angle. Adjust table height as needed. Ensure the subject is seated upright in a chair with their arms relaxed to their sides, elbows flexed at a 90° angle, the palms of their hands resting comfortably on the table at shoulder-width apart, crease of their wrists aligned with the table's edge, and midline aligned with the cup location on the placemat.
- Instruct the subject to use a specified hand (right or left) for initial recording.
NOTE: Subsequent additional trials of the drinking task activity are possible through the web-app. During any additional trials, the laterality of the hand can be indicated in the web-app, which will automatically be associated with respective trial file names during data curation. - Instruct the subject to practice the drinking task activity. Subjects may perform one or two practice trials of the drinking task activity (without recording). Remind the subject that only a small sip is required before returning the cup and the hand to their respective start positions.
- Avoid over-coaching the subject with respect to the drinking task activity. The intent is to capture behavior as it would occur in the real world. If the subject requests further instruction, then advise the subject to consider a real-world situation in their daily life.
- Record the drinking task activity
- Open the drinking task activity module (Drinking Task Activity Guide) located in the web-app dashboard menu (https://mobile-motion-lab-public.web.app/drinkingTaskActivity).
NOTE: This module is designed to guide video recording of a subject performing the drinking task activity. This process includes the following: (i) viewing an example recording of the drinking task activity; (ii) verifying the stereo camera identity and entering the subject identifier; (iv) entering the laterality of the hand to be used for the specific trial, e.g., right or left; and (v) previewing the stereo camera live feed before recording. - Before initiating recording, orient the subject to the countdown. A 3 s visual/audio countdown will be provided by the mobile app, after which a subsequent visual/audio cue will indicate when to start performing the drinking task activity.
- Initiate the video recording by clicking the Start Recording icon in the web-app. Using the countdown/cues, ask the subject to perform the drinking task activity (Figure 3). Total duration allotted for the drinking task activity is 20 s.
NOTE: Subject only needs to take a small sip from the cup before returning the cup to its outlined area on the placemat and then returning the hand to the outlined area.
- Open the drinking task activity module (Drinking Task Activity Guide) located in the web-app dashboard menu (https://mobile-motion-lab-public.web.app/drinkingTaskActivity).
- Review the drinking task video recording. Immediately after recording, a video playback is presented in the web-app. Review this video playback with attention to the following items.
- Subject in frame: Ensure the subject's face, torso, upper limbs, and the cup are fully captured within all video frames during the entire drinking task.
- Absence of visual disturbances: Ensure lighting is adequate, with no distracting shadows or glare. Avoid inadvertently capturing other people within the foreground/background of the video. Otherwise, the chances of a computer vision workflow successfully identifying the subject of interest may be compromised.
- Task completion: Ensure that the subject completes the entire task, including picking up the cup, drinking a sip from the cup, returning the cup to its original position, and returning the body/hands to the start position.
- Retry, if necessary. If any concerns about the quality of the drinking task video recording, then select the Retry option to re-initiate video recording for another attempt.
NOTE: The Retry option will discard the previous video recording. If discarding the video is not desired, then avoid selecting Retry and instead proceed with additional trials as described below.
- Recording additional trials of the drinking task activity
- If additional trials of the drinking task are desired for the same subject, then select the option Repeat Another Trial.
NOTE: The Drinking Task Activity Guide module is designed to be run as a unique instance for each unique subject (e.g., the module needs to be restarted for each unique subject). - Proceed with recording and reviewing additional trials for the same subject using the aforementioned instructions.
NOTE: For repeated trials with the same subject, the originally entered subject identifier and camera identifier will be automatically associated with all trials. Otherwise, each trial requires only the following steps: (i) enter the laterality of the hand to be used by the subject, e.g., right or left; (ii) preview the stereo camera live feed before recording; (iii) initiate the video recording of drinking task activity; and (iv) review/retry recording as needed.
- If additional trials of the drinking task are desired for the same subject, then select the option Repeat Another Trial.
- Save video recordings
- After all desired trials have been recorded, select Finished with all trials to proceed with saving video files to the desired destination.
- In the field denoted Notes, add any comments pertinent to future processing, analysis, and interpretation of the data. Select the Package and add Notes to proceed.
- Select the Save Drinking Task Videos icon. This will open a window prompt allowing the choice of file save destination. By default, the file save destination is set as the desktop.
NOTE: Once the file save destination is set, the web-app automatically curates the video data with a folder/subfolder structure that has a naming based on previous user input entered during completion of the web-app guide. This results in a main folder with standardized name (i.e., subj[identifier]_drinktask_[Date]_[Time]_[Camera Type]) as well as subfolders with standardized naming (i.e., [Laterality]_[Trial Number]_[Frame Rate]), which contain the respective videos for each activity trial. - Once the file save of videos is verified, select Confirm Save to proceed. A confirmation message will appear after saving, as well as an option to restart the Drinking Task Activity Guide module. As demonstrated in the results section below, saved videos can then be coupled with a computer vision workflow to extract kinematics.
Results
A major motivation for the web-based clinician guide is to reduce the technical barriers that might otherwise deter clinicians from using computer vision to assess upper limb biomechanics for their patients. The web-based clinician guide is expected to produce two primary outputs for the user: (i) a series of synchronized images of the checkerboard calibration pattern based on the dual image sensors of a stereo camera, and (ii) for every trial performed by the subject, a pair of synchronized videos of the standardized drinking task activity (Figure 3). The web-based guide provides instructions in multiple formats, including written procedures, video/audio demonstrations, and an interactive virtual walk-through. To reduce administrative burden, data curation is automated. Image and video data are saved to a preferred digital file folder as indicated by the user, e.g., located on a computer desktop or an institutional cloud-based network. The data is automatically organized in compressed folders including nested subfolders and standardized filenames based on subject identifier, date/time of data acquisition, hand laterality, camera type/laterality, and trial number.
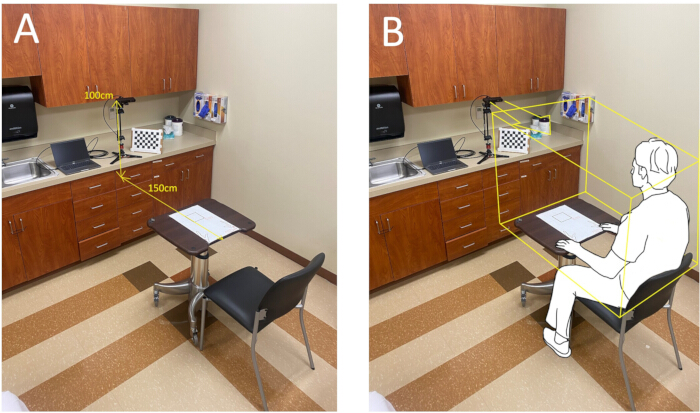
Figure 2: Outpatient clinic setup for recording images and video. Kinematics of the drinking task can be extracted from compatible video using computer vision, which can be achieved using the depicted setup of a stereo camera, a computer, and items commonly found in a clinic (chairs, tables, printing resources, clipboards, cups, drinking water). While the exact camera placement and orientation vary depending on device model, (A) an approximate position is shown, (B) which may be adjusted to capture the expected workspace that fully contains the subject's body and upper limbs during the drinking task. Please click here to view a larger version of this figure.
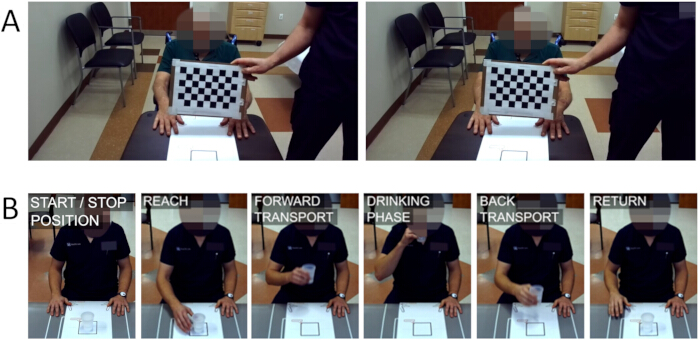
Figure 3: Compatible images and video created by a web-based clinician guide. The primary outputs from the web-based clinician guide include (A) a series of synchronized images of the checkerboard calibration pattern and (B) a pair of synchronized videos capturing the subject's performance of all phases of the drinking task activity. Please click here to view a larger version of this figure.
Based on the image and video data collected, upper limb biomechanics during the drinking task can then be extracted by using computer vision. Importantly, the collection of raw data and the application of computer vision can be decoupled. A variety of computer vision workflows have been described in prior literature for application to such data16,18 or users may apply their own custom-built workflows. For instance, we have previously developed a computer vision workflow for estimating three-dimensional human pose (Figure 4) and subsequently extracting three kinematics metrics. In brief, this computer vision workflow involves the following key steps: (i) calibration to extract intrinsic and extrinsic camera properties for mapping pixels to real-world dimensions; (ii) human pose detection to annotate the pixel locations of anatomic key points of the human body in two-dimensional images; (iii) application of a lifting procedure to calculate three-dimensional information from dual two-dimensional images; and (iv) application of filters for trajectory smoothing, e.g. moving average and Kalman filters. A more detailed description is beyond the scope of the current paper but can be accessed in prior work16. By applying this workflow, the extracted kinematic metrics quantify movement smoothness (e.g., number of movement units, NMU), compensation (e.g., trunk displacement, TD), and movement time (MT), which have been shown to be valid, reliable, and responsive to clinical change in stroke rehabilitation studies5,13,14. When compared to a conventional marker-based motion capture system, this computer vision workflow yields small error (NMUerror -0.12 units, TDerror 3.4 mm, and MTerror 0.15 s) relative to estimates of clinically significant change (3-7 NMU, 20-50 mm TD, and 2.5-5 s MT)16. To illustrate a specific kinematic metric, i.e. movement smoothness by NMU (Figure 5), a plot of the wrist velocity profile during the drinking task depicts the NMU (e.g., each movement unit denoted by a red asterisk) measured during a case study of an individual with history of stroke (51 year old female, right-hand dominant, history of ischemic stroke of right medulla resulting in mild left hemiparesis, stroke onset >6 months prior, comorbidities including hypertension and right carpal tunnel syndrome).
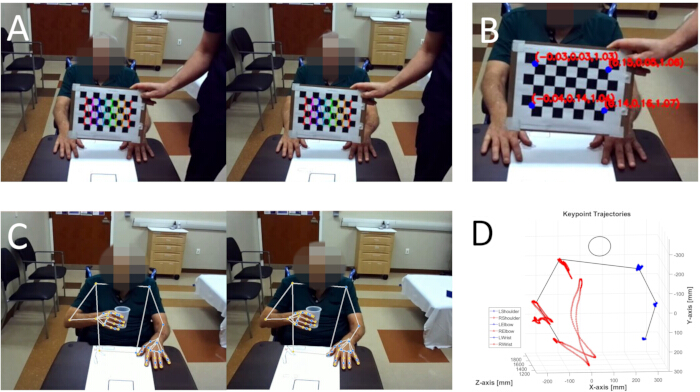
Figure 4: Computer vision application to images and video for extracting human movement data. A variety of computer vision workflows have been described to achieve the kinematics of the drinking task. (A) An initial calibration step requires 2D images to map pixels to the dimensions of the real world, (B) which can be converted to 3D coordinates using projective geometry. Subsequently, by applying human pose estimation to videos of the drinking task, (C) 2D anatomic key points can be detected automatically, which can be converted to (D) 3D key points for various metric computations and visualizations, e.g., keypoint trajectories. Please click here to view a larger version of this figure.
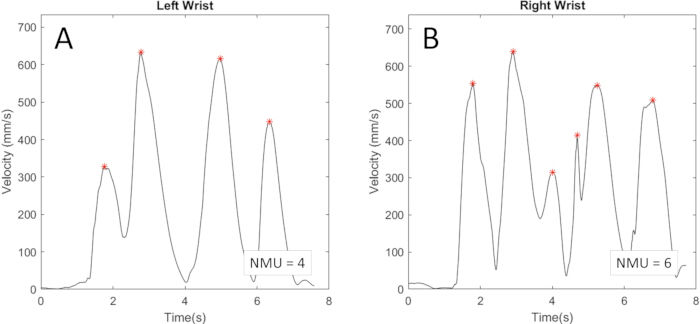
Figure 5: Kinematic metric of movement smoothness during the drinking task. Based on 3D human movement data from the drinking task, a variety of post-stroke kinematic metrics can be achieved. Based on a subject in the chronic phase of stroke recovery, a kinematic metric of movement smoothness (e.g., number of movement units, NMU, as depicted by the number of red asterisks on the wrist velocity profile) can be extracted from video with computer vision to reveal an objective difference in motor function between the (A) left and (B) right upper extremity. Please click here to view a larger version of this figure.
Discussion
Kinematic assessment of the drinking task has been recommended for use in stroke rehabilitation research6. However, practical concerns have been cited as barriers to the uptake of kinematics in rehabilitation research, and these concerns include the cost and technical requirements for motion capture technologies conventionally used to measure human biomechanics15. These concerns subsequently impede clinical uptake and translation of kinematic assessment to clinical practice. Alternatively, a more practical approach to extract kinematics by computer vision can be realized using a single stereo camera, a personal computer, and items commonly found in an outpatient clinic setting16. We present a protocol designed for clinicians that employs a web-based guide to record images and video that are compatible with a computer vision workflow to extract kinematic metrics of the drinking task. The long-term goal is to increase accessibility to these metrics, which have been previously developed and recommended for use in stroke rehabilitation research5,6,12,13,14.
Video synchronization is important for dual-camera approaches to computer vision. Dual-camera setups mimic human eyes, which simultaneously perceive a scene in the real world from slightly different vantage points to allow depth perception. In the case of computer vision, appropriate synchronization is then critical to the accuracy of 3-dimensional information (e.g., position of the human wrist in a Cartesian coordinate system) determined from two 2-dimensional sources (e.g., pixel location of the human wrist in a photo). In our experience, dual cameras can provide reasonable results when synchronized to within 1 ms16. Several factors may reduce synchronization, including unreliable camera frame rates, limited data transmission rates in cables, software inefficiencies, and limited hardware specifications (e.g., low RAM or low-tier processors). To alleviate synchronization issues, this protocol utilizes an off-the-shelf stereo camera, which benefits from a smaller physical footprint and is designed as a plug-and-play device (e.g., single USB connection to a standard personal computer) to automatically capture synchronized images from two built-in image sensors.
Camera characteristics require careful consideration for any computer vision application. In theory, higher resolution images and higher frame rate recordings of human movement offer more data for detecting anatomic key points with greater spatiotemporal accuracy. However, an inevitable balance is necessary between the amount of data and the computing resources available to process the data. The described protocol is based on a stereo camera that records video with 1280 x 720 pixel resolution at a frame rate of 60 Hz, which is comparable to prior studies applying computer vision for drinking task kinematics16,18. For recording these videos, we have observed reliable success using a higher-tier consumer-grade computer (e.g., 3.2 GHz CPU with 128 GB RAM) and mixed success using a laptop computer (e.g., 2.6 GHz CPU with 16 GB RAM). When applying lower-tier computers, a typical issue is missing video frames, which often presents as an output video with a duration less than the intended 20 s video recording. Of note, while data computing is a common culprit behind missing video frames, data transmission is also of importance. In the healthcare setting, for example, security settings associated with computer access ports (i.e., USB drives) might result in data transmission delays that interfere with reliable video recording.
Line-of-sight interference will challenge key steps in a computer vision workflow, including calibration and human pose estimation. Calibration relies on digital images of a standard-sized checkerboard pattern, which allows computer vision to map image pixels to the physical dimensions of the real world. Clear visualization of the checkerboard pattern improves the success rate of this mapping. Visual interference may arise due to a number of reasons including but not limited to the following: (i) lighting issues (e.g., bright glare from a nearby window or dark shadows); (ii) excessively fast movements of the checkerboard (e.g., image blurring due to prolonged camera exposure time); or (iii) inappropriate intrinsic camera properties (e.g., incorrect focal length or severe lens distortion). Human pose estimation leverages artificial intelligence to automatically annotate anatomic landmarks from images of a single person (single-pose estimation) or multiple people (multi-pose estimation). Clear visualization of the human is then critical to the success rate of pose estimation. Some visual interference may be tolerated depending on computer vision parameters (e.g., AI architecture, prediction thresholds). However, to gauge the suitability of a video for human pose estimation, common pitfalls to be wary of include the following: (i) bystanders in view in case of single-pose estimation; (ii) body segments intermittently outside the camera field-of-view; and (iii) self-occlusions due to overlapping body segments.
Decoupling data collection from the computer vision workflow itself offers both advantages and drawbacks. A notable drawback is the delay in clinically relevant information available to clinicians and patients to inform decision-making. A potential advantage is reduced interference with the clinician-patient interaction. For example, assuming calibration is performed prior to a patient's appointment, video recording 10 repetitions of the drinking task as described in prior literature12 would ideally require less than 4 min of video recording time plus any time required to orient patients who are naive to the protocol. Furthermore, this decoupling may boost clinician acceptance by dividing the responsibility for information. Within this separation of duties, the clinician takes ownership of when and why video assessments occur, and data scientists/engineers take ownership of refining the computer vision workflow that is responsible for accurate/reliable clinical metrics (e.g., drinking task kinematics). Indeed, this can be likened to the current reality of many blood-based (e.g., complete metabolic panels) and image-based tests (e.g., MRI studies) routinely ordered by clinicians. Lastly, this decoupling may be advantageous as the field of AI continues to advance. The video data acquired today could undergo repeat analysis by more advanced computer vision solutions of tomorrow, which may extract more kinematic metrics with greater speed, accuracy, and reliability.
Our goal is to further advance access to upper limb kinematics among the rehabilitation community, which includes clinicians in outpatient settings and foreseeably individuals in the home setting (e.g., telerehabilitation). This protocol and the web-based app should be viewed as an early stage of development, which has so far considered a very focused activity (i.e., the drinking task) and a relatively focused group of stakeholders (i.e., clinician users and subjects who can readily perform the drinking task). Future versions will be necessary to accommodate a more diverse user group, more diverse activities, and more diverse subject populations (e.g., individuals with severe deficits requiring activity accommodation). Additionally, future development will include important checkpoints before widespread implementation, such as integration into electronic medical records and maintenance of patient privacy and confidentiality. These future versions will also likely incorporate new technology and refine currently available technology. For example, the current protocol assumes a computer vision workflow based on binocular vision (e.g., stereo cameras). A logical next development is a protocol featuring monocular vision (e.g., more basic cameras), which may be achievable by utilizing AI trained on binocular datasets. Of note, the current protocol yields image and video data compatible with current state-of-the-art computer vision solutions, which are already being superseded in performance by newer solutions18. The web-based protocol described here may allow clinicians to implement into their practice a foundation for computer vision, which is likely to advance dramatically as AI technology permeates the healthcare industry.
Acknowledgements
We would like to thank Mitchell Embry for contributing his web development expertise to implement the envisioned web-app design. We also thank Dr. Mikhail Koffarnus and Dr. Carolyn Lauckner, leaders of the University of Kentucky (UK) mHealth Application Modernization and Mobilization Alliance (MAMMA). Funding was provided by the MAMMA Alliance through the UK College of Medicine, the Vice President for Research, and UK HealthCare.
Materials
| Name | Company | Catalog Number | Comments |
|---|---|---|---|
| Camera Mounting Arm, 2-section single articulated with camera platform | Manfrotto | 196B-2 | Mount for stereo camera |
| Camera Tripod, compatible with 1/4-in and 3/8-in standard mounting screws | iFootage | CB3 Base | Tripod to mount stereo camera |
| Clipboard, standard letter size | N/A | N/A | Surface to afix the calibration pattern |
| Cup, 8-oz plastic | N/A | N/A | Water container for drinking task |
| Height-adjustable chair, with locking caster wheels | Vermund Larsen A/S | VELA Independence | Chair for subject |
| Height-adjustable table, with locking caster wheels | Midmark Corporation | 6215 Rectangular Workstation | Table for drinking task setup |
| Printout of the Calibration Checkerboard | N/A | N/A | Pattern for calibraiton video |
| Printout of the Drinking Task Activity Placemat, | N/A | N/A | Placemat to guide drinking task setup |
| Stereo Camera, 4mm focal length, no polarizer, 5m USB 3.0 cable | Stereolabs | Zed 2i | Stereo camera for video recording |
| Tape | N/A | N/A | Adhesive for printouts |
References
- Tsao, C. W., et al. Heart Disease and Stroke Statistics-2022 Update: A Report From the American Heart Association. Circulation. 145 (8), e153-e639 (2022).
- Morris, J. H., van Wijck, F., Joice, S., Donaghy, M. Predicting health related quality of life 6 months after stroke: the role of anxiety and upper limb dysfunction. Disability Rehabilitat. 35 (4), 291-299 (2013).
- Winstein, C. J., et al. Guidelines for Adult Stroke Rehabilitation and Recovery: A Guideline for Healthcare Professionals From the American Heart Association/American Stroke Association. Stroke. 47 (6), e98-e169 (2016).
- World Report on Disability. Malta. , World Health Organization. http://who.int/teams/noncommunicable-diseases/sensory-functions-disability-and-rehabilitation/world-report-on-disability (2011).
- Alt Murphy, M., Willén, C., Sunnerhagen, K. S. Kinematic variables quantifying upper-extremity performance after stroke during reaching and drinking from a glass. Neurorehabil Neural Repair. 25 (1), 71-80 (2011).
- Kwakkel, G., et al. Standardized measurement of quality of upper limb movement after stroke: Consensus-based core recommendations from the Second Stroke Recovery and Rehabilitation Roundtable. Int J Stroke. 14 (8), 783-791 (2019).
- Valevicius, A. M., Jun, P. Y., Hebert, J. S., Vette, A. H. Use of optical motion capture for the analysis of normative upper body kinematics during functional upper limb tasks: A systematic review. J Electromyogr Kinesiol. 40, 1-15 (2018).
- Aprile, I., et al. Kinematic analysis of the upper limb motor strategies in stroke patients as a tool towards advanced neurorehabilitation strategies: a preliminary study. Biomed Res Int. 2014, 636123(2014).
- Kim, K., et al. Kinematic analysis of upper extremity movement during drinking in hemiplegic subjects. Clin Biomech. 29 (3), 248-256 (2014).
- Santos, G. L., Russo, T. L., Nieuwenhuys, A., Monari, D., Desloovere, K. Kinematic Analysis of a Drinking Task in Chronic Hemiparetic Patients Using Features Analysis and Statistical Parametric Mapping. Arch Phys Med Rehabil. 99 (3), 501-511.e4 (2018).
- Unger, T., et al. Upper limb movement quality measures: comparing IMUs and optical motion capture in stroke patients performing a drinking task. Front Digit Health. 6, 1359776(2024).
- Alt Murphy, M., Murphy, S., Persson, H. C., Bergström, U. B., Sunnerhagen, K. S. Kinematic Analysis Using 3D Motion Capture of Drinking Task in People With and Without Upper-extremity Impairments. J Vis Exp. (133), e57228(2018).
- Alt Murphy, M., Willén, C., Sunnerhagen, K. S. Movement kinematics during a drinking task are associated with the activity capacity level after stroke. Neurorehabil Neural Repair. 26 (9), 1106-1115 (2012).
- Alt Murphy, M., Willén, C., Sunnerhagen, K. S. Responsiveness of upper extremity kinematic measures and clinical improvement during the first three months after stroke. Neurorehabil Neural Repair. 27 (9), 844-853 (2013).
- Krakauer, J. W., Carmichael, S. T., Corbett, D., Wittenberg, G. F. Getting Neurorehabilitation Right: What Can Be Learned From Animal Models. Neurorehabil Neural Repair. 26 (8), 923-931 (2012).
- Huber, J., Slone, S., Bae, J. Computer vision for kinematic metrics of the drinking task in a pilot study of neurotypical participants. Sci Rep. 14 (1), 20668(2024).
- Uhlrich, S. D., et al. OpenCap: 3D human movement dynamics from smartphone videos. PLoS Comput Biol. 19 (10), e1011462(2023).
- Unger, T., et al. Differentiable Biomechanics for Markerless Motion Capture in Upper Limb Stroke Rehabilitation: A Comparison with Optical Motion Capture. ArXiv. , (2024).
Reprints and Permissions
