A customizable method for the administration of secreted immune proteins into the living mouse brain for temporal and spatial characterization of neuroimmune interactions.
Method Article
Targeted Intracranial Delivery of Secreted Immune Molecules to Investigate Neuroimmune Interactions
In This Article
Summary
Abstract
Although secreted immune proteins have increasingly been recognized to influence nervous system function, technical barriers persist in defining their spatiotemporal dynamics within the brain’s complex environment. For example, microglia, a population of key immune cells in the brain, release a variety of factors that interact with many diverse cellular targets. Microglia-derived proteins can signal to other cell types via mechanisms such as surface receptor binding without internalization, passive membrane transport, phagocytic uptake, or endocytosis-mediated uptake. Here, a method for localized delivery of a microglia-derived secreted protein is presented to dissect mechanisms of cellular interaction and downstream functional outcomes in vivo. We describe how to prepare protein samples for delivery, how to perform stereotaxic administration of protein to target brain regions, and best practices for the collection and preparation of brain tissue to visualize fixation-sensitive proteins by immunohistochemistry. This approach provides a versatile framework for spatiotemporally controlled studies of neuroimmune communication, enabling mechanistic exploration of how immune-derived proteins dynamically regulate neuronal and brain function.
Introduction
Neuroimmune communication, or the molecular conversation between the nervous and immune systems, has only recently been established as essential to the understanding of health and disease. The brain, once thought to be largely protected from immune system activity1,2, is now recognized as containing highly dynamic immune niches, allowing the nervous system to both send and receive immune signals throughout the body3. This robust, bi-directional crosstalk is most often mediated by immunocompetent cells that live either in the brain or at the nervous system interfaces, like the choroid plexus, meninges, and perivascular spaces4. In the brain parenchyma proper, however, immune signaling is primarily mediated by microglia, the long-lived, tissue-resident macrophages that first seed the brain during embryonic development. Although often experimentally investigated with special attention paid to their phagocytic functions, microglia also interact with both their immediate environments and across long distances through their release of a wide variety of immune factors5.
Modeling complex, multifactorial conditions like infections, injuries, and diseases in vivo, while beneficial in providing a holistic understanding of the nervous system under stress, leads to a cascade of factors with widespread and diverse consequences that can be hard to disentangle. Further, given the high heterogeneity amongst cells between brain regions, pinning down the causal release and associated effects of individual factors remains challenging. While tools such as lentiviral and adeno-associated viral vectors that allow for over-expression of specific factors following a location-precise infection have enabled investigation of the roles of secreted factors from other brain cells, such as neurons and astrocytes, in a variety of contexts, microglia thus far remain difficult to specifically and robustly modulate in this way6. Therefore, the ability to deliver microglia-derived signaling molecules to a defined brain location provides a useful method to separate their precise roles and consequences in different contexts.
The goal of this method is to spatiotemporally deliver microglia-derived factors into the brain of a living mouse in order to allow for downstream investigation of the functional impacts of a protein or molecule of interest. Moreover, this intracranial administration method is adaptable to many other contexts and questions, such as via the co-administration of multiple factors, like interacting immune factors or inhibitors, or the investigation of tissue responses across a time course of interest. While this protocol will describe tissue collection and preparation for immunohistochemical endpoints, a variety of other brain endpoints could be paired with this administration method, such as collecting fresh-frozen tissue punches from a brain region of interest for qPCR or protein abundance via Western blot or ELISA, or performing electrophysiological recordings of neuronal activity in an injected brain region.
Protocol
All procedures involving animals are conducted in accordance with the National Institutes of Health Guide for the Care and Use of Laboratory Animals and under protocols approved by the Institutional Animal Care and Use Committee (IACUC) at the institution of investigation. All procedures outlined here were reviewed and approved by IACUC at Duke University. The reagents and the equipment used are listed in the Table of Materials.
1. (Optional) Preparation of the injectate with the label of interest
- Purchase, isolate, or create a purified version of the immune protein or molecule of interest (see Discussion for guidance in protein optimization and validation recommendations).
- If needed, determine the best labeling strategy based on the chemical structure of the protein. For example, if specific domains or regions of your protein are required for its function, avoid conjugation at these sites. Validation of normal protein function following labeling should be performed.
NOTE: For purified proteins, common chemical labeling approaches include conjugation to thiol groups, usually on cysteine residues (maleimide or iodoacetamide dyes) or to amine groups, usually on lysine residues (N-hydroxysuccinimide (NHS) ester or isothiocyanate dyes) according to the manufacturer’s instructions. Kits may also be purchased from standard suppliers to perform conjugation.- Ensure any free dye is removed, such as through spinning proteins and dye through an appropriately sized column to capture protein and allow flow-through of any unbound dye before use.
- Alternatively, genetically tag proteins of interest for detection, express them in the cells of interest, and then purify them. The tag can be fused directly to the protein or connected through a flexible linker, with common options including fluorescent proteins (e.g., eGFP, tdTomato, mCherry) and self-labeling tags (e.g., HaloTag, SNAP-tag).
- Aliquot proteins to avoid freeze-thaw cycles that may cause damage. For best results, validate normal protein function for each freeze-thaw cycle number before use in vivo. Store at -80 °C.
NOTE: Unlabeled protein may be sufficient in cases where differentiation between endogenous and exogenous protein is not required (i.e., injecting into a knockout rodent model). Empirical testing should be performed to optimize experimental conditions.
2. Preparation of equipment for the surgical procedure
- Gather the following surgical tools into an autoclave-safe container with a steam indicator strip: scalpel handle, forceps, small scissors, hemostat, drill bit (1.35 mm), and surgical drape for tips-only aseptic technique. Sterilize surgical tools via autoclave at 121 °C at 15–20 psi for 30 min.
- Additional materials needed: sterile cotton-tip applicators, povidone-iodine solution, 70% ethanol, 0.9% saline, isoflurane, glass-pulled micropipettes, sterile scalpel blades, hair removal cream, eye lubricant, tissue adhesive or surgical sutures, heating pad, weighing scale, prepared medications and insulin syringes, and surgical logbook.
- To prepare glass-pulled micropipettes, select a glass capillary with an outer diameter that fits into the injector, usually around 1.0 mm, and an inner diameter of between 0.5 mm and 0.8 mm. Load it into a pipette puller, then pull using settings that result in a narrow but strong tapered tip (these settings will depend on the specific instrument and require individual optimization).
NOTE: Often, a lower temperature helps avoid a long, flexible tip that may bend when entering the parenchyma, and a low or moderate pull force helps avoid a tip opening that is too tight, which may cause clogging or injection resistance. Use a dissecting microscope to inspect all pulled pipette tips, and use fine forceps to gently clip the tip opening to leave an inner diameter opening of around 20 µm. If using a beveling instrument, use an angle of less than 35°. - Bring autoclaved tools, additional materials, and protein for injection on ice to the surgical space (Figure 1A). Unpack autoclaved tools carefully onto a surgical towel, placing the tips of all tools into the designated sterile field center (Figure 1B,C). Use the hemostat to place the drill bit into the center of the field. Affix a sterile scalpel blade to the handle and keep the blade end in the sterile field.
- Pre-warm the heating pad to 37 °C and turn on the bead sterilizer if performing multiple surgeries.
- Backfill the micropipette tip with mineral oil using a fine gauge needle, ensuring there are no bubbles throughout the length of the glass pipette. Load the glass pipette onto the microinjector, and carefully eject the volume of protein you will load. Load protein of interest at a volume based on published recommendations7 into the injector, then set the injector to the side.
3. Stereotaxic surgical procedure
NOTE: All surgeries were performed in a highly ventilated surgical suite, and all personnel wore personal protective gear consisting of gloves, face masks, hair covers, shoe covers, and gowns. Isoflurane gas exposure is a health risk and thus requires a scavenging system, such as activated charcoal canisters, which should be weighed before and after isoflurane use. Ensure all equipment, such as the anesthesia vaporizer, ventilation systems, and scavenging equipment, is properly certified and calibrated before use.
- Ensure the anesthesia vaporizer is filled with the proper volume of isoflurane and set the oxygen flow at a rate of 1 L/min. Record the weight of the mouse before placing it in an isoflurane chamber set to a delivery rate of 3.5%–4%. Record the time of the start of the surgery.
- Monitor the animal for reduced respiration rate, then confirm full anesthesia by the lack of toe pinch reflex. Once fully anesthetized, move the animal to the warmed heating pad on the stereotax to receive a constant flow of 2% isoflurane at 1 L/min through a nose cone. Adjust isoflurane flow as needed based on the animal respiratory rate.
- Apply a generous coating of eye lubricant gently to each eye. Monitor the lubricant throughout the surgery to ensure it remains covering the eyes entirely. Reapply as needed.
- Using a sterile cotton applicator, apply hair removal cream to the top of the head and massage into fur. Follow the hair removal cream application with applicators dipped in 0.9% saline to remove both the cream and head fur. Repeat hair removal cream application and removal until all fur is removed from the top of the head.
NOTE: Be careful not to apply hair removal cream to exposed skin with fur already removed, or to leave cream rubbed into fur for more than about 3 min at a time. Prolonged exposure to hair removal cream can cause skin burns. - Administer an appropriate amount of pre-operative analgesia based on the weight of the animal. The exact analgesic dose, route, and timing require review and approval by IACUC. This study used 4 mg/kg of meloxicam via a subcutaneous injection, administered at the start of surgery.
- Firmly secure the animal’s head between earbars, keeping the skull as flat and even as possible. Press gently down on the animal's head to confirm there is no movement. If the head dips or moves, resecure the earbars until it does not.
- Using sterile cotton applicators, apply betadine to the head in an inside-to-outside circular motion, then repeat with 70% ethanol.
- Repeat the povidone-iodine application, then apply 70% ethanol 2 more times, for a total of 3 applications.
NOTE: This is now treated as a sterile field, and only sterilized instruments are allowed into the area. - Use a scalpel to make a vertical incision from roughly just above the top of the eyes to about midway between the ears in one fluid motion. Use a sterile cotton-tip applicator to gently separate the skin and expose the skull. Confirm you can visualize both bregma and lambda, then carefully dispose of the scalpel blade in the appropriate sharps disposal container.
- Use ridged forceps to attach the sterile drill bit to the drill. Secure the drill into the stereotax arm and position the drill above the center of the bregma, just touching the skull. Zero the Z position on the stereotax.
- To perform a quality control measure for proper head placement:
- After zeroing at bregma, move the drill bit to lambda, again moving the Z position to just touch the surface of the skull. Record the Z position at lambda.
- Move the drill bit back up, then -2.1 mm in the Y position, which should be about midway between bregma and lambda. Move the X position -1.5 mm and +1.5 mm to either side, again recording the Z position in both locations when just touching the skull.
- Ensure every Z position recorded is <0.2 mm. Adjust as needed.
- Zero coordinates again at bregma, then move the stereotax arm to your (X,Y) desired coordinates.
NOTE: Published mouse stereotaxic coordinate atlases often use reference mice of normal young adult weight (~28 g). Larger or smaller mice may not perfectly fit these reference coordinates. It is recommended to perform pilot injections with a dye to confirm accurate coordinates before experimental administration of the protein. To adjust coordinates, one may consider using a bregma-lambda correction ratio, multiplying the measured distance in mm from bregma to lambda on the mouse by the coordinate recommended by the reference atlas, then dividing that result by the bregma-lambda distance in the reference atlas, as a starting point. - Turn on the drill and slowly lower the arm in the Z dimension to make contact with the skull. Carefully drill through the skull, ensuring not to make contact with or damage the brain tissue underneath. The surface of the brain will appear shiny and moist once the hole is properly drilled.
NOTE: Intermittent drilling and a lower drill speed (1000 rpm) will help reduce the risk of heat from excessive friction, and application of sterile saline solution following or during drilling will reduce bone dust aerosolization. Use of PPE (face mask, eye protection) is important for avoiding risks to the experimenter. - Repeat Step 3.12 as needed if multiple injection sites are being performed.
- Remove the drill from the stereotax arm. If performing more than one surgery, use the sterile, ridged forceps to remove the drill bit from the drill and place it into the bead sterilizer. After 10 s, remove the drill bit from the beads and place it in the sterile field on the surgical towel.
- Dip a sterile cotton-tipped applicator in 0.9% saline and use it to wet the exposed skull and wipe up any dust created by drilling. Check the animal’s eye lubricant and apply more if needed.
4. Injection of the protein of interest and surgical recovery
- Secure the loaded injector into the stereotax arm. Re-zero at bregma and adjust to desired (X,Y) coordinates. Lower the injector tip through the drilled hole in the skull until it is just on the surface of the brain, beneath the skull. Zero the Z plane.
- Very slowly insert the injector tip to just past your desired Z coordinate (an extra ~-0.2 mm) and then bring it back up to the correct coordinate.
- Slowly inject the desired protein, no faster than a rate of 500 nL/min. Record the time of injection.
NOTE: Carefully consider injectate volumes to achieve desired spatial targeting while avoiding tissue injury and damage. Empirical testing should be performed to optimize volume and delivery rate per region of interest (see Discussion for further details). - To prevent injectate backflow, keep the injector in place for 5–10 additional min following the conclusion of injection.
- Slowly bring the injector back up out of the brain, over the course of 1–2 min.
- Repeat Steps 4.1–4.5 if performing multiple injections.
- Remove the injector from the stereotax upon completion.
- Use a sterile cotton applicator dipped in saline to rehydrate the surgical incision site. Apply bupivacaine or another preferred local anesthetic topically to the skin.
- Use sterile forceps to close the incision site and apply tissue adhesive (or other preferred methods, such as sutures or wound staples) to seal the wound.
NOTE: Be careful not to get tissue adhesive near the animal’s eyes or any skin other than the incision itself. One can use a sterile pipette tip and pipette to apply the tissue adhesive in a more controlled manner than the manufacturer-supplied applicators. - Loosen the earbars and nosecone, and place the animal in a warmed, clean cage to recover. Record the time the animal is removed from isoflurane anesthesia.
- Monitor the animal and record the time the animal is first observed standing. Once fully ambulatory for at least 30 min, return the animal to a clean homecage with supplemental care, such as hydrogel and rehydrated milled food.
NOTE: Unless acutely (within 24 h) collecting tissue from the recovered animal, it should be weighed and monitored once a day for the first week after surgery to assess for any adverse reactions, normal wound healing, and confirm healthy recovery. Post-operative analgesics should be administered according to protocols reviewed and approved by IACUC; 4 mg/kg of meloxicam was administered subcutaneously every 24 h for the first 3 days after surgery. All observations should be recorded in a logbook. If an animal is observed to exhibit sickness behavior, such as reduced ambulation, weight loss of >15% of pre-surgery weight, or other indications of poor health, either a veterinarian should be contacted for consultation, or the animal should be humanely sacrificed and removed from the study.
5. Preparation of tissue for the immunohistochemical procedure
- Gather the following materials: 1x PBS, forceps, small scissors, 30 mL syringe or perfusion pump, 26-gauge butterfly needle, two 15 mL conical tubes, 4% paraformaldehyde (PFA) in PBS, three small weigh boats (for washing PFA off tissue), 30% sucrose in PBS.
NOTE: PFA is carcinogenic and releases toxic vapors that require special handling and disposal. All preparation, use, and disposal of PFA should be performed in a chemical fume hood or biosafety cabinet. All PFA waste, including both liquid waste and any solids that come in contact with PFA (i.e., pipette tips, tubes, weigh boats, etc.), should be placed in hazardous waste containers as outlined by the institution where the work is being performed. - Follow the institutional guidelines for euthanasia procedures. Once confirmed, move the animal to over a tray or bucket and open the abdominal cavity of the animal using forceps and scissors to expose the heart.
- Transcardially perfuse the animal with cold 1x PBS using a pump or manually using a 30 mL syringe.
NOTE: The time between sacrifice and perfusion should be as short as possible to avoid clotting, and so should be performed one at a time if collecting tissue from multiple mice. - Remove the whole brain from the skull and move to a 15 mL conical containing 4% PFA solution for no more than 2 h. Record the time each brain was placed in PFA to ensure you do not overfix the tissue.
NOTE: Optimization of tissue fixation should be empirically tested for targets of interest. For example, C1q interactions with neuronal ribonucleoprotein complexes are sensitive to overfixation8. Please refer to the Discussion for further details on selecting an appropriate fixation method. - After an appropriate length of tissue fixation, perform three washes in PBS to remove residual PFA from the tissue.
- Transfer the brain into a 15 mL conical containing 30% sucrose in PBS solution, and store at 4 °C until the brain sinks to the bottom. On average, this should take 1–3 days.
- To embed fixed brains, gather the following materials: 30% sucrose in PBS, freezing embedding medium, appropriately sized disposable freezing molds (such as 22 mm x 22 mm), razor blade, forceps, serological pipette, and tips.
- Mix freezing embedding medium and 30% sucrose solution in a 1:1 ratio to create the embedding solution. If using 22 mm x 22 mm molds, approximately 5 mL of embedding solution per mold is needed. Vortex well to combine the differing viscosities.
- For sagittal brain sections, use a razor blade to cut the brain down the midline (Figure 2A). Label each tissue mold with sample details, including hemisphere. Hemispheres can be placed in individual molds or mounted together, depending on preference, with the midline facing the bottom of the mold (Figure 2B).
- Add an appropriate volume of embedding solution to surround and fully submerge the brain tissue. Let the filled molds sit at room temperature for 1 h.
NOTE: It is okay if the embedding solution is still very bubbly from vortexing. The 1 h incubation period allows time for the bubbles to dissipate. - Gather dry ice and place a flat metal shelf or plate on top of the dry ice to create a flat surface for freezing.
- Gently move each filled mold to rest as flat as possible on the dry ice. Use forceps after moving the molds but before freezing begins to ensure the brains are still in position. Once the embedding solution has become fully opaque, it has frozen solid, and the embedded tissues can be moved to -80 °C until ready to perform immunohistochemistry (Figure 2C).
- Use a cryostat (chamber temperature: -20 to -25 °C, head temperature: -15 to -18 °C) to collect 15–40 µm sagittal sections onto charged slides, being sure to space them enough to allow for a pap pen barrier to be applied. Three sagittal sections can be well spaced on a single slide.
NOTE: If visualizing a sensitive protein, or a protein of unknown sensitivity, only collect the sections needed for an immunohistochemistry experiment, and perform it the same day. Embedded tissue can be saved and re-frozen in the -80°C for future experiments. Alternatively, slides with sectioned tissue may be stored in slide boxes at -80°C.
6. Performing immunohistochemistry for the injected protein
- Collect materials for immunohistochemistry: 1x TBS, pap pen, saponin, bovine serum albumin (BSA), primary antibodies of interest, secondary antibodies, Sudan Black B-based autofluorescence quencher, 70% ethanol, mounting media with DAPI, coverslips, nail polish.
NOTE: Commercially available autofluorescence quenching solutions often contain dimethylformamide (DMF), which requires careful use and disposal. Do not handle without gloves, and collect any used solution in an organic waste container according to the policies of the institution where the work is being performed. - Use a transfer pipette to apply 1x TBS to tissue sections on the slide for a 10 min wash.
- Aspirate off the 1x TBS wash, then use a pap pen to apply a hydrophobic barrier around each tissue section.
NOTE: Doing this after the first 1x TBS wash should help with removing excess embedding solution that may stick to the slides and make the barrier less effective. Use a task wipe to remove excess solution before applying the barrier. Be careful not to let rehydrated tissue dry out, however. - Repeat the 1x TBS 10 min wash twice, for a total of 3 washes.
- Prepare permeabilization buffer: Add 0.1% saponin to 1x TBS. Use within 2 weeks of preparation. Apply ~100 µL to each section and incubate for 10 min at room temperature.
- Prepare blocking buffer: Add 0.1% saponin and 1% BSA to 1x TBS. A blocking buffer will additionally be used for primary and secondary solutions, so make extra and store at 4 °C. Use within 2 weeks of preparation. Aspirate off the permeabilization buffer and apply ~100 µL of blocking buffer to each section. Incubate at room temperature for 1 h.
- Prepare primary solution: Add primary antibodies to the blocking buffer. Start with a 1:500 concentration of primary antibody, adjusting based on results. Aspirate off blocking buffer, and apply ~100 µL of primary solution to each section.
NOTE: To enhance the endogenous fluorescent signal of a target protein, amplification using a primary antibody against the tag (e.g., anti-GFP antibody) may be performed. - Store slides in primary solution overnight at 4 °C.
NOTE: In order to avoid overnight evaporation, ensure to have a generous amount of primary solution on each section and add additional moisture to the slide storage location. - Wash off the primary solution by washing three times in 1x TBS for 10 min at room temperature.
- Prepare secondary solution: Add secondary antibodies to the blocking buffer solution. Start with a 1:200 concentration of secondary, adjusting as needed. Apply ~100 µL of solution to each tissue section, and incubate for 1 h at room temperature, covered to protect from light.
NOTE: At this step, the slides should remain protected from light. - Remove secondary solution by washing with 1x TBS for 10 min at room temperature.
- Freshly prepare the autofluorescence quenching solution according to manufacturer's instructions. Prepare a 1x working solution by diluting the 20x quenching solution into 70% molecular grade ethanol.
- One slide at a time, aspirate off 1x TBS, and apply 1x quenching solution. Gently rotate the slide for 20–30 s, allowing the solution to move around the tissue sections.
- Dump the quenching solution into a waste container, then apply TBS using a transfer pipette to each section, dump the TBS into the waste container, and then quickly repeat the TBS washes until the TBS runs clear (usually 2–3 times is sufficient).
- Apply 1x TBS to the section to keep it from drying out before repeating the quenching solution steps for each slide.
- One slide at a time, aspirate off the TBS thoroughly, then apply at least a drop of mounting media with DAPI to each tissue section. Place a coverslip on the slide and seal the edges of the coverslip with nail polish to prevent any evaporation of mounting media or coverslip movement. Repeat with all slides.
- Keep slides at -20 °C for long-term storage if not imaging immediately.
Results
C1q is a large (~450 kD) protein highly expressed throughout the body with well-defined roles in the innate immune system as a key member of the classical complement pathway. However, the functional roles of C1q in the brain are still under investigation. C1q in the brain is primarily made by and released from microglia, the brain’s resident immune cell population9. The role of C1q in processes such as synaptic removal across normal brain development, learning and memory, and in disease contexts has been repeatedly demonstrated10,11,12,13,14. C1q has also been observed to accumulate within or immediately adjacent to neuronal structures as the brain ages, in both rodents and non-human primates9,15,16. Our lab is interested in the functional consequences of C1q accumulation in the brain during aging. This study discovered that C1q interacts with neuronal intracellular proteins in adult and aging rodents, including RNA-binding proteins8. Because T cells have been previously shown to internalize C1q derived from other cell types17, we determined if neurons are also able to internalize exogenous C1q in vivo.
This study first performed unilateral intracerebroventricular (ICV) injections of 2 µL of C1q protein into 3-month-old male mice. Because C1q is expressed in the wild-type adult brain, we used two approaches: first, C1q protein was injected into a C1q -/- (knockout) mouse, and second, the C1q was fluorescently labeled through 594-maleimide conjugation to allow one to distinguish between native and exogenous C1q protein in a C1q +/+ (wild-type) animal. Protein was administered at a concentration of 1 mg/mL, suspended in a buffer solution of 10 mM HEPES, 300 mM NaCl, pH 7.2. The following stereotaxic coordinates were used for a left hemisphere ICV injection: X = +1.0 mm, Y = -0.4 mm, Z = -2.5 mm, and the volume was injected at a rate of 500 nL/min. To reduce backflow, the glass-pulled needle used to inject was left in place for 5 min after the cessation of injection before removal. Tissue was collected 1 h following injection and processed for immunohistochemical analysis in sagittal sections. Successful injection should result in localized fluorescence to the stereotaxically targeted area.
First, in C1q -/- mice, we imaged 30 µm sagittal sections of the left (Figure 3A) and right (Figure 3B) hemisphere after the full immunohistochemistry procedure (Steps 6.1–6.17). An anti-NeuN antibody was used for visualizing neuronal somas (cyan), and an anti-C1q antibody (red) to visualize non-tagged C1q that was injected 1 h prior into the left ventricle. There is abundant C1q observed in the left hemisphere in the peri-ventricular parenchyma, and high colocalization between neuronal cell bodies and C1q in hippocampal CA3 (Figure 3A), similar to what we observe in a wild-type mouse with endogenous C1q expression. As expected, injected C1q is not observed around the ventricles (or anywhere in the parenchyma) in the contralateral hemisphere 1 h after injection (Figure 3B). Next, brains of C1q +/+ wild-type (C57BL/6J) mice that were ICV-injected with C1q-594 were imaged. Here, it was confirmed that C1q-594 (magenta) could be visualized in 30 µm sagittal sections with only autofluorescence quenching and coverslipping with DAPI (blue) (Steps 6.12–6.17). In the left (injected) hemisphere, fluorescently tagged injected C1q (magenta) is observed in the same peri-ventricular distribution (Figure 3C).
In order to confirm neuronal colocalization, a secondary experiment was performed with two C1q -/- 2-month-old males. In one hemisphere, mice received an ICV injection of 2 µL of C1q-594, and in the other hemisphere, mice received 2 µL of heat-inactivated (HI) C1q-594. Heat inactivation was performed following 594-maleimide conjugation, when half of the prepared protein was placed in a heat block set to 56 °C for 30 min. Heat inactivation has been previously shown to alter native C1q protein structure and disrupt activation18. Normal, native C1q at a concentration of 200 µg/mL in suspension buffer (50 mM HEPES, 150 mM NaCl, pH 7.5) is soluble in solution and does not form any visible aggregates under brightfield microscopy (Figure 4A). In contrast, when the same protein preparation was heated, visible aggregates were observable under brightfield (Figure 4B), suggestive of a protein conformation change. Next, it was determined if the injection of HI-C1q in vivo would change neuronal uptake of C1q. Brains were collected 1 h after injection, and each hemisphere was processed identically as described in the above protocol. In 20 µm sagittal sections, immunohistochemistry was performed to identify neurons. 40x images were captured with identical settings of hippocampal CA3 to capture NeuN+ neurons (cyan) and C1q-594 (red) (Figure 5A,B). In the normal C1q-594-injected hemisphere, robust C1q labeling was observed (Figure 5A), whereas in HI-C1q-594-injected hemispheres, there was no observed C1q-594 in CA3, though the fluorescent protein could be observed collecting around the ventricle edges (Figure 4C), consistent with a change to the normal C1q protein function of neuronal uptake. Quantification of NeuN+ cells by manual quantification by a blinded experimenter in 8, 40x fields of view revealed no changes in the density of neurons in CA3 across hemispheres (Figure 5D), however the percent of neurons that were C1q+ was significantly reduced in hemispheres injected with HI-C1q-594 (Figure 5C) by two-tailed t-test (p = 0.026, n = 2 animals, 2 images of each hemisphere per animal analyzed).
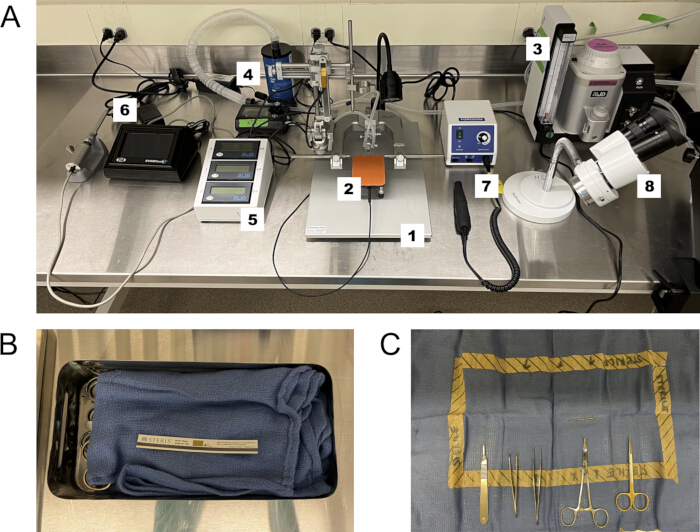
Figure 1: Surgical setup and surgical sterile field preparation. (A) Surgical equipment: 1. Stereotax, 2. Rodent warmer, 3. Isoflurane vaporizer, 4. Isoflurane scavenging canister, 5. Digital stereotax arm, 6. Microinjector, 7. Drill, 8. Stereo microscope. (B) Autoclave tools and sterile field surgical towel with a steam indicator strip to confirm sterility. (C) Autoclaved tools are carefully placed “tips in” to the sterile field designated on the autoclaved surgical towel. Handles remain outside the sterile center, and tips of tools should only contact the animal following sterilization with betadine and 70% ethanol. Please click here to view a larger version of this figure.
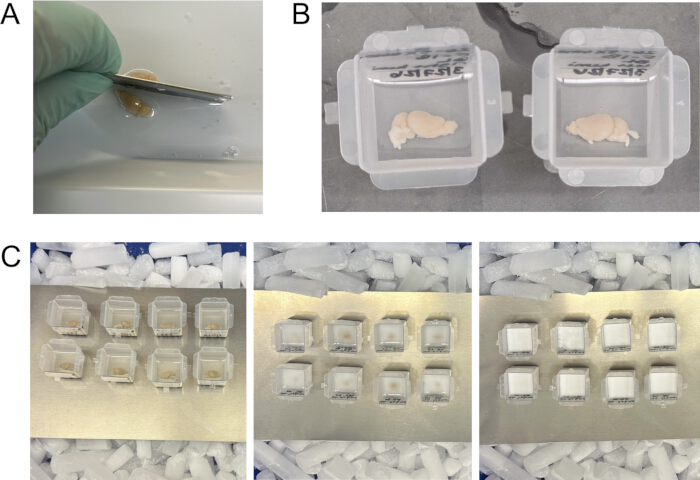
Figure 2: Brain processing and freezing for sagittal sectioning. (A) Use a razor blade to cut the brain down midline, then place each hemisphere midline-side facing down in a freezing mold. (B) Fill the molds with a 50:50 mix of freezing embedding medium and 30% sucrose in PBS. (C) Freeze the brains in molds on dry ice (left). They will become opaque when fully frozen (right). Please click here to view a larger version of this figure.
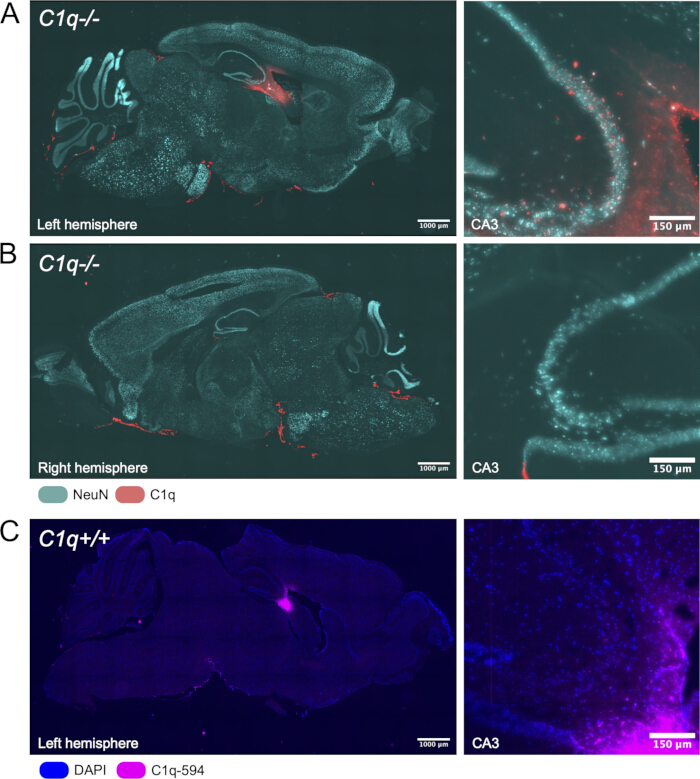
Figure 3: Representative results of intracerebroventricular (ICV) administration of C1q protein 1 h after injection. (A) Sagittal section of injected C1q protein (red) and NeuN+ neuronal somas (cyan) in the injected hemisphere, and an inset of the CA3 hippocampal region adjacent to the ventricle. (B) Sagittal section of the opposite hemisphere from the injection in the same animal, with injected C1q protein (red) and NeuN+ neuronal somas (cyan), and an inset of CA3. (C) Sagittal section of a wild-type animal injected ICV with C1q fluorescently tagged using 594-maleimide conjugation (magenta), not amplified by immunohistochemistry, but coverslipped with DAPI (blue), and an inset of CA3. Left image scale bars = 1000 µm, right image scale bars = 150 µm. Please click here to view a larger version of this figure.
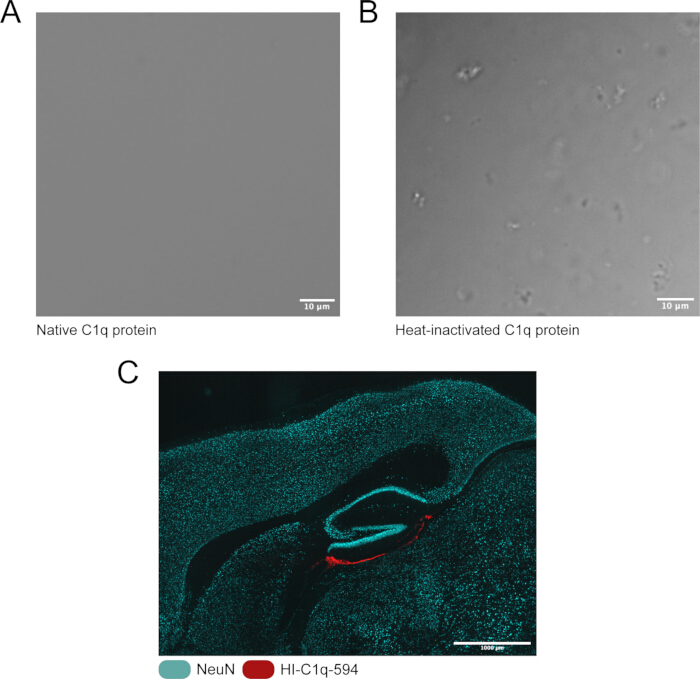
Figure 4: Heat-inactivation of C1q protein. (A) Native C1q protein, suspended in buffer (50 mM HEPES, 150 mM NaCl, pH 7.5) at 200 μg/mL imaged with brightfield microscopy. (B) The same C1q protein source, suspended in the same buffer at the same concentration, but heat-treated at 56 °C for 30 min before imaging with brightfield microscopy. (C) Localization of heat-inactivated (HI)-C1q-594 (red) and NeuN+ cells (cyan) in a sagittal section 1 h after ICV injection. Top scale bar = 10 µm, bottom scale bar = 1000 µm. Please click here to view a larger version of this figure.
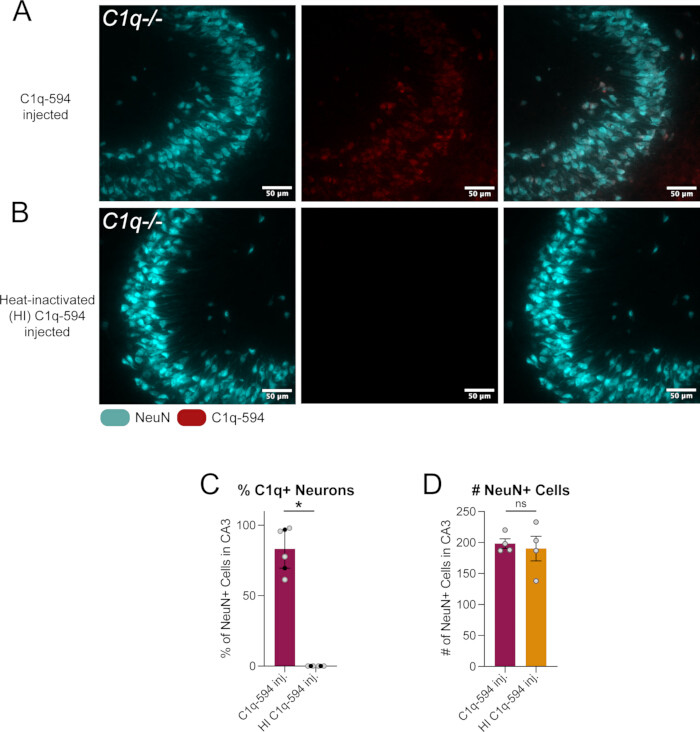
Figure 5: Quantification of normal versus heat-inactivated C1q protein uptake into neurons in the hippocampus. (A) Sagittal section of the CA3 region of the hippocampus adjacent to the ventricle, where C1q-594 was injected 1 h prior. NeuN+ neuronal somas (cyan), C1q-594 (red), and overlay of the two. (B) Sagittal section of the CA3 region of the hippocampus adjacent to the ventricle, where heat-inactivated (HI)-C1q-594 was injected 1 h prior. NeuN+ neuronal somas (cyan), C1q-594 (red), and overlay of the two. (C) Quantification of the percent of NeuN+ cells that are C1q-594+ in the 40x field of view, two-tailed t-test. (D) Quantification of the number of NeuN+ cells in the 40x field of view, two-tailed t-test. Scale bars = 50 µm. Please click here to view a larger version of this figure.
| Protein Labeling | Antibody | |
| Visualization | Direct, not dependent on an antibody | May have cross-reactivity with other proteins, dependent on antigen availability |
| Preparation | Longer, more technical preparation and validation of protein of interest as labeling may alter protein structure and function. Reaction yields may be poor and require large volumes of input protein | No preparation, many antibodies are commercially available and already validated |
| Experimental Flexibility | Live-tracking possible if desired | Requires fixation |
| Sensitivity | Limited sensitivity due to stoichiometry | Allows for amplification |
Table 1: Advantages and disadvantages of protein labeling vs. antibody detection.
Discussion
Emerging evidence supports a critical role of microglia in CNS homeostasis mediated by an increasingly complex repertoire of secreted factors5. The ability to deliver microglia-derived factors in a defined spatiotemporal manner provides a valuable tool to disentangle complex neuroimmune communication under a variety of environmental and genetic conditions.
This method can be easily adapted to answer a variety of biological questions. While this method was previously used to better understand the roles of C1q, a very large protein, in neuronal function8, it could also be applied to investigate the roles of other large proteins, as well as small proteins such as cytokines and chemokines. While the immune roles of cytokines and chemokines are fairly well understood, in vivo, these factors are often released together, in response to a stressor, and in a widespread fashion. Further, the non-immune/non-canonical, often homeostatic roles of different immune factors are becoming increasingly apparent. Use of this method would allow for investigation of specific factors in isolation, as well as in specific brain regions, and even the roles of these factors in homeostasis. Another beneficial application of this protocol would be the administration of proteins of interest in transgenic mouse lines, such as in knockout lines or models of specific disease states. The ability to control the precise localization and amount of a protein of interest in a mouse with no endogenous expression of that protein can be used to determine whether acute, localized administration of the protein induces an effect, such as a behavioral change. Alternatively, one could inject into a transgenic line lacking a specific receptor or signaling protein hypothesized to be important for the function of the injected factor.
Additionally, the intracranial administration of microglia-derived factors can be performed in tandem with the injection of other factors to better our mechanistic understanding of a protein’s function. For example, in order to determine how C1q, a microglia-derived protein, enters neurons and interacts with their translational machinery, we previously used this technique to co-administer an endocytosis inhibitor 30 min prior to C1q injection. This allowed us to determine that C1q can enter neurons via endocytosis, as co-application with the inhibitor led to a significant reduction in C1q within neurons8. Similar experiments could be performed with the administration of blocking antibodies or even other hypothesized competitive binding factors. These co-administration experiments can also be modulated temporally by extending or reducing the injection intervals, for example, injecting one factor 30 min before the other, or one factor 5 min versus 1 h prior.
Several factors should be considered when designing experiments using this methodology, beginning with the strategy for detecting the protein of interest. Here, two representative approaches were demonstrated: direct fluorescent labeling of the protein (Figure 3C) and immunohistochemical detection using antibodies (Figure 3A), each with distinct advantages and limitations (Table 1). Antibody-based detection is highly sensitive and enables signal amplification but requires tissue fixation, making it unsuitable for applications such as live imaging of protein dynamics. Direct fluorescent labeling avoids this limitation but requires modification of the protein itself, which may affect its properties and therefore should be validated. Regardless of the approach, careful validation is essential. Commercial antibodies are widely available but may exhibit off-target binding or cross-reactivity, making specificity testing critical. Whenever possible, antibody performance should be confirmed using appropriate controls, such as comparison of staining in wild-type and protein knockout tissue, which remains the gold standard for antibody validation.
In contrast, direct fluorescent labeling requires both preparation and validation before experimental use. Although this approach enables direct visualization of the protein without relying on antibodies, it is essential to confirm that the fluorescent tag does not alter protein structure, localization, interactions, or function. Appropriate validation is protein-dependent but may include confirming the expected molecular weight by Western blot, verifying normal cellular or subcellular localization, or assessing preservation of known protein–protein interactions through assays such as co-immunoprecipitation. Ultimately, both antibody-based detection and direct protein labeling have inherent advantages and limitations, and the most appropriate approach should be determined empirically through pilot studies tailored to the protein of interest and published recommendations19.
In order for this methodology to be reliable, it is important that the stereotaxic coordinates and injected protein concentration selected by the experimenter are empirically optimized and validated in advance. Coordinate validation can be accomplished through pilot injection of a dye, such as Fast Green, and then collecting the brain immediately following injection. This will allow for visual confirmation of dye localization to the region of interest, as well as the opportunity to adjust coordinates for the most accurate injection possible. The authors recommend referencing previously published work to determine accurate stereotaxic coordinates for regions of interest or calculating coordinates to test on large or small mice based on the bregma-lambda ratio, as described in the Protocol.
In order to make experimental conclusions about your injected protein, there are a number of key controls that should be considered and included in a well-designed experiment. There are inherent challenges to studying microglia-derived proteins via intracranial administration. If an experimenter is interested in the response to a particular protein in a specific brain region, the surgery itself will be inflammatory and may confound findings. When considering immune-related proteins, the simplest to perform are surgical controls, where either or both a sham surgery is performed (all steps except the injection of a protein) or a vehicle control injection is performed (all steps, but instead of protein injected, the same volume of only the protein buffer solution is injected). These help distinguish between effects that are surgery- or tissue-damage dependent versus a result of the protein itself. Even more definitive would be to include a control where either an inactive or irrelevant protein is injected at the same volume and concentration. It is important to consider the relative size of the control protein compared to the experimental protein; for example, C1q is a very large protein (~450 kD), so injecting a common control protein like bovine serum albumin (~66 kD) may not be the most appropriate. Therefore, heat-inactivated C1q was used as an inactive protein control. Depending on the spread of the protein injected in the desired time window before collection, this may be performed as a within-subject control by including one of these control conditions in the contralateral hemisphere to the experimentally injected hemisphere, as seen in Representative Results (Figure 4 and Figure 5).
An important consideration in experimental design is the tissue fixation strategy, as both the type and duration of fixation can profoundly influence protein visualization, tissue morphology, and, in some cases, protein function. Crosslinking fixatives such as paraformaldehyde (PFA) generally provide superior preservation of tissue architecture but may reduce detection of fixation-sensitive epitopes through excessive protein crosslinking, increase autofluorescence, and necessitate antigen retrieval. In contrast, non-crosslinking fixatives such as alcohol-, acetone-, or methanol-based solutions often better preserve fixation-sensitive proteins but can compromise tissue integrity. These tradeoffs can be mitigated by optimizing fixation duration and method, including the use of fresh-frozen sections with on-slide fixation, saline perfusion followed by brief PFA immersion, or standard perfusion fixation, depending on the experimental goals. Because no single fixation strategy is optimal for all applications, investigators should select and empirically optimize fixation conditions based on their primary experimental endpoints to achieve the best balance between tissue preservation and protein detection.
The purpose of this protocol is to standardize protein delivery rather than prescribe methods for quantifying experimental outcomes; however, several approaches may be useful depending on the study objectives. In this example, cell-type-specific protein uptake is assessed by immunolabeling with antibodies against cellular markers (e.g., NeuN for neurons) and quantifying colocalization with the protein of interest (Figure 5), although fluorescent reporter mouse lines provide an alternative means of identifying specific cell populations. Another important outcome is protein diffusion, which is strongly influenced by the biochemical properties of the injected protein. When accurate characterization of protein spread is required, we recommend co-injecting an inert fluorescent tracer, such as dextrans of defined molecular weights, to estimate injection distribution and tissue diffusion at defined time points following intracranial delivery. These experiments were previously performed by the authors to determine experimental parameters for the Representative Results section8.
Finally, optimization of protein detection and intracranial delivery may be necessary during troubleshooting. One common challenge is obtaining a reliable fluorescent signal from the protein of interest. As discussed above, the fixation strategy is a major determinant of signal quality. If high autofluorescence is accompanied by a weak true fluorescent signal, it is recommended to first reduce the duration and/or extent of tissue fixation, as overfixation is common and can contribute to both increased autofluorescence and reduced target signal. This protocol also incorporates an autofluorescence-quenching solution, which can improve the signal-to-noise ratio of the target fluorescence. When performed correctly, the injection procedure should result in minimal tissue damage. Cavitation or lesion formation at the injector entry site should not be observed. If either occurs, the preparation of the glass-pulled pipettes may need to be optimized to ensure clean tissue penetration. For example, confirm that the pipette tip is sufficiently rigid and does not bend upon contact with the brain parenchyma, and adjust the bevel as needed to produce a sharp edge that facilitates smooth entry. For injections into deep brain regions, the length of the pulled pipette may also need to be increased to allow the target region to be reached without the injector contacting the brain surface. When delivering injectate directly into the brain parenchyma rather than into a ventricle, a small injection volume (<1 µL) is recommended to minimize edema, prevent cavitation at the injection site, and reduce backflow of injectate during pipette withdrawal. It is also recommended injecting slowly (<500 nL/min) and waiting 5–10 min after completion of the injection before withdrawing the pipette to allow the injectate to diffuse into the surrounding tissue. If liquid is observed flowing back along the injection track during pipette removal or is detected along the injection tract after immunohistochemical processing, the injection volume and/or injection rate should be reduced, and the post-injection waiting period should be extended.
Disclosures
The authors declare no conflicts of interest.
Acknowledgements
This work was supported by funding from the National Alzheimer’s Coordinating Center (NACC; NSH), the Alzheimer’s Association (NSH), and the Duke Institute for Brain Sciences (DIBS) Germinator Award (JD).
Materials
| Name | Company | Catalog Number | Comments |
|---|---|---|---|
| 0.9% Saline (pharmaceutical grade) | Cytiva | Z1376 | |
| 30 mL syringes | Becton, Dickinson and Company (BD) | 302832 | |
| 70% ethanol | Koptec | UN1170 | |
| Alexa Fluo 594 C5 Maleimide | Invitrogen | A10256 | |
| Anesthesia vaporizer | RWD | TAIJI-IE | |
| Bead sterilizer | VWR | 75999-324 | |
| BSA | Genessee Scientific | 25-529 | |
| Butterfly needle - Vacutainer Safety-Lok | Becton, Dickinson and Company (BD) | 367281 | |
| Coverslips - 50 mm No. 1 | Avantor (VWR) | 48393-081 | |
| Digital rodent stereotax | RWD | 68803 | |
| Disposable freezing molds | Electron Microscopy Sciences | 70182 | 22 mm x 22 mm for adult mouse brain sagittal sections |
| Dissecting microscope | Leica | MZ FLIII | |
| Embedding medium - Tissue-Tek OCT | Sakura | 4583 | |
| Eye lubricant | Optixcare | OPX-4242 | |
| Glass pipette puller | Sutter Instrument Co. | Model P-30 | We use 1.14 MM, 3.5" size for our injector |
| Glass pipettes | World Precision Instruments | 504949 | |
| Goat anti Rabbit AF594 secondary | Invitrogen | A-11012 | |
| Goat anti Rat AF488 secondary | Invitrogen | A-11006 | |
| Hair removal cream | Nair | 42016527 | |
| Heated stage - Rodent Warmer X1 | Stoelting | 53800M | |
| High Speed Rotatory Micromotor (Drill) with drill bits | Stoelting | 51449 | |
| Isoflurane | Dechra | Isospire | |
| Microinjector and controller | WPI | NANOLITER2020 | |
| Microscope slides | Premiere | 8348 | |
| Mineral oil, light | Fisher Scientific Education | S25439 | |
| Mounting media with DAPI | Sigma-Aldrich | F6057 | |
| Nail polish | Electron Microscopy Sciences | 72180 | |
| Native mouse complement C1q protein | Creative Biolabs | CTP-463 | Other manufacturers may contain molecular contaminents that inhibit normal brain C1q dynamics |
| Pap pen - ImmEdge Pen | Vector Laboratories | H-4000 | |
| Paraformaldehyde - 16% | Electron Microscopy Sciences | 15710 | Dilute to 4% |
| Phospohate buffered saline (PBS) | Sigma-Aldrich | P3813 | |
| Povidone-Iodine Solution, 10% (w/v) | Ricca | 3955-16 | |
| Rabbit anti C1q primary antibody | Abcam | ab182451 | |
| Rat anti NeuN (RBFOX3) primary antibody | Biolegend | 608451 | |
| Saponin | Sigma-Aldrich | 47036 | |
| Scalpel blades - No. 10 | VWR | 76457-442 | |
| Steam indicator strips | Steris | 801010 | |
| Puritan Sterile Cotton Tipped Applicators | Puritan | 25-806 1WC | |
| Sucrose | Sigma-Aldrich | 84097 | |
| Surgical towels | McKesson | 16-6006-B | |
| Tissue adhesive - Vetbond | 3M | 1469SB | |
| Tris buffered saline | Sigma-Aldrich | T5941, S7653 | |
| TrueBlack | BIOTIUM | 23007 |
References
- Medawar PB. Immunity to homologous grafted skin; the fate of skin homografts transplanted to the brain, to subcutaneous tissue, and to the anterior chamber of the eye. Br J Exp Pathol. 1948;29(1):58-69.
- Medawar PB. Immunological tolerance. Nature. 1961;189:14-17.
- Guo X, et al. Neuro-immune crosstalk: molecular mechanisms, biological functions, diseases, and therapeutic targets. MedComm (2020). 2026;7(2):e70497.
- Castellani G, Croese T, Peralta Ramos JM, Schwartz M. Transforming the understanding of brain immunity. Science. 2023;380(6640):eabo7649.
- Di Pietro AA, et al. Microglia in systemic neuroimmune communication: functions beyond phagocytosis. Trends Immunol. 2026;47(6):495-510.
- Zhou L, Wang Y, Xu Y, Zhang Y, Zhu C. A comprehensive review of AAV-mediated strategies targeting microglia for therapeutic intervention of neurodegenerative diseases. J Neuroinflammation. 2024;21(1):232.
- Yue W, Shen J. Local delivery strategies for peptides and proteins into the CNS: status quo, challenges, and future perspectives. Pharmaceuticals (Basel). 2023;16(6):810.
- Scott-Hewitt N, et al. Microglial-derived C1q integrates into neuronal ribonucleoprotein complexes and impacts protein homeostasis in the aging brain. Cell. 2024;187(16):4193-4212.e4124.
- Fonseca MI, et al. Cell-specific deletion of C1qa identifies microglia as the dominant source of C1q in mouse brain. J Neuroinflammation. 2017;14(1):48.
- Stevens B, et al. The classical complement cascade mediates CNS synapse elimination. Cell. 2007;131(6):1164-78.
- Schafer DP, et al. Microglia sculpt postnatal neural circuits in an activity and complement-dependent manner. Neuron. 2012;74(4):691-705.
- Hong S, et al. Complement and microglia mediate early synapse loss in Alzheimer mouse models. Science. 2016;352(6286):712-6.
- Wang C, et al. Microglia mediate forgetting via complement-dependent synaptic elimination. Science. 2020;367(6478):688-94.
- Stevens B, Johnson MB. The complement cascade repurposed in the brain. Nat Rev Immunol. 2021;21(10):624-5.
- Stephan AH, et al. A dramatic increase of C1q protein in the CNS during normal aging. J Neurosci. 2013;33(33):13460-74.
- Datta D, et al. Classical complement cascade initiating C1q protein within neurons in the aged rhesus macaque dorsolateral prefrontal cortex. J Neuroinflammation. 2020;17(1):8.
- Ling GS, et al. C1q restrains autoimmunity and viral infection by regulating CD8. Science. 2018;360(6388):558-63.
- Zubler RH, Lange G, Lambert PH, Miescher PA. Detection of immune complexes in unheated sera by modified 125I-C1q binding test: effect of heating on the binding of C1q by immune complexes and application of the test to systemic lupus erythematosus. J Immunol. 1976;116(1):232-5.
- Obermaier C, Griebel A, Westermeier R. Principles of protein labeling techniques. Methods Mol Biol. 2015;1295:153-65.
Reprints and Permissions
This article has been published
Video Coming Soon