This protocol describes a reliable embryo microinjection method for integrating foreign genetic material into the stable fly genome, a fluorescent screening system for monitoring post-injection embryonic development, and a larval rearing substrate consisting of activated carbon-supplemented egg yolk agar inoculated with Escherichia coli that supports egg-to-adult development.
Method Article
An Efficient Rearing and Microinjection Protocol for Genetic Modification of the Stable Fly, Stomoxys calcitrans
In This Article
Summary
Abstract
Stable flies are blood-feeding pests of livestock, companion animals, and humans, and are found on all continents except Antarctica. The painful bites of both male and female adults induce stress-related behaviors in livestock, resulting in weight loss and substantial economic losses for producers. Both male and female stable flies are obligate blood-feeders, which poses a challenge to sterile insect technique and other pest management strategies that require the mass release of males. Current stable fly pest management strategies often fail to adequately control fly populations. Although numerous genetic manipulation methods for introducing exogenous genetic material or inducing gene knockouts have been developed for mosquitoes, Drosophila, and other model insect groups, methods for the genetic transformation of stable flies remain limited. This protocol describes a reliable and improved approach for introducing foreign genetic material into stable flies using a hyperactive variant of the piggyBac transposase and a novel solid larval rearing medium that supports larval recovery, hatching, feeding, and fluorescent screening after embryonic microinjection.
Introduction
Stable flies (Stomoxys calcitrans L., 1758) are economically important pests and disease vectors of livestock1,2,3and have a cosmopolitan distribution globally. Integrated pest management (IPM) strategies often fail to adequately control stable fly populations2,3, resulting in annual losses estimated to exceed $2 billion USD in the United States alone3. In addition, insecticide resistance has been documented in stable fly populations in Europe4,5 and has also been reported in the United States6. Consequently, genetic control approaches such as the sterile insect technique (SIT) and gene drive systems represent desirable additions to traditional IPM programs.
Previous efforts to develop genetic control methods in stable flies, including the generation of genetic sexing strains for SIT, relied on selective breeding and radiation-induced translocation7,8. These approaches are labor-intensive and limited to non-transgenic modifications. Subsequently, O'Brochta et al.9 demonstrated that the use of the Hermes transposase system was able to integrate transgenes into S. calcitrans; however, the protocol yielded a low transformation efficiency, with approximately 0.11% of injected embryos producing transgenic offspring, and produced weak expression of the enhanced green fluorescent protein (eGFP) marker under the control of an exogenous promoter9.
Other genetic manipulation approaches, including CRISPR-Cas systems, have not yet been widely applied in stable flies, in part because of the difficulty of penetrating the resilient chorion of stable fly embryos. The hard outer chorion is comparable to that of other muscid flies10,11. Attempts to inject through the chorion using quartz needles or to remove the chorion using double-sided adhesive tape were unsuccessful, necessitating treatment with an oxidizing solution (3% sodium hypochlorite, NaOCl), which reduces egg hatch rates.
Stable flies can be maintained long-term under laboratory conditions, and immature stages are typically reared in fermented cellulosic substrates such as wood chips, wheat bran, or straw supplemented with nitrogen sources, including calf protein supplements or fish flakes12. However, these substrates present several drawbacks when used for rearing microinjected embryos. Their opacity and high autofluorescence make it difficult to identify GFP-positive larvae after hatching and burrowing into the substrate. In addition, although some bacterial presence is required for larval survival13, fermented media introduce unpredictable bacterial and fungal communities that may damage or consume embryos before hatching. These limitations prevented recovery of transformed larvae using previously described injection and rearing methods9, highlighting the need for a more reliable injection protocol that also permits fluorescent screening throughout development.
Presented here is a reproducible microinjection protocol that incorporates improvements in transposase selection, injection methodology, and screening and rearing media. These modifications facilitate the development of genetically modified stable flies for applications including genetic sexing strains for SIT, gene drives, and CRISPR-Cas-mediated gene knockouts. Key improvements include the use of hyperactive piggyBac transposase14 under the control of the stable fly heat shock protein (hsp)83 promoter, embryo desiccation to minimize ooplasm loss following injection, and the elimination of adhesive tape and halocarbon oil during embryo injection.
Recovery of injected embryos was further improved by replacing bulk rearing media with flat, pigmented nutrient agar plates inoculated with a lawn of Escherichia coli. This agar formulation provides two major advantages. First, it supplies a predictable monogenic bacterial food source for larval development. Second, it provides a high-contrast, low-autofluorescence background that facilitates observation of morphology, development, and GFP expression in first-generation (G0) larvae. House flies and stable flies develop and pupate normally on E. coli-inoculated egg-yolk-based agar plates13,15. The formulation described here incorporates activated carbon powder as a non-reactive, food-safe additive to further reduce background fluorescence.
Protocol
All experiments and operations were carried out with approval from Texas A&M’s Institutional Biosafety Committee (protocol IBC2019-081). The reagents, chemicals, and tools used in this protocol are listed in the Table of Materials.
1. Rearing flies for egg production
- Preparing adult cages
- Set the thermostat of an incubator chamber to 28°C and mix 3 kg of sodium chloride with ~5 L of tap water in a 10 L pan, dissolving ~50% of the salt.
- Place this uncovered brine pan at the bottom of the incubator chamber to maintain a humidity of around 80% RH. Maintain a 16:8 day-night cycle in the chamber or room.
- Line the bottom of insect cages (30 x 30 x 30 cm stainless/aluminum cages with mesh netting) with two layers of paper towels and place a 45 mL disposable condiment cup filled with granulated table sugar on top of the paper towel layer (Figure 1A).
NOTE: The paper towels help absorb flyspeck, and the sugar provides a food source before blood-feeding. - Fill a 250 mL Griffin beaker with approximately 100 mL of room temperature tap water and pack a 20 cm x 20 cm square of black cotton fabric (cut from plain black pillowcase or bed sheets) into the water until the fabric is moistened. Adjust the black fabric so its edges extend 1-2 cm beyond the rim of the beaker (Figure 1B).
NOTE: This moist cloth provides both liquid water and an oviposition surface for adult flies. Death can occur rapidly if adults do not have access to a moisture source. - Transfer 500-1,500 stable fly pupae to a small dish or beaker and place them into the insect cage. Place the adult cage in the humid rearing chamber (step 1.1.1) and monitor daily for eclosion. Once adults emerge, begin daily feeding with citrated bovine blood (section 1.2.).
- Feeding adult flies
- Prepare citrated bovine blood by adding a final concentration of 10.9 mM trisodium citrate dihydrate to freshly collected bovine blood.
- Briefly, suspend ~12.8 grams of citrate salt in a minimal volume of deionized water and add to 4 liters of blood collected at the local abattoir.
NOTE: Blood containers should have screw-capped lids (e.g., square, wide-mouth, 4L grip bottles) and be cleaned thoroughly with warm soap and water before use. At the abattoir, avoid collecting the first ~1 liter of bovine blood from a slaughtered animal to minimize contamination with hair, perspiration, dirt, and other coagulants. - Freeze citrated bovine blood in 200 mL aliquots and thaw as needed, keeping thawed aliquots refrigerated at 4°C for up to a week.
- Provide ~40 mL of room-temperature blood per 600 flies to each adult cage.
- Blood can be offered in a condiment container or beaker, and a folded non-sterile cotton gauze sponge should be inserted in the vessel to wick the blood. Agitate the wick until the cotton is fully saturated and insert it into the cage.
NOTE: Blood should be changed daily starting 24 hours post-eclosion.
- Egg collection
- Once eggs are observed on the black cotton fabric, remove the cloth from the beaker and wash eggs into a separate ~700 mL shallow plastic container using a wash bottle (Figure 2A). Oviposition typically occurs when the flies are 7-10 days old.
NOTE: Check blood cups for eggs as well and collect any stray eggs that may be deposited there. - Collect eggs on filter paper via vacuum filtration. This is done by placing a black filter paper in a Buchner funnel, applying a vacuum, and then pouring the eggs from step 1.3.1. over the setup.
- Afterward, transfer eggs to a graduated cylinder or graduated 1.7 mL microcentrifuge tube using a wash bottle and record the volume of eggs collected (Figure 2B).
NOTE: Avoid prolonged immersion of eggs in water, as mortality begins to increase ~10 minutes post-immersion.
- Once eggs are observed on the black cotton fabric, remove the cloth from the beaker and wash eggs into a separate ~700 mL shallow plastic container using a wash bottle (Figure 2A). Oviposition typically occurs when the flies are 7-10 days old.
- Preparation of bulk larval media
- Collect materials for bulk larval media (Figure 3A), as outlined in Table 1.
- In a 1000 mL beaker, add the calf protein supplement and all of the tap water. Allow to rehydrate overnight at room temperature.
- Add the wheat bran and vermiculite to a separate, larger mixing container.
- After overnight rehydration, thoroughly stir the rehydrated calf supplement to break up clumps, then pour the mixture into the container with wheat bran and vermiculite. Mix thoroughly until homogenous and all wheat bran has been coated with the calf supplement slurry.
- Transfer the bulk media to a polypropylene food storage container in an ~8 cm deep layer covering the entire container bottom (Figure 3B).
- Add ~1,000 embryos (approximately 0.2 mL of eggs per 2.2 L of bulk media) by collecting embryos via .vacuum filtration on a 90 mm diameter circular filter paper and then placing the filter paper with eggs face down in the center of the media bin (Figure 3B, C).
- Cover the filter paper with ~1 cm of media to retain moisture (Figure 3C) and cover the container with an oversized rectangle of black cotton cloth, with 5 cm of overhanging cotton cloth extending past the container edge.
- Cut a large hole (~12 cm in diameter) in the lid of the food container to allow for gas exchange and snap the lid onto the media bin while trapping the black cotton cloth between the container and lid (Figure 3D).
NOTE: This serves as a gasket, preventing the lid-to-container gap from trapping 1st instar larvae in condensation droplets. - Place the finished media bin in the adult rearing chamber until pupation and monitor for larval development (Figure 4) (pupation occurs in ~10 days depending on media temperature and larval density).
NOTE: The cloth covering should be fine enough to prevent 1st instar larvae from passing through, but permeable enough to prevent condensation from forming on the inside walls of the media bins, which can trap and drown larvae.
- Pupae separation
- Remove cloth covering from pupal bins and collect pupae with a spoon or scoop.
NOTE: Stable fly pupae appear as non-mobile red-brown cylinders, 4-7mm in length, in contrast to the mobile yellow-white larvae. Pupae typically accumulate on the outer perimeter of the container walls or on moist, elevated positions within their media bin as the flies begin metamorphosis from larvae to pupae to adults. - Layer 500-1,500 pupae ~1 cm deep on a dish and place in a new clean cage as described in section 1.1 to propagate the next generation.
- Remove cloth covering from pupal bins and collect pupae with a spoon or scoop.
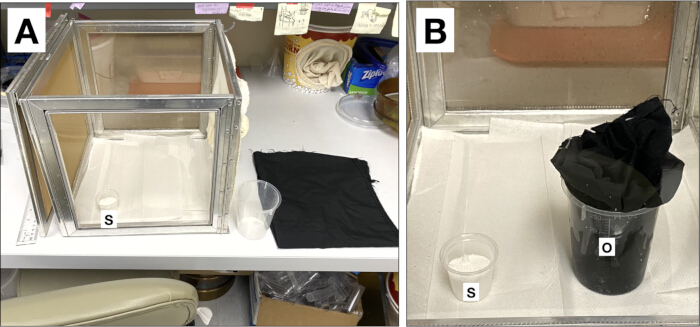
Figure 1: Adult fly rearing materials. (A) Adult fly rearing cage showing the sucrose cup (S) and oviposition cup (O). (B) Oviposition cup prepared with water-saturated black cotton cloth extending slightly beyond the rim of the beaker. Please click here to view a larger version of this figure.
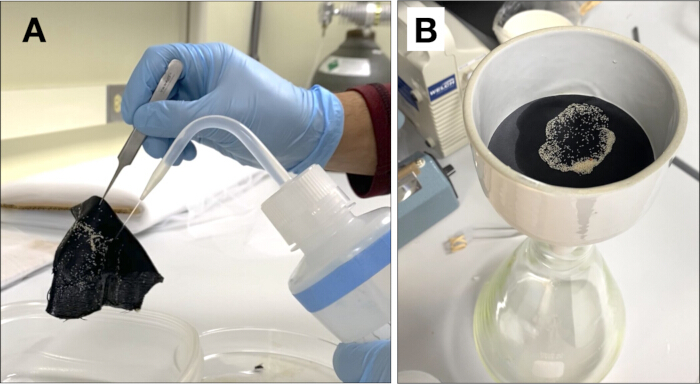
Figure 2: Egg collection. (A) Collection of eggs from the oviposition cloth using a wash bottle. (B) Recovery of eggs by vacuum filtration onto high-contrast filter paper. Please click here to view a larger version of this figure.
| Materials for Bulk Larval Media | |
| Reagent | Mass (g) |
| Water | 900 |
| Wheat bran | 230 |
| Calf supplement | 100 |
| Vermiculite (A4 coarse) | 70 |
| Materials for De-chorionation Solutions | |
| Solution | Composition |
| Oxidizing bath | 3% sodium hypochlorite in deionized water |
| Wash bath | Triton X-100 0.02% solution in deionized water |
| Rinse | Deionized water |
| Materials for Black Agar Screening and Rearing Plates | |
| Reagent | Mass (g) |
| Water | 500 |
| Powdered egg yolks | 18 |
| Activated charcoal | 4 |
| Sodium chloride | 1 |
Table 1: Reagents for Bulk larval media, dechorionation solutions, and black agar plates. Reagents used for the preparation of bulk larval media for colony maintenance, as well as the composition of solutions used to weaken and remove the chorion from stable fly embryos, and materials required to prepare 500 mL of black agar screening and rearing medium.
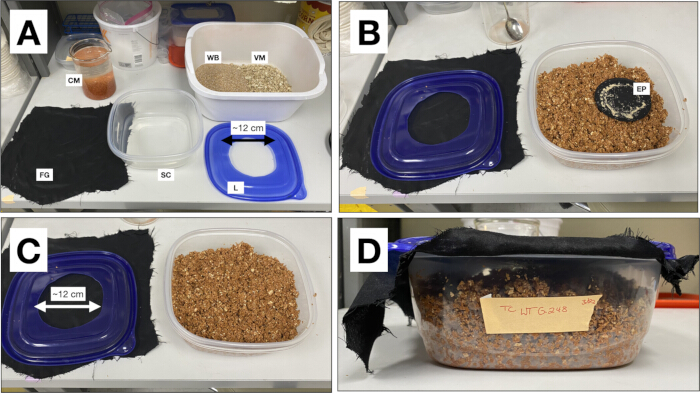
Figure 3: Preparation of bulk larval media. (A) Materials used for bulk larval media preparation: calf protein supplement (CM), wheat bran (WB), vermiculite (VM), storage container (SC), lid (L), and fabric gasket (FG). (B) Thorough mixing of media components. (C) Placement of egg-covered filter paper (EP) face-down on the media surface and covering with additional media to prevent desiccation. (D) Installation of the cotton-cloth gasket between the container and lid. Please click here to view a larger version of this figure.
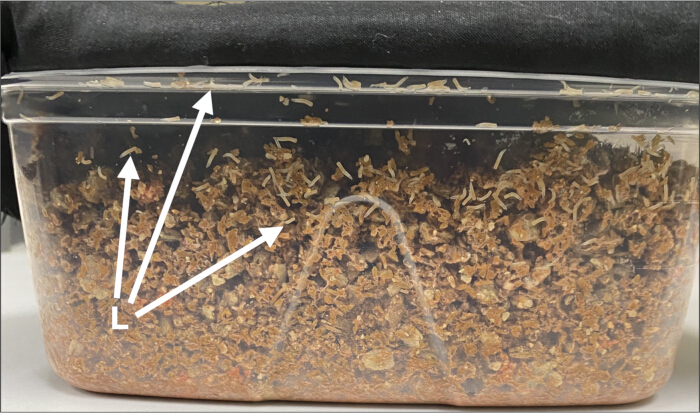
Figure 4: Larval development in bulk media. Transparent containers permit monitoring of larval development and media condition. Larvae (L) are visible on the container walls, lid, and within the media. Please click here to view a larger version of this figure.
2. Preparation for injection: de-chorionation and desiccation
- Place a moistened black cotton cloth in a beaker as described in step 1.1.4. and transfer it to an adult cage for 25 min to collect eggs. Rinse the eggs onto a 106 µm stainless-steel sieve using a wash bottle.
NOTE: A 25 min collection period typically yields approximately 400 eggs. - Allow the embryos to rest undisturbed on the sieve for an additional 30 min.
- While the embryos are aging, prepare 150 mL each of the oxidizing, washing, and rinsing solutions described in the “Materials for De-chorionation Solutions" section of Table 1 (Figure 5). Use sufficient volume to cover the embryos with approximately 1 cm of solution.
- Immerse the sieve containing embryos in the oxidizing bath for 2 min and gently agitate the embryos using a Pasteur pipette (Figure 6A).
NOTE: Repeated aspiration and dispensing of solution to create a circular vortex helps concentrate embryos in the center of the sieve and prevents freshly dechorionated embryos from adhering to the sieve walls. - Remove the sieve from the oxidizing bath and tap off excess solution. Transfer the sieve to the washing solution and agitate by aspiration and dispensing for 2 min.
- Transfer the sieve containing embryos to the rinsing solution and agitate as described in step 2.4. for 2 min. Remove the sieve from the rinsing solution and tap off excess water.
- Place a sterile glass coverslip on the sieve and, under a dissection microscope, use a fine-tipped nylon paintbrush to transfer embryos (Figure 6B) from the sieve to the edge of the coverslip. Position embryos close together without allowing them to touch, with the wider posterior pole facing the edge of the coverslip. Avoid bending, distorting, or tearing embryos during transfer.
- Prepare a desiccation chamber by covering the bottom of a 1 L flask with 100 mL of calcium sulfate desiccant and sealing the flask with a rubber stopper.
NOTE: After 24 h of equilibration, the desiccation chamber typically reaches a relative humidity of <5% at 23 °C. - Remove excess water from the coverslip and place the coverslip containing dechorionated embryos onto the desiccant. Reseal the flask with a rubber stopper and desiccate the embryos for 8 min.
- Remove the coverslip from the desiccation chamber and place it on the microscope stage under a 20× objective for microinjection.
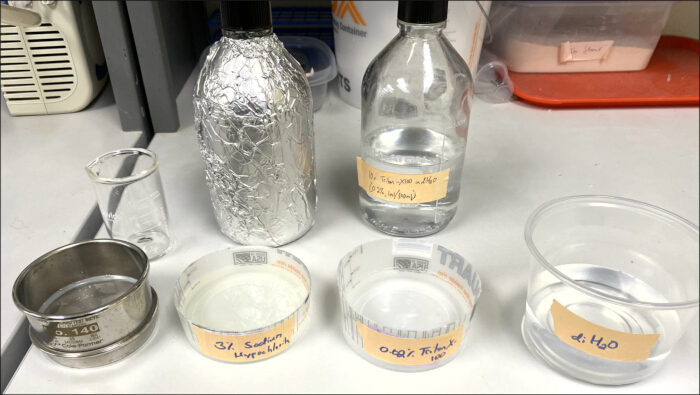
Figure 5: Dechorionation solutions. From left to right: stainless-steel sieve, oxidizing solution, washing solution, and rinsing solution used for embryo dechorionation. Sodium hypochlorite is maintained as a 6% stock solution protected from light, and Triton X-100 is maintained as a 10× stock solution and diluted to a final concentration of 0.02% before use. Please click here to view a larger version of this figure.
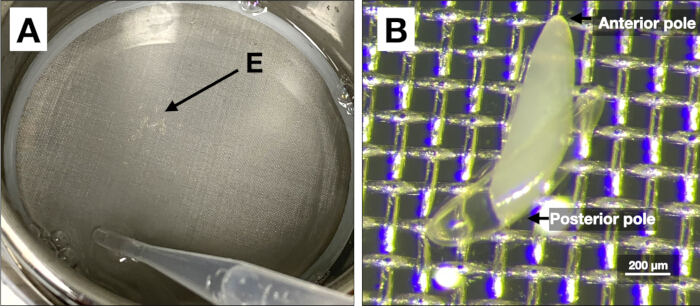
Figure 6: Embryo dechorionation. (A) Gentle aspiration and dispensing of solution generate a vortex that concentrates embryos in the center of the sieve and reduces adhesion to the sieve walls. (B) Dechorionated embryo emerging from the translucent chorion after rinsing. The anterior pole (narrower end) typically emerges before the posterior pole. Please click here to view a larger version of this figure.
3. Microinjection
- Pull quartz microinjection needles from 100 mm filamented glass capillaries (I.D. 0.7 mm, O.D. 1.0 mm) using the parameters listed in Table 2. Store the needles in a dust-free location until use.
NOTE: Borosilicate needles with similar geometry may also be used. - Prepare injection buffer (0.1% w/v phenol red in phosphate buffered saline (PBS), pH 7.4) and filter-sterilize through a 0.22 µm syringe filter.
- Prepare 20 µL of injection mix by combining 10 µg each of piggyBac helper plasmid and donor plasmid, which contains the genetic cargo between the left and right piggyBac inverted terminal repeats, with 4 µL of injection buffer. Dilute to a final concentration of 500 ng/µL using nuclease-free water.
NOTE: The helper plasmid comprises the 3.1 kb hsp83 promoter sequence upstream of the hsp83. start codon and the hyperactive piggyBac transposase coding sequence. - Transfer the injection mix to a low-volume 0.20 µm PTFE syringe filter and place the filter into the opening of a 0.5 mL microcentrifuge tube (Figure 7A). Centrifuge at ≥11,000 x g. for 10 minutes or until all injection mix has passed through the filter. Store unused injection mix at -20 °C.
- Back-fill a quartz microinjection needle with approximately 2 µL of injection mix using a micro gel-loading pipette tip (Figure 7B). Avoid introducing air bubbles during loading.
NOTE: Orient the microinjection needle parallel to the long axis of the embryo and maintain zero horizontal and vertical angular offset to minimize tearing and shearing. - Gently tap the needle tip against the edge of a glass slide until the injection mix flows through the needle tip (Figure 7C).
NOTE: Break the needle tip gradually to create the smallest, sharpest aperture that still permits injection-mix flow. - Inject the embryo through the posterior pole immediately after desiccation using approximately 700 hPa injection pressure and 300 hPa back pressure.
- Gently pierce the embryo and inject approximately one-tenth of the embryo volume with the injection mixture (Figure 7D–F).
NOTE: Minimize needle penetration to reduce disturbance of the vitelline membrane and prevent ooplasm loss during needle withdrawal. - Transfer the coverslip to a Petri dish lined with a sterile, moistened 90 mm black filter paper immediately after injection and incubate at room temperature for 48 h.
NOTE: Complete all injections within 2 h of oviposition to target embryos before the syncytial stage. - Examine embryos for hatching every 12–16 h. Transfer newly hatched larvae and the glass coverslip to an inoculated and conditioned agar plate prepared as described in section 4.
| Parameter | Heat | Fil | Vel | Del | Pull |
| Value | 825 | 5 | 60 | 150 | 175 |
Table 2: Needle Pulling Parameters. Parameters used to generate quartz microinjection needles.
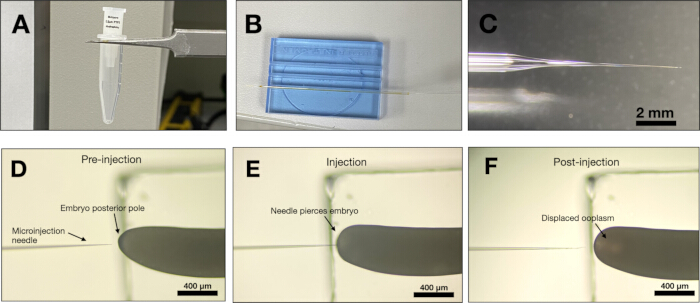
Figure 7: Embryo microinjection. (A) Filtration of injection mixture using a syringe filter nested in a 0.5 mL microcentrifuge tube. (B) Loading of filtered injection mixture into a microinjection needle using a gel-loading pipette tip. (C) Terminal geometry of a quartz microinjection needle. (D) Alignment of the needle with the posterior pole of the embryo. (E) Penetration of the embryo surface while minimizing disturbance of the vitelline membrane. (F) Injection of approximately one-tenth of the embryo volume followed by needle withdrawal. Increased transparency indicates displacement of ooplasm by the injection mixture. Scale bar = 400 µm (D–F) Please click here to view a larger version of this figure.
4. Treated plate preparation
- Agar medium formulation
- Prepare the medium described in the “Materials for Black Agar Screening and Rearing Plates” section of Table 1 and autoclave for 15 min at 121 °C. Pour the agar at 40 °C or store it at room temperature before reheating and dispensing it into 90 mm Petri dishes.
NOTE: Swirl vigorously before pouring to resuspend solid particulates.
- Prepare the medium described in the “Materials for Black Agar Screening and Rearing Plates” section of Table 1 and autoclave for 15 min at 121 °C. Pour the agar at 40 °C or store it at room temperature before reheating and dispensing it into 90 mm Petri dishes.
- Plate inoculation
- Dilute a 24 h culture of K12 Escherichia coli. to OD600 = 0.200 in Luria-Bertani broth and dispense 200 µL onto a cooled, solidified agar plate. Spread the culture evenly using sterile glass beads or a glass spreader and allow the plate to absorb excess moisture (Figure 8A, B).
NOTE: Use agar plates within 1 month of pouring or discard them to ensure reliable bacterial and larval growth.
- Dilute a 24 h culture of K12 Escherichia coli. to OD600 = 0.200 in Luria-Bertani broth and dispense 200 µL onto a cooled, solidified agar plate. Spread the culture evenly using sterile glass beads or a glass spreader and allow the plate to absorb excess moisture (Figure 8A, B).
- Plate conditioning
- Fold 6 × 6 cm pieces of black filter paper to create 6-10 corrugated ridges and sterilize by baking or autoclaving. Place one sterile corrugated filter paper aseptically onto the inoculated Petri dish and moisten it with several drops of sterile water (Figure 8C).
- Surface-sterilize untreated, uninjected wild-type (WT) first-instar larvae and transfer 10 larvae to the moistened filter paper.
NOTE: Sterilize WT embryos by immersing them in 10% bleach (0.6% NaOCl) for 1 min, followed by rinsing in sterile deionized water for 2 min. - Place a 90 mm filter paper between the lid and body of the Petri dish to act as a gasket.
- Allow WT larvae to condition the plates for 24 h before adding injected embryos on glass coverslips (Figure 8C). Remove the WT larvae after the first injected embryos hatch.
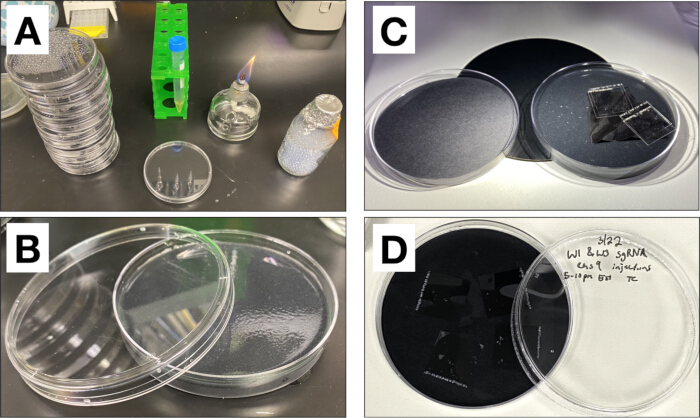
Figure 8: Agar plate preparation and post-injection recovery. (A) Inoculation of agar plates with an OD600 = 0.2 culture of Escherichia coli using sterile glass beads. (B) Absorption of excess surface moisture before embryo transfer. (C) Placement of a 90 mm filter paper gasket between the lid and body of the Petri dish. (D) Screening of larvae for fluorescent markers on conditioned agar plates. Injected embryos are recovered on a deionized-water-saturated 90 mm filter paper placed in the lid of an inverted Petri dish and incubated for 48 h before transfer to screening plates. Please click here to view a larger version of this figure.
Results
Using this protocol, 431 stable fly embryos were dechorionated and injected with piggyBac-Hsp83 donor plasmid and Hsp83 helper plasmid at a final concentration of 500 ng/µL. Of the 431 injected embryos, 18 ZsGreen-positive larvae (4.2%) and 8 ZsGreen-negative larvae (1.9%) hatched 48-76 h post-injection when screened on black carbon agar plates (Table 3). Overall, 26 of 431 injected embryos hatched (6.0%), and 16 of 26 hatched larvae survived to adulthood (61.5%).
| Species | Type of injection | Construct | # injected | ZsGreen(+) L1 | ZsGreen(-) L1 | ZsGreen(+) Pupae | ZsGreen(-) Pupae | ZsGreen(+) Adults | ZsGreen(-) Adults | # Adults producing ZsGreen(+) offspring |
| Stomoxys calcitrans | Transposase insertion | Hsp83:hy-pBac (helper, 500 ng/uL) Hsp83: zsGreen (donor, 500 ng/uL) | 226 | 5 | 8 | 5 | 6 | 3 | 6 | 1 |
| Stomoxys calcitrans | Transposase insertion | Hsp83:hy-pBac (helper, 500 ng/uL) Hsp83: zsGreen (donor, 500 ng/uL) | 205 | 13 | 0 | 7 | 0 | 7 | 0 | 5 |
Table 3: Injection Statistics. Survival, transformation, and recovery rates following embryo microinjection.
Of the 18 ZsGreen-positive G0 larvae, 12 survived to pupation (66.7%) and 10 eclosed as adults. Six ZsGreen-positive adults (1.4% of injected embryos, 60% of fertile G0 survivors) produced ZsGreen-positive offspring. These offspring (Figure 9A–E) were self-crossed and maintained fluorescence for six generations at the time of writing.
Among the eight ZsGreen-negative larvae, six survived to adulthood (75%). None of the non-fluorescent adults produced fluorescent offspring.
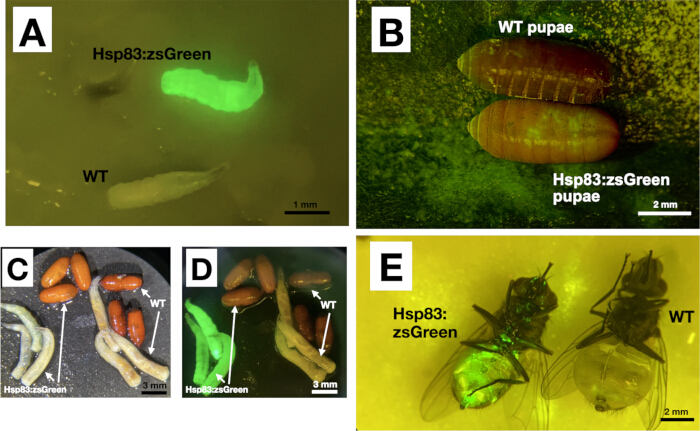
Figure 9: Fluorescent screening of transgenic flies. (A) Comparison of ZsGreen-expressing F1 larvae and WT larvae. (B) Fluorescence visible through the pupal cuticle, enabling transgenic screening at the pupal stage. (C,D) Comparison of three ZsGreen-expressing larvae and pupae (left) with three WT larvae and pupae (right) under white-light (C) and fluorescence (D) illumination. (E) Adult transgenic F1 fly expressing ZsGreen (left) compared with a WT adult fly (right). Scale bars = 1 mm (A), 2 mm (B,E), and 3 mm (C,D). Please click here to view a larger version of this figure.
Discussion
The genetic transformation of non-model insect species remains a major bottleneck in the development and evaluation of genetic control strategies for arthropod pests and vectors.
For stable flies, the protocol described here reduces the time, resources, labor, and variability associated with the injection and rearing of G0 flies following embryo microinjection. In addition, the use of black agar screening plates enables direct observation of development throughout the life cycle, facilitating identification and correction of issues that arise during injection, recovery, and larval rearing. Using the plasmid constructs evaluated in this study, the protocol generated transgenic stable fly lines with fewer injected embryos than previously reported methods9. Although beyond the scope of this methods article, confirmation and localization of transgene insertion sites can be performed using established approaches such as inverse PCR and splinkerette PCR.
An efficient injection protocol also facilitates future studies in functional genomics, including promoter characterization using fluorescent reporters; vector competence, through reverse-genetics analyses of genes associated with pathogen transmission; nuclease characterization, including evaluation of CRISPR-Cas9 and other programmable nucleases in stable flies; insecticide resistance research through modification of candidate resistance alleles; and investigations of basic biology, including genes involved in blood feeding, mating, and development. Our protocol also eliminates the need for oil-immersed embryo injections and oxygenated humidity chambers for embryo post-injection-recovery as documented in previous Musca domestic and Lucilia cuprina piggyBac transformation literature16,17.
Several parameters are critical to successful transgenesis. Embryo desiccation and injection timing are particularly important because plasmid DNA must be introduced before cellularization to ensure incorporation into germline precursor cells. However, the precise timing of syncytium formation in stable fly embryos remains unknown. In addition, embryonic developmental rate is influenced by temperature, and the developmental timeline of stable fly embryos under different environmental conditions has not been fully characterized. Future research into the developmental rates and embryogenesis of stable fly laboratory strains may provide insight into optimizing microinjection and transformation protocols, thereby further increasing efficiency and protocol reproducibility. However, until then, determining the optimal injection window remains a methodological limitation that may affect transformation efficiency. When survival rates are low, troubleshooting can be performed by comparing hatch and adult survival rates among untreated embryos, dechorionated embryos, embryos injected with filter-sterilized PBS, and WT embryos reared on agar plates. Previous literature describing the transformation of Musca domestic yielded 14 integration events out of 1,668 injections (0.84% of injected)16, and transformation of the sheep pest Lucilia cuprina established 3 transgenic lines from approximately 900 embryo injections (0.33% of injected)17, suggesting that the stable fly transformation protocol described in this protocol (6 integration events in 431 injections, 1.4% of injected) offers an improvement of injection efficiency compared to other pest dipteran species in literature.
The stable fly hsp83 constitutive promoter provided robust expression of ZsGreen throughout development and supported expression of the hyperactive piggyBac transposase during early embryogenesis, thereby improving fluorescent marker visibility and transformation efficiency compared with a previously reported stable fly transformation protocol9. The helper plasmid used in this study was generated by subcloning 3.1 kb of genomic DNA immediately upstream of the hsp83 start codon into a minimal plasmid vector upstream of the hyperactive piggyBac transposase coding sequence. The helper-to-cargo plasmid ratio was empirically established at 1:1 by mass and was used throughout the study. Although additional plasmid ratios were not evaluated, alternative ratios may also prove effective.
The improvements described here may be applicable to transgenesis protocols for other arthropods. In addition, the agar-based screening and rearing system is currently being applied to black soldier fly (Hermetia illucens) embryo injection and screening. The protocol may be particularly useful for transgenesis efforts in other muscid flies, including Musca domestica and Haematobia irritans, because of their similar larval ecology and development in decomposing fibrous substrates. The use of Escherichia coli-inoculated agar plates may provide a practical approach for post-injection monitoring while allowing researchers to evaluate embryonic development, larval morphology, marker expression, hatch rates, and overall recovery. Adapting the bacterial component of the medium to the biology of the target species may further enhance the utility of this approach for developing and optimizing transgenesis protocols.
Disclosures
The authors declare no competing interests.
Acknowledgements
This research was supported by the U.S. Department of Agriculture Agricultural Research Service (ARS) grant 58-3094-3-013. The authors thank Max Scott for guidance during the early stages of this project and acknowledge the contributions of the Adelman laboratory postdoctoral researchers, graduate students, technicians, and undergraduate researchers. The authors also thank Phillip Kaufman and members of his laboratory for training and for providing stable flies used to establish the laboratory colony.
Materials
| Name | Company | Catalog Number | Comments |
|---|---|---|---|
| 1 L flask with rubber stopper (desiccation chamber) | VWR | 214-1134 | Dessication chamber |
| Bacto Agar | Difco | 281230 | Agar for black agar plates |
| Black pillowcases | Aisawate | 3.45496E+11 | Black cotton cloth for egg collection cups and fabric gasket for larval rearing bins |
| Calcium sulfate desiccant | Drierite | 21001 | Dessicant for dessication chamber |
| Calf Manna Performance Supplement | Manna Pro | 095668940010 | Bulk larval media |
| Compound microscope | Leica Microsystems | DM750M | Injection microscope |
| Dried Egg Yolks | Judee’s From Scratch | B098SP2LTV | Nutrient source for black agar plates |
| E. coli | New England Biolabs | C2987H | Bacterial used on black agar plates |
| Femtojet 4i microinjection pressure supply | Eppendorf | 5252000021 | Microinjection pressure supply |
| Fine-tipped nylon paintbrush | Transon | 7.42298E+11 | Transferring embryos |
| Fire-polished quartz capillaries with filament, OD 1.0 mm, ID 0.70 mm, 10 cm length | World Precision Instruments | QF100-70-10 | Capillaries for pulling needles |
| Forceps | Fine Science tools | 11251-20 | Sample handling |
| Full height seive, 3” dia, No. 140 ASTM-E11 Standard test sieve (106 μm) | Cole-Parmer | UX-59987-24 | Holds embryos during dechorionation |
| Germicidal Ultra Bleach (6% sodium hypochlorite) | Pure Bright | 59647-21014 | Bleach solution to remove chorion |
| GladWare Family Size Food Storage Containers, XL 104 oz | Glad | 012587701294 | Bulk larval media container |
| Grade 8613, 9cm Black qualitative filter papers | Ahlstrom | 8613-0550 | Collecting embryos |
| LB Broth | BD Difco | DF0446-17-3 | LB broth for E.coli culture |
| M60 zoom stereo dissecting microscope with Leica Ergo Tubes | Leica Microsystems | SP-M60-TS | Microscope for moving and lining up embryos |
| Microloader tips 0.5-20 uL 100mm | Calibre Scientific | EPE 930001007 | Used to load injection mix into needles |
| Micromanipulator | Leica Microsystems | 11520137 | Micromanipulator for injection |
| Millex Syringe Filter, Hydrophilic PTFE, 0.2 μm | MilliporeSigma | SLLGR04NL | Used to filter injection mix |
| Nuclease-free water | Corning | 46-000-CM | Injection buffer |
| Organic coconut activated charcoal powder | Belle Chemical | B073BSNLJ3 | Pigment for black agar plates |
| P-2000 Laser-based pipette puller | Sutter Instruments | P-2000/G | Device for pulling needles from capillaries |
| PBS, pH 7.4 | Gibco | 10-010-023 | Injection buffer |
| Petri plates | VWR | 391-0609 | Petri dishes for agar black egg plates |
| Phenol red, CAS:143-74-8 | Thermo scientific | B21710.09 | Dye for injection |
| Rubber stoppers | Stony Lab | NY-RubberStoppers-HI-5PK-#12 | Dessication chamber plug |
| Soft wheat bran (soft red winter wheat) 50 lb | Siemer | 55600050500000 | Bulk larval media |
| Square Glass Coverslips, 18X18mm | Alkali Scientific | SM1818 | Glass coverslips for microinjection |
| Stereo microscope fluorescent adapter | Nightsea | SFA-RB | Fluorescent lamp and filters for screening larvae |
| Sterile glass beads | VWR | 1.04016.0500 | Spreading bacteria onto plates |
| Transfer Pipette Disposable 5mL | LabAid | BP1200 | Washing embryos during dechorionation |
| Triton X-100 | Sigma-Aldritch | T8787-50ML | Dechorionating embryos |
| Wash bottle | Safetyware | Z423335 | Washing embryos off surfaces |
Reprints and Permissions
This article has been published
Video Coming Soon