Compound Administration I

All animal procedures described here must be conducted in accordance with institutional animal ethics guidelines and approved by IACUC. All procedures must follow the principles of the 3Rs—Replacement, Reduction, and Refinement—and must be performed by trained personnel.
1. Subcutaneous injection
- Manually restrain the mouse via the one-handed restraint hold. Once grasped, allow the mouse to rest on a table or other secure surface. Be sure to avoid putting pressure on the body of the mouse.
- Rest the heel of the hand on the table to avoid undue weight on the mouse that can compromise respirations. Mice can also be restrained in a commercial device. For rats, it is best to use a commercial restraint device.
- Grasp the skin, and pull upward to create a tent of skin. If using a restraint device, forceps may be required to grasp the skin through the slot on the top.
- Insert the needle parallel to the spine, directed away from the head at the base of the skin fold of the tent. Direct the needle away from the head to avoid the possibility of puncturing the skull, as the skull bone of the mouse is very thin. Rats have the tendency to raise their head, which could cause the injection to be placed into the neck muscles.
- Insert the needle bevel up to allow a gentle glide into the skin. Note that the needle is inserted below the fingers grasping the skin. To improve safety when injecting biohazardous articles, the skin is grasped with forceps, thereby eliminating the possibility of needle stick injuries.
- Pull back the plunger to check for proper placement. If air is drawn into the syringe, it indicates that the tip of the needle is not positioned under the skin and will need to be withdrawn and repositioned. If there is back pressure when the plunger is pulled back, it indicates proper placement of the needle, and that the injection can proceed.
- Inject the substance slowly with a steady motion. To prevent loss of the injection article, pause after injection, slightly rotate the needle under the skin, and pinch the skin at the injection site while withdrawing the needle.
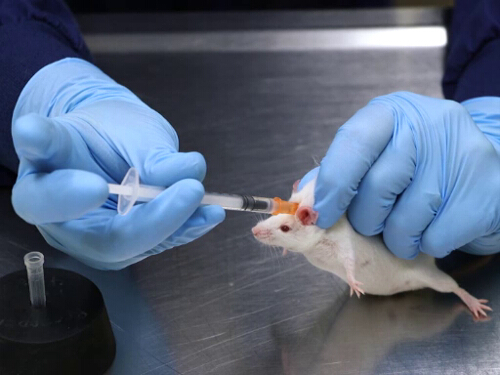
Figure 1. Subcutaneous injection in mice.
2. Intraperitoneal injection
- The one-handed manual restraint method is used for this injection technique in mice. Adjust the hand so that it is positioned high enough on the neck to prevent the mouse from turning.
- Grasp the loose skin at the nape of the neck between the thumb and index finger.
- Stabilize the hind quarters by either pinning the loose skin along the back between the second, third, and fourth fingers and the base of the thumb, or by placing the tail between the third and fourth fingers.
- The IP injection in the rat requires two people, one to restrain the rat and the other to perform the injection.
- Grasp the rat over the shoulders using the index and middle fingers on each side of the neck and the palm on the back. The thumb and the third and fourth fingers should encircle the chest to prevent forward or backward movement. The position of the fingers on each side of the neck prevents the rat from turning its head.
- Lift the rat and turn it to expose the ventral abdomen.
- Stabilize the hind quarters by grasping the feet and tail securely and extending them away from the body.
- Position the mouse or rat to expose the abdomen, ensuring that it faces upward.
- Tilt the animal with the head pointing downward at about a 30° angle, to allow the intestines to fall forward.
- Injection landmarks are as follows:
- The area to be injected is bordered cranially by an imaginary line extending horizontally across the body at the top of the hip (from flank to flank).
- The midline is the medial border, recognized as where hair growing in opposite directions meets. In hairless animals, the midline extends in a straight line from the xiphoid to the anus.
- The lateral border is a line from the top of the hip to the prepuce in the male, and from the top of the hip and following the teats in the female.
- This provides a triangular area for safe injection.
- Injection of an article within the landmarks
- Insert a needle perpendicular to the spine, off the midline, in the triangle as described above. Placing the needle at an angle to the plane of the body allows for safe injection utilizing both sides of the abdomen. This is especially important with multiple injections, as it minimizes tissue trauma by allowing alternation of injection sites.
- When the needle is placed at an angle, it will "pop" into the abdomen, allowing for easier determination of depth. This is also a visual and tactile cue that the needle is properly positioned.
- Aspirate the syringe to ensure placement within the peritoneal cavity and not within the urinary bladder, intestine, or vascular structures.
- Avoid injecting caudally in the male mouse to prevent administering the article into the scrotal sac. Avoid injecting into the teat of the female to prevent trauma.
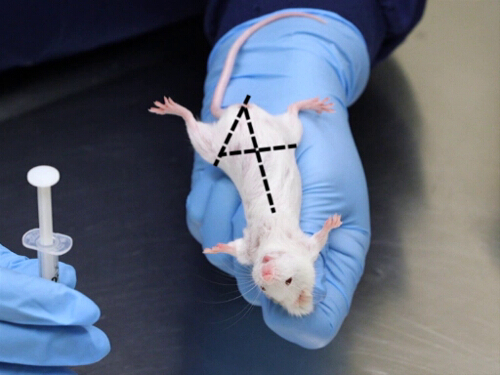
Figure 2. The landmarks for intraperitoneal injection in mice.
3. Intramuscular injection
- Restraint for this technique for mice and rats requires either two people or the use of a restraint tube. Described here is a one-person method utilizing a restraining device.
- Place the animal in the restraint device.
- Once the animal is in the tube, grasp the tail to position the animal with the hind legs out of the tube.
- Grasp the skin of the flank at the cranial portion of the femur to extend the leg and prevent the stifle from bending.
- Position the restraint device so that it stands on the table with the animal's head pointed down, or lying on the table pointed toward the body of the technician to allow stabilization of the device while the injection is performed.
- Injection landmarks are as follows: both the mouse and rat legs are small with the gluteal muscles (the caudal thigh muscles) comprising the largest muscle mass in the hind limb; the second largest muscle mass in the hind limb is the gastrocnemius (the calf muscle). The injection is made from the caudal aspect of the leg.
- Locate the gluteal muscle mass posterior to the femur. The bone can be palpated and the large muscle is easily felt.
- Note that the midline of the leg from the posterior aspect runs from the point of the hock to the tail. The hair often has a ridge where it comes together, as it grows in opposite directions from the lateral and inner surfaces.
- Injections are made toward the lateral aspect of the thigh off the midline. This reduces the likelihood of damaging the nerves and blood vessels located on the medial surface of the leg.
- Injections made into the gastrocnemius are done from the posterior aspect and with careful consideration of the location of the lateral saphenous vein.
- Injection of an article within the landmarks
- Insert the needle perpendicularly to the femur off the midline as described above, to a maximum depth of 5 mm for the gluteal muscle and a maximum of 3 mm for the gastrocnemius.
- To avoid trauma to the muscle, extraneous movement of the needle in the tissue must be prevented. The syringe should be held in a manner that does not require repositioning of the hand to perform the injection.
- Aspirate the syringe to ensure placement within the muscle and not in a blood vessel.
- Inject the material in a steady, fluid motion. Do not inject rapidly as to allow slow expansion of the muscle. Rapid injection will cause tissue trauma.
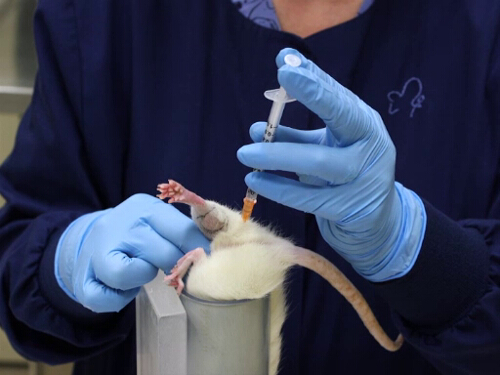
Figure 3. Intramuscular injection into the gluteal muscle in rats.
4. Intravenous injection utilizing the tail vein
- Restraint of the animal is dependent upon whether the animal is anesthetized or awake.
- Use a cylindrical restraint tube for conscious mice or rats, except for the hairless or nude animals. Due to the oily nature of the hairless animals, it is difficult to reposition and remove them from the acrylic restrainers, as their skin tends to adhere to the rigid plastic. Thus, a flexible plastic cone is used.
- Other injection devices include lighted platforms, heated platforms, and rigid plastic cones where the mouse is kept in the cone strictly with tension on the tail.
- Anesthetized mice may not need restraint.
- Warm either the entire body or just the tail to ensure vasodilation of the tail vessels.
- Warm the whole body with an electrical heating pad set on medium or a circulating water blanket.
- Place the animal in the restraint device, wrapped in the heat source.
- Observe the animal closely, and remove it from the heat source as soon as the blood vessels dilate. Whole body warming can also be achieved with the use of a heat lamp directed into a cage. When using a heat lamp the animals must be closely observed, as it is easy to overheat them.
- When whole body warming is not feasible, heating the tail alone can be achieved using warm compresses from a heated towel, hot water bottle, or submerging the tail into warm water. Caution must be employed to avoid burning the tail because hot water bottles, warmed towels, and warm water do not have temperature controls. It is common for the heat sources to be overheated initially. These heat sources also cool down quickly.
- The use of tissue oil is another way to enhance the visualization of the vessels.
- Dip a cotton-tipped applicator into the tissue oil, and apply the oil well away from the portion of the tail that is gripped for stabilization. The tissue oil causes the vessels to appear more clearly defined.
- There are nontoxic oils commercially available that contain a chemical in the formulation that creates warming of the skin and vasodilation with evaporation. These oils are applied, and after a few moments, when the vessels are visible, the excess oil is wiped away with a cotton ball.
- All oils can make the tail more difficult to hold.
- When using oils, the injection must be made immediately upon visualization of the vessels.
- Injection landmarks are as follows:
- The lateral tail veins are located on the sides of the tail. There are also vessels that run along the dorsal and ventral midlines of the tail that are not suitable for injection purposes.
- The animal in the restrainer can be rotated so that the lateral vessels are facing up for ease of injection. Alternatively, the tail can be turned to bring the vessels into a more acceptable position for injection.
- The vessels are very superficial. They become more superficial as they reach the base of the tail.
- Injection of an article into the tail vein requires skill. To avoid trauma to the blood vessel, extraneous movement of the needle must be prevented. The syringe is held in a manner that does not require repositioning of the hand to perform the injection.
- Position the tail so that the vessel is visible and held under tension. Do not apply excessive tension to the tail, or the vessel can be stretched and the blood flow diminished.
- Place the needle directly over the vessel as far distally as possible.
- Apply slight pressure and slide the needle into the tail parallel to the vertebrae. Avoid angling the needle downward, as the needle will transect the vessel. The needle should be visible in the vessel as it is advanced at least 2 mm into the lumen.
- Inject the material in a slow, fluid motion to avoid rupture of the vessel.
- Pay special attention to the tail during injection. If properly inserted in the vessel, the injection material flowing into the vessel is felt with no resistance. The blood vessel should blanch as the blood is pushed out by the injection material.
- If the needle is not in the vessel, there will be strong resistance when injecting. If injected with force, the material will fill the subcutaneous space and the tail will balloon. Stop immediately, as material designed to be injected intravenously may be caustic to the surrounding tissues. Withdraw the needle, and attempt another injection more cranially on the tail.
- After successful injection, withdraw the needle and apply pressure to the injection site to ensure good hemostasis before returning the animal to the cage.
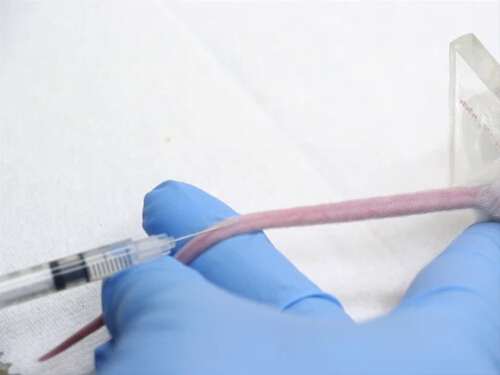
Figure 4. Tail vein injection in mice.
Key Terms and Definitions
As many of the test compounds that are utilized in biomedical research are novel substances that are not commercially available, proper substance preparation is vital. Fundamental concerns of sterility, viscosity, and physiologic compatibility of the formulation of the test compound and the medium or vehicle in which it is dissolved/suspended must be addressed. A dosing solution, whether given enterally or parenterally, must be physiologically buffered to the proper pH for the compound to be properly absorbed and to prevent tissue injury. The viscosity of a solution may be the determining factor in the route of injection. A substance that is too thick to pass through the small-gauge needle required for the commonly used injection sites in a mouse may require reformulation for oral administration. All solutions that are to be injected parenterally must be sterile to prevent introducing pathogens into the animal.
Needle selection for injections is based on the route of administration, the viscosity of the solution, and the size of the animal. In general, the smallest gauge feasible to administer the solution should be chosen; this is usually 22-30 gauge in the mouse and 20-25 gauge for the rat. The syringe to be selected is again the smallest possible with the correct graduations needed for accurate dosing.
There are several routes for parenteral injections. For the purpose of this video, the most commonly used routes (subcutaneous [SQ], intraperitoneal [IP], intravenous [IV], and intramuscular [IM]) are discussed. Other injection techniques, such as intradermal (ID), footpad injections, intranasal, and intravenous via the tail vein, are covered in a different video.
The absorption rate varies based on the compound’s solubility and the route of administration. Generally, absorption occurs fastest with intravenous delivery, followed by intraperitoneal and intramuscular administration. Although an IP injection is considered parenteral administration, the absorption mechanism is actually more similar to oral dosing. Subcutaneous dosing is a convenient way to administer a large volume of fluid. The absorption rate is slower than other routes, providing a sustained effect. The choice of the route is an essential component of the experimental protocol.
Subcutaneous administration places the materials between the skin layers and the muscle, into a virtual space created by lifting the skin. This allows for the safe injection of larger volumes, as the fluid is absorbed slowly and the excess fluid is quickly excreted via the kidneys. This avoids fluid overload and pulmonary edema, which can result from large volumes being injected intravenously. The needle selected should be the smallest size possible that will allow for the viscosity of the material injected, generally a 22-30 gauge needle for mice and a 22-25 gauge needle for rats. Injection volumes range from 0.1 ml to 0.5 ml for mice and 0.1 ml to 1.0 ml for rats, per injection site.
The IP route is commonly used in rodents because it can be used for the delivery of larger volumes than an IV or IM route. However, the absorption of material that is administered IP is significantly slower than an IM or IV route. Substances administered with this method are thought to be subjected to hepatic metabolism prior to entering the bloodstream. Again, the needle selected should be the smallest size possible that will allow for the viscosity of the material injected, generally a 22-30 gauge needle for mice and a 22-25 gauge needle for rats. For mice, injection volumes range from 0.05 ml to 1.0 ml per injection based on the size of the mouse. For rats, the range is 0.1 ml to 1.5 ml per injection site.
IM injections, although commonly used in larger animals, have minimal uses in mice and rats due to their small muscle mass. Improper or repeated injection in the muscle can cause nerve damage, resulting in paralysis or muscle necrosis. The needle selected should be the smallest size possible that will allow for the viscosity of the material injected, generally 27-30 gauge. For mice, injection volumes range from 0.01 ml to a maximum of 0.05ml per injection site for the gluteal muscle. Injection volumes for the gastrocnemius have a maximum of 0.05 ml. In contrast, rat injection volumes range from 0.01 ml to a maximum of 0.3 ml per injection site for the gluteal muscle. Injection volumes for the gastrocnemius have a maximum of 0.1 ml.
IV injection is the most effective route of substance administration, as it is introduced immediately into the circulatory system. However, with the undersized vessels available for IV dosing in the mouse, its usefulness is limited. If repeated intravenous administration is required, the use of vascular access ports or other specialized dosing equipment should be considered for the welfare of the animals. The needle selected should be the smallest size possible that will allow for the viscosity of the material injected, generally 27-30 gauge. Injection volumes range from 0.05 ml to a maximum of 0.5 ml per injection, based on the size of the mouse.
| Route | Mouse | Rat | |||
| Needle gauge (g) | Injection volume (mL) | Needle gauge (g) | Injection volume (mL) | ||
| SC | 22–30 | 0.1–1.5 | 22–25 | 0.1–3.0 | |
| IP | 22–30 | 0.05–1.0 | 20–25 | 0.1–1.5 | |
| IM | 27–30 | 0.01–0.05 (gluteal/gastrocnemius) | 25–27 | 0.01-0.3 (gluteal)
0.01-0.1 (gastrocnemius) |
|
| IV | 27–30 | 0.05–0.5 | 22–25 | 0.05–4.0 | |
Table 1. Appropriate needle gauge and injection volume range for mice and rats depending on the route.
NOTE: Appropriate needle gauge and injection volume range for mice and rats depend on species, age, and target site, and must follow institutional guidelines for approved protocols.
Questions that this video will help you answer
Substance administration is a common component of experimental protocols that utilize animals. When choosing a route of delivery, many factors must be considered, including the technical proficiency of those individuals responsible for dosing the animals, the size of the animal, the viscosity of the fluid, and the amount to be administered. Careful consideration of these factors will enhance the well-being of the animal and the overall outcome of the experiment.
Source: Kay Stewart, RVT, RLATG, CMAR; Valerie A. Schroeder, RVT, RLATG. University of Notre Dame, IN
As many research protocols require that a substa…
Chapters in this video
0:00
Overview
1:30
Key Considerations for Compound Administration
3:43
Characteristics of Different Injection Techniques
5:15
Subcutaneous Injection
7:15
Intraperitoneal (IP) Injection
9:30
Intramuscular (IM) Injection
12:02
Intravenous (IV) Injection via the Tail Vein
13:36
Applications
14:34
Summary
Copyright © 2026 MyJoVE Corporation. All rights reserved.