Rodent Handling and Restraint Techniques

All animal procedures described here must be conducted in accordance with institutional animal ethics guidelines and approved by IACUC. All procedures must follow the principles of the 3Rs—Replacement, Reduction, and Refinement—and must be performed by trained personnel.
1. Rodent handling:
- Rodent handling is essential for routine procedures but can induce stress responses. These responses may affect animal welfare and experimental outcomes. Refined handling techniques are therefore necessary to minimize stress and improve data reliability.
- Habituation involves gradual exposure to handling and procedures to reduce fear responses. Repeated, non-threatening interactions help animals become familiar with the handler and environment. Handling devices can be introduced into the cage to allow voluntary exploration before use. Positive reinforcement, such as food rewards, can encourage voluntary participation and cooperative behavior.
- Cup Handling
- Cup handling is a refined, non-aversive technique commonly used for mice.
- The animal is gently guided onto open hands or scooped using both hands to provide full body support.
- The mouse is allowed to freely explore the hands, reducing anxiety and minimizing defensive behaviors.
- Gentle, controlled movements and continuous support are essential to maintain a low-stress interaction.
- With repeated handling, animals become habituated, improving ease of handling and reducing stress responses.
- Tunnel Handling
- Tunnel handling involves transferring rodents using a tube or tunnel, rather than direct hand contact.
- Tunnels can be placed in the home cage to allow animals to use them as shelter and become familiar with them.
- Rodents often voluntarily enter the tunnel, after which they can be transferred between locations.
- This method reduces handling-induced stress and is particularly useful for routine tasks such as cage changing.
- Tunnel handling is widely recommended as a refinement technique for minimizing aversion to handling.
- Three-Finger Method (Refined Restraint Support)
- The three-finger method is a refined approach used during manual restraint of mice.
- It involves gently securing the animal using the thumb and index finger at the scruff, while the middle finger provides additional support along the body.
- This technique improves stability and control while minimizing pressure on the animal.
- Proper support of the body and hindquarters is essential to reduce discomfort and prevent injury.
- This method should be applied by trained personnel and only when restraint is required for procedures.
- Cup Handling
2. Restraint techniques
- Scruffing
Mice and sometimes young rats may be restrained using scruffing when required for specific procedures; however, refined handling methods should be used wherever possible prior to restraint. Adult rats are more difficult to restrain with this technique due to a more muscular neck, a reduced amount of loose skin, and an aversion to this method.- The one-handed restraint method is utilized most often in mouse strains that are very calm, such as the athymic nude, SCID, and some GEM strains. However, there is a greater risk for being bitten with this method. Novice animal handlers should become comfortable with the two-handed restraint technique before attempting the one-handed method.
- Place the animal on a surface that they can grip, such as a wire bar cage top or a mat.
- The animal may be gently guided into position on a surface it can grip, minimizing the need for tail traction.
- Turn the hand so that the palm is facing the body of the animal.
- With the index finger and thumb, pin the rodent over the shoulders.
- Gently slide the thumb and index finger forward, and position them at the base of the skull. Grasp the loose skin at the neck and lift the animal.
- Use the middle finger to stabilize the animal along the back by pinning the dorsal skin against the base of the thumb.
- Two-handed restraint
- Place the animal on a surface that they can grip.
- Hold the tail at the base (within 1-2 cm of the body) with the dominant hand, and apply gentle backward traction. This causes the animal to hold onto the surface, and results in the body being stretched and elongated.
- With the index finger and thumb of the other hand, pin the rodent over the shoulders.
- Gently slide the thumb and index finger forward, and position them at the base of the skull. Grasp the loose skin at the neck and lift the animal.
- Use the remaining fingers to stabilize the animal along the back by pinning the dorsal skin against the base of the thumb.
- Secure the hindquarters by pinning the tail against the palm with the fourth finger, or by allowing the hind limbs to rest on a solid surface.
- The one-handed restraint method is utilized most often in mouse strains that are very calm, such as the athymic nude, SCID, and some GEM strains. However, there is a greater risk for being bitten with this method. Novice animal handlers should become comfortable with the two-handed restraint technique before attempting the one-handed method.
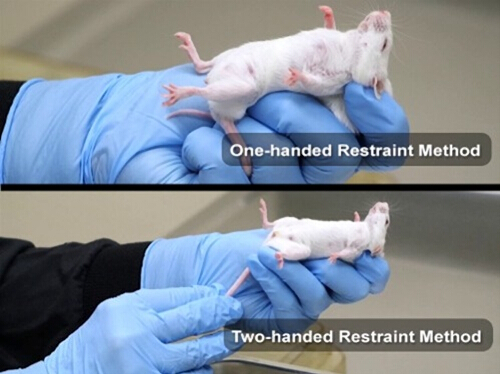
Figure 1: One-handed and two-handed restraint method for mice
2. Gloves
There are a variety of gloves available for handlers to wear for protection from rat bites. Gloves should allow adequate dexterity and gentle handling, as reduced tactile sensitivity may increase stress to the animal. Often, the disadvantages of many glove types outweigh the advantages.
- Cotton canvas work gloves are not bite resistant, but provide a small amount of protection from teeth and nails. They do not provide good grip as they slide easily over the fur.
- Good quality leather gloves are bite resistant. However, their stiffness causes a reduction in dexterity. The thickness of the leather, though protective, reduces tactile acuity and hand mobility.
- Chain mail gloves provide a psychological sense of security for the animal handler. However, they are heavy and most rats' teeth can penetrate between the links. In addition, these gloves decrease manual dexterity, and if used improperly are more dangerous for both the animal and the handler.
- Rubber-insulated gloves that are commonly used in homes for washing dishes provide a textured palmar surface, and allow for a secure grip on the hair coat of rodents. The stretchy latex surface is thick enough to resist puncture by rodent incisors, and thin enough to be able to feel and control the animal. The major disadvantage is that they are made of latex, which is a concern for persons with latex allergies. Furthermore, these gloves deteriorate in light, and need to be replaced regularly.
3. Body Restraint
- The "T. rex grip" is a two-handed restraint method for rats.
- Place a rat on a surface that can be gripped.
- Holding the base of the tail with one hand, bring the other hand up and over the back with the index and middle fingers split.
- Place the hand over the shoulder with the index finger on one side of the head, and the middle finger on the other side. The fingers on each side of the head restrict side-to-side movement of the head.
- Encircle the body behind the forelegs with the third finger, the fourth finger, and the thumb. Care must be taken to avoid compressing the chest and compromising respirations. This grip prevents the rat from moving forward or backward out of the hand.
- Stabilize the tail and hindquarters by grasping the base of the tail with or without holding onto the hind feet.
- This restraint works well with larger rats, and when access to the head is needed.
- The forelimb control method is a two-handed restraint method.
- Place the animal on a surface that they can grip.
- Hold the tail at the base (within 1-2 cm of the body) with the dominant hand and apply gentle backward traction. This causes the animal to grip onto the surface, and results in the body being stretched and elongated.
- Bring the other hand from behind over the back.
- Grasp the rat directly behind the shoulders, with the fingers on one side and the thumb on the other side of the chest, and slide the hand forward, thus forcing the forelegs forward.
- The forelegs will cross under the rat's chin, creating a physical barrier and preventing the rat from moving its head down toward the fingers.
- Take care to avoid compressing the chest and compromising respirations.
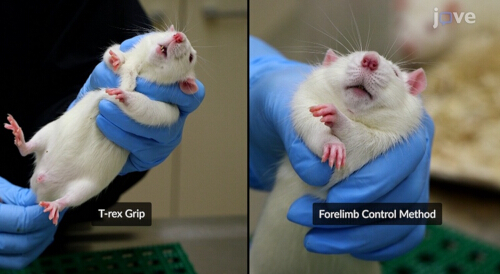
Figure 2: T-rex grip and forelimb control method for restraining rats
4. Restraint devices
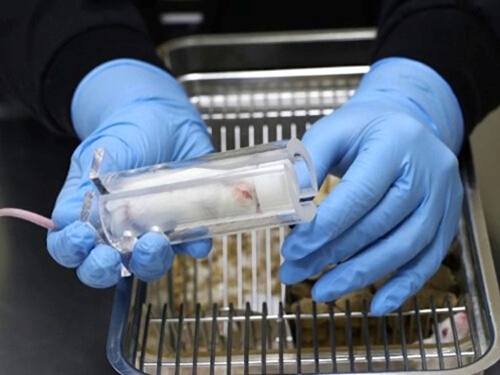
Figure 3: Broome-style restraining device
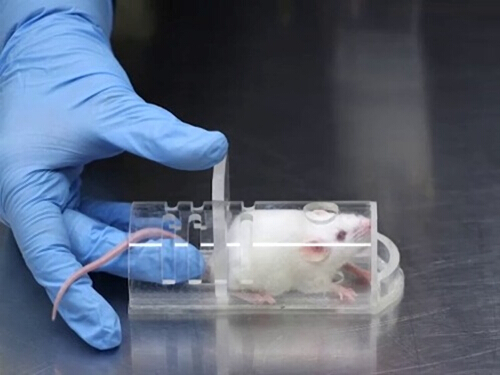
Figure 4: Flat-bottomed rodent restrainer
- Rigid devices come in a variety of types, and are generally made of nonporous material that is easily disinfected.
- The Broome-style restraint is designed to provide access to the tail for intravenous injections. It is constructed with a slot that runs along the full length of the device, which allows the animal to be guided into the restrainer hindquarters first. A plastic nosepiece is inserted to hold the animal in place.
- Remove the nosepiece from the body of the restraint tube by loosening the screw.
- Grasp the animal at the base of the tail, and orient the restraint tube so that the slit that runs the length of the tube is facing up. Gently guide the animal into the restraint device hindquarters first.
- It is often advantageous to place the animal on a smooth surface to facilitate its placement into the tube.
- Once the animal is fully in the tube-and has been drawn to the closed end-slide the plastic nosepiece into the tube to occlude the opening.
- Place the nosepiece assembly so that the animal's nose is in the center opening. Do not position the nosepiece so tightly that the animal cannot breathe.
- The flat-bottomed rodent restrainer is a half cylinder with openings that allow access from the top and the bottom of the restraint device. A rigid plastic gate is inserted into one of several graduated slots to hold the animal within the device.
- Hold the animal by the base of the tail with the dominant hand on a smooth surface, or on a cage top.
- Hold the flat-bottomed restraint tube in the other hand, and angle it so that the open end is at the animal's head at a 45° angle to the table/cage top surface.
- Some animals will immediately enter the tube, while others are reluctant and require the handler to steer them into the tube.
- Place the tube over the animal's head. Gently guide the animal forward to encourage entry into the device.
- Once the animal is in the restraint device, slide the plastic gate into the appropriate slot to hold the animal in the restraint device.
- Tube restraints are Plexiglass cylinders with one closed end containing holes or slits for air circulation. Some are modified with a wide slot half the length of the cylinder to accommodate exposure of a hind limb for intramuscular injections, saphenous and femoral blood collection, or access to the dorsal surface for subcutaneous injections.
- Grasp the animal by the base of the tail with the dominant hand on a smooth surface, or on a cage top.
- Hold the restraint tube in the other hand and angle it so that the open end is at the animal's head at a 45° angle to the table/cage top surface.
- Some animals will immediately enter the tube. Other animals are reluctant and require the handler to steer them into the tube.
- Place the tube over the animal's head. Gently guide the animal forward to encourage entry into the device.
- For animals that do not readily cooperate, brief manual restraint may be used by trained personnel.
- Once the animal is in the restraint device, it is necessary to occlude the opening to prevent the animal from backing up.
- Depending on the procedure, several fingers are placed across the opening.
- Stuff a large latex glove into the opening. The gloves are usually textured and will grip the Plexiglass surface.
- Some restraint tubes will have closures specific to that style or size.
- The Broome-style restraint is designed to provide access to the tail for intravenous injections. It is constructed with a slot that runs along the full length of the device, which allows the animal to be guided into the restrainer hindquarters first. A plastic nosepiece is inserted to hold the animal in place.
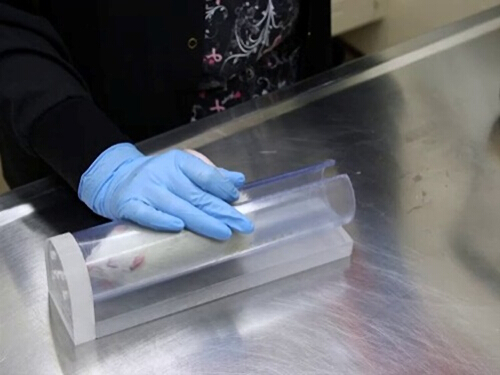
Figure 5: Tube restraining device
- Flexible restrainers are disposable flexible plastic cones. They are available in either transparent or opaque plastic. The plastic is thin enough to allow penetration by a needle to accomplish injections without removing the animal from the restraint device. They come in a variety of sizes to fit mice and rats, both adult and weanling.
- Cut the plastic with scissors to allow access to the limbs, the tail, and other injection sites.
- Select a cone size appropriate for the animal. The cone should be long enough to extend 2-3 inches beyond the animal's rump.
- Insert the animal into the cone
- Open the cone and grasp it around the upper half.
- Grasp the animal by the base of the tail with the dominant hand, placing it on a smooth surface or a cage top.
- Hold the restraint cone in the other hand, and angle it so that the open end is at the animal's head at a 45° angle to the table/cage top surface.
- Some animals will immediately enter the cone. Other animals are reluctant and require the handler to steer them into the restraint cone.
- Place the cone over the animal's head. Immediately tap the animal's rump and maintain pressure to prevent the animal from backing up. Due to the larger diameter of the cone opening, animals are much more likely to turn around to exit the cone.
- As soon as the animal enters the cone, grasp the open end and seal it to force the animal to the end.
- Secure the opening by folding the plastic to one side of the tail and applying the binder clip to the folded plastic, being careful to avoid clamping the tail or skin. Alternatively, gather the plastic around the tail evenly, and place the twist tie as close to the body as possible to secure the opening.
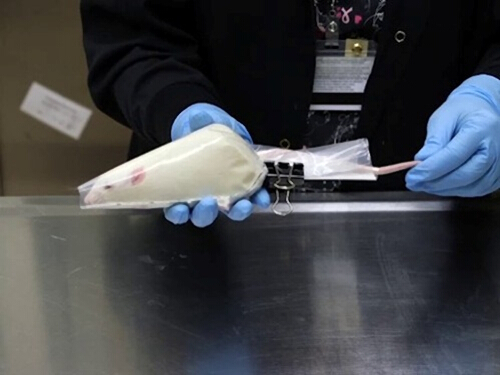
Figure 6: Flexible restrainer
5. Restraint methods for specific technical procedures
- Ventral exposure is required for intraperitoneal injections.
- Scruffing
- Scruff the animal and turn the hand so that the abdomen is exposed.
- Tilt the animal so that the head is pointing downward at a 30° angle.
- Secure the hindquarters by pinning the tail against the palm using the fourth finger.
- Alternatively, the hindquarters can be immobilized by pinning the excess skin along the back between the fingers and the base of the thumb.
- T. rex grip and forelimb control restraint methods
- Grasp the animal (rats only) using either of the above techniques.
- With the free hand, grasp both hind legs above the hock, and extend them caudally.
- Support the weight of the animal with the palm of the hand on the back.
- Tilt the animal so that the head is pointing downward at a 30° angle.
- A second person performs the injection.
- Rigid restrainer
- Most rigid restraint devices cannot prevent the animal from instinctively rolling to remain upright.
- If a rigid restrainer is employed, turn the animal so that its head is pointed down and is perpendicular to the tabletop.
- Flexible restrainer
- When placed properly in a flexible plastic cone, the animal is unable to turn over or around.
- Care must be taken to position the animal such that the hind limbs are sufficiently separated to allow access to the abdomen.
- As the animal is compressed, it is imperative that the injection be low enough on the ventral surface to avoid puncture of the spleen, liver, kidney, or stomach.
- Scruffing
- Dorsal exposure is required for injections into the subcutaneous space.
- Scruffing
- Scruff the animal and allow its hind legs to rest on a solid, flat surface.
- Lift the scruff to create a tent of skin over the neck and shoulders.
- Place the weight of the hand on the table when injecting mice. Placing weight on the mouse can cause suffocation.
- Hold rats in place with weight on the hindquarters, but never the chest.
- Inject the substance into the space below the fingers on the body of the animal.
- Rigid restrainers
- Place the animal in a restraint device with an opening large enough to allow gentle lifting of the skin up.
- It may be necessary to use forceps to grasp the skin.
- Most animals remain in the proper posture unless the restraint is rotated.
- Do not inject a volume that prevents the skin from receding from the opening once the injection is complete.
- Scruffing
- The restraint of the hind limb is necessary for intramuscular injection; blood withdrawal from the saphenous vein, femoral vein, or femoral artery; and injection into the footpad.
- Scruffing of mice and small rats (under 200 g)
- Scruff the animal and turn the hand so that the abdomen is exposed.
- Access the hind foot by placing the foot between the fingers.
- This method is best used only for footpad injections.
- T. rex grip or forelimb control
- This method requires two people: one for restraint of the body, and one for restraint of the limb and the performance of the injection.
- Extend the rat's hind leg by grasping the foot for access to the saphenous vein, femoral vein or artery, or the muscle for injection.
- Hold the leg just above the hock for injection of the footpad.
- Rigid restrainers
- Place the animal in a restraint tube head first.
- Expose the tail and hindquarters by gently guiding them backward from the tube.
- Immobilize the leg by grasping the skin of the flank and locking the knee straight. This provides access to the quadriceps muscle for injection in the mouse or rat, and prevents the animal from exiting the restraint device.
- In devices with large slots, position the leg outside the tube for access to the blood vessels for sampling or footpad injection.
- Those restraint tubes with flat end pieces allow the tube to rest on the table and stabilize the device during the procedure.
- Because the animal is secured in this manner, it is possible to perform injections or blood sampling of rats by a single technician.
- Flexible restraint
- Flexible plastic restraints can be modified by cutting openings to accommodate the exposure of limbs.
- The openings made can be customized for each animal, or for specific procedures.
- As the animal is secured in this manner, it is possible for a single technician to perform injections or blood sampling of rats.
- Scruffing of mice and small rats (under 200 g)
Key Terms and Definitions:
Common methods for removing rodents from their cages include cup handling, tunnel handling, and full-body supported transfer. Tail handling should be reserved for specific situations where alternative methods are not feasible.
For animals that are anxious or exhibit stereotypies, placing tubes into the cage may decrease handling difficulty, and reduce the flight/fright response to daily animal husbandry. A tube made of a nonporous material can be added for enrichment, and serve as a place for the animal to shelter or seek safe refuge. Such tubes can be open-ended or capped on one end. Most mice or rats will willingly go into the tubes when their cage is opened, or they can be easily guided to the tube. Once the animal is inside the tube, the open end is covered to transport the animal to the new location. When placed in a fresh cage, the tube can be gently tipped upward to encourage the animals to leave it. Animals are easily conditioned to this method of cage changing and will immediately enter the tubes, making this method as quick and easy as others for moving animals from one place to another. Although tubes do not have to be present in the home cage to be effective, having a tube in the primary enclosure increases recognition of a familiar safe site, as well as provides cage enrichment.
Some institutions prefer that animals be lifted by the body for routine handling, especially for handling rats. Animals must be habituated to this method from an early age. Young rats between 2-4 weeks of age tend to jump straight up. Placing a hand over the rat's back will cause it to jump into the palm of the handler, allowing it to be grasped. A second hand may be needed to prevent the rat from squirming out of grasp before placing it into another cage. Adult rats should be lifted using techniques that provide full-body support, with the forequarters and hindquarters supported throughout transfer.
When changing cages with neonate mice or rats, it is often necessary to remove them while keeping the nest intact. With the use of two hands to scoop the nest and neonates from the bottom of the cage, the intact nest is moved into a new cage. However, to avoid dropping pups, the fingers of each hand must be held closely together. Once moved to a new cage, it is important to verify that the pups are all present. It is advisable to count the pups before and after moving them. A plastic scoop may be used instead of the hands. If this method is used, a hand should be placed over the top of the scoop to prevent neonates from wiggling or jumping out of the scoop. This method of transferring pups, compared to the individual handling of the pups, is less distressing to both the pups and the dams.
Restraint for technical procedures requires a confident and firm, but gentle, touch. Restraint should be performed by trained personnel using calm, controlled, and consistent techniques that minimize stress and ensure animal and handler safety.
Mice and small rats can be restrained by grasping the skin at the nape of the neck, referred to as scruffing. Precautions for this method include both grasping the skin too firmly or too loosely. If the skin is grasped too tightly, the airway can become constricted, which can lead to death. If grasped too loosely, the animal will be able to turn its head and potentially bite the handler.
Animals exhibiting signs of fear or distress may be more difficult to handle safely. It is best to calm the animal prior to handling. There are various calming techniques that have been tried with varying success. The most reliable method is to use some sort of chemical restraint, most often an inhalation anesthetic. Isoflurane or sevoflurane are short-acting inhalation anesthetics that can be delivered with only the handling required to transfer the animal from its cage to an induction chamber. Once the animal is anesthetized, they can be manipulated or manually restrained for the procedure.
Questions that this video will help you answer
Routine handling for cage changing and technical procedures is a cause of stress for experimental animals. Although this type of stress is not a threat to the overall wellbeing of the animal, it can cause fluctuations in physiologic parameters that can have an adverse effect on the research data. The use of skilled personnel, proper techniques, and equipment can mitigate some of the stress.
Source: Kay Stewart, RVT, RLATG, CMAR; Valerie A. Schroeder, RVT, RLATG. University of Notre Dame, IN
It has been demonstrated that even minimal handl…
Chapters in this video
0:00
Overview
1:27
Basics of Rodent Handling
6:30
Manual Restraining Methods
9:58
Rodent Restraint Devices
14:08
Applications
15:27
Summary
Copyright © 2026 MyJoVE Corporation. All rights reserved.