This protocol presents methods for a high-throughput, automated assessment of alcohol drinking behaviors in socially housed mice run via the IntelliCage testing system. Provided is a detailed methodology for an operant, intermittent alcohol drinking paradigm, along with the experimental files and code to analyze the resulting data.
Method Article
Automated Operant Intermittent Alcohol Drinking In Socially-Housed Mice via The Intellicage Testing System
In This Article
Summary
Abstract
Despite known confounds of social isolation on rodent behavior, many investigators rely on singly housing mice to assess alcohol preference in preclinical models of alcohol use disorder (AUD). This protocol describes a social alcohol drinking task that allows for high-throughput, automated assessment of alcohol drinking behaviors in mice without the confounding impacts of stress induced by social isolation. The IntelliCage testing system enables investigators to simultaneously assess operant alcohol drinking behavior in up to 16 same-sex mice, each uniquely identified with a subcutaneously implanted radiofrequency identification (RFID) transponder. Access to sipper bottles is software-controlled and can be adjusted individually for each mouse. In this chronic, intermittent alcohol drinking paradigm, mice voluntarily engage in operant nosepokes to access sipper bottles containing 20% alcohol for six consecutive weeks. Alcohol bottles are only accessible every other day for 24 h at a time and can be optionally adulterated with quinine to assess punishment-insensitive drinking. Visits to each operant corner, nosepokes, and lick data are automatically recorded for each mouse. Detailed experimental methods and the open-source code to analyze the recorded data will allow investigators to assess alcohol drinking behaviors relevant to AUD in an increasingly efficient and ethologically relevant manner.
Introduction
Studies in preclinical models are crucial for developing a deeper understanding of the neurobiological mechanisms underlying alcohol use disorder (AUD)-like behaviors. Yet, many traditional measures of alcohol drinking in rodents, such as the two-bottle choice1,2 and drinking-in-the-dark3,4,5 tests, require manual measurement of liquid volumes among singly-housed rodents, a low-throughput and error-prone method. The recent adoption of open-source lickometer systems using either capacitive6,7,8,9,10 or photoelectric11,12 technology to automate lick counting represent a significant advancement in the throughput, accuracy, and technical sensitivity of alcohol drinking methodology. However, most home-cage lickometer systems still require rodents to be singly-housed, inducing isolation stress13,14. Though reported findings vary widely15,16, rodents generally have a greater preference for alcohol when singly-housed17,18,19,20. However, the effects of social isolation on alcohol drinking vary based on animal age, sex, housing environment, and previous stress exposure20,21,22. Social isolation has the potential to significantly interact with experimental manipulations to limit the validity of assessed AUD-like behavioral outcomes.
New, fully-automated home-cage monitoring systems, such as the IntelliCage testing system (TSE Systems23,24,25) or open-source alternatives, LIQ PARTI20 and FARESHARE26, solve this problem by combining lickometry with radiofrequency identification (RFID) tracking of multiple, group-housed animals. These home-cage monitoring systems enable more efficient and reproducible quantification of alcohol drinking behaviors, without the confounds of stress induced by social isolation. Thus, they are ideal for high-throughput, confirmatory studies of experimental manipulations affecting vulnerability to AUD-like behaviors. Among these, the IntelliCage testing system is unique in incorporating programmable, operant corners to gate sipper bottle access, allowing investigators to assess seeking behaviors in the absence of drug access, modulate operant ratios for individual animals, and more.
Here, the authorss present an operant intermittent alcohol drinking paradigm run via the IntelliCage testing system among socially-housed mice27,28. This paradigm allows for the long-term, automated assessment of alcohol drinking in up to 16 same-sex mice, each uniquely identified by subcutaneously implanted RFID transponders. As described below, mice are trained to operantly nosepoke on a fixed ratio (FR)-3 to access sipper bottles. After a brief training period, sipper bottles in two of the four operant corners are replaced with 20% alcohol (95% ethanol [190 proof] in tap water, v/v). Mice have continuous access to water, but intermittent access to alcohol every other day for 24-h periods (12:30 PM to 12:30 PM). Alcohol licks are quantified over the course of six weeks, with a two-day quinine-adulteration (0.5 mM, 1.0 mM) test halfway through the experiment to assess punishment-insensitive drinking. Visit, nosepoke, and lick data are recorded for each mouse (Figure 1), extracted using TSE’s proprietary software, and subsequently analyzed using the open-source pipeline29 to yield insights into AUD-like behaviors.
This protocol complements other published uses of the IntelliCage testing system to assess AUD-like behaviors30,31,32,33,34,35,36,37,38,39, as well as other substance use disorder-like behaviors40,41,42. Consistent with reports suggesting that intermittent access schedules increase voluntary alcohol consumption in rodents1,43,44,45,46,47, this protocol yields high levels of voluntary alcohol consumption in most mice. Nevertheless, as the authors note throughout the protocol, experimental parameters can be easily modified to address experimental questions. In all, this methodology provides an efficient and flexible solution for investigators to study the mechanisms underlying AUD.
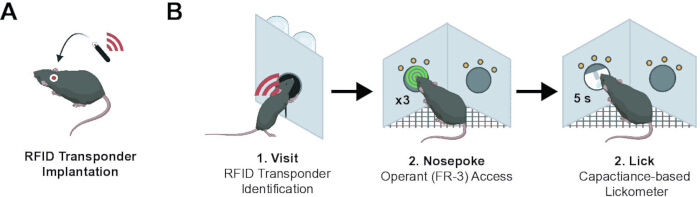
Figure 1: Fully-automated tracking of mouse visits, nosepokes, and licks via unique RFID identification. (A) Cartoon diagram of mouse RFID transponder implantation. RFID transponders are subcutaneously implanted in the dorsocervical region to enable individual tracking in an automated homecage monitoring system. (B) Schematic of data collection phases during the automated, operant intermittent alcohol paradigm. Animal identity is read, and a corner visit is recorded via dual RFID ring antenna and temperature sensor readings, both of which must be positive for a visit to be recorded (left). After, mice are trained to nosepoke on an FR-3 schedule to access sipper bottles (middle). Successful nosepoking yields 5 s of sipper bottle access, at which point mouse licks are recorded via a capacitance-based lickometer (right). Cartoons made from modified BioRender templates by Lucy Anderson, licensed under CC BY 4.0 (https://BioRender.com/ko79xuy). Please click here to view a larger version of this figure.
Protocol
All experimental procedures were approved by the NIH Institutional Animal Care and Use Committee (IACUC) and complied with Public Health Service policy on the humane care and use of laboratory animals.
1. Preparing the apparatus
NOTE: Each IntelliCage testing system apparatus consists of a large plastic home-cage (39 cm x 58 cm x 21 cm) within which up to 16 same-sex mice can reside.theprevious cohorts ranged in size from 8–16 mice/cage. The apparatus is equipped with four operant corners, all of which connect to a central microprocessor on the top lid. Rodent chow is accessible from a large metal hopper set in the center of the lid. Within the cage, mice freely roam between operant corners and a central living space, which is equipped with bedding and enrichment materials. Each operant corner has a small circular entrance that only physically accommodates entry by one mouse at a time. The identity of the mouse is read and recorded based on dual RFID ring antenna and temperature sensor readings, both of which must be positive for a visit to be recorded. Within each operant corner, mice are presented with two nosepoke ports, each of which controls access to one of two motorized doors. These programmable, motorized doors provide access to one of two sipper bottles. Investigators manually program conditions for sipper bottle access, as well as the sensitivity of the capacitance-based lickometers. Visit, nosepoke, and lick data are individually recorded for each mouse and transponded via a central microprocessor to a computer onto which TSE’s proprietary software system is loaded. Though it will not be discussed in this protocol, each operant chamber also contains a programmable air puff valve for use in aversive conditioning.
- Equip plastic home-cage with five compressed cotton fiber pads (15.24 x 25.4 cm), two small cotton squares (5.08 x 5.08 cm), and four plastic burrowing structures for bedding and enrichment.
NOTE: The use of compressed cotton fiber pads is recommended for two reasons: (1) to avoid the potential dust or flakes of commonly used bedding materials from interfering with the door mechanics, and (2) to allow for easier identification of fighting amongst animals. - Place the top lid with operant corners into the plastic home-cage.
- If disconnected, connect all operant corners to the central microprocessor using the provided cables and then connect the central microprocessor to a computer pre-loaded with TSE software using CAN cables.
- If using multiple apparatuses, connect all cages to the same computer serially.
- Connect the microprocessor to the power source and ensure that the LED lights in each corner switch on and that all eight motorized doors move.
- Fill eight sipper bottles with ~250 mL each of tap water (or other liquid), securely press on caps to ensure proper seal, and then gently twist into lickometer openings, ensuring a tight connection to the lickometer.
NOTE: Visit, nosepoke, and lick sensor sensitivity can be optionally optimized through a pilot experiment. To adjust the sensitivity of each corner, follow the manufacturer's instructions described in the “Help” file of the “Controller” program. All ofthestudies have used the following settings: visit- 816 ON/768 OFF; nosepoke- 21 ON/26 OFF; lickometer- 69 ON/80 OFF/15 time-out. - Fill food hopper with rodent chow.
- Turn the computer on, open the “Controller” application, and load the desired experiment file.
2. Preparing animals
NOTE: Animals should be implanted with RFID transponders at least one week prior to the start of behavioral testing to allow for sufficient recovery time. Use mice aged at least ~50 days, with body weights greater than 15 g. Implanting smaller mice increases the risk of injuring the mouse during injection. Depending on the mouse line, aggressiveness may become a problem in group-housed conditions, especially among males. Mitigate this risk by housing all mice together during adolescence. The authors did not observe significant aggression in studies with adult (~PND 80–150) wildtype C57BL/6 mice, but this does not guarantee the generalizability of this protocol to other genotypes, ages, or housing arrangements.
- Subcutaneously implant mice with RFID transponders in the dorsocervical region for unique identification.
- Print off a data table listing all experimental animals with a space beside each animal ID to place a barcode sticker listing their RFID code.
- Collect all animals and necessary supplies: RFID transponders, re-loadable RFID transponder injector, and isoflurane induction setup.
- Place the first mouse in the induction chamber and anesthetize via vaporized isoflurane (oxygen flowmeter: 1.5 mL/min, isoflurane: 1.5–3.5%) until the mouse is taking large, hiccupping breaths and is unresponsive to a toe pinch.
- While waiting for the mouse to become anesthetized, load the RFID transponder onto the injector by screwing the pre-loaded needle onto the injector base and then slowly ejecting the syringe until one sees the microchip move.
- Apply the barcode identifying the RFID code onto the printed data table beside the appropriate animal ID.
- Remove the mouse from the induction chamber and implant the pre-loaded RFID transponder subcutaneously into the dorsocervical region.
- After first verifying that the mouse is unresponsive to a toe pinch, use the thumb and forefinger of the non-dominant hand to pinch the mouse’s scruff directly above the shoulder blades.
- Using the dominant hand, insert the injector needle subcutaneously into the posterior end of the mouse’s scruff, being sure to keep the needle lifted above and parallel with the spine to avoid injuring the mouse.
- With the syringe tip inside the mouse’s scruff and firmly stabilized between the thumb and forefinger, carefully move the dominant hand so that a person can depress the injector plunger.
- Eject the RFID transponder, keeping the fingers of the non-dominant hand pinched around the scruff so that one can feel once the microchip has exited the syringe tip.
- While keeping the scruff pinched, slowly remove the injector. Only release the scruff once the injector has been completely removed to avoid the transponder falling out.
NOTE: Optionally, a single suture knot can be added to close the skin while the mouse is under anesthesia.
- Return the mouse to its homecage and monitor recovery from anesthesia until fully ambulatory.
- Monitor mouse for any signs of physical impairment, including partial paralysis, limping, or circling, that may indicate an off-target injection. If impairments persist for more than 24 h or severely impact animal wellbeing, humanely euthanize.
- Point the RFID transponder reader above the dorsocervical region of the mouse and scan to confirm successful placement.
- Optionally, take a tissue sample for genotyping.
- Repeat with all experimental mice.
- One day following initial RFID transponder implantation, use the RFID transponder reader to verify that no mice have lost their RFID transponders. If any mice have lost their transponders, repeat the procedure with a new transponder and update records accordingly.
NOTE: Usually, if a mouse is going to have their RFID transponder fall out, it will happen within 24 h of implantation. This can occur because of improper RFID transponder placement and/or mouse grooming/scratching at the injection site. Avoid re-injecting into previous injection wounds and exclude mice after three failed RFID transponder implantations. - Prior to rehousing mice into the IntelliCage apparatus, verify that all RFID transponders can be read successfully. Weigh and record body weights for all mice.
3. Preparing experimental files
NOTE: The IntelliCage testing system is controlled and operated via graphical user interfaces provided by TSE. There are three applications used to run IntelliCage experiments: “Designer,” “Controller,” and “Analyzer.” Different phases of the experiment are run via different experiment files, which are designed in the “Designer” application and then run in the “Controller” application. Detailed information on how to design and adapt experiment files has been described previously48,49. Templates of the four experiment files used in the study (Habituation.experiment, Water Training.experiment, Intermittent Alcohol.experiment, Open Bar.experiment) have been provided to aid in protocol replication. In these files, phase changes occur at 12:30 PM. The authors chose this timing because animals were housed on a 6:00 AM–6:00 PM light cycle. This allowed for an uninterrupted dark phase to measure drinking behaviors. However, investigators may wish to change this timing to be consistent with other alcohol drinking methodology, such as “drinking in the dark” procedures50.
- Set up experiment files in the “Designer” application.
NOTE: If working with the template files, delete the four example animals before entering the current cohort. Also, rename the group names to the experimental design and add groups as necessary. Ensure that the new groups all start with the same cluster as the ones in the template.- Open the Habituation.experiment file in the “Designer” application and carefully enter the animal ID, RFID transponder code, and experimental group/genotype for each mouse. Save the file with a new name to maintain the template file.
NOTE: If RFID transponder codes are mistyped, data will not be recorded. Assigning animals to relevant experimental groups will aid in monitoring their behavior and ultimately analyzing the data. - Export the animal information as an animals file.
- For each phase of the experiment, open the corresponding experiment file and load the animals file. Save and rename appropriately.
- If designing files on a separate computer, download experiment files onto a portable flash drive for transport to the behavior room.
- Open the Habituation.experiment file in the “Designer” application and carefully enter the animal ID, RFID transponder code, and experimental group/genotype for each mouse. Save the file with a new name to maintain the template file.
- Download all experiment files onto the computer attached to the IntelliCage apparatus(es) and open the first file in the “Controller” application. Verify that all information loads properly.
- Either on paper or electronically, create an experimental log file in which one notes the date and time that one can start/stop different phases of the experiment. This will greatly aid in the analysis, since certain drug conditions (i.e., quinine-adulterated alcohol) are not recorded in the IntelliCage archive files.
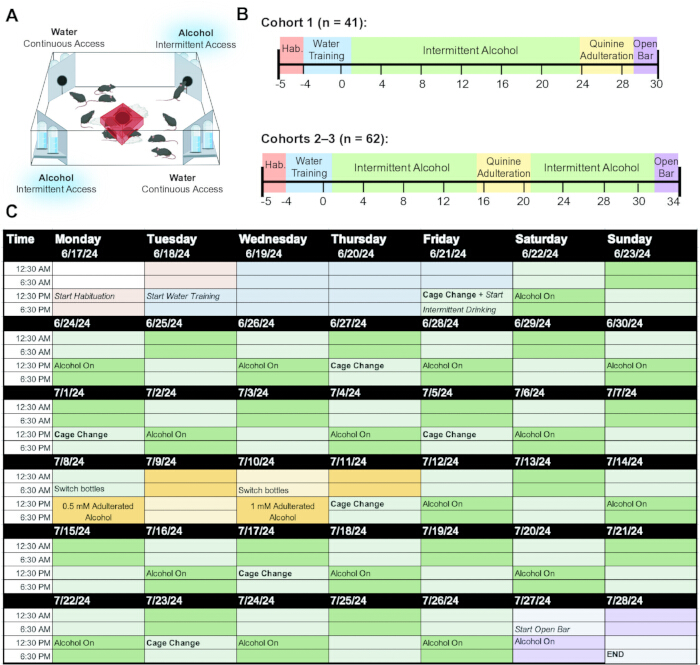
Figure 2: Experimental timeline for operant, intermittent alcohol drinking paradigm. (A) Schematic of the IntelliCage apparatus with alcohol-containing sipper bottles in two of four corners. (B) Experimental timeline depicting the schedule of all experimental phases, as used intheprevious publication23. Cohort 1 conducted a quinine-adulterated alcohol test after concluding intermittent alcohol drinking, whereas cohorts 2 and 3 returned to intermittent alcohol drinking after adulteration. (C) Detailed experimental calendar depicting software changes for all experimental phases: habituation, water training, intermittent alcohol drinking, quinine-adulterated alcohol test, and “open bar”/free access alcohol drinking. Cage changes are scheduled at least once a week following the completion of an “Alcohol Access ON” module. Cartoons made from modified BioRender templates by Lucy Anderson, licensed under CC BY 4.0 (https://BioRender.com/ko79xuy). Please click here to view a larger version of this figure.
4. Running the experiment
NOTE: The operant, intermittent alcohol drinking paradigm consists of five phases: (1) habituation, (2) water training, (3) intermittent alcohol drinking, (4) quinine-adulterated alcohol test, and (5) “open bar”/free access alcohol drinking. Each phase of the experiment is run on different experiment files except for intermittent alcohol drinking and quinine-adulterated alcohol test, which both use the parameters specified in the Intermittent Alcohol.experiment file. Outside of cage changes, experimenters should check on mice at least three times per week to assess animal well-being and ensure that the software is running properly. Any mice found to be injured/unwell should be removed from the experiment. For a sample experimental schedule, see Figure 2.
- Cage changes
NOTE: Conduct cage changes at least once per week. During alcohol drinking, only perform these changes after 12:30 PM during “Water Access ONLY” to avoid interrupting alcohol drinking. To facilitate this, the Intermittent Alcohol.experiment and Open Bar.experiment files will always start with “Water Access ONLY.” Due to the size of the cages, it is difficult to handle occupied cages alone. The authors recommend having at least one additional investigator assist with cage changes. Check on mice 24 h after each cage change to ensure that the software is running correctly and that no aggression/fighting has occurred in response to the stress of the cage change.- Before starting cage change, prepare a new, clean plastic cage with new bedding and nesting materials. Fill each of eight sipper bottles/cage with ~250 mL of tap water or 20% alcohol (95% ethanol [190 proof] in tap water, v/v).
NOTE: Optionally, investigators may add a small amount of the old bedding material to the new, clean cage. This minimizes disruption to established group hierarchies and may lower the risk of fighting. - Stop experiment in “Controller” application. After ensuring no mice are in the operant corners, remove the metal food hopper. Have one person lift the metal microprocessor apparatus up high enough that the second person can slide the plastic cage out from underneath it. Verify the correct number of mice.
- Remove mice one by one from the dirty cage, scan the RFID transponder, and record body weight. Visually examine each mouse for signs of injury or illness.
NOTE: The authors recommend recording body weight in an electronic spreadsheet (csv) so that it can be easily read into the analysis pipeline. - Temporarily place mice into a clean holding container after recording body weights.
- Clean the top part and the corners with a wet towel soaked in disinfectant. Take specific care to wipe down the surface and bottom ridge of the corner plate, without letting any liquid leak onto the electronic parts.
- Lift the metal microprocessor apparatus up high enough to slide the new, clean plastic cage into place.
- Gently twist new sipper bottles into the lickometer openings, ensuring a tight connection to the lickometer.
- Transfer mice into a new, clean apparatus.
- Replace the food hopper with a new, clean food hopper and fresh rodent chow.
- Re-start the same experiment in the “Controller” application or load and start a new experiment file.
- Ensure that the program is running properly and that all mice are having visits, nosepokes, and licks recorded appropriately.
NOTE: The “Controller” program will automatically present warnings when an animal has no recorded licks within a 12 h period. - Clean dirty equipment. Plastic cages, sipper bottles, and plastic burrowing structures can generally be washed through typical cage wash systems.
- Before starting cage change, prepare a new, clean plastic cage with new bedding and nesting materials. Fill each of eight sipper bottles/cage with ~250 mL of tap water or 20% alcohol (95% ethanol [190 proof] in tap water, v/v).
- Day 0: Habituation
NOTE: The habituation phase is run using the Habituation.experiment file. During this phase, all sipper bottles contain tap water. Mice have free access to all bottles without operant nosepokes. Motorized doors open when mice enter an operant corner, revealing access to sipper bottle nozzles.- After verifying RFID transponder presence and recording mouse body weights, fill all eight sipper bottles with ~250 mL of tap water and gently twist into lickometer openings.
- Place up to 16 same-sex mice into the prepared IntelliCage apparatus.
- Load Habituation.experiment file into the “Controller” application and start recording.
- Verify that all motorized doors are opening properly when a mouse enters the operant corner and that all visits, nosepokes, and licks are being recorded successfully for each mouse. If no visits, nosepokes, or licks have been recorded for a mouse within a 6 h period, check the .animal file for mistakes.
- Day 1-3: Water training
NOTE: The water training phase is run using the Water Training.experiment file. All sipper bottles should continue to contain tap water only. This phase will train mice to nosepoke on an FR-1 and then subsequently on an FR-3 schedule to access the sipper bottle nozzles. After successful nosepoking, motorized doors will open to provide sipper bottle access for 5 s. Once an individual mouse reaches a 60% or higher success rate, they are moved to an FR-3 schedule for the remainder of the program duration. Usually, mice move to an FR-3 schedule within 24–72 h. Monitor the animals’ performance in the “Controller.” If an animal does not reach an FR-3 schedule within 72 h, exclude it from further experimentation.- If all mice look hydrated and uninjured after 24 h of habituation, stop running the Habitatuation.experiment file and begin running the Water Training.experiment file.
- Verify visits, nosepokes, and licks are being recorded successfully by the software for each mouse and that all motorized doors are opening properly.
- Day 4+: Intermittent alcohol drinking
NOTE: The intermittent alcohol drinking phase is run using the Intermittent Alcohol.experiment file. In this phase, sipper bottles in two of the four operant corners are replaced with 20% alcohol. Water vs alcohol corners are pre-specified via the “Clusters” feature in the experiment file. In the template, water is delivered in corners one and three (labeled as “neutral”) while alcohol is in corners two and four (labeled as “incorrect”). Mice have continuous access to water, but intermittent access to alcohol for 24-h periods (12:30 PM to 12:30 PM) every other day. 5 s of sipper bottle access is provided on an FR-3 for all corners. During this phase of the experiment, conduct cage changes during “Water Access ONLY” periods to avoid interrupting alcohol drinking. Investigators should ensure that experimental groups exhibit roughly equal preference for all four corners during water training before assigning alcohol corners for intermittent alcohol drinking. In each of the cohorts, experimental groups exhibited roughly equal visits and licks across all four corners during water training. For this reason, the authors kept corner assignments fixed across cohorts. Experimenters can easily view the proportion of licks and visits across corners via the “Controller” program. Be sure to monitor visit and lick data regularly throughout the experiment to ensure that no problems arise (e.g., equipment malfunctions or mice “hogging” certain corners).- After all mice have successfully achieved an FR-3 schedule to access sipper bottles, prepare 20% alcohol (95% ethanol [190 proof] in tap water, v/v; ~250 mL/bottle).
- Stop running the Water Training.experiment file.
- Remove sipper bottles in operant corner two and four (or the corners you specified in the experiment file, if different) and replace each with ~250 mL of 20% alcohol.
- Gently twist new alcohol-containing sipper bottles into lickometer openings, ensuring a tight connection to the lickometer.
- Load the Intermittent Alcohol.experiment file and start recording.
- Verify visits, nosepokes, and licks are being recorded successfully by the software for each mouse and that all motorized doors are opening properly.
- After 12:30 PM on the following day, verify that the program successfully switched from the “Water Access ONLY” to the “Alcohol Access ON” module and that licks have been recorded in the operant corners containing alcohol.
- Day 16+: Quinine-adulterated alcohol test
NOTE: The quinine-adulterated alcohol test phase is run using the Intermittent Alcohol.experiment file. In this phase, the sipper bottles in two operant corners previously containing 20% alcohol are replaced with 0.5 mM, and subsequently, 1 mM quinine adulterated 20% alcohol to assess punishment-insensitive drinking. These quinine concentrations, which translate to 0.016% and 0.032% quinine (w/v), respectively, have previously been found to be aversive in testing done bythegroup27,28 and others31 Mice have continuous access to water, but intermittent access to quinine-adulterated alcohol for 24-h periods every other day (i.e., one day of 0.5 mM quinine, one day of water-only access, one day of 1.0 mM quinine). Access is provided on an FR-3 schedule for all corners. In this study, mice performed this phase of the task after either 16 or 24 consecutive days of unadulterated intermittent alcohol drinking. Cage changes were not conducted on the water day in between adulteration tests to avoid confounding impacts of stress. After this phase of the experiment, mice can either start “open bar”/free access alcohol drinking or return to intermittent drinking to assess rebound drinking post-adulteration.- Prepare 0.5 mM and 1 mM quinine-adulterated 20% alcohol (95% ethanol [190 proof] in tap water, v/v; ~250 mL/bottle).
- Perform a cage change, removing all sipper bottles.
- Fill each sipper bottle in alcohol corners with ~250 mL of 0.5 mM quinine-adulterated 20% alcohol solution.
- Gently twist new alcohol-containing sipper bottles into lickometer openings, ensuring a tight connection to the lickometer.
- Load the Intermittent Alcohol.experiment file and start recording.
- Verify visits, nosepokes, and licks are being recorded successfully by the software for each mouse and that all motorized doors are opening properly.
- After 12:30 PM, verify that the program successfully switched from the “Water Access ONLY” to the “Alcohol Access ON” module and that licks have been recorded in the operant corners containing alcohol.
- Before 12:30 PM on the next alcohol day, replace each bottle in the alcohol corner with ~250 mL of 1 mM quinine-adulterated 20% alcohol solution. There is no need to stop the experiment for the bottle switch.
- Before 12:30 PM on the next alcohol day, remove sipper bottles containing adulterated alcohol and replace each with ~250 mL of unadulterated 20% alcohol.
- Day 20+: “Open bar”/free access to alcohol drinking
NOTE: One may optionally run one day of “open bar”/free access alcohol drinking to serve as a non-operant control. This phase is run using the Open Bar.experiment file. In this phase, sipper bottles in two of the four operant corners contain 20% alcohol, which mice have access to for one 24-h period (12:30 PM to 12:30 PM). A corner visit will open the doors without requiring nosepokes. In this study, mice performed this phase of the task after either the intermittent alcohol drinking or quinine-adulterated alcohol test phases.- If necessary, prepare 20% alcohol (95% ethanol [190 proof] in tap water, v/v; ~250 mL/bottle).
- Before 12:30 PM on the next alcohol day, stop running the current experiment file.
- If necessary, remove sipper bottles in alcohol corners and replace each with ~250 mL of 20% alcohol.
- Gently twist new alcohol-containing sipper bottles into lickometer openings, ensuring a tight connection to the lickometer.
- Load the Open Bar.experiment file and start recording.
- Verify visits, nosepokes, and licks are being recorded successfully by the software for each mouse and that all motorized doors are open freely.
- After 12:30 PM, verify that the program successfully switched from the “Water Access ONLY” to the “Alcohol Access ON” module and that licks have been recorded in the operant corners containing alcohol.
5. Analyzing data
NOTE: The data for each experiment is stored internally until the program is stopped. At that time, a zipped data archive file is created and stored on the local hard drive in C:\Documents\NewBehavior\IntelliCage Plus\Archives. The file name consists of the date and time the program was started and ends in .zip. The data archive files contain all relevant information about the experiment, including corner visits (start time, end time, duration, visit sequence), nosepokes (start time, end time, duration), licks (start time, end time, duration), light and dark times, and temperature data. This data archive can be read and analyzed with the “Analyzer” program. Though other open-source packages exist for analyzing IntelliCage data outputs (Ruffini et al., 2021; Gastaldi et al., 2025), the authors created a data analysis pipeline in R using publicly available packages from the tidyverse to analyze data from the intermittent alcohol-drinking paradigm. The pipeline includes multiple quality control steps, including analysis of corner occupancy per mouse; average visit, nosepoke, and lick frequency across the circadian rhythm; FR-3 lick acquisition rate per mouse; and daily lick counts per mouse. Additionally, the authors provide script basic analyses of alcohol drinking measures. The basis is an R notebook template file using the Quarto markup language that processes the data files and can be adapted for animal cohort-specific variations. Analysis is done using the free version of RStudio. A project template file for R is located at the GitHub repository29.
- Compile all data, including zip files outputted by the “Controller” application and the CSV file containing mouse body weight data.
NOTE: The weights are required to normalize intake by body weight. In this workflow, it made more sense to collect the weight data in a separate file than to add it to each experiment file. The first column needs to match the Animal ID from the archive files. - Download the R project template from the GitHub repository.
- Rename the project to match the experiment.
- The template comes with sample data files to illustrate how the analysis works, located in the data/C1 subfolder. Replace the archive files with personalized data archives.
- Launch RStudio and open the project.
- In the files section of the window in the bottom right corner of RStudio, navigate to the qmd folder and open the IC_template.qmd file.
- Duplicate the template file and rename to match the experiment.
- Adjust the metadata in the YAML header portion of the duplicated file and the initial code chunk.
- Adjust the group names in the IC_Commons.R file in the R directory to match the experimental groups. (The template uses two groups: Control and LBN.)
- Run the notebook file.
NOTE: More detailed instructions are given with the README.md files in the GitHub repository.
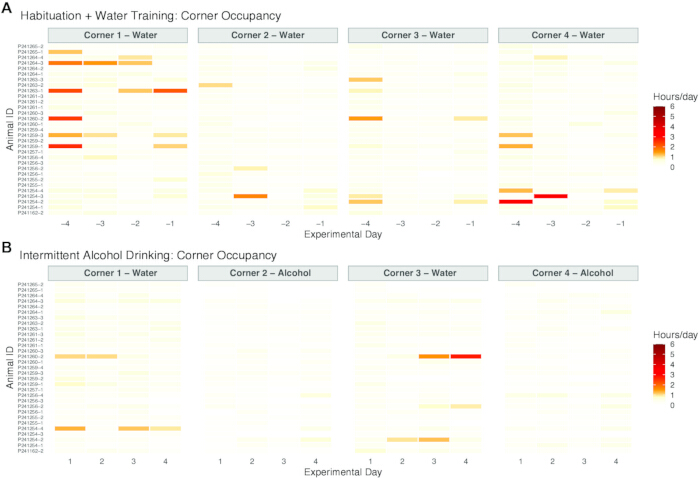
Figure 3: Comparable access to operant corners among all mice during training and intermittent alcohol drinking phases. Among cohort one mice23, heatmap depicting total time spent in each corner per day per mouse during (A) habituation and water training versus (B) the first four days intermittent alcohol drinking (n = 15 F, 16 M). Darker red colors denote more time in the corner per day. Please click here to view a larger version of this figure.
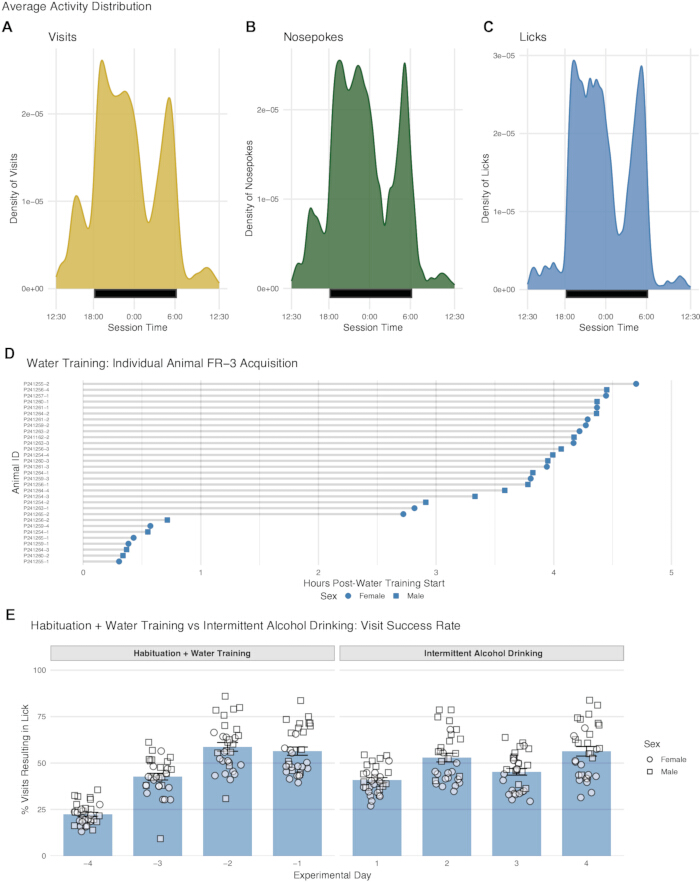
Figure 4: Mice engage in visits, nosepokes and licks consistent with circadian rhythm and successfully acquire operant sipper bottle access on an FR-3 schedule. Among cohort one mice23, average density of operant corner (A) visits, (B) nosepokes, and (C) licks across session time during the first eight days of testing. (D) Time until each mouse successfully licks on an FR-3 ratio during water training. (E) Visit success rate (= % of visits resulting in lick / total visits) among mice during habituation and water training (left) versus the first four days of intermittent alcohol drinking (right). Circle symbols denote females (n = 15); square symbols denote males (n = 16). Please click here to view a larger version of this figure.
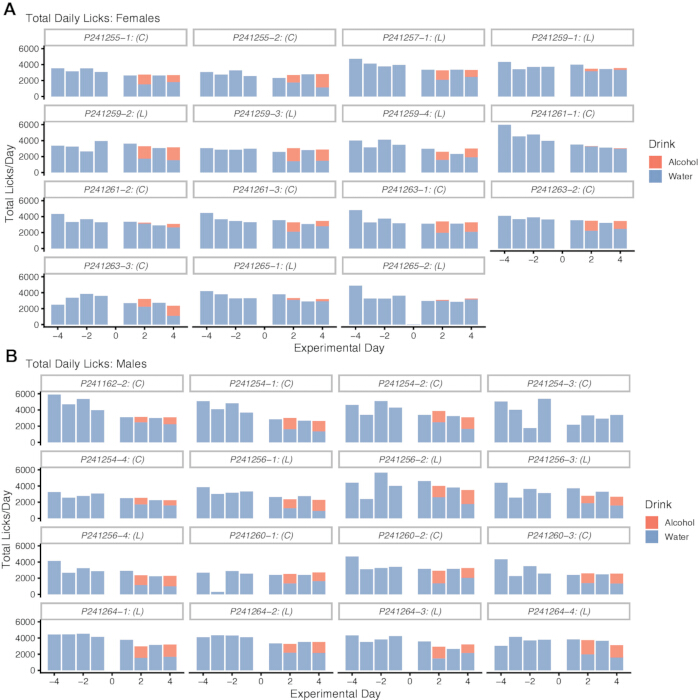
Figure 5: Mice engage in comparable daily lick rates during training and intermittent alcohol drinking phases. Among (A) female (n = 15) and (B) male (n = 16) cohort one mice23, total number of daily water (blue) and alcohol (red) licks during habituation and water training (day -4–0) versus intermittent alcohol drinking (day 1–4). C denotes control-rearing; L denotes LBN-rearing. Please click here to view a larger version of this figure.
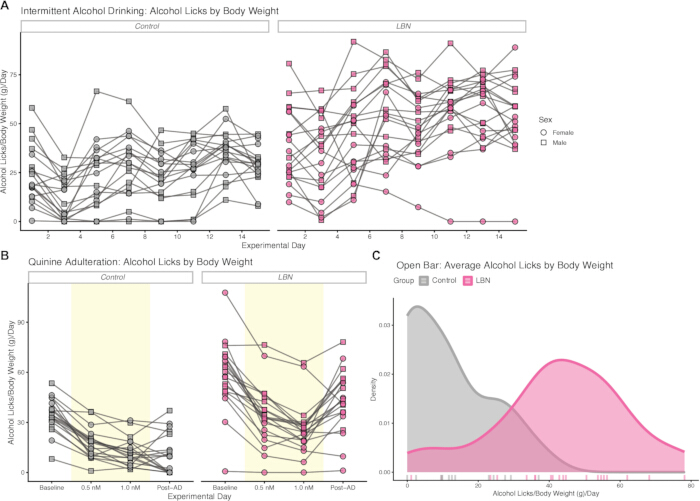
Figure 6: Mice exposed to early life adversity drink more alcohol than controls in operant, intermittent alcohol drinking paradigm. (A) Mean alcohol licks per day normalized by body weight (g; measured weekly) during 8 days of intermittent alcohol access among control (gray; left) and LBN-reared (pink; right) mice. (B) Mean alcohol licks per day normalized by body weight before, during, and after quinine adulteration (0.5 mM, 1 mM). (C) Density plot showing mean alcohol licks per day normalized by body weight during a single, FR-0 “Open Bar” alcohol access day. Circle symbols denote females (n = 15); square symbols denote males (n = 16). Please click here to view a larger version of this figure.
Results
The authors used automated homecage testing via IntelliCages to assess how early life adversity (ELA) alters vulnerability to AUD-like behaviors27. To induce adversity, they used the limited bedding and nesting (LBN) paradigm, a model of resource scarcity that induces unpredictable and fragmented maternal care51,52,53,54,55,56. The study was novel in assessing the effects of ELA on alcohol drinking behaviors among socially housed mice, without the confounding impacts of stress induced by social isolation. This was important given that social isolation in adulthood is known to differentially impact ELA-exposed mice22,57. To achieve maximum throughput, the authors simultaneously measured alcohol drinking behaviors in four IntelliCage apparatuses, two for each sex.
The authors began the analysis pipeline by conducting thorough quality control of the raw data. Plots included here show representative data from cohort one (n = 15 F, 16 M) of the published study23. Script for all analysis and plotting is included in the GitHub repository29. Experimental day 0 has been excluded due to a cage change, which disrupted data collection. Among the considerations for data exploration and quality control, the authors ensured that all mice had roughly equal access to all operant corners during both training (Figure 3A) and intermittent alcohol drinking phases (Figure 3B). This rules out significant impacts of mice “hogging” operant corners, preventing other mice from accessing the sipper bottles. The authors next validated that mice engaged in visits, nosepokes, and licks in an expected circadian rhythm across experimental days (Figure 4A–C) and that all mice successfully engaged in the first lick on an FR-3 ratio within six hours of the module start (Figure 4D). By the end of the water training phase, all mice achieved a relatively high lick success rate (= % of visits resulting in lick / total visits), further confirming that training was successful by the end of water training (Figure 4E).
During habituation, water training, and the start of intermittent alcohol drinking, mice maintained roughly comparable numbers of daily licks (Figure 5A–B). Though some mice displayed a drop in total daily licks at the start of operant water training on experimental day -3 (e.g., P241260-1), most mice acquired an FR-1 and FR-3 nosepoke schedule quickly enough to maintain baseline lick rates. Thus, it is unlikely that mice experienced excessive dehydration during water training. All mice learned the FR-3 schedule at a reasonable rate. Once intermittent alcohol drinking began on experimental day 1, nearly all mice chose to engage in alcohol drinking, though at varying rates. In general, mice did not significantly increase the total daily licks when consuming alcohol. Instead, the mice engaged in fewer water licks to accommodate the increased alcohol consumption.
Across all days of intermittent alcohol drinking, cohort one mice varied widely in the daily alcohol licks relative to body weight (Figure 6A). The authors found that mice that underwent the LBN paradigm had significantly smaller body weights than cross-fostered controls23. Thus, when examining group differences in alcohol drinking, they chose to normalize daily alcohol licks by body weight, which authors assessed weekly during cage changes. LBN-reared mice generally drank more alcohol per gram of body weight than controls during both intermittent drinking (Figure 6A) and quinine adulteration (Figure 6B). This trend remained during a single day of non-operant open access (Figure 6C). These findings from cohort one are consistent with the published results, in which the authors report that ELA-exposed mice consistently drank more alcohol per gram of body weight than cross-fostered controls during intermittent access, an effect that was particularly pronounced in males23.
Enabled by the efficiency of automated home-cage monitoring systems, the published study confirmed elevated alcohol drinking among socially-housed ELA-exposed rodents at extremely robust sample sizes, inclusive of both sexes (n = 54 control, 43 LBN)23. These results represent a step forward in modelling the AUD-like behaviors seen in AUD patients with a history of adverse childhood experience58,59,60,61,62, and open the door to future mechanistic studies identifying the neurobiology underlying increases in AUD vulnerability following ELA.
Discussion
As exemplified by the authors' use of IntelliCages to robustly assess AUD-like behaviors in mice exposed to ELA27 as well as the past work in transgenic lines28, automated home-cage monitoring systems offer an efficient and flexible solution for studying preclinical models of AUD. The simultaneous assessment of up to 16 co-housed mice significantly increases the throughput of alcohol drinking methodology while avoiding the confounding impacts of stress induced by social isolation. The operant, intermittent alcohol drinking paradigm allows experimenters to probe multiple facets of AUD-like behavior over a single ~5–6-week period, including binge drinking, escalation over time, and punishment-insensitive drinking. Though the paradigm offers one method for assessing AUD-like behavior, the design can be easily adapted to measure intermittent drinking more chronically, test for punishment-insensitive drinking in response to an air puff, or add a variable operant ratio, among other possibilities. In all, automated home-cage monitoring systems substantially increase the throughput and specificity with which investigators can assess AUD-like behaviors, fueling the identification of novel underlying circuitry and treatments.
As with all technology, authors occasionally experience mechanical and technical failures. Despite the temptation to allow the system to run unsupervised, it is critical that investigators continue to regularly monitor the apparatus to ensure proper functioning. Occasional mechanical failures of the magnetic doors resulted in sipper bottles being inaccessible to the mice. This occurred infrequently with proper cleaning and maintenance and was usually minimally disruptive to data collection. To identify errors quickly, it is important to monitor sipper bottles for comparable decreases in liquid and regularly check the “Controller” application to verify that licks are being recorded in all corners for all animals. For more thorough advice, Masuda and colleagues present an excellent description of how to set up and perform maintenance on IntelliCages48.
It is also essential to regularly observe animal behavior to monitor for fighting or other confounding behaviors. Though the authors did not have major issues with fighting when running this paradigm with C57/BL6 mice, co-housing males of more aggressive genotypes has resulted in significant issues. Regularly monitor for dried blood, limping animals, or other signs of fighting, especially after cage changes. If one notices these signs, promptly remove the offending animal(s) and exclude them from further experimentation. Use the “Individual mouse performance” section of the provided code to assess whether, and for how long, aggression impacted the drinking behavior of individual mice. Exclude all affected days from the analysis. As stated earlier, the authors cannot guarantee the generalizability of the protocol to different genotypes or housing arrangements.
Relatedly, the authors occasionally had issues with mice “hogging” operant corners, by sleeping in or otherwise occupying the same corner for hours at a time. This behavior blocks other mice from accessing the sipper bottles in that corner. These situations have the potential to confound drinking results if not properly accounted for in the analysis. Use the “Corner Occupancy (Visit Durations)” and “Individual mouse performance” sections of the provided code to decide whether “hogging” impacted mouse behavior significantly enough to exclude certain experimental days. In general, the inability to record or quantify social behaviors during experiments is a major limitation of this automated monitoring system.
Finally, as is increasingly the case with advanced neuroscientific methods, automated homecage monitoring systems produce large amounts of data. Through open-source code such as that presented here29 and developed by others63,64, experimenters have multiple tools at their disposal to organize and analyze outputting data. However, modifications to the protocol presented here will necessitate adaptation of the code. Further, numerous additional analyses could be conducted on the trove of output data not presented here.
For example, investigators may be interested in quantifying alcohol consumption (g of alcohol per kg of mouse weight per day). The authors discuss this briefly and provide some preliminary code to perform this analysis in the GitHub repository29. There, the authors use a lick-to-volume conversion factor of 1.94 µL/lick, consistent with calculations made by Kasia Radwanska and colleagues30,37. Though this lick conversion factor has been used to estimate alcohol consumption by others in the field30,37,38,39, it was calculated by measuring water consumption. Thus, it may not be an accurate measure of 20% alcohol consumption due to differences in the surface tension between water and alcohol. Others in the field have used a lick conversion factor of 3 µL/lick31,34,36,38, highlighting the need to resolve this measurement. One cannot rule out the possibility that mice engage in licks of different sizes, further complicating this calculation. If investigators are interested in getting an accurate measure of alcohol consumption (g/kg/day), the authors recommend calculating a lick-to-volume conversion factor consistent with the experimental design.
In conclusion, the advancement and increased accessibility of automated home-cage monitoring systems offer AUD researchers new and improved tools to assess alcohol drinking preclinically. Operant intermittent alcohol drinking paradigms such as this enable experimenters to simultaneously assess multiple aspects of AUD-like behavior at a much higher throughput and with greater ethological relevance than traditional methodology. Through IntelliCage testing systems and open-source alternatives20,26, investigators can more efficiently and flexibly probe alcohol drinking behaviors consistent with AUD, accelerating the identification of effective interventions.
Disclosures
The authors declare no competing interests.
Acknowledgements
This work was supported by funding from the NIH Intramural Research Program of the National Institutes of Health to V.A.A. (ZIA AA000421; ZIA MH002987). We would like to thank Miriam Bocarsly, Anoo Maskeri, and Erin Murray for their help in developing this protocol.
Materials
| Name | Company | Catalog Number | Comments |
|---|---|---|---|
| Ethanol, 190 Proof | Decon Laboratories | 2801G | |
| IntelliCage Testing System | TSE Systems | https://www.tse-systems.com/products/intellicage/ | Includes 1x 2000P Static Cage (Tecniplast, 2000P001), 4x Mouse Houses (Tecniplast, ACRE011), and 8x Sipper Bottles (Techniplast, ACBT0252) and Caps (Techniplast, ACCP3521) |
| IntelliCage Software ("Designer", "Controller", "Analyzer") | TSE Systems | https://www.tse-systems.com/products/intellicage/ | Version 3.6.9.0 |
| Iso Pads, 6" x 10" | Braintree Scientific, Inc. | ISO 6105 | Compressed cotton fiber pads (15.24 x 25.4 cm) |
| Isoflurane | Baxter | 10019-360-40 | |
| Isoflurane VXP™ Well-fill Vaporizer | MedVet | 91305535 | |
| Laboratory Rodent Diet | LabDiet | 5001 | |
| Medium Sure-Seal Mouse/Rat Induction Chamber | World Precision Instruments | EZ-178 | |
| Nestlets | Ancare | NES 3600 | Small cotton squares (5.08 x 5.08 cm) |
| OHAUS Compass™ CX Scale - 2,200 grams x 1 gram | Uline | H-8110 | For mouse body weight measurements |
| PC + Display | Supermicro | https://www.tse-systems.com/products/intellicage/ | Sold as part of IntelliCage testing system |
| RFID Transponder (1.25 x 7 mm) | TSE Systems | 290000-IC-60400 | |
| RFID Transponder Injector | AVID | AVID2028 | |
| RFID Transponder Reader | TSE Systems | 290000-IC-50800 | |
| RStudio | Posit | https://posit.co/download/rstudio-desktop | Version 2026.01.1+403; with Tidyverse (2.0.0) and Quarto (1.9.37) |
| Tri Pour Disposable Beaker | Consolidated Plastics | 45317 | For mouse body weight measurements |
References
- Melendez, R. I. Intermittent (Every-Other-Day) Drinking Induces Rapid Escalation of Ethanol Intake and Preference in Adolescent and Adult C57BL/6J Mice. Alcoholism: Clinical and Experimental Research. 35 (4), 652-658 (2011).
- Xiao, T., Chen, Y., Boisvert, A., Cole, M., Kimbrough, A. Chronic Intermittent Ethanol Vapor Exposure Paired with Two-Bottle Choice to Model Alcohol Use Disorder. Journal of Visualized Experiments (JoVE). (196), e65320 (2023).
- Rhodes, J. S., Best, K., Belknap, J. K., Finn, D. A., Crabbe, J. C. Evaluation of a simple model of ethanol drinking to intoxication in C57BL/6J mice. Physiology & Behavior. 84 (1), 53-63 (2005).
- Thiele, T. E., Crabbe, J. C., Boehm, S. L. “Drinking in the Dark” (DID): A Simple Mouse Model of Binge-Like Alcohol Intake. Curr Protoc Neurosci. 68, 9.49.1-9.49.12 (2014).
- Huynh, N., Arabian, N. M., Asatryan, L., Davies, D. L. Murine Drinking Models in the Development of Pharmacotherapies for Alcoholism: Drinking in the Dark and Two-bottle Choice. Journal of Visualized Experiments (JoVE). (143), e57027 (2019).
- Longley, M., Willis, E. L., Tay, C. X., Chen, H. An open source device for operant licking in rats. PeerJ. 5, e2981 (2017).
- Melo, M. C., Alves, P. E., Nogueira Cecyn, M., Eduardo, P. M. C., Abrahao, K. P. Development of an Eight-Wireless Automated Cage System with Two Lickometers Each for Rodents. eNeuro. 9 (4), ENEURO.0526-21.2022 (2022).
- Petersen, N., Adank, D. N., Raghavan, R., Winder, D. G., Doyle, M. A. LIQ HD (Lick Instance Quantifier Home Cage Device): An Open-Source Tool for Recording Undisturbed Two-Bottle Drinking Behavior in a Home Cage Environment. eNeuro. 10 (4), (2023).
- Hou, S., Soto, N. M. A., Glover, E. J., Hou, S., Soto, N. M. A., et al. Modeling Alcohol Consumption in Rodents Using Two-Bottle Choice Home Cage Drinking and Microstructural Analysis. Journal of Visualized Experiments (JoVE). (213), e67486 (2024).
- Wilcox, M. V., Cuzon Carlson, V. C., Sherazee, N., Sprow, G. M., Bock, R., et al. Repeated binge-like ethanol drinking alters ethanol drinking patterns and depresses striatal GABAergic transmission. Neuropsychopharmacology. 39 (3), 579-594 (2014).
- Godynyuk, E., Bluitt, M. N., Tooley, J. R., Kravitz, A. V., Creed, M. C. An Open-Source, Automated Home-Cage Sipper Device for Monitoring Liquid Ingestive Behavior in Rodents. eNeuro. 6 (5), (2019).
- Frie, J. A., Khokar, J. Y. An open source automated two-bottle choice test apparatus for rats. HardwareX. 5, e00061 (2019).
- Ieraci, A., Mallei, A., Popoli, M. Social Isolation Stress Induces Anxious-Depressive-Like Behavior and Alterations of Neuroplasticity-Related Genes in Adult Male Mice. Neural Plast. 2016, 6212983 (2016).
- Hebda-Bauer, E. K., Dokas, L. A., Watson, S. J., Akil, H. Adaptation to single housing is dynamic: Changes in hormone levels, gene expression, signaling in the brain, and anxiety-like behavior in adult male C57Bl/6J mice. Horm Behav. 114, 104541 (2019).
- Johnson, M. C., Zweig, J. A., Zhang, Y., Ryabinin, A. E. Effects of social housing on alcohol intake in mice depend on the non-social environment. Front Behav Neurosci. 18, (2024).
- Logue, S., Chein, J., Gould, T., Holliday, E., Steinberg, L. Adolescent mice, unlike adults, consume more alcohol in the presence of peers than alone. Developmental Science. 17 (1), 79-85 (2014).
- Holgate, J. Y., Garcia, H., Chatterjee, S., Bartlett, S. E. Social and environmental enrichment has different effects on ethanol and sucrose consumption in mice. Brain Behav. 7 (8), e00767 (2017).
- Panksepp, J. B., Rodriguez, E. D., Ryabinin, A. E. Sweetened-ethanol drinking during social isolation: Enhanced intake, resistance to genetic heterogeneity and the emergence of a distinctive drinking pattern in adolescent mice. Genes Brain Behav. 16 (3), 369-383 (2017).
- Johnson, M. C., Zweig, J. A., Zhang, Y., Ryabinin, A. E. Effects of social housing on alcohol intake in mice depend on the non-social environment. Front Behav Neurosci. 18, 1380031 (2024).
- Petersen, N., Adank, D. N., Quan, Y., Edwards, C. M., Hallal, S. D., et al. A Novel Mouse Home Cage Lickometer System Reveals Sex- and Housing-Based Influences on Alcohol Drinking. eNeuro. 11 (10), (2024).
- Lander, S. S., Linder-Shacham, D., Gaisler-Salomon, I. Differential effects of social isolation in adolescent and adult mice on behavior and cortical gene expression. Behavioural Brain Research. 316, 245-254 (2017).
- Kuhlman, K. R. Pitfalls and potential: Translating the two-hit model of early life stress from pre-clinical non-human experiments to human samples. Brain Behav Immun Health. 35, 100711 (2023).
- Lipp, H. P. High-throughput and Automated Behavioural Screening of Normal and Genetically Modified Mice. Bus Brief Future Drug Discov. , (2005).
- Kiryk, A., Janusz, A., Zglinicki, B., Turkes, E., Knapska, E., et al. IntelliCage as a tool for measuring mouse behavior - 20 years perspective. Behav Brain Res. 388, 112620 (2020).
- Iman, I. N., Yusof, N. A. M., Talib, U. N., Ahmad, N. A. Z., Norazit, A., et al. The IntelliCage System: A Review of Its Utility as a Novel Behavioral Platform for a Rodent Model of Substance Use Disorder. Front Behav Neurosci. 15, 683780 (2021).
- Frie, J. A., Khokhar, J. Y. FARESHARE: An open-source apparatus for assessing drinking microstructure in socially housed rats. NPP—Digit Psychiatry Neurosci. 2 (1), 1 (2024).
- Anderson, L. G., Tischer, A. E., Bock, R., Michaelides, M., Alvarez, V. A. Early life adversity increases striatal dopamine D1 receptor density and promotes social alcohol drinking in mice, especially males. Transl Psychiatry. , (2026).
- Bocarsly, M. E., Shaw, M. J., Ventriglia, E., Anderson, L. G., Goldbach, H. C., et al. Preexisting risk-avoidance and enhanced alcohol relief are driven by imbalance of the striatal dopamine receptors in mice. Nat Commun. 15 (1), 1-17 (2024).
- Bock, R., Anderson, L., Averbeck, T. . IntelliCage Intermittent Drinking Analysis Template [R]. , (2026).
- Radwanska, K., Kaczmarek, L. Characterization of an alcohol addiction-prone phenotype in mice. Addiction Biology. 17 (3), 601-612 (2012).
- Smutek, M., Turbasa, M., Sikora, M., Piechota, M., Zajdel, J., et al. A Model of Alcohol Drinking under an Intermittent Access Schedule Using Group-Housed Mice. PLOS ONE. 9 (5), e96787 (2014).
- Mijakowska, Z., Łukasiewicz, K., Ziółkowska, M., Lipiński, M., Trąbczyńska, A., et al. Autophosphorylation of alpha isoform of calcium/calmodulin-dependent kinase II regulates alcohol addiction-related behaviors. Addiction Biology. 22 (2), 331-341 (2017).
- Holgate, J. Y., Garcia, H., Chatterjee, S., Bartlett, S. E. Social and environmental enrichment has different effects on ethanol and sucrose consumption in mice. Brain and Behavior. 7 (8), e00767 (2017).
- Koskela, M., Piepponen, T. P., Andressoo, J. O., Võikar, V., Airavaara, M. Towards developing a model to study alcohol drinking and craving in female mice housed in automated cages. Behavioural Brain Research. 352, 116-124 (2018).
- Beroun, A., Nalberczak-Skóra, M., Harda, Z., Piechota, M., Ziółkowska, M., et al. Generation of silent synapses in dentate gyrus correlates with development of alcohol addiction. Neuropsychopharmacology. 43 (10), 1989-1999 (2018).
- Simmons, K. E., Healey, K. L., Li, Q., Moore, S. D., Klein, R. C. Effects of sex and genotype in human APOE-targeted replacement mice on alcohol self-administration measured with the automated IntelliCage system before and after repeated mild traumatic brain injury. Alcoholism: Clinical and Experimental Research. 45 (11), 2231-2245 (2021).
- Pagano, R., Salamian, A., Skonieczna, E., Wojtas, B., Gielniewski, B., et al. Molecular fingerprints in the hippocampus of alcohol seeking during withdrawal. Res Sq. , rs.3.rs-3337670 (2023).
- Stefaniuk, M., Pawłowska, M., Barański, M., Nowicka, K., Zieliński, Z., et al. Global brain c-Fos profiling reveals major functional brain networks rearrangements after alcohol reexposure. Neurobiol Dis. 178, 106006 (2023).
- Frycz, B. A., Nowicka, K., Konopka, A., Hoener, M. C., Bulska, E., et al. Activation of trace amine-associated receptor 1 (TAAR1) transiently reduces alcohol drinking in socially housed mice. Addiction Biology. 28 (7), e13285 (2023).
- Skupio, U., Sikora, M., Korostynski, M., Wawrzczak-Bargiela, A., Piechota, M., et al. Behavioral and transcriptional patterns of protracted opioid self-administration in mice. Addiction Biology. 22 (6), 1802-1816 (2017).
- Ismail, N. I. W., Jayabalan, N., Mansor, S. M., Müller, C. P., Muzaimi, M. Chronic mitragynine (kratom) enhances punishment resistance in natural reward seeking and impairs place learning in mice. Addiction Biology. 22 (4), 967-976 (2017).
- Ajonijebu, D. C., Abboussi, O., Mabandla, M. V., Daniels, W. M. U. Differential epigenetic changes in the hippocampus and prefrontal cortex of female mice that had free access to cocaine. Metab Brain Dis. 33 (2), 411-420 (2018).
- Kimbrough, A., Kim, S., Cole, M., Brennan, M., George, O. Intermittent Access to Ethanol Drinking Facilitates the Transition to Excessive Drinking After Chronic Intermittent Ethanol Vapor Exposure. Alcohol Clin Exp Res. 41 (8), 1502-1509 (2017).
- Gage, G. A., Muench, M. A., Jee, C., Kearns, D. N., Chen, H., et al. Intermittent-Access Operant Alcohol Self-Administration Promotes Binge-like Drinking and Drinking Despite Negative Consequences in Male and Female Heterogeneous Stock Rats. Neuropharmacology. 235, 109564 (2023).
- Hwa, L. S., Chu, A., Levinson, S. A., Kayyali, T. M., DeBold, J. F., et al. Persistent escalation of alcohol drinking in C57BL/6J mice with intermittent access to 20% ethanol. Alcohol Clin Exp Res. 35 (11), 1938-1947 (2011).
- Miczek, K. A., Akdilek, N., Ferreira, V. M. M., Kenneally, E., Leonard, M. Z., et al. Excessive alcohol consumption after exposure to two types of chronic social stress: intermittent episodes vs. continuous exposure in C57BL/6J mice with a history of drinking. Psychopharmacology (Berl). 239 (10), 3287-3296 (2022).
- Ko, Y. E., Hwa, L. S. Serotonin regulation of intermittent and continuous alcohol drinking in male and female C57BL/6J mice with systemic SB242084 and buspirone. Alcohol Alcohol. 58 (3), 280-288 (2023).
- Masuda, A., Kobayashi, Y., Itohara, S. Automated, Long-term Behavioral Assay for Cognitive Functions in Multiple Genetic Models of Alzheimer’s Disease, Using IntelliCage. Journal of Visualized Experiments (JoVE). (138), e58009 (2018).
- Kahnau, P. General Instructions for Using the IntelliCage with Mice. Curr Protoc. 6 (2), e70314 (2026).
- Thiele, T. E., Navarro, M. “Drinking in the dark” (DID) procedures: a model of binge-like ethanol drinking in non-dependent mice. Alcohol. 48 (3), 235-241 (2014).
- Rice, C. J., Sandman, C. A., Lenjavi, M. R., Baram, T. Z. A novel mouse model for acute and long-lasting consequences of early life stress. Endocrinology. 149 (10), 4892-4900 (2008).
- Ivy, A. S., Brunson, K. L., Sandman, C., Baram, T. Z. Dysfunctional nurturing behavior in rat dams with limited access to nesting material: a clinically relevant model for early-life stress. Neuroscience. 154 (3), 1132-1142 (2008).
- Baram, T. Z., Davis, E. P., Obenaus, A., Sandman, C. A., Small, S. L., et al. Fragmentation and unpredictability of early-life experience in mental disorders. Am J Psychiatry. 169 (9), 907-915 (2012).
- Molet, J., Maras, P. M., Avishai-Eliner, S., Baram, T. Z. Naturalistic rodent models of chronic early-life stress. Dev Psychobiol. 56 (8), 1675-1688 (2014).
- Walker, C. D., Bath, K. G., Joels, M., Korosi, A., Larauche, M., et al. Chronic early life stress induced by limited bedding and nesting (LBN) material in rodents: critical considerations of methodology, outcomes and translational potential. Stress. 20 (5), 421-448 (2017).
- Demaestri, C., Gallo, M., Mazenod, E., Hong, A. T., Arora, H., et al. Resource scarcity but not maternal separation provokes unpredictable maternal care sequences in mice and both upregulate Crh-associated gene expression in the amygdala. Neurobiology of Stress. 20, 100484 (2022).
- Peña, C. J. Early-life stress sensitizes response to future stress: Evidence and mechanisms. Neurobiology of Stress. 35, 100716 (2025).
- Dube, S. R., Felitti, V. J., Dong, M., Chapman, D. P., Giles, W. H., et al. Childhood abuse, neglect, and household dysfunction and the risk of illicit drug use: the adverse childhood experiences study. Pediatrics. 111 (3), 564-572 (2003).
- Anda, R. F., Felitti, V. J., Bremner, J. D., Walker, J. D., Whitfield, C., et al. The enduring effects of abuse and related adverse experiences in childhood. Eur Arch Psychiatry Clin Neurosci. 256 (3), 174-186 (2006).
- Pilowsky, D. J., Keyes, K. M., Hasin, D. S. Adverse Childhood Events and Lifetime Alcohol Dependence. Am J Public Health. 99 (2), 258-263 (2009).
- Kirsch, D., Nemeroff, C. M., Lippard, E. T. C. Early Life Stress and Substance Use Disorders: Underlying Neurobiology and Pathways to Adverse Outcomes. ADV RES SCI. 1 (1), 29-47 (2020).
- Leza, L., Siria, S., López-Goñi, J. J., Fernández-Montalvo, J. Adverse childhood experiences (ACEs) and substance use disorder (SUD): A scoping review. Drug Alcohol Depend. 221, 108563 (2021).
- Ruffini, N., Müller, M. B., Schmitt, U., Gerber, S. IntelliPy: a GUI for analyzing IntelliCage data. Bioinformatics. 37 (21), 3972-3973 (2021).
- Daguano Gastaldi, V., Hindermann, M., Wilke, J. B. H., Ronnenberg, A., Arinrad, S., et al. A comprehensive and standardized pipeline for automated profiling of higher cognition in mice. Cell Reports Methods. 5 (3), 101011 (2025).
Reprints and Permissions
This article has been published
Video Coming Soon