All procedures involving animal models have been reviewed by the local institutional animal care committee and the JoVE veterinary review board.
1. Rodent Acclimation and Food Restriction
- Use adult Wistar rats that are 3 months old at the start of the experiment. House rats singly in cages equipped with a laminar flow unit and air filter in a temperature- and humidity-controlled, American Association for Accreditation of Laboratory Animal Care (AAALAC)-accredited animal care facility on a reversed 12-hr light/dark cycle (lights off at 0600 hr).
- Provide water and standard rodent chow freely until body weights are approximately 380 – 400 g. Subsequently, food-restrict rats and maintain at 85 to 90% of their free-feeding body weights during the experimental sessions to facilitate acquisition and maintenance of response to methamphetamine.
- Handle rodents in the home cage room daily from arrival throughout the experimental sessions in order to record body weight and adjust daily food allocation.
- Once target weights are achieved, prepare to surgically implant each rat with a chronic indwelling jugular catheter and intracranial stimulating electrodes.
2. Jugular Vein Catheterization
- Catheter Preparation
- Prepare a 13-cm length of silastic tubing with an inner diameter of 0.012 x 0.025', create a silicone ball 4 cm from one end of the tubing using extra silicone tubing and electrocautery, and allow to air dry.
- Dip the other end of the tubing in a limonene-based solvent derived from citrus for a few minutes and allow it to expand. Connect the expanded tubing to a stainless steel guide cannula bent at a right angle.
- Anchor the bent base of the stainless steel guide cannula to a 1” square of biocompatible mesh using dental acrylic cement.
- Flush the catheter inside and out with ethanol and distilled water. Inject air through the tubing to eliminate residual liquid droplets. Allow to dry overnight (O/N).
- Sterile Technique
- Perform all surgeries in a dedicated animal surgical suite using aseptic surgical techniques. Sterilize instruments and implants using an autoclave and prepare a sterile area by placing waterproof paper on the operating (OR) table covered with a sterile towel(s).
- Wear sterile gloves and keep all instruments, implants, and surgical gauze on the sterile area during the procedure. Wipe down each instrument with an alcohol swab followed by 20 sec in a bead sterilizer between procedures when multiple surgeries are performed.
- Anesthesia
- Pretreat rats with atropine (sulfate) (0.04 mg/kg, s.q.) followed by pentobarbital (20 - 50 mg/kg, ip) to achieve anesthesia.
- Inject animals with sterile penicillin G procaine suspension (75,000 units, intramuscular [i.m.]) and an analgesic agent (carprofen, 5 - 10 mg/kg, sc or ketoprofen, 2 - 5 mg/kg, sc) immediately prior to surgery to decrease perioperative infections and pain, respectively.
- Check for adequate anesthesia by delivering a moderate toe pinch to the animal and, if no response occurs, then proceed. Apply eye lubricant to both the eyes.
- Surgical Site Preparation
- Shave a 2 x 2 cm dorsal patch on the rat’s back just posterior to a line connecting the shoulder blades. Shave a 1 x 1 cm ventral patch in the right neck region between the jawbone and the sternum.
- Wipe the shaved areas with alcohol pads followed by betadine solution. Place the rat on a sterile towel and allow the betadine to dry before proceeding.
- Catheter Implantation
- Make an incision parallel to a line connecting the shoulder blades in the mid-scapular region on the back using a 10-blade knife. Use a hemostat to separate the skin from the underlying connective tissue to create a plane for the mesh catheter base. Irrigate the area with sterile saline and cover it with sterile gauze prior to turning the rat onto its back.
- Make a diagonal incision between the right jawbone and the sternum using a 10-blade knife. Use a hemostat to separate the skin from the underlying connective tissue to locate the jugular vein.
Note: The jugular vein appears white/silver and shiny, and is larger in male rats than in females. - Place a spatula underneath the vein, tie a 4-0 silk suture gently around the top (proximal part) of the exposed vein, and push the vein back into the neck.
- Separate the connective tissues to create a superficial pocket under the inferolateral neck skin but above the muscle. Push a sterilized trocar from the neck incision to the midscapular incision by tunneling back behind the arm and upward. Run the catheter from the back to the neck by inserting a stiff guide wire up through the trocar from the neck end and into the distal catheter. Pull the guide wire back through to the neck incision, and the attached distal catheter will follow.
- Isolate the right jugular vein over a spatula by pulling up on the previously placed proximal suture. Use a ball scissors to make a small partial cut on the topside of the vein.
- Insert a curved forceps into the vein incision to open it up. Keeping the forceps apart but in place, pass the catheter tip in between the forceps tips and into the vein about 2 - 3 cm, where it will terminate outside the right atrium.
- Secure the catheter by tying a 4-0 silk suture around the distal vein. Tie the proximal and distal sutures together in a “box” knot to add extra stability.
- Flush the catheter with heparinized sterile saline and draw back blood to confirm successful implantation. Trim the sutures 1 - 2 mm above the knots and tuck the remaining proximal catheter under the neck skin. close with an appropriate suture/method of your choosing. If non-absorbable sutures or staples are used, they must be removed in 10-14 days under general anesthesia. Cover the incision with antibiotic ointment using a sterile cotton-tip applicator.
- Anchor the distal catheter/guide cannula/mesh assembly to the subcutaneous back tissue using absorbable sutures at two of the opposing corners of the mesh base. Close the back incision around the guide cannula using interrupted, non-inverted absorbable sutures. Cover the incision with antibiotic ointment using a sterile cotton tip applicator.
- Postoperative Care
- Flush the catheter with heparinized 0.9% sterile saline solution using a 3 ml syringe and place an obturator into the guide cannula to prevent clogging.
- Flush each rat’s catheter on a daily basis to maintain patency.
- Immediately following the procedure, place the rat in its home cage over a heating pad in the surgical suite and observe until consciousness and spontaneous movement return.
- Return the recovered rat to the colony room and allow five to seven days to pass before intracranial surgery. Weigh, handle, and assess their general condition daily, including checking for infection and evaluating animal behavior, appearance, and activity levels.
- Consult the Animal Resources veterinarian if any problems arise and follow any recommended treatment regimens. Inject animals with an analgesic agent (carprofen, 5 - 10 mg/kg, sc or ketoprofen, 2 - 5 mg/kg, sc) to treat perioperative pain as needed.
3. Intracranial Electrode Placement
- Surgical Preparation
- Perform all surgeries under sterile conditions as described in section 2.2.
- Anesthesia
- Place the animal in an anesthesia induction chamber and provide isoflurane gas flow into the chamber at 1,000 - 2,000 ml/min with the vaporizer set at 5%.
- Once the animal is recumbent, remove it from the chamber and place it in the nose cone on the padded stereotactic operating platform. Switch the gas flow from the chamber to the nose cone and run the gas with the vaporizer set at 2 - 3%.
- Adjust the vaporizer as needed to maintain stable respirations and no response to stimulation during surgery.
- Inject the rat with sterile penicillin G procaine suspension (75,000 units, i.m.) and an analgesic agent (buprenorphine 0.05 to 0.5 mg/kg sc) immediately prior to surgery to decrease perioperative infections and pain, respectively.
- Check for adequate anesthesia by delivering a moderate toe pinch to the animal and, if no response occurs, then proceed. Apply eye lubricant to both the eyes.
- Surgical Site Preparation
- Shave the top of the rat’s head and place the rat in ear bars to keep its head immobile during the procedure. Wipe the shaved area with alcohol pads followed by betadine solution. Allow the betadine to dry before proceeding.
- Electrode Implantation
- Grasp the scalp between and slightly anterior to the ears with forceps and use scissors to cut across the base. This maneuver will remove a 1.5 x 1 cm area of skin over the mid-skull.
- Use a 10-blade to make a circumferential incision through the pericranium down to the skull, and a curved forceps to scrape off and remove the pericranium. Irrigate the area with sterile saline, dab excess blood and saline with gauze, and allow the skull to dry completely so the bony landmarks, including the bregma, can be clearly seen.
- For bilateral surgery, mount two bipolar platinum-iridium electrodes, one into each electrode holder on either side of the stereotactic operating platform. Move the first electrode into position ~1 mm over the bregma and write down the stereotactic coordinates for the anterior-posterior (AP) and medial-lateral (ML) positions, which will be shown on the digital display. Do NOT actually touch the electrode tip to the skull because the electrode will no longer function. Repeat this procedure for the other electrode.
- Calculate the final AP and ML coordinates based on the target structure of interest. Move the electrode to this position with the tip just above the skull to obtain the initial dorsoventral (DV) coordinate on the digital display. Calculate the final DV depth based on the target structure of interest.
Note: The nucleus accumbens shell was targeted in this example, given its known involvement in drug-consummatory behavior, using the following stereotactic coordinates relative to bregma:AP entry coordinate = [Digitally displayed coordinate at bregma] + 1.6ML entry coordinate = [Digitally displayed coordinate at bregma] ± 2.4 for right/leftDV depth = [Digitally displayed coordinate at skull surface at AP/ML entry] - 8.5 - Mark the projected entry position of each electrode on the surface of the skull with a permanent marker. Do not bump or touch the electrode’s tip during this maneuver.
- Use a round ball diamond-coated burr to drill a 1.4 mm hole at each mark. Be careful not to plunge through the skull into the intracranial vault with the high-speed drill. Use curved forceps to puncture the dura once the skull has been drilled away.
- Use a round ball diamond-coated burr to drill 0.7 mm holes in an additional four locations behind the electrode entries for placement of skull screws. Use a manual screwdriver to place four 0.8 (diameter) x 3.2 (length) mm stainless steel screws into the skull, two on each side of midline. Tightly secure these screws up to about half their length into the skull because they are the major infrastructure that will hold the cranial cap in place for the coming weeks and months.
- Carefully insert the first electrode through its burrhole into the brain to the calculated DV depth by manually turning the knob that manages the Z-coordinate of the electrode holder. Turn the knob at a rate roughly equal to 1/2 turn per second to prevent undue damage to the tip of the electrode. Ensure the electrode tip does not touch the bony edge of the burrhole when entering the brain.
- Secure the first electrode using super glue layered over the burrhole and the posterior screws, followed by dental cement. Once this construct has dried completely, remove the electrode from its holder. Repeat the insertion and cementing process for the second electrode. Apply dental cement right up to the skin edge, but do not overlap with the skin because this loosens the cranial cement cap long-term.
- Postoperative Care
- Place two dust caps over the electrode pedestals to prevent clogging.
- Immediately following the procedure, place the rat in its home cage over a heating pad in the surgical suite and observe until consciousness and spontaneous movement return.
- Return the recovered rat to the colony room and allow five days to pass before starting the experiment. Weigh, handle, and assess the rats’ general condition daily, including checking for infection and evaluating animal behavior, appearance, and activity levels.
- Consult the Animal Resources veterinarian if any problems arise and follow any recommended treatment regimens. Inject animals with an analgesic agent (buprenorphine 0.05 to 1 mg/kg sc) to treat perioperative pain as needed. Intracranial bleeding can be more prevalent with the use of non-steroidal pain medications (carprofen, 5 - 10 mg/kg, sc or ketoprofen, 2 - 5 mg/kg, sc), so use buprenorphine perioperatively for intracranial surgery.
4. Operant Apparatus
- Use plastic and stainless steel operant conditioning chambers contained within sound-attenuating enclosures to run the behavioral experiments.
- Outfit each enclosure with an exhaust fan to supply ventilation and white noise to mask extraneous sounds.
- Use a personal computer and a behavioral software interface system to program the procedures and collect the experimental data.
- General Set-Up
- Equip each experimental chamber with two response levers mounted on one wall of the chamber, with a stimulus light located above each lever. Designate one of the levers the “active” lever so that it results in a programmed consequence when pressed.
- Program a stimulus light located directly above the active response lever to illuminate during every operant session, indicating the drug's availability.
- Have a response on the active lever result in an infusion delivery of methamphetamine (0.05 mg/kg/infusion in 100 µl 0.9% NaCl) over 2.8 sec, accompanied by the house light on the opposite wall going ON for 5 sec and the stimulus light going OFF for a 30-sec timeout.
- Count responses on the active lever, but they should have no scheduled consequences during the 30-sec timeout period. For completion, record responses on the inactive lever but they should have no scheduled consequences.
5. Intravenous (IV) Methamphetamine Self-Administration Procedure
- General Preparations
- Load rats into the operant chambers as quickly and calmly as possible to minimize behavioral artifacts. Attach a stainless steel spring leash to the guide cannula on the rodent’s back and to a leak-proof fluid swivel suspended above the operant chamber.
- Ensure the integrity of the connection tubing from the swivel to the 20-ml drug syringe in a motor-driven pump located outside the sound-attenuating enclosure. To do this, push the plastic connection tubing at least ¼ of an inch onto the metal swivel tip and the drug syringe needle tip until it will not slide off with moderate pulling. Counterbalance the swivel and leash assembly to permit relatively unrestrained movement of the animal.
- Conduct operant sessions at approximately the same time each day, Monday through Friday.
- Acquisition
- In order to facilitate rapid acquisition of IV methamphetamine self-administration, run rats on daily 6-hour sessions for four to five consecutive days.
- Conduct these sessions on a fixed ratio FR-1 + 30 sec schedule of reinforcement during which rats receive one infusion of IV methamphetamine for each press on the active lever, followed by a 30 sec time-out (e.g., no cue or reward consequences occur with pressing of either lever).
Note: This initial prolonged and “easy” access will result in the majority of rodents acquiring significant drug-taking behavior in less than or equal to one week (Figure 3).
- Maintenance
- During the second week of training, run rats on daily 2-hr sessions Monday through Friday to maintain and refine IV methamphetamine self-administration.
- Conduct sessions on a fixed ratio FR-1 + 30 sec timeout schedule of reinforcement.
- Document stable, intense responding when the total number of methamphetamine presentations across each session varies less than 10% for three consecutive sessions (Figure 4) and the cumulative number of infusions across the first 30 minutes is greater than the cumulative number of infusions during the second 30 minutes (Figure 5).
Note: This criterion ensures that the rats develop a drug-loading pattern at the beginning of the session that indicates addictive behavior19 and not simply casual use.
- Post-Session
- At the end of each session, disconnect the leash from the rodent’s back. Flush the catheter with 0.1 ml of 0.9% saline solution containing 800 IU streptokinase to prevent blood clots. Insert an obturator into each guide cannula to prevent clogging before returning the rats to the home cages.
- Test the patency of the catheters immediately after the end of each experimental session on Wednesdays throughout the course of the experiment.
- Prepare a 3 cc syringe with a 22 G needle, containing heparinized bacteriostatic saline to test catheter patency. Attach one end of a 4 to 6-inch-long piece of plastic tubing to the needle and the other end to the metal post of the catheter-cannula assembly on the animal’s back.
- Infuse 0.1 to 0.2 ml of saline to ensure a clear flow and then draw the syringe plunger back. If the catheter is patent, it should both flush easily and draw back blood that will be visible in the tubing. Release the plunger and infuse another 0.2 ml to flush all of the blood back through the catheter.
- If blood cannot be withdrawn, then remove the 3 cc syringe and tubing from the metal post.
- Prepare a 1 cc syringe with a 22 G needle, containing methohexital sodium, a fast-acting anesthetic, to further test catheter patency. Attach one end of a 4 to 6-inch-long piece of plastic tubing to the needle and the other end to the metal post of the catheter-cannula assembly on the animal’s back.
- Infuse 1.5 mg and quickly remove the 1 cc syringe and tubing from the metal post on the animal’s back. Reconnect the 3 cc syringe filled with heparinized bacteriostatic saline and infuse 0.1 - 0.2 ml. If the animal loses muscle tone within 3 seconds, then the catheter is patent and functional.
- See the Supplemental File “Common Pitfalls” for a pitfalls section that addresses adverse reactions to methamphetamine, failure to acquire methamphetamine self-administration, and rat extraction difficulty.
6. Brain Stimulation Apparatus
- Use 10 to 12 plexiglass boxes (12 x 18 x 18 in) (w x h x d) to run the DBS experiments. Cover each box on the outside with stiff opaque paper that covers the back and sides of the box to prevent the rats from viewing or interacting with each other. Leave the clear front panel uncovered so the examiner can view the animals during the stimulation sessions.
- Cover the tops of the boxes with a semi-permeable panel that prevents the rats from escaping while allowing airflow. Use this panel to support the commutators that are located above each box to facilitate the electrical connection between the rodent head cap and the stimulation system.
- Use a stimulation system that can deliver constant current to multiple simultaneous animals for the DBS experiments. Use a system that consists of a user-programmable digital signal processor/communications interface, a stimulator, a stimulator battery pack, a channel splitter box, and the accompanying software (See Materials Sheet).
- Use custom-length cables to connect the stimulator’s channel ports to the superior electronic pedestal of each commutator.
Note: The length needed will depend on the individual laboratory. These cables are outside of the animal area and do not need to be covered in a stainless steel spring. - Connect the inferior electronic pedestal of the commutator to the implanted electrode pedestal on the rodent’s head cap using 16-in cables covered with a stainless steel spring. Ensure that the cables are long enough to allow free movement to every area of the enclosure without significant tension on the head cap.
Note: A cable that ends roughly where the head of the rat would be when standing on all four feet is usually adequate. - Brain Stimulation Programming
- Use a personal computer and programming software to program the stimulation parameters (e.g., waveform, frequency, pulse width, inter-stimulus delay, current amplitude) and collect the experimental data.
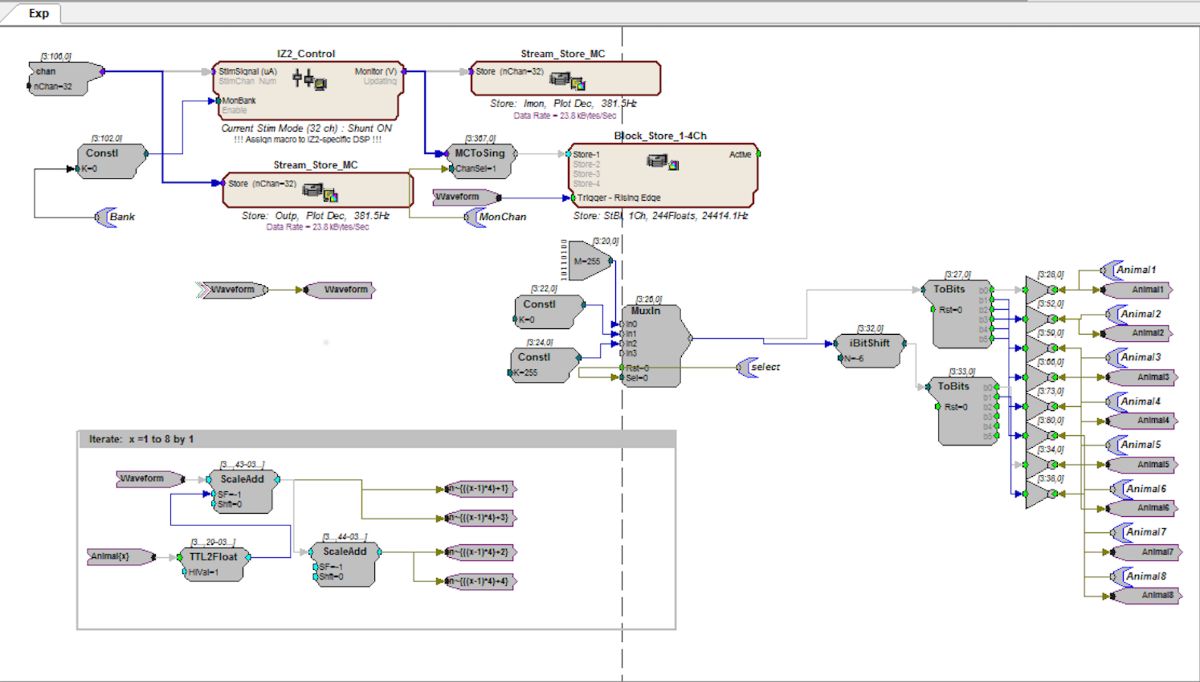
- Using a visual programming language, specify which functions each device will perform to meet the experimental endpoints and which data will be stored and/or projected for viewing in real time. The commands that run this particular project are demonstrated in Figure 1.
- Specify the desired frequency, pulse width, and amplitude in the visual control panel (Figure 2) prior to the start of the experiment. Typical parameters for high-frequency stimulation in rats are similar to those used in clinical human deep brain stimulation: frequency of 130 to 180 Hz, pulse width of 60 to 90 msec, and current amplitude of 100 to 250 μA4,8-10.
Note: A lower current is used in the rodent due to its reduced size compared to the primate.
7. Deep Brain Stimulation Procedure
- To load rats into the boxes, attach the stainless steel spring cable from the commutator to each electrode pedestal on the head cap. Test the impedance of each electrode by running 5 μA of current at a frequency of 1,000 Hz for 2 seconds.
- If the impedance is equal to or less than 125 KOhm, then proceed with the experiment because the electrode is able to deliver therapeutic stimulation. If the impedance is greater than 125 kOhms, consider removing the animal from the experiment because the electrode’s high resistance may truncate the current to potentially sub-therapeutic levels.
- Run the rats through one or two mock sessions for habituation, during which they will be attached to the electrode cable(s) but not receive any active therapy. Mock testing will eliminate any non-specific behavioral effects. Immediately following each mock session, transport the rats to the operant boxes for the daily 2-hour session of IV methamphetamine self-administration.
- Counter-balance rats into two groups, an active-stimulation and a sham-stimulation cohort, so that the baseline drug intake is not significantly different between groups.
- Perform daily DBS sessions on the rodent cohort for 5 day,s during which they receive either active electrical brain stimulation or no stimulation for 3 hr depending on their group assignment. Immediately following each DBS session, transport rats to the operant boxes for the daily 2-hour session of IV methamphetamine self-administration.
- Observe animals carefully during at least a portion of each DBS session to make sure the stimulation is not causing clear alterations in animal behavior. If any abnormal behaviors occur during/after stimulation, take care to document these observations. Note: The authors have not noticed significant behavioral alterations or changes in food/water intake during the experiment described in this article.
- Alter the length of DBS treatment, the electrical parameters, and the time between the DBS session and the operant session as needed, depending on the hypothesis.