The video demonstrates the purification and concentration of virus particles from clarified allantoic fluid collected from virus-infected embryonated chicken eggs. It showcases a series of filtration and separation steps, including depth filtration, tangential flow filtration, and density gradient ultracentrifugation to isolate intact viruses. The virus-rich fraction is then dialyzed to remove residual salts and gradient components by diffusion, followed by concentration using a hypertonic solution through osmosis. The result is a purified, high-titer virus preparation suitable for experimental use.
A subscription to JoVE is required to view this content. Sign in or start your free trial.
Method Article
Purification of Virus from the Allantoic Fluid of Embryonated Chicken Eggs
157 views
⸱
August 31st, 2026
In This Article
Abstract
Protocol
1. Amplification of Newcastle disease virus (NDV) using specified pathogen-free embryonated chicken eggs
- Inoculation of specific pathogen-free (SPF) embryonated chicken eggs
NOTE: Typically, eight dozen SPF embryonated chicken eggs are used to generate one in vivo-grade batch of Newcastle disease virus (NDV). Order one or two dozen extra eggs to account for damage during shipping, as well as variability in viability.- After receiving SPF embryonated chicken eggs, incubate them in an egg incubator at 37 °C, 60% humidity for 9 days. Ensure the incubator is set to automatically rock/rotate the eggs every hour.
NOTE: Eggs can be stored at room temperature for up to 24 h or 4 °C for up to 72 h; however, this may decrease embryo viability. - After 8-11 days of incubation (ideally on day 9), candling the eggs to determine embryo viability. Look for web-like vasculature (Figure 1A) and embryo movement as indicators of viable embryos. Dispose of eggs lacking these features (Figure 1B).
- On the viable eggs, mark the interface between the air sac and the embryo in pencil with an 'X' (Figure 1A). Ensure that this injection site will not cause perforation of the vasculature. Return the marked eggs to the incubator while the inoculum is prepared.
- Calculate the amount of virus required to inject all the SPF embryonated chicken eggs. Ensure that each egg receives 100 plaque-forming units (PFU) of virus in a volume of 100 µL; dilute the virus in phosphate-buffered saline (PBS) to a concentration of 1 × 10³ PFU/mL. Prepare an extra 20% of the inoculum to account for inaccuracies in virus administration.
- Using an antistatic wipe, clean the tops of the marked eggs with a 10% iodine solution diluted in 70% ethanol. Wait approximately 1-2 minutes for the solution to dry.
- Carefully pierce the shell using a pair of sterile, sharp tweezers. Sanitize the tweezers in 70% ethanol between eggs.
- Using a 1 mL syringe and a 25 G needle, inject 100 µL of the inoculum prepared in step 1.1.4 into the chorioallantoic cavity (Figure 1C). Approach with the needle at a nearly 90° angle to the egg. Insert the needle just into the top of the chorioallantoic membrane.
- Following inoculation, use nail polish to cover the puncture site and return the eggs to the incubator. Ensure that the rocking setting is ON until 24 h post-inoculation.
- Check egg viability 24 h post-inoculation. Discard dead eggs that lack vasculature in the chorioallantoic membrane and embryo movement (Figure 1B).
NOTE: These eggs have died due to the inoculation process and not from NDV. - Return the eggs to the incubator, with the rocker setting OFF to prevent contamination of the allantoic fluid with egg proteins.
- Check the eggs every 12-24 h as described in step 1.1.9 to identify dead eggs. Move the eggs that die after 24 h post-inoculation to 4°C to minimize autolysis. Harvest the allantoic fluid within 2-12 h of chilling.
- Incubate the eggs for at least 72 h.
NOTE: If propagating a mesogenic strain of NDV, the optimal incubation time is 60-72 h, as prolonged incubation times can impair the purification process due to reduced clarity of the allantoic fluid. This issue is not as important when propagating lentogenic NDV strains, as they take much longer to kill the embryo. - After the appropriate incubation period, move the remaining eggs to 4 °C for 2-12 h before harvesting the allantoic fluid.
- After receiving SPF embryonated chicken eggs, incubate them in an egg incubator at 37 °C, 60% humidity for 9 days. Ensure the incubator is set to automatically rock/rotate the eggs every hour.
- Harvesting allantoic fluid containing NDV
- Move the chilled eggs into the biosafety cabinet. Clean the tops of the eggs with 70% ethanol.
- Use sterile tweezers and surgical scissors to break open the apical side of the egg where the air sac is located.
- Remove the shell to reveal the chorioallantoic membrane (Figure 1D).
- Carefully puncture the membrane and peel it back to expose the allantoic cavity (Figure 1E). Ensure that the yolk sac is not accidentally punctured, as this will spoil the egg.
- Use blunt forceps to grab the embryo and open the embryonic sac.
NOTE: The fluid inside the embryonic sac also contains NDV. - Depress the embryo with the forceps and collect the allantoic fluid using a 10 mL serological pipette.
- Store the allantoic fluid on ice in 15 mL conical tubes until clarification.
NOTE: If the allantoic fluid is yellow, the yolk sac has been compromised, and the allantoic fluid should be discarded. - Centrifuge the conical tubes containing the allantoic fluid at 1,500 × g for 10 min at 4 °C.
- Pause point: Aliquot the clarified allantoic fluid into 50 mL conical tubes and store them at -80 °C for long-term storage (e.g., weeks to months), supplementing the fluid with sucrose to a final concentration of 5% to protect the virus from the harsh effects of freeze-thaw. Alternatively, for short-term storage (e.g., 1-3 days), supplement the allantoic fluid with sucrose (final 5%) or with 3× Mannitol-Lysine (ML) buffer (15% Mannitol, 3% Lysine) to yield a final concentration of 1× (5% Mannitol, 1% Lysine) prior to storage at 4 °C.
2. Purification of NDV from allantoic fluid
- Depth filtration of allantoic fluid
- Store the clarified allantoic fluid at -80 °C and thaw it at 4 °C the night before purifying.
- In a biological safety cabinet, set up the tubing and peristaltic pump as shown in Figure 2.
- If not already performed, combine the allantoic fluid with 3× ML buffer to a final concentration of 1×.
- Before attaching the depth filter, sterilize the tubing by passing 50 mL of 0.5 M sodium hydroxide (NaOH) through the system into a waste vessel.
- Rinse the tubing by passing 100 mL of sterile, molecular-grade water through the system and into the waste vessel.
NOTE: As NaOH will inactivate NDV, it is important that the lines are adequately washed prior to introducing the virus-containing allantoic fluid. - Prime the system by running 50 mL of PBS through it, stopping the pump when there is approximately 5 mL of PBS left in the tube.
- Attach a depth filter with a 1-3 µM retention rating to the tubing and remove the second cap on the apical side of the depth filter to vent the filter. Begin running an additional 50 mL of PBS through the system.
- Once PBS begins to flow through the vent at the top of the filter, close the port and continue to flow PBS through the lines.
NOTE: Minor air bubbles are acceptable, but the presence of large quantities of air will require the filter to be vented again as described in steps 2.1.7 and 2.1.8. - Stop the pump when there is approximately 5 mL of PBS remaining in the tube.
- Replace the waste vessel with a new sterile collection vessel and begin running allantoic fluid through the depth filter.
NOTE: The pressure should not exceed 10 psi, as this results in shearing of the virus. Pressure can be manipulated by decreasing or increasing the flow rate of the pump. If the pressure begins to exceed 10 psi and the flow rate cannot be decreased any further, a new depth filter should be used. In this case, steps 2.1.6-2.1.8 should be performed prior to resuming the flow of allantoic fluid. - Once all the allantoic fluid has passed through the filter, run 50 mL of 1× ML buffer through the lines to maximize virus recovery.
- Collect the liquid until the lines run dry. Store the virus overnight or up to 36 h at 4 °C.
NOTE: Once the virus has been depth-filtered, continue the purification process within 36 h of completing depth filtration. - Disconnect the depth filter and sanitize the tubing by running 100 mL of 0.5 M NaOH, 400 parts per million (ppm) bleach prewarmed to 42 °C through the system prior to storage in 0.5 M NaOH.
- Tangential flow filtration for the concentration of NDV
- Assemble the components of the cassette as depicted in Figure 3A in a biological safety cabinet.
NOTE: The manifold and endplate should be washed in detergent and dried before use. The silicon gaskets are reusable and should be stored in 0.5 M NaOH with the cassette. - Set up the tangential flow filtration (TFF) (also known as cross-flow filtration) system in an 'open' conformation (Figure 3B).
- If using a cassette for the first time, assemble the TFF cassette in the Elution conformation and flush with 100 mL of sterile, molecular-grade water (Figure 3C).
- Once there is only 5 mL of water remaining in the reservoir tank, pause the pump and change the TFF system setup to a closed conformation (Figure 3D).
- Add 100 mL of 0.5 M NaOH, 400 ppm bleach prewarmed to 42 °C to the reservoir and cycle through the system for 30-60 min.
- Pause the flow and return the TFF system to the elution setup, resuming the flow to elute the cleaning solution.
- When there is approximately 5 mL left in the reservoir, pause the pump and add 100 mL of sterile, molecular-grade water to rinse the system.
- When there is approximately 5 mL left in the reservoir, pause the pump and place the TFF system in the open conformation (Figure 3B). Continue with step 2.2.3.
- Sterilize the cassette and tubing by passing 100 mL of 0.5 M NaOH through the system using the peristaltic pump. Ensure that the pressure does not exceed 30 psi to maintain cassette integrity.
- Pause the pump when there is approximately 5 mL of 0.5 M NaOH left in the reservoir.
- Add 100 mL of sterile, molecular-grade water to the reservoir and resume passing the fluid through the cassette. Swirl the reservoir to wash all NaOH from the sides of the reservoir to prevent inactivation of virus. Repeat the reservoir wash step.
- When there is approximately 5 mL of sterile, molecular-grade water left in the reservoir, pause the pump.
- Add 100 mL of PBS to the reservoir, swirling to ensure the sterile, molecular-grade water is washed from the sides. Resume the flow of liquid through the cassette.
- When there is approximately 5 mL left in the reservoir, pause the pump, add depth-filtered allantoic fluid to the reservoir, and resume pump flow.
- Monitor pressure gauge 1 (Figure 3B) to ensure it does not exceed 10 psi to prevent shearing of the virus. Use a combination of the speed of the peristaltic pump and the use of C-clamps to increase elution to waste.
NOTE: Combining the speed of the peristaltic pump and C-clamps will result in increased pressure. - When there is 50-100 mL of allantoic fluid left in the reservoir, pause the pump to perform a buffer exchange by adding 150-200mL of 1× ML buffer.
- Resume pump flow, again monitoring pressure gauge 1 (Figure 3B) to ensure it does not exceed 10 psi.
- When there is 5-10 mL left in the reservoir, pause the pump.
- Using two C-clamps, close the two waste lines as shown in Figure 3C.
- Uncouple the retentate line feeding the reservoir and insert it into a 50 mL conical tube (Figure 3C).
- Resume the flow of the pump, pausing when there are a few drops of fluid left in the reservoir tank.
- Remove the C-clamps from the waste lines and reattach the retentate feed line to the reservoir tank (Figure 3B).
- Add 20-25 mL of 1× ML buffer and resume pump flow until there is approximately 5 mL left in the reservoir tank.
- Repeat steps 2.2.13 to 2.2.16.
NOTE: A 3rd elution can be done by repeating steps 2.2.17 and 2.2.13 to 2.2.16 to increase virus yield. However, most of the virus is present in the first two elutions. - After finishing the elutions, place the virus on ice or at 4 °C.
- To cleanse the lines, set up the system such that it is a closed loop format (Figure 3D) with the waste lines feeding back into the reservoir, as depicted in Figure 3D.
- Proceed to clean the system by adding 250 mL of 0.5 M NaOH, 400 ppm bleach prewarmed to 42 °C.
- Flow the cleaning solution through the system overnight.
NOTE: While recirculating the cleaning solution, if the pump is run at a speed of 50 mL/min, a pressure of about 5 psi should be observed. If the pressure exceeds this, the cassette is dirty, and the cleaning solution should be replaced, and the process repeated. - Elute the cleaning solution by directing both waste lines and the retentate line into a waste container.
- Add 400-500 mL of sterile water to the reservoir and flow it through the system and into the waste vessels.
- When approximately 5 mL is left in the reservoir, pause the pump and add 100-200 mL of 0.5 M NaOH to the reservoir tank, swirling the solution to wash the reservoir container.
- Once the reservoir is almost empty, repeat step 2.2.23 an additional two times.
- Disassemble the TFF setup, storing the TFF cassette and gaskets in a small volume of 0.5 M NaOH in a resealable plastic bag at 4 °C.
NOTE: Tubing can be stored at room temperature submerged in 0.5 M NaOH.
- Assemble the components of the cassette as depicted in Figure 3A in a biological safety cabinet.
- Iodixanol density gradient ultracentrifugation
- Turn the ultracentrifuge on and set it to precool to 4 °C. Precool the desired rotor at 4 °C as well (see the Table of Materials).
NOTE: Rotors should be stored at 4 °C. - Use the stock 60% iodixanol solution (concentration at time of purchase) to generate 40%, 20%, and 10% iodixanol solutions by diluting with PBS and 3× ML Buffer to a 1× final concentration of ML buffer.
- In a 13.2 mL, open-top, thin-wall ultracentrifuge tube, overlay 0.5 mL, 2.5 mL, and 2.5 mL of the 40%, 20%, and 10% iodixanol solutions, respectively (Figure 4A).
NOTE: Tilting the ultracentrifuge tube on its side and slowly expelling the solution will significantly reduce the risk of mixing the two gradient layers. The separation of each layer should be evident, with a "halo" visible between each layer of the gradient. - Use a marker pen to mark the interfaces of the various gradient layers.
- Layer 6-6.5 mL of the eluted virus from the TFF procedure over the density gradient. Add the virus carefully as described in step 2.3.3 to avoid disturbing the density gradient.
- Load the ultracentrifuge tubes into the inserts for the swinging bucket rotor (see the Table of Materials) using an open-top scale to balance the inserts within 0.01 g of each other. Use PBS or extra virus eluent to account for the weight differences.
- Once the tubes are balanced, cap the tubes and load them into the rotor.
- Centrifuge for 1.5 h at 125,000 × g at 4 °C.
NOTE: This can be performed overnight if an ultracentrifuge with delay-start capability is available. - Following ultracentrifugation, remove the tubes using a pair of sterile forceps. Look for the target band large band-between the 10% and 20% gradients (Figure 4B).
- Suspend the tube over the top of a beaker using a retort stand.
- Attach an 18 G × 1.5-inch needle to a 5 mL syringe and puncture the side of the ultracentrifuge tube.
NOTE: The tube should be punctured slightly below the target band, with the needle on an upward angle and bevel up such that it would travel into the target band. - Slowly extend the plunger to remove the target band.
NOTE: Move the needle around within the target band to maximize the virus extracted. Be careful that other bands or debris do not get mixed with the target band, and avoid taking excess solution, as this will lead to the use of more dialysis cassettes. - Once the target band has been extracted, remove the needle, and allow the remaining solution to drain into the waste beaker. Dispense the target band into a 50 mL conical tube until all bands from all other ultracentrifuge tubes have been extracted.
- Repeat steps 2.3.10-2.3.13 until all the target bands have been extracted from all the ultracentrifuge tubes.
- Alternative approach to extracting the target bands as described in steps 2.3.10 to 2.3.13
- Slowly remove the liquid overlaying the target band using a pipette. Once at the target band, extract using a pipette and store the virus in a 50 mL conical tube.
NOTE: This allows for the ultracentrifuge tubes to be reused.
- Slowly remove the liquid overlaying the target band using a pipette. Once at the target band, extract using a pipette and store the virus in a 50 mL conical tube.
- Turn the ultracentrifuge on and set it to precool to 4 °C. Precool the desired rotor at 4 °C as well (see the Table of Materials).
- Removal of iodixanol from the virus solution
NOTE: The NDV-containing band appears at an iodixanol density between 15% and 16%. The concentration of iodixanol in the solution can be determined by measuring the absorbance at 340 nm in reference to a standard curve. This step may be omitted as no adverse effects or acute toxicity were observed when iodixanol solutions of this concentration were administered to C57BL/6 mice.- Pre-wet a 0.5-3 mL 10 kDa molecular weight cut-off dialysis cassette by submerging it in PBS for 1 min.
NOTE: The dialysis membrane should change from smooth to having a ruffled or bumpy appearance. If the volume of extracted virus exceeds 10 mL, two 0.5-3 mL dialysis cassettes or a 5-12 mL dialysis cassette should be used. - As applicable, use either a 5 or 10 mL syringe and an 18 G × 1.5 inch blunt-fill needle to collect the virus from the 50 mL conical tube.
- Use the syringe to enter the dialysis cassette, being careful not to pierce the membrane, and inject the virus.
NOTE: The dialysis cassette can be rotated to manipulate the positioning of the air pocket in the cassette. The air pocket should be removed before removing the needle from the cassette. - Fill a 1 L beaker with sterile 1× PBS, place a stir bar and the dialysis cassette inside, and cover. Incubate at 4 °C with gentle stirring.
NOTE: Use extruded polystyrene foam and an elastic band to attach the dialysis cassette so that it will float in the PBS. The cassette may swell slightly due to the ML buffer. - After 1-2 h, replace with fresh 1× PBS and continue to incubate at 4 °C for another 8-10 h with slight stirring.
NOTE: This can also be done overnight. - Replace with fresh 1× PBS once more, incubating at room temperature for 1-2 h.
- Pre-wet a 0.5-3 mL 10 kDa molecular weight cut-off dialysis cassette by submerging it in PBS for 1 min.
- Concentration of virus solution
- Remove the dialysis cassette from the dialysis buffer (Figure 4C) and place it into a small, sealable plastic bag. Add 15-25 mL of 40% 20,000 MW polyethylene glycol so that the dialysis cassette is completely submerged.
- Incubate at room temperature with rocking. Check the volume of virus in the cassette periodically using a 5 or 10 mL syringe and an 18 G × 1.5 inch blunt-fill needle.
NOTE: The amount of time required to concentrate the virus will vary based on starting volume and desired end volume. Typically, the final desired volume is between 1 and 1.5 mL regardless of the starting volume of allantoic fluid. When checking the volume, be careful not to use the same port, as this will compromise port integrity and may result in the mixing of the polyethylene glycol solution and the virus. - Before removing the concentrated virus from the dialysis cassette, briefly rinse the cassette in 1× PBS and fill an 18 G × 1.5 inch blunt-fill needle with air.
- Insert the air-filled syringe into the dialysis cassette and depress the plunger. Rotate the apparatus so that the concentrated virus can be removed without removing any of the introduced air.
- Dispense the concentrated virus into a 50 mL conical tube, noting the volume dispensed.
- Using the same syringe and needle, inject an appropriate amount of 60% sucrose into the dialysis cassette so that, when combined with the previously removed virus, it is at a final concentration of 5% sucrose.
- Use gloved fingers to massage the membrane to dislodge residual virus that may have adhered to the membrane, being careful not to damage it. Remove some of the excess air in the dialysis cassette to ease the dislodging process.
- Combine this wash with the virus already in the 50 mL conical tube.
NOTE: The virus is now in 5% sucrose and ready to be dispensed into 20 µL, 50 µL, 100 µL, or 200 µL aliquots and stored at -80 °C. Alternatively, for long-term storage, NDV can be lyophilized and stored at 4 °C as described in section 2.6.
Access restricted. Please log in or start a trial to view this content.
Results
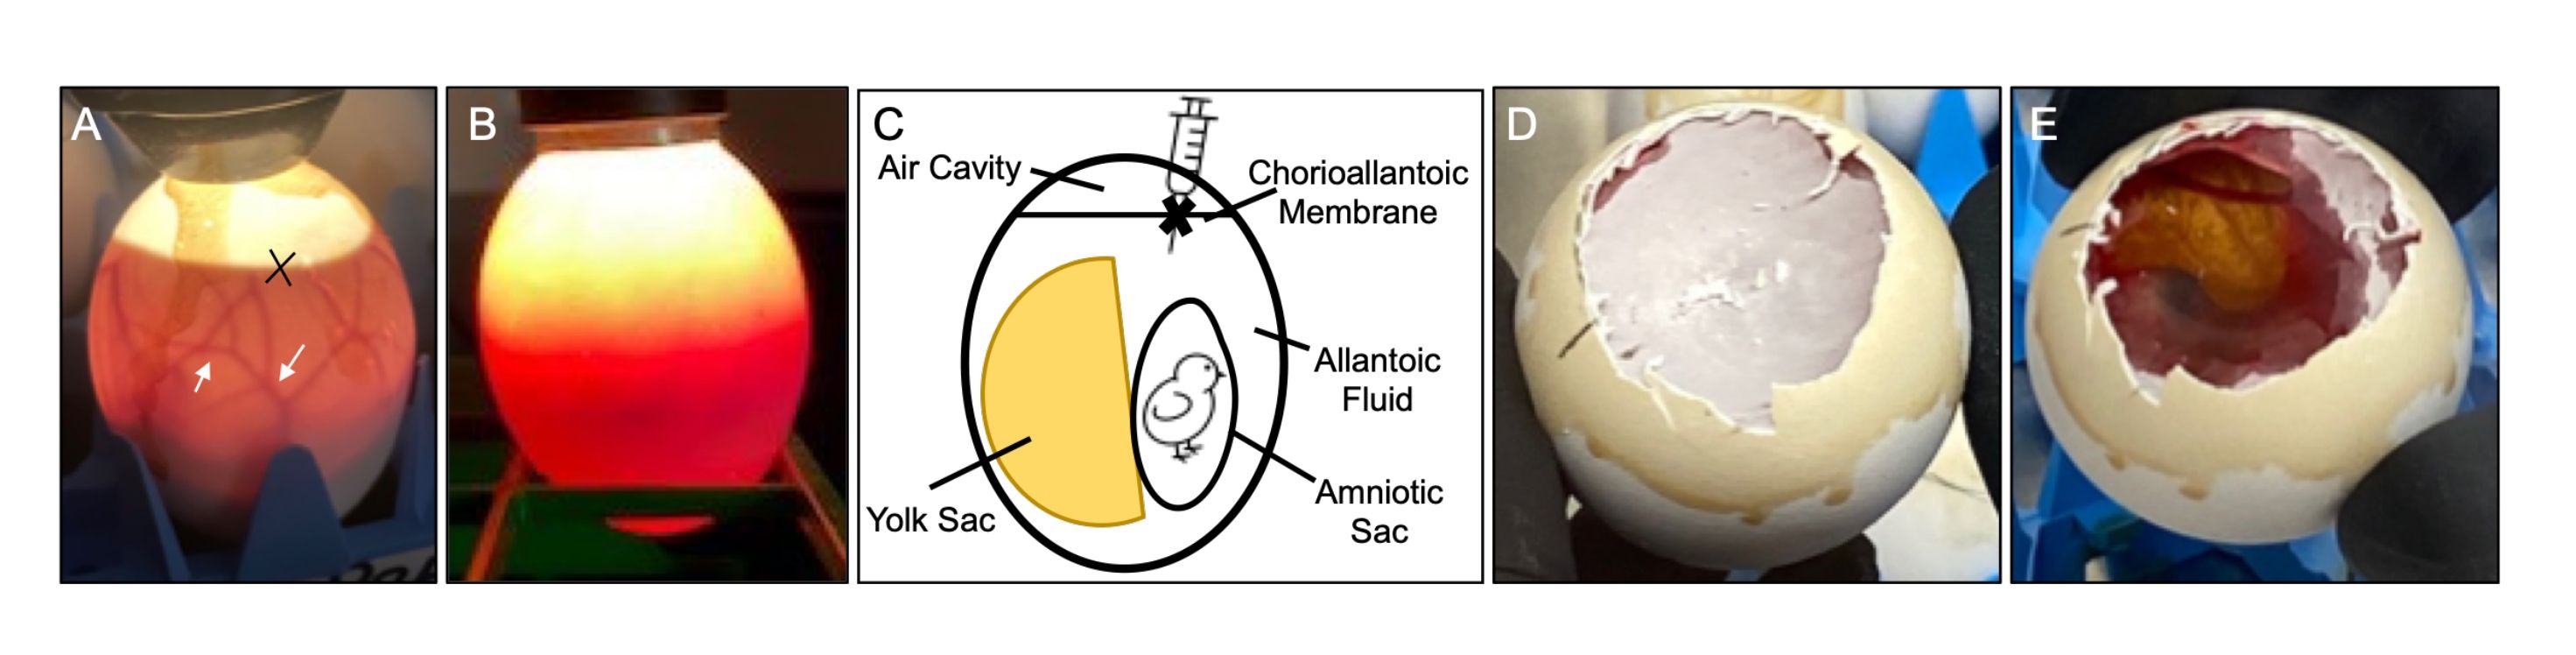
Figure 1: Infection and harvest of NDV from specified pathogen-free embryonated chicken eggs. (A) Web-like vasculature (arrows) should be apparent after 9 days of incubation in addition to embryo movement. 'X' den...
Access restricted. Please log in or start a trial to view this content.
Materials
| Name | Company | Catalog Number | Comments |
|---|---|---|---|
| 1 mL Slip-Tip Syringe | BD | 309659 | |
| 10 mL Luer-Lok Syringe | BD | 302995 | |
| 10% Povidone Iodine Solution | LORIS | 109-08 | |
| 15 mL Conical Tubes | Thermo-Fisher | 14955240 | |
| 18G x 1 1/2 in Blunt Fill Needle | BD | 305180 | |
| 18G x 1 1/2 in Precision Glide Needle | BD | 305196 | |
| 25 G x 5/8 in Needle | BD | 305122 | |
| 5 mL Luer-Lok Syringe | BD | 309646 | |
| Acetic Acid, Glacial | Thermo-Fisher | A38-212 | |
| Agarose | Froggabio | A87-500G | |
| Alexa-Fluor 488 Goat-Anti-Mouse | Invitrogen | A11001 | |
| Allegra X-14 Centrifuge | Beckman Coulter | B08861 | |
| Ammonium Persulfate | BioRad | 161-0700 | |
| Bleach (5%) | Thermo-Fisher | 36-102-0599 | |
| Broad, unserrated tipped forceps | Thermo-Fisher | 09-753-50 | |
| Bromophenol Blue | Sigma-Aldrich | 114405-25G | |
| Centramate Cassette Holder | PALL | CM018V | |
| ChemiDoc XRS+ | BioRad | 1708265 | |
| Digital 1502 Sportsman Egg Incubator | Berry Hill | 1502W | |
| D-Mannitol | Sigma-Aldrich | M4125-500G | |
| Egg Candler | Berry Hill | A46 | |
| Ethanol (70%) | Thermo-Fisher | BP82031GAL | |
| Female Threaded Tee fittings, nylon, 1/8 in NPT(F) | Cole-Parmer | 06349-50 | |
| Humidity Kit | Berry Hill | 3030 | |
| Iodixanol | Sigma-Aldrich | D1556 | 60% (w/v) solution of iodixanol in water (sterile) |
| L-Lysine Monohydrochloride | Sigma-Aldrich | 62929-100G-F | |
| Male and Female Luer-Lok a 1/8 in national pipe thread, NPT | Cole-Parmer | 41507-44 | |
| Masterflex L/S Digital Drive | Cole-Parmer | RK-07522-20 | Peristaltic Pump with digital display |
| Masterflex L/S Easy Load Pump Head for Precision Tubing | Cole-Parmer | RK-07514-10 | |
| Masterflex Silicon tubing (Platinum) L/S 16 | Cole-Parmer | 96420-16 | BioPharm Platinum-Cured Silicone |
| Omega Membrane LV Centramate Cassette, 100K | PALL | OS100T02 | |
| Optima XE-90 Ultracentrifuge | Beckman Coulter | A94471 | |
| PBS 10X Solution | Thermo-Fisher | BP399-20 | |
| Poly(Ethylene Glycol) Average Mn 20,000 | Sigma-Aldrich | 81300-1KG | |
| Slide-a-lyzer Dialysis Cassette (Extra Strength), 10,000 MWCO 0.5-3 mL | Thermo-Fisher | 66380 | |
| Sodium Hydroxide (Pellets) | Thermo-Fisher | S318-10 | |
| Specific pathogen free eggs | CFIA | NA | Supplier will vary depending on location |
| Sucrose | Thermo-Fisher | S5-3 | |
| Supracap 50 Depth Filter | PALL | SC050V100P | |
| Surgical Scissors | Thermo-Fisher | 08-951-5 | |
| Sw41Ti Rotor | Beckman Coulter | 331362 | Used in protocol step 2.3.1, 2.3.6, 2.3.7 |
| SX4750 Rotor | Beckman Coulter | 369702 | |
| SxX4750 Adaptor for Concial-Bottom Tubes | Beckman Coulter | 359472 | |
| Thin-Wall Ultraclear centrifuge tubes (9/16 in x 3 1/2 in) | Beckman Coulter | 344059 | |
| Tubing Screw Clamp | PALL | 88216 | |
| Utility Pressure Gauges | Cole-Parmer | 68355-06 |
