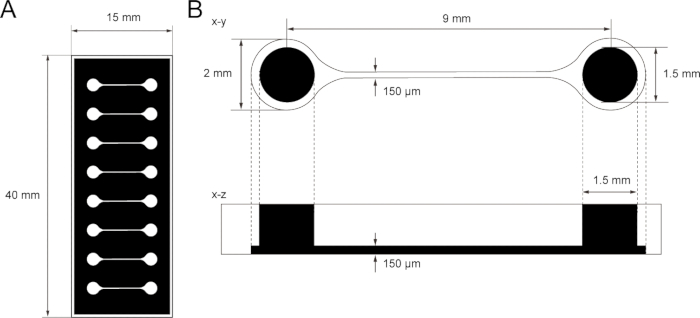
1. SU-8 mold fabrication by photolithography
NOTE: This procedure involves hazardous chemicals. Use fume hood and PPE throughout.
- Clean the silicon wafer (4-inch in diameter, 1-mm thickness, polished) with acetone and blow with nitrogen gas. Then bake at 180 °C for 3 min to dry.
- Dispense 3 mL of SU-8 2100 on to a cleaned wafer.
- Coat the SU-8 uniformly on the wafer using a spin coater at 500 rpm for 10 s and then, sequentially spin at 1500 rpm for 30 s with an acceleration of 300 rpm/s to obtain a 150 µm thick layer of SU-8.
NOTE: Make sure that the silicon wafer is positioned at the center of the spin coater and correctly fixed by vacuum.
- Soft bake the wafer on the hot plate at 50 °C for 10 min, at 65 °C for 7 min, and at 95 °C for 45 min.
- Set the photomask (Figure 1) to the mask aligner and expose UV light (365 nm) for 60 s.
NOTE: Exposure time needs to be optimized by an appropriate dose of UV light.
- After exposure, bake the wafer at 65 °C for 6 min, and at 95 °C for 13 min on the hot plate.
- Develop the wafer for 10-20 min in SU-8 developer with agitation using an orbital shaker, changing the developing solution once during the process.
NOTE: Extend the developing time when the debris of SU-8 remains.
- Rinse the wafer in isopropanol and gently dry the wafer with nitrogen gas.
- Measure the height of the deposited SU-8 by a measuring microscope and make sure it is approximately 150 µm thick. It can be stored indefinitely at room temperature.
2. Polydimethylsiloxane (PDMS) microfluidic-based tissue culture chip fabrication
- Fix the SU-8-deposited wafer to a container (e.g., 15 cm plastic Petri dish) by double-sided tape.
- Blow the dust off the wafer using nitrogen gas.
- To silanize, put the SU-8-deposited wafer in a vacuum chamber together with a small container (e.g., 35 mm dish). Drop 10 µL of (tridecafluoro-1,1,2,2-tetrahydrooctyl)-1-trichlorosilane into the small container. Do not directly apply the (tridecafluoro-1,1,2,2-tetrahydrooctyl)-1-trichlorosilane to SU-8 wafer.
- Close the vacuum chamber tightly and turn on a vacuum pump for at least 2 h.
- Take a plastic cup and pour the silicone elastomer (e.g., Silpot 184 or equivalently, Sylgard 184) and the curing agent at a 10:1 weight ratio. Then, mix well using a spatula and degas in the vacuum chamber until bubbles are removed entirely.
- Pour the PDMS mixture into the container with the SU-8 wafer to the desired thickness (3-4 mm) and degas again to remove bubbles.
- Bake the PDMS in an oven at 60 °C for at least 3 hours to fully cure the PDMS.
- After cooling, cut off the cured PDMS from the wafer by using a scalpel or a razor blade.
- To create the two chambers of the tissue culture chip, punch two holes where the two compartments are located by using a 1.5 mm diameter biopsy punch.
- To create a medium reservoir, prepare another PDMS mixture (silicone elastomer and the curing agent at a 10:1 weight ratio) and pour it into a new 10 cm Petri dish. Adjust the pouring volume to 5 mm of thickness of PDMS.
- Bake the PDMS in an oven at 60 °C for at least 3 hours to fully cure the PDMS.
- After cooling the PDMS, cut off the cured PDMS with a scalpel to get a rectangular ring.
- Bond the bottom layer with the medium reservoir by applying uncured PDMS between them and baking the assembled PDMS layers. This bonded structure results in the PDMS tissue culture chip.
- Clean the PDMS tissue culture chip by scotch tape to remove dust and small particles from the surface. PDMS tissue culture chips can be stored at room temperature if protected from dust and UV.
3. Preparation of culture
- Culture medium
NOTE: All media listed below should be filtered for sterilization unless otherwise stated. Prepared media may be stored at 4 °C and used within a month.
- To prepare mTeSR Plus medium: combine one bottle of 100 mL mTeSR Plus 5x supplement with one bottle of 400 mL of mTeSR Plus Basal Medium.
- To prepare 100 mL of KSR medium: In 85 mL of Dulbecco's Modified Eagle Medium or DMEM/F12, add 15 mL of Knockout serum replacement (KSR, 15%), 1 mL of commercial glutamine supplement (1%) and 1 mL of non-essential amino acid (NEAA, 1%).
- To prepare 100 mL of N2 medium: In 100 mL of Neurobasal medium, add 1 mL of N2 (100x), 1 mL of commercial glutamine supplement, and 1 mL of NEAA.
- To prepare 250 mL of Maturation medium: In 250 mL of Neurobasal medium, add 5 mL of B27 (2%), 2.5 mL of commercial glutamine supplement (1%), and 2.5 mL of Penicillin/Streptomycin (1%).
- Resuspend the compounds (retinoic acid (RA), SB431542, LDN-193189, SU5402, DAPT, SAG, Y-27632) in cell-culture-grade DMSO to the desired concentration. Prepare aliquots and store them at -20 °C for up to 6 months. The following stock solutions are used: 1 mM RA, 10 mM SB431542, 100 μM LDN-193189, 10 mM SU5402, 10 mM DAPT, 1 mM SAG, 10 mM Y-27632.
- Coating
NOTE: To prevent polymerization of the basement membrane matrix by heat, avoid repetitive freeze-thaw cycles. Handle all coating procedures with pre-cooled pipette tips and tubes if possible. The basement membrane matrix should be thawed overnight at 4 °C and aliquoted using pre-chilled pipette tips and tubes. The aliquots can be frozen at -20 °C or -80 °C.
- Thaw the frozen aliquot at 4°C on ice. The aliquot should be kept cold during the coating procedure. Using a pre-cooled pipette tip, dilute the basement membrane matrix with ice-cold DMEM/F12 at a ratio of 1:40. Unused diluted basement membrane matrix can be stored at 4 °C for 2-3 days, given that no polymerization occurred.
- Add 1 mL of the basement membrane matrix/DMEM-F12 solution to coat one well of the 6-well plate.
- Incubate the plate at room temperature for at least an hour, or 4 °C overnight. Coated plates can be stored at 4 °C for a maximum of one week.
4. Maintenance of iPS cells
- Prepare basement membrane matrix-coated dishes as previously mentioned in step 3.2.
- Fully aspirate the mTeSR Plus medium. Wash the well once with PBS and add 0.5 mL of passaging reagent (see Table of Materials). Wait a few seconds and aspirate the solution.
- Incubate the plate at 37 °C in the incubator for 5 min or until cells become round.
NOTE: Incubation time might vary between different iPS cell lines and the confluency. Please check periodically under the microscope to determine the dissociation time during the incubation.
- Add 1 mL of mTeSR Plus medium and tap the plate for 30-60 s to detach the colonies.
- Gently mix 1 mL of the cell suspension solution with 7 mL of fresh mTeSR plus medium. Do not pipette more than 5 times.
- Plate at a ratio of 1:8. Typically add 1 mL of the suspension from step 5.5 and add 1 mL of mTeSR plus media supplemented with 5-10 μM of Y-27632 (ROCK inhibitor). Passage dilution ratio depends on iPSC line.
- Place the cell in a 5% CO2/37 °C incubator. On the next day, remove Y-27632 by adding fresh mTeSR Plus medium. Thereafter, change media every other day initially, and every day as the cell reaches higher confluency.
5. Differentiation of iPS cells into motor neurons
- Passaging iPSC for motor neuron differentiation
NOTE: Differentiation can be successfully conducted in 3D (5.2) protocol.
- Allow undifferentiated iPS cells to grow until they reach a confluency of approximately 80% in mTeSR Plus medium in a 6-well plate.
- Completely aspirate the medium. Immediately wash the well once with sterile PBS and add 0.5 mL of cell dissociation solution to the cells.
- Incubate the plate at 37 °C in the incubator for approximately 2-3 min, or until cells become separated and round but remain attached to the well.
- Add 1 mL of medium and gently pipette up and down a few times using a 5 mL serological pipette. Transfer the cell suspension to a 15 mL tube consisting of 4 mL of the medium.
- Centrifuge at 200 x g for 3 min.
- Carefully aspirate the supernatant, leaving the pellet undisturbed, and resuspend the cells in 1 mL of the medium supplemented with 10 µM of Y-27632.
- Count the cells using a hemocytometer and proceed to either 5.2 (3D differentiation).
- Formation of motor neuron spheroid (MNS) in 3D differentiation ("3D protocol")
NOTE: A complete medium change is done daily from Days 0-12 of differentiation (Figure 2).
- Seed the iPS cells from step 5.1.7 to a 96 well U bottom plate at 40,000 cells/well in 100 µL of mTeSR Plus supplemented with 10 µM of Y-27632.
- On the next day, replace each well with 100 µL of the fresh medium.
- On days 0 and 1: Aspirate the culture medium and replace with 100 µL of KSR medium (3.1.2) supplemented with 10 µM SB431542 and 100 nM LDN-193189.
- On days 2 and 3: Aspirate the culture medium and replace with 100 µL of KSR medium supplemented with 10 µM SB431542, 100 nM LDN-193189, 5 µM DAPT, 5 µM SU5402, 1 µM RA and 1 µM SAG.
- On days 4 and 5: Prepare a mixed medium consisting of 75% KSR medium and 25% N2 medium (3.1.3). Then, aspirate the culture medium and replace with 100 µL of mixed medium supplemented with 10 µM SB431542, 100 nM LDN-193189, 5 µM DAPT, 5 µM SU5402, 1 µM RA, and 1 µM SAG.
- On days 6 and 7: Prepare a mixed medium consisting of 50% KSR medium and 50% N2 medium. Then, aspirate culture medium and replace it with 100 µL of mixed medium supplemented with 5 µM DAPT, 5 µM SU5402, 1 µM retinoic acid and 1 µM SAG.
- On days 8 and 9: Prepare a mixed medium consisting of 25% KSR medium and 75% N2 medium. Then, aspirate culture medium and replace with 100 µL of mixed medium supplemented with 5 µM DAPT, 5 µM SU5402, 1 µM RA and 1 µM SAG.
- On days 10 and 11: Replace medium with 100 µl of N2 medium supplemented with 5 µM DAPT, 5 µM SU5402, 1 µM RA and 1 µM SAG.
- On day 12: Proceed to transfer the MNs into the tissue culture chip (Step 6) or replace medium with 100 µL of the Maturation medium (3.1.4) supplemented with 20 ng/mL brain-derived neurotrophic factor (BDNF).
NOTE: The MNS can be transferred to the tissue culture chip starting from day 12 until day 19. Spheroids that are not transferred should be kept cultured in 96 well U bottom plates in Maturation medium supplemented with 20 ng/mL BDNF until transfer.
6. Preparation of the tissue culture chip for motor nerve organoid (MNO) formation
- Sterilize the prepared PDMS (from step 2.13) by immersing it in 70% ethanol in the Petri dish for at least 1 h.
NOTE: All following steps should be manipulated in a biosafety cabinet.
- Sterilize the microscope glass (76 x 52 mm) by immersing it in 70% ethanol in the Petri dish.
- During the drying process of the microscope glass, place the PDMS device on the half wet-microscope glass and let it dry completely by waiting overnight. Once it is completely dried, the PDMS device should adhere to the glass.
NOTE: This bonding is not permanent to allow detaching of the PDMS devices from the microscope glass after the culture for tissue collection. Permanent bonding by oxygen plasma can be used to maximize adhesion between PDMS and glass, but it would prohibit disassembly of the chips and tissue collection.
- Coat the surface of the microchannel in PDMS device and microscope glass with 30 μL of diluted basement membrane matrix in DMEM/F12 (1:40) by making a droplet on one side of the inlet of the channel and then aspirate the solution from the other side of the inlet with a pipette or suction pump (Figure 3A). Do not aspirate too much volume of solution to avoid bubble contamination.
- Then, incubate the PDMS device for 1 hour at room temperature or overnight at 4 °C in a secondary container (e.g., Petri dish).
7. Motor nerve organoid (MNO) formation
- Replace the coating solution with pre-warmed 150 µL of Maturation medium supplemented with 20 ng/mL of BDNF just before use.
- Then, place the MNS from step 5.2.9 into the inlet of the microchannel using a micropipette with a wide-bore tip. MNS can spontaneously settle down at the bottom of the device by gravity. Do not apply too much pressure when injecting the MNS (Figure 3B).
NOTE: If the MNS is stuck on the sidewall of a hole in a tissue culture chip, gently aspirate the solution from another side of the inlet.
- Fill a small reservoir (e.g., a cap of 15 mL tube) with sterile water and place it nearby the tissue culture chip in the secondary container to prevent medium evaporation. Then, place it in a 5% CO2/37 °C incubator.
- For a medium change, aspirate the exhausted culture medium from the center of the medium reservoir (Figure 3C). Do not aspirate all the medium and the tissue.
- Gently add fresh Maturation medium (with BDNF). The medium should be changed every 2-3 days. Do not dry the culture medium at any time during the culture. Axons grow from an MNS into the channel and spontaneously assemble into a single bundle in 2-3 weeks, which result in the formation of an MNO. MNO can be cultured for more than additional 1 month in the device.