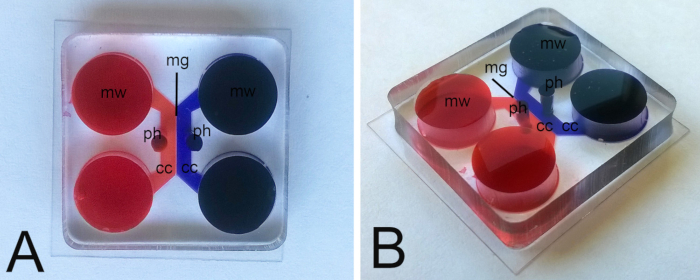
All procedures involving sample collection have been performed in accordance with the institute's IRB guidelines.
1. Preparation of Dissection Material, Culture Media, Microfluidic Devices
- Autoclave micro-dissection forceps and scissors (121 °C, sterilization time: 20 min) and store them in a sterile container.
- Sterilize glass coverslips (24 mm x 24 mm) by incubating them in 1 M HCl for 24 hr on an orbital shaker at 37 °C. Wash them thrice with sterile, distilled H2O and three times with ethanol 99%. Then dry the coverslips at 37 °C or under a sterile flow hood. Finally, autoclave or expose the coverslips to UV light (30 min) to complete the sterilization. Coverslips can then be stored in ethanol 70%.
- Using sterile forceps, carefully remove the AXIS Axon Isolation Devices from the package and place them in a sterile Petri dish.
- Using a sterile biopsy punch (ø: 1mm) create one hole per sample to be cultured (Figure 1) in correspondence of the culture chambers.
NOTE: Do not punch too close to the microgrooves, as they may be damaged by the pressure applied.
- Sterilize the AXIS Axon Isolation Devices by immersing them in ethanol 70%. Then dry the AXIS Axon Isolation Devices and coverslips completely under a sterile flow hood. Wait a minimum of 3 hr before proceeding.
NOTE: Incomplete drying will result in defective assembly of the microfluidic devices.
- Place each coverslip into a 35 mm Petri dish or a well within a 6-well plate.
- Place the AXIS Axon Isolation Device onto the coverslip and press gently but firmly with forceps with bent ends to allow full adhesion between the isolation device and the glass coverslip.
- In each culture chamber, pipette 150 μl of poly-D-lysine (0.1 mg/ml in sterile, distilled H2O). Place the microfluidic devices under a vacuum for 5 min, to remove all the air from the culture chambers.
- If air can still be seen within the chambers, re-pipette the poly-D-lysine solution into the chambers.
- Incubate the devices with poly-D-lysine O/N at 37 °C.
- Wash chambers three times with sterile, distilled H2O.
- Fill chambers with 150 μl laminin working solution (Sigma-Aldrich, 5 μg/ml, in phosphate-buffered saline (PBS) or serum-free medium), and incubate O/N at 37 °C.
- Prepare 50 ml of medium for trigeminal ganglia cultures with the following composition: 48 ml Neurobasal medium, 1 ml B-27, 100 U/ml penicillin/streptomycin, 2 mM L-glutamine, 5 ng/ml nerve growth factor (NGF), 0.25 pM cytosine arabinoside.
- Prepare 50 ml of medium for tooth germ cultures with the following composition: 40 ml Dulbecco's Modified Eagle's Medium (DMEM)-F12, 10 ml fetal bovine serum (FBS, final concentration: 20%), 100 U/ml penicillin/streptomycin, 2 mM L-glutamine, 150 μg/ml ascorbic acid.
2. Mouse Embryo Generation and Dissection
- Determine embryonic age based on the vaginal plug (vaginal plug: embryonic day of development 0.5, E0.5) and confirm it via morphological criteria. For this protocol, we generally use E14.5-E17.5 mouse embryos.
- Clean the dissection area and the stereoscope with ethanol 70%.
- Sacrifice the pregnant mother via cervical dislocation. Position the mouse's neck between the first and second fingers on a grid, and decisively pull the tail.
- Dissect the skin around the lower abdomen and open the abdomen using scissors. Locate the uterus: during the late stages of pregnancy, the uterus abundantly fills the abdominal cavity.
- Dissect out the uterus and place it in a tube filled with PBS on ice. When on ice, the tissue can be left for several hours. Discard the corpse of the mother according to institutional guidelines.
- Dissect the embryos from the uterus and free them from their extraembryonic tissues. Place the embryos in PBS on ice.
- Decapitate the embryos using scissors and separate the lower jaw from the rest of the head using micro-dissection scissors (Figure 2A). Remove the lower jaw precisely, without damaging the trigeminal ganglia; as the latter are localized in close proximity to the lower jaw, their accidental damage is possible. Preserve the lower jaw and the rest of the head in cold PBS, on ice.
- To dissect trigeminal ganglia (TG), take the head and place it onto a dissection glass Petri dish, previously filled with cold PBS. Using the forceps, remove the skin and the skull. Then remove the telencephalon and the cerebellum by placing forceps below the telencephalon and lift; the telencephalon and the cerebellum will flip together, leaving the bottom of the skull exposed.
- Localize the trigeminal ganglia (Figure 2B). Use forceps to separate the TG from the trigeminal nerves. Eliminate the remnants of the trigeminal projections using the dissection needles as knives. Place the dissected TG in a Petri dish filled with cold PBS and keep them on ice.
- To dissect embryonic teeth, place the lower jaw, previously separated from the skull, onto the dissection glass Petri dish, filled with cold PBS. Using dissection needles as knives, remove the tongue and the skin surrounding the jaw. Separate the left and the right hemi-jaws by cutting along the midline of the jaw. The tooth germs are easily visible, as shown in Figure 2C. Isolate the tooth germs using dissection needles and remove excess non-dental tissues. Place the dissected tooth germs in a Petri dish filled with cold PBS and keep them on ice.
3. Microfluidic Co-cultures
- After dissection, remove laminin from the microfluidic devices. Fill the chambers with 200 μl of the respective media.
- With forceps, gently transfer the dissected TG and tooth germs into the holes created by punching (Figure 2D). Make sure that the tooth germs do not float and that they sink until they contact the coverslips.
- Culture the samples in an incubator at 37 °C, 5% CO2.
- Change the culture medium every 48 hr. Do not empty the chambers completely, and do not pipette directly into the culture chambers.
Complete emptying of chambers would result in the formation of air bubbles within the chambers; direct pipetting into the chamber would result in axonal damage. To avoid these issues, remove the medium pointing the pipette towards the external side of the wells; similarly, pipette the fresh medium on the side of the wells located opposite to the chambers.
- Co-cultures can be easily imaged by time-lapse microscopy during the culture period and can be maintained for over 10 days.
- After the culture period, wash the chambers by pipetting 150 μl of PBS into one well per chamber, and letting PBS flow through the chambers three times.
- Remove the PBS and fix the samples by pipetting 150 μl of paraformaldehyde 4% (in PBS) in one well per chamber; incubate at RT for 15 min. Wash the chambers twice with PBS as described in 3.6.
- Proceed with further analysis.