1. Larval Glue Dissection
- Thoroughly mix 10 parts of silicone elastomer base with 1 part of silicone elastomer curing agent from the elastomer kit (Table of Materials).
- Coat 22 x 22 mm glass coverslips with the elastomer and cure on a hot plate at 75 ˚C for several hours (until no longer sticky to the touch).
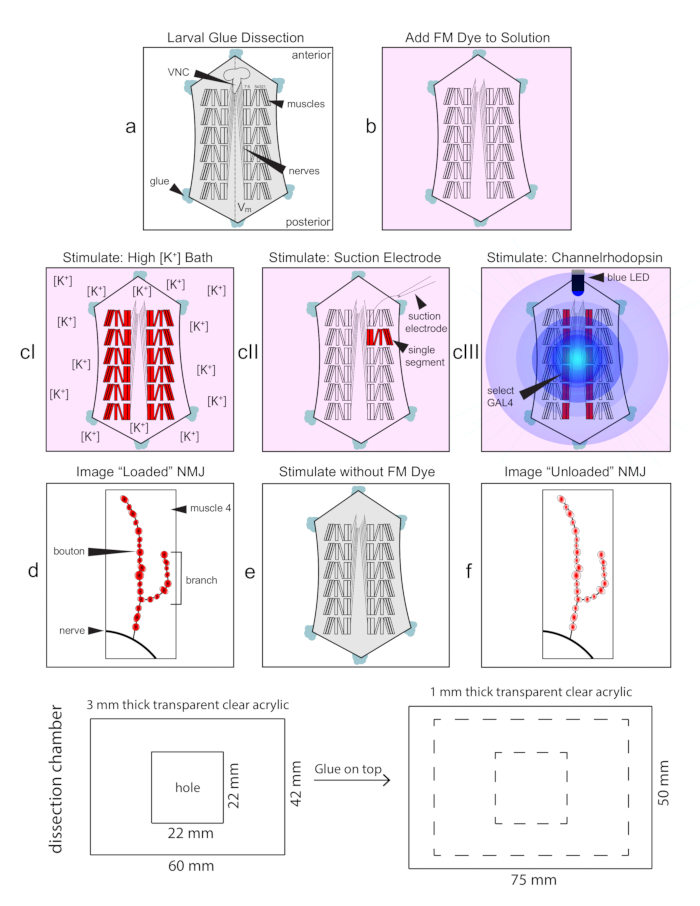
- Place a single elastomer-coated glass coverslip into the custom-made plexiglass dissection chamber (Figure 1, bottom) in preparation for the larval dissection.
- Prepare the glue pipettes from borosilicate glass capillary using a standard microelectrode puller to obtain the desired taper and tip size.
- Gently break off the micropipette tip, and to the other end, attach 2 ft of flexible plastic tube (1/32" interior diameter, ID; 3/32" outside diameter, OD; 1/32" wall; Table of Materials) with mouth fitting (P2 pipette tip).
- Fill a small container (0.6 mL Eppendorf tube cap) with a small volume (~20 μL) of glue (Table of Materials) in preparation for the larval dissection.
- Fill the chamber with saline (in mM): 128 NaCl, 2 KCl, 4 MgCl2, 1 CaCl2, 70 sucrose, and 5 2-[4-(2-hydroxyethyl)piperazin-1-yl]ethanesulfonic acid (HEPES) pH 7.2.
- Add anti-horse radish peroxidase (HRP) antibody conjugated to Alexa Fluor 647 (anti-HRP:647; dilute 1:10 from a 1 mg/mL stock) for labeling the neuromuscular junction (NMJ) presynaptic terminal during dissection.
- Using a fine paintbrush (size 2), remove a wandering third instar larva from the food vial and place it onto the elastomer-coated cover glass.
- Fill the glass micropipette tip with a small volume of glue using negative air pressure generated by mouth with attachment (step 1.5).
- Position larva dorsal side up with forceps and glue the head to the elastomer-coated coverslip with a small drop of glue using positive air pressure by mouth.
- Repeat this procedure with the posterior end of the larva, making sure that the animal is stretched taut between the two glue attachments.
- Using scissors (blades 3 mm; Table of Materials), make a horizontal cut (~1 mm) at posterior and a vertical cut all along the dorsal midline.
- Using fine forceps (#5, Table of Materials), gently remove dorsal trachea, gut, fat body and other internal organs covering the musculature.
- Repeat the gluing procedure for the four body wall flaps, making sure to gently stretch the body wall both horizontally and vertically.
- Lift the ventral nerve cord (VNC) using forceps, carefully cut the motor nerves with scissors, and then completely remove the VNC.
- Replace the dissection saline with Ca2+-free saline (same as the above dissection saline without the CaCl2) to stop synaptic vesicle (SV) cycling.
2. Imaging: Confocal Microscopy
- Use an upright confocal microscope with a 40X water immersion objective to image NMJ dye fluorescence (other microscopes can be used).
- Image muscle 4 NMJ of abdominal segments 2-4 (other NMJs can be imaged) and collect images using appropriate software (Table of Materials).
- Use a HeNe 633 nm laser to excite HRP:647 (with long-pass filter > 635 nm) and an Argon 488 nm laser to excite FM1-43 (with bandpass filter 530-600 nm).
- Operationally determine optimal gain and offset for both channels.
NOTE: These settings will remain constant throughout the rest of the experiment.
- Take a confocal Z-stack through the entire selected NMJ from the HRP-marked top to bottom of the synaptic terminal.
- Take careful note of the NMJ imaged (segment, side and muscle) to ensure excess to the exact same NMJ after FM dye unloading.
3. Channelrhodopsin Stimulation FM Dye Loading
- Raise ChR2-expressing larvae on food containing the ChR2 co-factor all-trans retinal (dissolved in ethanol; 100 μM final concentration).
- Place the larval preparation in the plexiglass chamber on a dissection microscope stage equipped with a camera port.
- Attach a blue LED (470 nm; Table of Materials) to a programmable stimulator using a coaxial cable and place the LED into the camera port.
- Focus the blue LED light beam onto the dissected larval function using the microscope zoom function.
- Replace the Ca2+-free saline on the larval preparation with above FM1-43 saline (4 μM; 1 mM CaCl2) on the optogenetic stage.
- Set the LED parameters using the stimulator (e.g., 15 V, 20 Hz frequency, 20 ms duration and time of 5 min (Figure 2)).
- Start the light stimulation and track with a timer for the pre-determined duration of the optogenetic stimulation period (e.g., 5 min; Figure 2).
- When the timer stops, quickly remove the FM dye solution and replace with Ca2+-free saline to stop the SV cycling.
- Wash in quick succession with the Ca2+-free saline (5x for 1 min) to ensure the FM dye solution is completely removed.
- Maintain the larval preparation in fresh Ca2+-free saline for immediate imaging with the confocal microscope using imaging protocol.
- Take careful note of the NMJ imaged (segment, side and muscle) to ensure access to the exact same NMJ after FM dye unloading.
4. Channelrhodopsin Stimulation: FM Dye Unloading
- Replace Ca2+-free saline with regular saline (without FM1-43 dye) on the dissection microscope stage with camera port LED focused on the larva.
- Set the stimulator parameters for unloading (e.g., 15 V, 20 Hz frequency, 20 ms duration and time of 2 min (Figure 2).
- Start the light stimulation and track with a timer for the pre-determined duration of the optogenetic stimulation period (e.g., 2 min; Figure 2).
- When the timer period ends, quickly remove the FM dye solution and replace with Ca2+-free saline to stop the SV cycling.
- Wash in quick succession with Ca2+-free saline (5x for 1 min) to ensure the external dye is completely removed.
- Maintain the larval preparation in fresh Ca2+-free saline for immediate imaging with the confocal microscope.
- Ensure to image the FM1-43 dye fluorescence at the same NMJ noted above using the same confocal settings.