Self-assembled monolayers (SAMs) formed from long chain alkane thiols on gold provide well-defined substrates for the formation of protein patterns and cell confinement. Microcontact printing of hexadecanethiol using a polydimethylsiloxane (PDMS) stamp followed by backfilling with a glycol-terminated alkane thiol monomer produces a pattern where protein and cells adsorb only to the stamped hexadecanethiol region.
A subscription to JoVE is required to view this content. Sign in or start your free trial.
Method Article
Creating Two-Dimensional Patterned Substrates for Protein and Cell Confinement
In This Article
Summary
Abstract
Microcontact printing provides a rapid, highly reproducible method for the creation of well-defined patterned substrates.1 While microcontact printing can be employed to directly print a large number of molecules, including proteins,2 DNA,3 and silanes,4 the formation of self-assembled monolayers (SAMs) from long chain alkane thiols on gold provides a simple way to confine proteins and cells to specific patterns containing adhesive and resistant regions. This confinement can be used to control cell morphology and is useful for examining a variety of questions in protein and cell biology. Here, we describe a general method for the creation of well-defined protein patterns for cellular studies.5 This process involves three steps: the production of a patterned master using photolithography, the creation of a PDMS stamp, and microcontact printing of a gold-coated substrate. Once patterned, these cell culture substrates are capable of confining proteins and/or cells (primary cells or cell lines) to the pattern.
The use of self-assembled monolayer chemistry allows for precise control over the patterned protein/cell adhesive regions and non-adhesive regions; this cannot be achieved using direct protein stamping. Hexadecanethiol, the long chain alkane thiol used in the microcontact printing step, produces a hydrophobic surface that readily adsorbs protein from solution. The glycol-terminated thiol, used for backfilling the non-printed regions of the substrate, creates a monolayer that is resistant to protein adsorption and therefore cell growth.6 These thiol monomers produce highly structured monolayers that precisely define regions of the substrate that can support protein adsorption and cell growth. As a result, these substrates are useful for a wide variety of applications from the study of intercellular behavior7 to the creation of microelectronics.8
While other types of monolayer chemistry have been used for cell culture studies, including work from our group using trichlorosilanes to create patterns directly on glass substrates,9 patterned monolayers formed from alkane thiols on gold are straight-forward to prepare. Moreover, the monomers used for monolayer preparation are commercially available, stable, and do not require storage or handling under inert atmosphere. Patterned substrates prepared from alkane thiols can also be recycled and reused several times, maintaining cell confinement.10
Protocol
1. Preparation of the Patterned Master (Figure 1)
- Center the silicon wafer on the spin-coater and rinse the wafer with acetone during the initial step of the two-cycle spin program in Table 1. The acetone will evaporate during the second step of the spin program leaving a clean, dry wafer.
- Apply approximately 1 mL AZ9245 photoresist/in (in diameter) to the wafer and spin-coat using the conditions described in Table 1.
- Soft-bake the photoresist-coated wafer at 110°C for 2 m using a high-uniformity hotplate.
- Photopattern the substrate using either a direct-write photolithography system or a mask aligner system and appropriate mask. Masks can be purchased from a number of commercial sources. Additionally, transparencies printed with UV absorbent ink, taped to an optical flat, may be used to produce patterns with large features.
- Develop the patterned wafer in 1:2 400K developer:semi-conductor grade deionized water for 1 m 45 s with gentle agitation. Rinse thoroughly with semi-conductor grade deionized water and dry with a stream of nitrogen (N2) gas. Pattern development can be checked using a microscope with a UV filter. If the pattern is not fully developed, the wafer can be returned to the developing solution for additional time.
Note: For best results, photopatterning should be carried out in a cleanroom environment.
2. Preparation of PDMS Stamp (Figure 2)
- Prepare a 10:1 by weight resin:hardener mixture of Sylgard 182 (PDMS) and completely cover the master (photopatterned wafer) with the mixture in a disposable petri dish.
- De-gas the PDMS-covered master in a vacuum dessicator until no bubbles are visible and allow the stamp to cure in an oven at 65°C for 1.5 h. Prior to curing, it is important make sure the master is at the bottom of the dish as it may rise to the surface during the de-gassing step.
- Cut the PDMS stamp out of the master and trim to the appropriate size. Store the stamp in a covered container (feature side up) to protect it from dust and debris.
3. Preparation of the Patterned Gold Substrate (Figure 3)
- Prepare 25 mm no. 1 round glass coverslips for metal deposition by treating them with oxygen plasma for 10 m. Rinse twice with 18.2 MΩ deionized water followed by twice with ethanol, drying with a stream of N2 gas between each step.
- Using a multi-pocket electron-beam deposition system, deposit 50 Å titanium followed by 150 Å gold. Do not vent the evaporator between deposition of the titanium layer and gold layer. Alternatively, gold-coated coverslips may be purchased from a variety of suppliers, however, it is important that the metal layers are prepared by electron-beam evaporation and not thermal evaporation. If purchased from an outside source, gold substrates may be cleaned by plasma oxidation or "piranha" (7:3 Conc. H2SO4:30% H2O2)11 prior to use.
Note: "Piranha" solution is explosive in the presence of organic compounds.
- Prepare the stamping solution, 10 mM hexadecanethiol in absolute ethanol, and the backfilling solution, 1 mM glycol-terminated thiol in absolute ethanol.
- Rinse the stamp with ethanol and dry thoroughly with N2 gas. Apply stamping solution to the PDMS stamp dropwise until fully coated. Dry the stamp thoroughly with N2 gas. Proceed to 5a or 5b as appropriate based on the features of the PDMS stamp.
-
- Gently press the stamp onto the gold substrate and allow the monolayer to form for 15 s.
- Place the gold substrate into a petri dish containing 18.2 MΩ deionized water, ensuring the substrate is submerged. Gently press the stamp onto the gold substrate and allow the monolayer to form for 15 s.
- Rinse the stamped substrate twice with ethanol, drying with N2 gas after each rinse and place the substrate in a petri dish.
- Cover the substrate with backfilling solution and seal the dish with parafilm to prevent evaporation.
- Allow the background monolayer to form in the dark for 12-14 h.
- Remove the patterned coverslip from the backfilling solution and rinse twice with ethanol, drying with N2 gas after each rinse.
4. Applying Protein and Cells to the Patterned Substrate
- Place the patterned coverslip in a small petri dish or cell culture chamber and cover with 500 μL to 1 mL of Dulbecco's Phosphate Buffered Saline (DPBS). The DPBS must completely cover the substrate during protein incubation to ensure even protein coverage.
- Add a concentrated solution of protein to the DPBS and mix the solution by pipeting several times. Incubate the protein mixture with the substrate at 37°C for 1 h. Final concentrations for laminin and fibronectin are typically 12 μg/mL and 20 μg/mL, respectively. Protein can be labeled with an amine reactive fluorescent dye to allow for easy pattern visualization. However, labeled protein should be mixed 1:1 with unlabeled protein as protein labeling can interfere with biological activity.
- After incubation, rinse the substrate thoroughly with DPBS (4-5x) to remove unbound protein, taking care not to dry the substrate or bring it through the air-water interface. After the first three rinses, add approximately 500 μL of complete cell growth media to maintain a wet substrate.
- Replace the growth media used to rinse the substrate with fresh media.
- Dissociate and count cells for plating onto the substrate. Either dissociated primary cells, such as hippocampal neurons, or immortalized cell lines, such as CHO-K1 cells, can be utilized.
- Plate dissociated cells onto the substrate. Typically 30 to 200 cells/mm2 are used.
5. Representative Results:
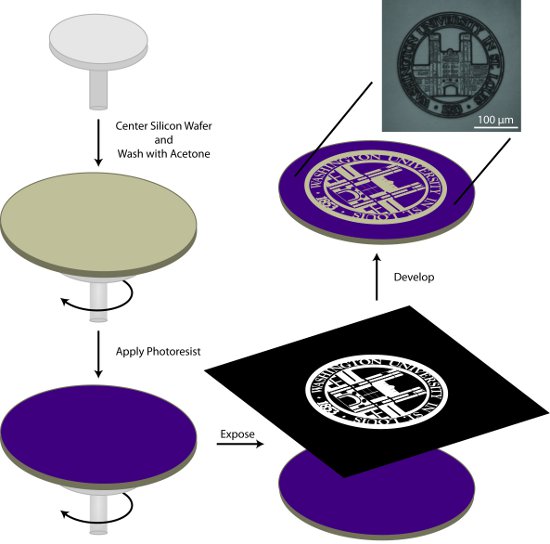
Figure 1.General schematic for the photolithographic preparation of a patterned master. In this process, a silicon wafer is cleaned with acetone, coated with photoresist, exposed to the pattern of interest, and the pattern is developed.
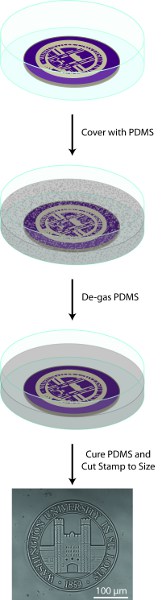
Figure 2. General schematic for PDMS stamp preparation. In this process, the patterned master is covered with Sylgard (10:1 resin:hardener), de-gassed in a vacuum desiccator, cured in an oven at 60°C, and cut to size.
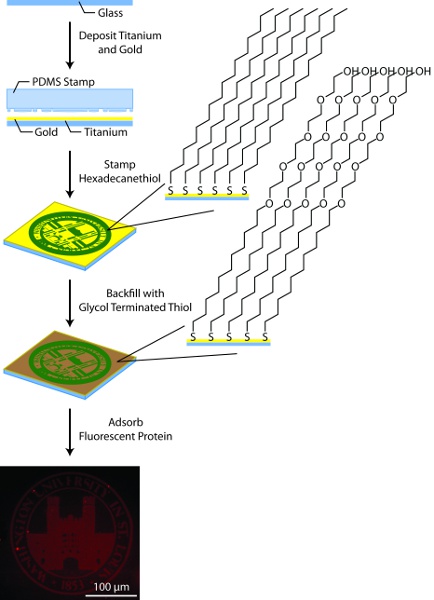
Figure 3. General schematic for substrate patterning. In this process, glass substrates are coated with titanium (50Å) and gold (150Å) using an electron beam evaporator, patterned by microcontact printing hexadecanethiol using a PDMS stamp, backfilled with glycol terminated alkane thiols, and coated with fluorescently-labeled protein.
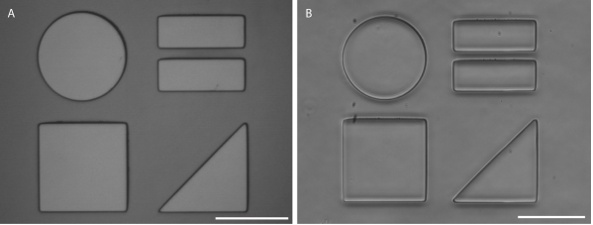
Figure 4. Patterned master (A) and PDMS stamp (B) prepared using the described methods. Scale bars are 100μm.
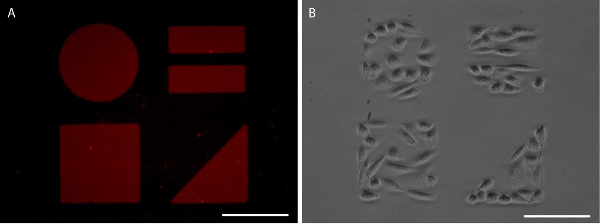
Figure 5. Patterned SAMs visualized with AlexaFluor 647-labeled fibronectin (A) and CHO-K1 cell confinement (B). Scale bars are 100 μm.
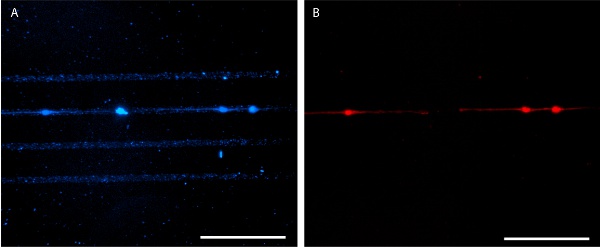
Figure 6. Patterned laminin seeded with E18 mouse hippocampal neurons at 4 days in vitro. AlexaFluor 350-conjugated anti-laminin antibody is used for pattern visualization (A) and E18 mouse hippocampal neurons are stained with MitoTracker Red 580 (B). Scale bars are 100 μm.
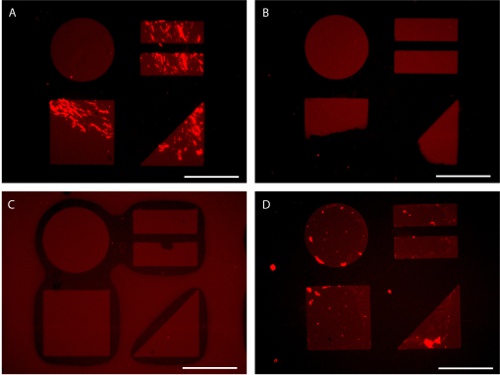
Figure 7. Potential pitfalls in patterned substrate preparation visualized by AlexaFluor 647-conjugated fibronectin adsorption. (A) Insufficent mixing leads to uneven protein adsorption. (B) Uneven application of pressure during stamping leads to partial patten transfer. (C) Excessive pressure during stamping can lead to stamp collapse. (D) Exposure of patterned surface to the air water interface during rinsing can result in background protein adsorption. Scale bars are 100 μm.
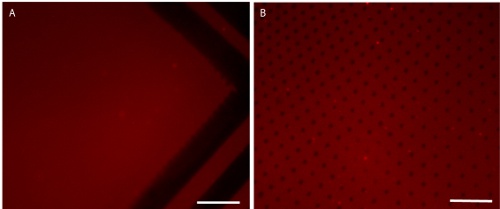
Figure 8.Submerged patterning can produce patterns with small features that are difficult to print by conventional microcontact printing in air. Images (A) and (B) show different regions of the same pattern, printed with the same PDMS stamp in air (A) or deionized water (B). 10μm-wide support lines which surround the pattern (added to help prevent stamp collapse) are seen in (A), however, the smaller dot features as shown in (B) are not seen. This demonstrates that printing in air works well for larger features, but printing in water may be necessary for patterns with smaller features. Scale bars are 20 μm.
| Cycle | Acceleration Rate (rpm/s) | Final Speed (rpm) | Time (s) |
| 1 | 500 | 1000 | 5 |
| 2 | 3800 | 3800 | 30 |
Table 1. Two-cycle spin program used to create a 4.5 μm thick coating of AZ9245 on a silicon wafer.
To prepare PDMS stamps for the formation of patterned substrates, a master in photoresist is first fabricated (Figures 1 and 4A). The master is the inverse of the stamp and is created using either a direct-write lithography system or a mask aligner. When a positive photoresist, such as AZ9245, is used for master production, the resist-coated wafer is exposed to light with the same pattern that will appear on the final substrate. While it is not always possible, it has been reported that the ideal aspect ratio (feature size to resist thickness) for PDMS stamp masters is 1:2.13 We have found that aspect ratios of 1:40 are possible, depending on the nature of the pattern. AZ9245 coated silicon wafers under the conditions described here give photoresist with a nominal thickness of 4.5 μm. We have found that this thickness of AZ9245 can be used to produce PDMS masters with features ranging from >100 μm to 2 μm.
PDMS stamps are cast from Sylgard 182 (or Sylgard 184) using the master fabricated from photoresist (Figure 2). Photoresist masters can be used multiple times to create many copies of the same stamp. After hardening the PDMS, stamps are removed from the master using a razor blade and the resulting stamp can be visualized under a microscope by placing stamp feature side down on a glass coverslip (Figure 4B)
Proper stamping results in a sharp, clear protein pattern that can be visualized by application of fluorescently labeled protein (Figures 3 and 5). Alternatively, immunohistochemistry may be used to visualize the protein pattern after cell fixation (Figure 6). Cell growth is well confined to the protein pattern for both immortalized cell lines and primary cells (Figures 5 and 6).
While this technique is easily mastered, several common problems may arise. The application of protein without sufficient mixing of the concentrated protein solution in the DPBS can lead to uneven protein patterns (Figure 7A). Improper stamping can lead to partial pattern transfer or stamp collapse (Figure 7B-C). In addition, exposing the patterned substrate containing adsorbed protein to air can disrupt the monolayer causing decreased resistance in the background (Figure 7D). Patterns comprised of very small features (< 5 μm) and high aspect ratios often require the use of submerged microcontact printing. In this procedure (3.5b) water is used as a barrier to prevent hexadecanethiol from depositing onto the substrate outside of the pattern (Figure 8).14
Access restricted. Please log in or start a trial to view this content.
Discussion
A number of issues can arise in the lithographic production of the master used for PDMS stamp creation. Underexposure of the resist-coated wafer results in hazy and indistinct patterns and overexposure of the resist-coated wafer results in enlarged or missing features. In general, masters with large feature sizes (>10 μm) are relatively easy to pattern and develop, while masters with smaller features can require extensive optimization of photopatterning and development parameters (beyond the parameters recommended ...
Access restricted. Please log in or start a trial to view this content.
Disclosures
No conflicts of interest declared.
Acknowledgements
We would like to acknowledge the entire Maurer group at Washington University whose collective knowledge has made this protocol possible. Funding for this work is provided by the National Institute of Mental Health (1R01MH085495).
Access restricted. Please log in or start a trial to view this content.
Materials
| Name | Company | Catalog Number | Comments |
|---|---|---|---|
| Silicon wafer | Wafer Reclaim Services | 2 inch | |
| Spin coater/hot plate | Brewer Science, Inc. | Cee 200CB Spin-Bake System | |
| AZ9245 Photoresist | Mays Chemical Company | 105880034-1160 | |
| Direct-write photolithography system | Microtech s.r.l. | LW325 LaserWriter System | |
| Mask Aligner | HTG | 3HR | |
| AZ 400K Developer | Mays Chemical Company | 105880018-1160 | |
| Sylgard 182 Silicone Elastomer Kit | Dow Corning | ||
| 25 mm no. 1 round glass coverslips | VWR international | 16004-310 | |
| Plasma Oxidizer | Diener | Femto | |
| Titanium piecesKamis | Incorporated | 99.95% pure | |
| Gold pellets | Kamis Incorporated | 99.999% pure | |
| Electron-beam evaporator | Kurt J. Lesker | PVD 75 Thin Film Deposition System | with electron-beam accessory |
| Hexadecanethiol | Alfa Aesar | A11362 | |
| 1-mercaptoundec-11-yl)tetra(ethyleneglycol) | Sigma-Aldrich | 674508 | |
| Ethanol | Pharmco-AAPER | 111000200 | 200 proof, absolute |
| Parafilm | VWR international | 52858-000 | |
| DPBS | VWR international | 4500-434 | Without calcium and magnesium |
| Mouse Laminin I | VWR international | 95036-762 | |
| Human Plasma Fibronectin | Invitrogen | 33016-015 | |
| AlexaFluor® 647 carboxylic acid, succinimidyl ester | Invitrogen | A-20006 | |
| MitoTracker Red 580 | Invitrogen | M22425 | |
| AlexaFluor® 350 carboxylic acid, succinimidyl ester | Invitrogen | A-10168 | |
| Anti-laminin antibody | Fisher Scientific | AB2034MI |
References
- Wilbur, J., Kumar, A., Biebuyck, H., Kim, E., Whitesides, G. Microcontact printing of self-assembled monolayers: Applications in microfabrication. Nanotechnology. 7, 452-457 (1996).
- Chang, J., Brewer, G., Wheeler, B. A modified microstamping technique enhances polylysine transfer and neuronal cell patterning. Biomaterials. 24, 2863-2870 (2003).
- Lange, S., Benes, V., Kern, D., Horber, J., Bernard, A. Microcontact printing of DNA molecules. Analytical Chemistry. , 1641-1647 (2004).
- Xia, Y., Mrksich, M., Kim, E., Whitesides, G. Microcontact printing of octadecylsiloxane on the surface of silicon dioxide and its application in microfabrication. J. Am. Chem. Soc. , 9576-9577 (1995).
- Mrksich, M., Dike, L., Tien, J., Ingber, D., Whitesides, G. Using microcontact printing to pattern the attachment of mammalian cells to self-assembled monolayers of alkanethiolates on transparent films of gold and silver. Experimental Cell Research. , 305-313 (1997).
- Prime, K. L., Whitesides, G. M. Adsorption of proteins onto surfaces containing end-attached oligo(ethylene oxide) - a model system using self-assembled monolayers. J. Am. Chem. Soc. 115, 10714-10721 (1993).
- Raghavan, S., Desai, R., Kwon, Y., Mrksich, M., Chen, C. Micropatterned Dynamically Adhesive Substrates for Cell Migration. Langmuir. , 17733-17738 (2010).
- Rogers, J., Bao, Z., Baldwin, K., Dodabalapur, A., Crone, B., Raju, V. R., Kuck, V., Katz, H., Amundson, K., Ewing, J. Paper-like electronic displays: Large-area rubber-stamped plastic sheets of electronics and microencapsulated electrophoretic inks. Proc Natl Acad Sci U S A. 98, 4835-4840 (2001).
- Yanker, D., Maurer, J. Direct printing of trichlorosilanes on glass for selective protein adsorption and cell growth. Molecular Biosystems. 4, 502-504 (2008).
- Johnson, D., Maurer, J. Recycling and reusing patterned self-assembled monolayers for cell culture. Chemical Communications. , 520-522 (2011).
- Herne, T., Tarlov, M. Characterization of DNA probes immobilized on gold surfaces. J. Am. Chem. Soc. , 8916-8920 (1997).
- Hanson, E., Schwartz, J., Nickel, B., Koch, N., Danisman, M. Bonding self-assembled, compact organophosphonate monolayers to the native oxide surface of silicon. J. Am. Chem. Soc. , 16074-16080 (2003).
- Johannes, M., Cole, D., Clark, R. Atomic force microscope based nanofabrication of master pattern molds for use in soft lithography. Applied Physics Letters. , (2007).
- Bessueille, F., Pla-Roca, M., Mills, C. A., Martinez, E., Samitier, J., Errachid, A. Submerged microcontact printing (SμCP): An unconventional printing technique of thiols using high aspect ratio, elastomeric stamps. Langmuir. , 12060-12063 (2005).
- Xia, Y., Whitesides, G. Extending microcontact printing as a microlithographic technique. Langmuir. , 2059-2067 (1997).
- Biasco, A., Pisignano, D., Krebs, B., Pompa, P. P., Persano, L., Cingolani, R., Rinaldi, R. Conformation of microcontact-printed proteins by atomic force miroscopy molecular sizing. Langmuir. , 5154-5158 (2005).
- Shen, K., Qi, J., Kam, L. C. Microcontact printing of proteins for cell biology. J Vis Exp. (22), e1065-e1065 (2008).
- Piner, R., Zhu, J., Xu, F., Hong, S., Mirkin, C. "Dip-pen" nanolithography. Science. 283, 661-663 (1999).
- Ryan, D., Parviz, B. A., Linder, V., Semetey, V., Sia, S. K., Su, J., Mrksich, M., Whitesides, G. M. Patterning multiple aligned self-assembled monolayers using light. Langmuir. , 9080-9088 (2004).
Access restricted. Please log in or start a trial to view this content.
Reprints and Permissions
