Method Article

Inhibition of Neuronal Activity and Its Detection Using Electrophysiology in a Rat

651 views

August 7th, 2025

In This Article

Abstract

Source: Lai, J., et al. Simultaneous Electrophysiological Recording and Micro-injections of Inhibitory Agents in the Rodent Brain. J. Vis. Exp. (2015)

This video demonstrates a microinjection-based technique for simultaneous neuronal recording and inhibition in the rat superior colliculus. The procedure involves stereotaxic targeting, skull drilling, and the insertion of an injectrode, which delivers an inhibitory neurotransmitter while recording neuronal activity. Light stimulation evokes action potentials, while drug microinjection suppresses neuronal excitability. As neurotransmitter levels decline, neuronal activity returns to baseline, enabling the study of both inhibition and recovery.

Protocol

All procedures involving animal models have been reviewed by the local institutional animal care committee and the JoVE veterinary review board.

1. Assembly of the Recording-injection Pipette

  1. Pull an approximately 7 cm long glass capillary (1 mm outer diameter) using a pipette puller.
  2. Break the tip of the capillary and check the aperture under a light microscope. Confirm that the inner diameter is between 30 µm to 40 µm.
  3. Insert a 7 cm long silver wire into the glass capillary with approximately 1 cm protruding from the non-tapered end of the glass pipette.
  4. Bend the excess filament orthogonally to the glass capillary.
  5. Apply a droplet of flexible plastic adhesive on the shaft of a 30 G hypodermic needle.
  6. Insert a 30 G hypodermic needle in the glass pipette according to the schematics presented in Figure 1.
  7. Add a second coating of glue to ensure a proper seal from the junction between the glass pipette and the hypodermic needle.
  8. Leave the pipette to dry with the tip facing upward for about 12 hr to ensure proper curing of the glue. The finished result is shown in Figure 2.

NOTE: This procedure is done on acute experiments and sterilization of the pipette tip is not required.

2. Animal Preparation

  1. Place the rat in an anesthesia box.
  2. Induce anesthesia using 4% isoflurane for 5 to 10 min.
  3. Place the animal on a stereotaxic table with a heating pad and a rectal probe to maintain a body temperature of 37 °C. Use a nose cone to maintain anesthesia with 2% isoflurane. Secure the rat’s head using ear bars and a teeth holder.
  4. Apply ophthalmic ointment or eye drops, which include 1% Atropine drops to aid in pupil dilation. To prevent dryness, apply lubricating drops approximately every 30 min.
  5. Shave the head and clean it with 10% povidone-iodine.
  6. For local anesthesia, inject 0.5 ml of 2% lidocaine under the scalp in 2-3 locations by lifting up the skin and inserting the tip of the needle.
  7. Confirm an adequate level of anesthesia by performing a toe pinch and observing the lack of movement. In addition, monitor the heart rate to ensure that it is within normal values (300 to 400 beats/min).
  8. Incise the scalp in a straight line along the median with a #10 scalpel blade to expose both the coronal and sagittal sutures.
  9. Reveal the Lambda and Bregma points by pushing aside the tissue that is covering the cranium with a surgical spatula.
  10. Level the cranium so that Bregma and Lambda positions are on the same plane.
  11. To set the reference point, use a stereotaxic device with a mounted glass tube to set it right above Bregma. This will be the “zero” for the antero-posterior and medial-lateral measurements coordinates.
  12. Set the point of interest by moving the stereotaxic mount to the required coordinates, note the stereotaxic coordinates, and draw a square around the target area that marks where the craniotomy will be performed.
  13. Use a surgical drill with a sterilized drill bit along the marked square slowly without pressure to slowly remove the bone material. Be careful not to drill too long in the same area, as it will produce heat and cause lesions on the cortex.
  14. When the bone delimiting the craniotomy becomes sufficiently thin, carefully remove the cranial section with tweezers to expose the cortex.
  15. Frequently irrigate the exposed cortex with artificial cerebrospinal fluid to prevent tissue desiccation.
    NOTE: Dura mater removal is unnecessary on the rat as the tip of the injectrode is sturdy enough to penetrate.

3. Filling and Mounting of the Injection System

  1. Fill the 5-10 µl microsyringe by aspiration with mineral oil.
  2. Fill the hypodermic needle with the fixed glass pipette with a solution of 0.5% Chicago Sky Blue (CSB) and 300 µM γ-aminobutyric acid (GABA) or a solution of 2% lidocaine with 0.5% CSB. Dilute all solutions with saline.
    1. In the case of an abundant substance, fill using a regular syringe and use the usual precautionary techniques to avoid the formation of air bubbles.
    2. In the case of more expensive substances, use mineral oil to fill the injectrode and the chemical agent can then be introduced by aspiration. As the density difference between mineral oil and water is relatively high, this substance is a good candidate for the injection of aqueous solutions.
      NOTE: A dye can be added to confirm the separation between two liquids.
  3. To fill the injection pipette, fill a 1 ml syringe with the solution by aspiration and then slowly inject the solution into the injection pipette.
  4. Pay careful attention to leaks in regions indicated in Figure 1 by swabbing these areas clean and observing leakages by further injecting the solution slowly with the syringe.
  5. Remove the 1 ml syringe. When doing so, be sure to keep light pressure on the plunger so that the vacuum does not remove the solution from the injection pipette.
  6. Fill the microsyringe with mineral oil by aspiration and attach it firmly to the filled injection pipette, then carefully wipe away any excess solution from the assembled injectrode with gauze.
  7. Verify that the tip is not blocked by injecting a very small volume, enough to see a small drop forming at the tip of the glass pipette.
  8. Mount the injectrode on the micropump system and ensure that it is well fixed.
  9. Carefully position the injectrode tip at the target coordinates and lower the tip to the surface of the cortex.
  10. Slowly lower the injectrode using the stereotaxic apparatus to the target structure (superior colliculus in this case) using the appropriate anatomical coordinates.
  11. Cover the exposed cortex with warm agar to prevent tissue desiccation.

4. Injection and Reversible Inactivation

  1. Set the microinjection pump to inject 400 to 800 nl at 40 nl/min and press Run to start the injection. Note that the spike rate will show a reduction during the injection.
    NOTE: In the experimental setup, neural activity recovered within an hour after the end of GABA delivery. Any calibrated mechanical device can be used to apply pressure on the microinjection syringe in order to conduct the injection.
  2. After acquisition of the electrophysiological data, euthanize using a method approved by the local Animal Ethics Committee.

Access restricted. Please log in or start a trial to view this content.

Results
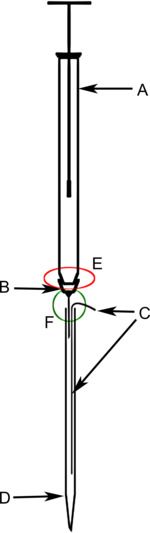
Syringe diagram, labeled parts illustrating fluid dynamics and flow mechanism in medical equipment.

Figure 1: Schematic representation of the injectrode assembly. A micro syringe (A

Access restricted. Please log in or start a trial to view this content.

Materials

List of materials used in this article
NameCompanyCatalog NumberComments
Injection pump (UltraMicroPump III)WPI#UMP3
Injection console (Micro4 Controller)WPI#SYS-MICRO4
Hamilton syringeHamliton(80301) 701LT 10 µL SYRSyringes between 5 and 10 μL used
Gel cyanoacrylate adhesiveKrazy GlueKG86648RThe gel form is easier to apply on the shaft of the 30G hypodermic needle
Glass pipettesWPI#TW100F-4Thin wall, 1mm OD, 0.75mm ID with filament pipettes used
720 Needle Pipette PullerKopf720
Silver wireA-M Systems, Inc.782500Bare 0.010”

Reprints and Permissions

Request permission to reuse the text or figures of this JoVE article

Request Permission

Tags

Electrophysiological RecordingMicroinjection TechniqueStereotaxic TargetingSuperior ColliculusInhibitory NeurotransmitterInjectrode AssemblyLight StimulationNeuronal Activity RecordingGABA MicroinjectionChloride Ion Influx

Related Articles