This video demonstrates the implantation of a spinal cord window in an anesthetized mouse for in vivo imaging. The protocol stabilizes the exposed spinal cord using a borosilicate cover glass and a 3D-printed backplate. This method enables high-resolution two-photon microscopy to study blood-brain barrier dynamics and neurovascular interactions.
A subscription to JoVE is required to view this content. Sign in or start your free trial.
Method Article
Spinal Cord Window Implantation in a Mouse for In Vivo Imaging
1K views
⸱
August 7th, 2025
In This Article
Abstract
Protocol
All procedures involving animal models have been reviewed by the local institutional animal care committee and the JoVE veterinary review board.
1. Cover-glass Implantation
- Gently apply a 3 mm borosilicate cover glass to the exposed cord.
- Ensure agarose is cooled to 39 °C. Using a small spatula, apply warm 2% agarose/aCSF (artificial cerebrospinal fluid) to the edge of the cover glass and allow capillary action to draw it under the surface.
Note: At temperatures below 39 °C, the agarose may start to gel. If this occurs, rewarm using a water bath or microwave. Some operators prefer to first apply one drop of agarose and lay the cover glass on top. - Apply tissue adhesive to the exposed bony articular processes of the intact adjacent vertebrae at thoracic level 11 vertebral spine and thoracic level 13 vertebral spine. Apply additional tissue adhesive in a ring around the laminectomy site, over the adjacent tendon and transverse process.
Note: Tissue adhesive is required for proper adherence to the dental cement in the subsequent steps. The articular processes form a natural seat on which the backplate can rest stably (Figure 1). Adhesion to the articular processes will form the strongest points of attachment. - Mix dental cement with accelerant in a porcelain mixing tray. Utilize a small spatula to transfer dental cement onto the tissue adhesive layer. Use dental cement to adhere the backplate to the surgical field centered over the window. Allow 10 minutes for the dental cement to cure.
Note: The firm adhesion of the backplate to the anterior and posterior articular processes provides the fundamental structural stability of the implant. - Use additional dental cement to fill in the interior base of the backplate, and the underside of the backplate : tissue interface.
Note: The extra application of dental cement improves adherence and reduces risk of leakage of microscope objective immersion fluid (saline) out the bottom of the backplate. - Advance the forked backplate holder to the appropriate position over the window. Secure the backplate into the backplate holder with screws.
Note: This protocol utilized a custom-machined backplate holder (Figure 2G‒H). - Apply saline to the backplate to test for leakage. If any fluid leaks, dry the area and apply more dental cement.
2. Imaging Preparation
- Transfer the animal to the surgical platform to the optical table.
Note: Our surgical platform, backplate holder, and isoflurane nose-cone holder can be transported between surgical and two-photon imaging stations as one unit while applying continuous isoflurane anesthesia (Figure 2D, H). Similar units can be assembled from holding forks, beams, and supportive pillar posts obtainable from commercial sources (e.g., ThorLabs). For intravital microscopy, there should be at least 11 inches of clearance between the microscope objective and the optical table to accommodate the height of the surgical platform. - Affix the surgical platform to the optical table using a stainless-steel mounting post and counterbored clamping fork.
- Apply fresh saline into the well of the backplate. Lower a water-immersion lens into the well.
- Use transmitted or epifluorescence light to identify the area of interest and focus. Switch to laser scanning mode and perform in vivo imaging according to the appropriate two-photon laser excitation wavelength, dichroic, and bandpass filters for the fluorophores present in the tissue6.
Access restricted. Please log in or start a trial to view this content.
Results
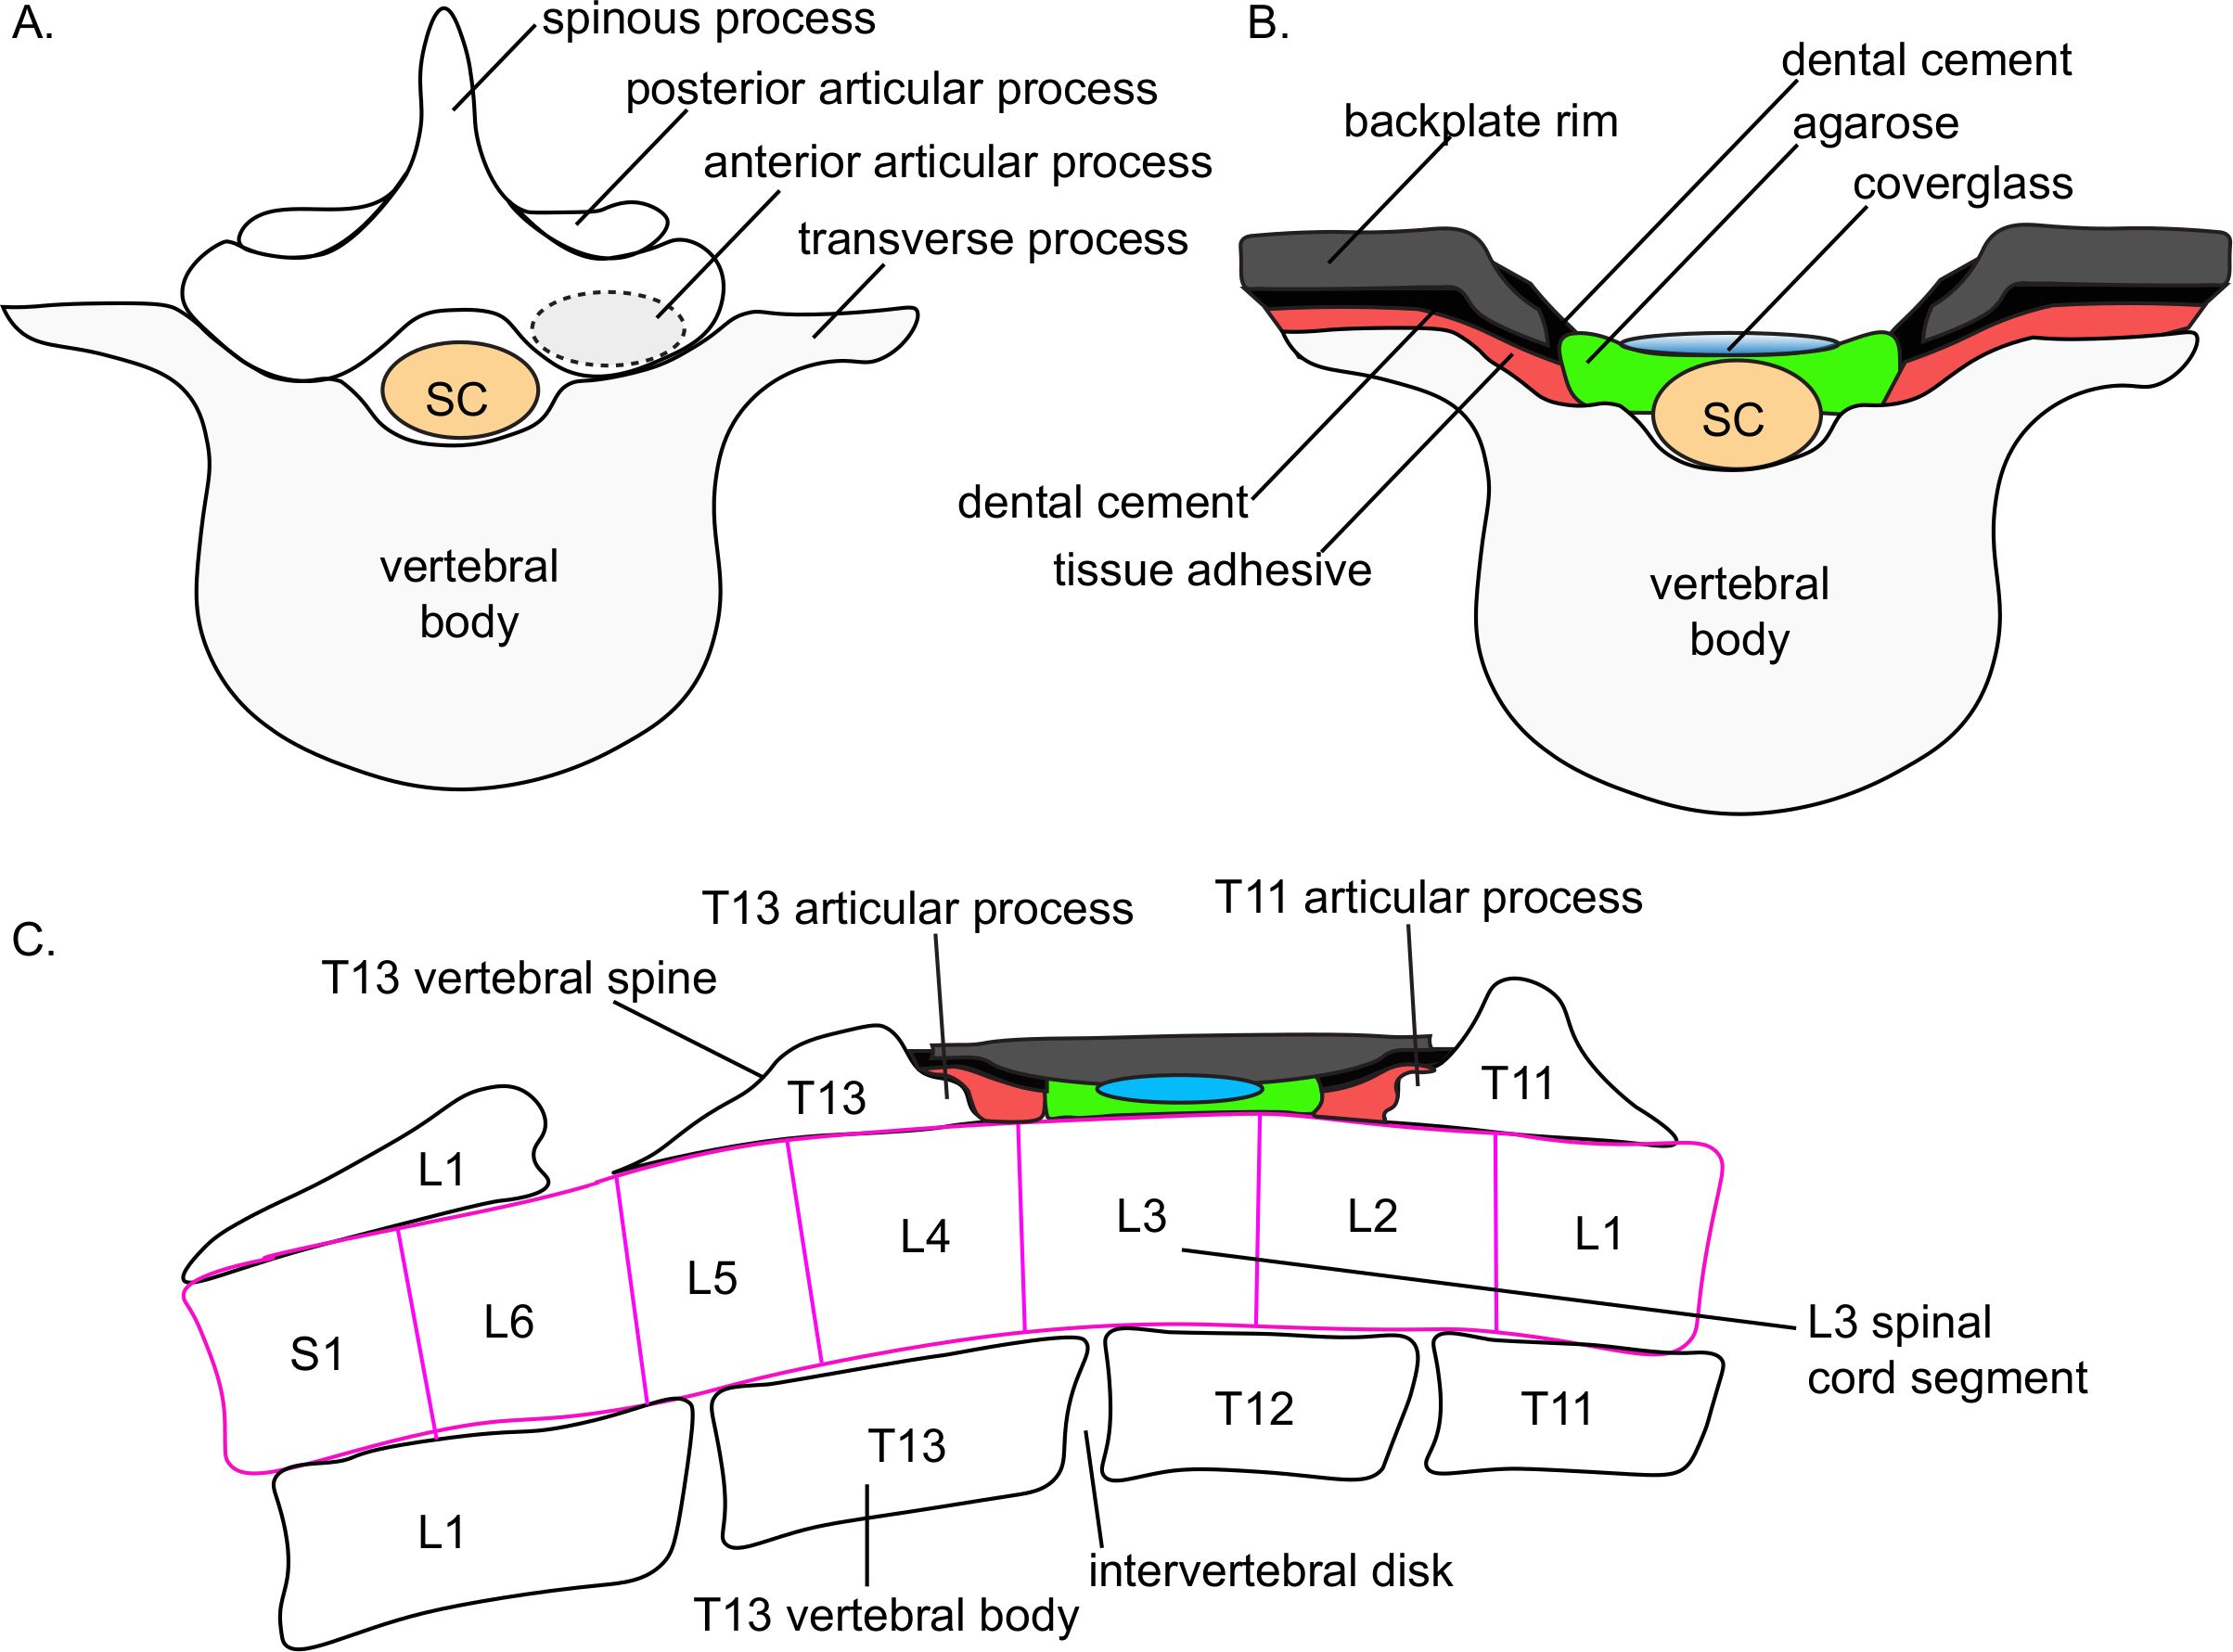
Figure 1. Schematic depiction of the anatomic placement of the spinal cord window....
Access restricted. Please log in or start a trial to view this content.
Materials
| Name | Company | Catalog Number | Comments |
|---|---|---|---|
| 3D printed oval backplate | custom | Stabilizing imaging field | |
| Surgical dissecting microscope | Leica | M205 C | Equipped with Leica FusionOptics, Planapo 0.63x M-series objective, and gliding stage |
| Microscope camera | Leica | MC170 | HD color camera for visualizing surgical field |
| Gliding stage | Leica | 10446301 | The gliding stage is constructed of two metal plates. The base plate is fixed. The upper plate slides on greased interface to allow rotational and linear movement. |
| Surgical station and stabilization fork | Whale Manufactoring | custom | Laminectomy |
| SomnoSuite low-flow isoflurane delivery unit | Kent Scientific | SS-01 | Surgical anesthesia administration with integrated digitial vaporizer |
| Stainless steel 1.5 inch mounting post | ThorLabs | P50/M | For mounting surgical station onto optical table for two-photon imaging |
| Counterbored Clamping Fork for 1.5" mounting Post | ThorLabs | PF175 | For stabilizing surgical station mount onto optical table for two-photon imaging |
| Ideal bone microdrill | Harvard apparatus | 72-6065 | Thinning bone for laminectomy |
| Water bath | Fisher Scientific | 15-462-10 | Warming saline |
| Cautery gun | FST | 18010-00 | Cauterizing minor bleeds |
| Heating pad | Benchmark | BF11222 | 1.9” x 4.5” silicone heater with 20” Teflon leads, 10W, 5V |
| K type thermocoupled rectal probe | Physitemp | RET3 | Measuring mouse body temperature |
| Petroleum jelly | Sigma | 8009-03-08 | Lubricating rectal probe |
| Feedback-regulated thermal controller | custom | NA | Commercially available alternatives include the Physitemp TCAT series |
| PVA Surgical eye spears | Beaver-visitec international | 40400-8 | Absorbing blood |
| Electric trimmer | Wahl | 41590-0438 | Trimming mouse fur |
| Blade, #11 | FST | 14002-14 | Surgical tool |
| Forceps, #5 | FST | 11254-20 | Surgical tool |
| Forceps, #4 | FST | 14002-14 | Surgical tool |
| Titatnium toothed forceps | WPI | 555047FT | Surgical tool |
| Titanium Iris scissors | WPI | 555562S | Surgical tool |
| Vetbond tissue adhesive | 3M | 084-1469SB | Preparing tissue surface for dental acrylic |
| Ceramic mixing tray | Jack Richeson | 420716 | Mixing dental acrylic agent with accelerant |
| Orthojet dental acrylic | Lang Dental | 1520BLK, 1503BLK | Permanently bonding backplate to tissue |
| Small round cover glass, #1 thickness, 3 mm | Harvard apparatus | 64-0720 | optical window |
| NaCl | Fisher Scientific | 7647-14-5 | For aCSF |
| KCl | Fisher Scientific | 7447-40-7 | For aCSF |
| Glucose | Fisher Scientific | 50-99-7 | For aCSF |
| HEPES | Sigma | 7365-45-9 | For aCSF |
| MgCl₂·6H₂O | Fisher Scientific | 7791-18-6 | For aCSF |
| CaCl₂·2H₂O | Fisher Scientific | ################# | For aCSF |
| Carprofen | Rimadyl | QM01AE91 | Analgesia |
| Bacteriostatic water | Henry Schein | 2587428 | Diluent for carprofen |
| Isoflurane | Henry Schein | 11695-6776-2 | Anesthesia |
| Lactated ringer solution | Baxter | 0338-0117-04 | Hydration for mouse |
| Agarose High EEO | Sigma | A9793 | gel point 34-37 degrees C |
| Opthalmic lubricating ointment | Akwa Tears | 68788-0697 | Prevent corneal drying |
| MOM Two-Photon Microscope | Sutter |
