This video demonstrates intranasal mesenchymal stem cell (MSC) delivery in a mouse model. MSCs absorb into nasal tissue, migrate to the brain via cytokine signals, and secrete neurotrophic factors at the injury site, offering neurotherapeutic potential for neuronal repair.
A subscription to JoVE is required to view this content. Sign in or start your free trial.
Method Article
Intranasal Mesenchymal Stem Cell Delivery in a Mouse Model of Traumatic Brain Injury
945 views
⸱
June 17th, 2025
In This Article
Abstract
Protocol
All procedures involving animal models have been reviewed by the local institutional animal care committee and the JoVE veterinary review board.
1. Labeling of mesenchymal stem cells (MSCs) with superparamagnetic iron oxide (SPIO) Nanoparticles
- To label MSCs with SPIO, add 6 mL of labeling media (25 µg/mL of SPIO in Dulbecco's modified Eagle medium (DMEM) with no fetal bovine serum (FBS)) to a T75 flask containing MSCs (80% confluency).
- Incubate the cells with the labeling media in a CO2 incubator (37 °C, 5% CO2 ) without shaking. After 24 h, gently remove the labeling media using a sterile Pasteur pipette with a plastic tip attached to a vacuum. Wash the cells monolayer 2x with 6 mL of phosphate-buffered saline (PBS) to remove any traces of uninternalized SPIO.
- To determine whether the cells have been successfully labeled, check the labeled cells under a fluorescent microscope or confocal microscope if the SPIO is tagged with a fluorophore (i.e., like those used here; Figure 1B, C).
- Harvest adherent cells by treatment with 3 mL of trypsin and incubate at 37 °C. After 5 min of incubation, add 7 mL of pre-warmed DMEM media with 10% FBS (v/v) to inactivate the trypsin. Collect the cell suspension using a pipette into a 15 mL conical tube.
- Centrifuge the cell suspension at 300 x g for 5 min. Discard the supernatant and resuspend the cell pellet in PBS. Count the viable cells using trypan blue dye and a hemocytometer.
NOTE: The cell pellet of the labeled cells will appear as a dark color due to iron loading (Figure 1D). This protocol is relevant for MSC labeling and magnetic resonance imaging (MRI). The procedure for MSC labeling has been previously optimized, and only the steps to prepare labeled MSCs to track in vivo are included here, since in vivo tracking is the focus. The protocol for culturing and labeling of other cell types should be optimized by the researcher. - Adjust the cell concentration using PBS to 150,000 cells (or a number that results in a sufficient MRI signal) in 18 µL of PBS (or the total volume that will be used in the intranasal delivery procedure).
NOTE: It was noticed that a cell concentration higher than 150,000 cells/18 µL of PBS leads to cell aggregation, which may affect the efficiency of intranasal delivery. If a higher number of cells is needed for intranasal delivery, increase the total volume of cell suspension and increase the number of intranasal administrations, as intranasal administration is a non-invasive procedure, and multiple dosing is possible.
2. Controlled Cortical Impact (CCI) Injury
NOTE: In this protocol, male C57 BL/6 mice (7–8 weeks old) were kept in a 12/12 h light/dark cycle with ad libitum access to food and water.
- To prepare each mouse for CCI injury, administer the zolazepam (50 mg/kg) and xylazine (20 mg/kg) anesthetizing cocktail via intraperitoneal (i.p.) injection (1 mL/kg). Ensure that the depth of anesthesia is sufficient by a lack of toe-pinch response. Alternatively, place the mouse in a chamber supplied with 2%–4% isoflurane for 60 s.
- Shave the fur of the dorsal surface of the skull between the ears using an electronic hair clipper. Clean the shaved area several times using a sterile cotton swab soaked in iodine. Use a cotton swab soaked in 70% ethanol to clean off the iodine.
- Place the anesthetized mouse in the stereotactic frame and secure the mouse using ear bars and nose bars. Make a midsagittal incision (approximately 2.5 cm) in the shaved skin using sterile scissors to access the surface of the skull.
- Remove the tissue on the bone using a cotton pad to expose the skull. Clean the skull surface using a cotton swab soaked in 3% hydrogen peroxide (H2O2) for 10 s, then clean it with a dry cotton pad.
NOTE: The skull sutures and both bregma and lambda can now be easily identified. - Identify the coordinates of choice on the skull surface for the CCI injury and draw a circle (4 mm diameter) around the coordinates using a pencil or proper marker.
NOTE: In this protocol, the coordinates at anteroposterior (AP) -2.0 mm and mediolateral (ML) +1.5 mm were used for CCI induction. - Use a microdrill and round burr (0.5 mm diameter) to thin the skull at the marked circle. Avoid applying pressure while drilling, as drilling through the bone may cause damage to the brain parenchyma. Clean bone dust away using a clean and dry cotton swab.
- Gently remove the bone flap using sterile fine forceps to expose the dura mater while keeping it intact. Remove the mouse from the stereotactic frame that was used for pre-injury preparation and place it into the stereotactic frame of the CCI device.
- Stabilize the head of the mouse using the ear bars and nose bars. Make sure the head of the mouse is level in the rostral-caudal direction and adjust the nose bars, if needed.
- Follow the instructions on the control box to zero the impactor tip to the exposed cortical surface. Make sure that the impactor tip is aligned directly above the desired cortex coordinates to be impacted using the X and Y control wheels on the base of the impactor.
- Set the experiment parameters using the control box with a velocity of 5 m/s, dwell time of 250 ms, and injury depth of 1 mm to induce mild injury in the mouse.
- Induce injury by pressing the ‘’impact’’ button on the control box. Swab any bleeding that occurs using a sterile cotton swab.
- Remove the mouse from the stereotactic frame and close the incision using silk surgical sutures. Do not use metal clips to close the surgical site, since the mouse will be subjected to a magnetic field for MRI.
- Apply topical antibiotics (bacitracin neomycin) to the surgical site to prevent infections. Keep the mouse on the heating pad and monitor it closely during the recovery phase.
- Administer ketoprofen (2.5 mg/kg, IP) daily for 3 days after surgery, unless the ketoprofen administration contradicts the study goals.
3. Intranasal Delivery
- At 1 day post-CCI induction, administer the zolazepam (50 mg/kg) and xylazine (20 mg/kg) anesthetizing cocktail via i.p. injection. Ensure that the mouse is deeply anesthetized by lack of toe-pinch response.
- Prepare the mouse for intranasal delivery of MSCs by hyaluronidase treatment.
- Grab the mouse’s scruff and turn on its back firmly while immobilizing the skull. Place the tip of a pipette that contains hyaluronidase in sterile PBS (4 U/µL) near the nostril of the mouse at a 45° angle.
- Administer 3 µL of hyaluronidase suspension in each nostril. Keep the mouse immobilized and facing upward on a clean pad for 5 min. Repeat hyaluronidase treatment 4x (total of 100 U hyaluronidase suspension).
- After hyaluronidase treatment, keep the treated mouse on a clean pad facing up for 30 min.
- To deliver MSCs into the brain, hold the mouse firmly, as described in step 3.2.1. Administer 3 µL/nostril of MSC suspension with a 3 s interval. Keep holding the mouse in the same position for 30 s until the sample drops have completely disappeared.
NOTE: Avoid forming air bubbles during administration. - Repeat the administration with a 2-minute interval up to 3x.
NOTE: The total number of cells to be delivered is 150,000, such that 18 µL of the cell suspension can be delivered at a 3 µL dosage for each nostril, 3x each. - Return the mouse to its cage and monitor it closely until it fully recovers from anesthesia.
Access restricted. Please log in or start a trial to view this content.
Results
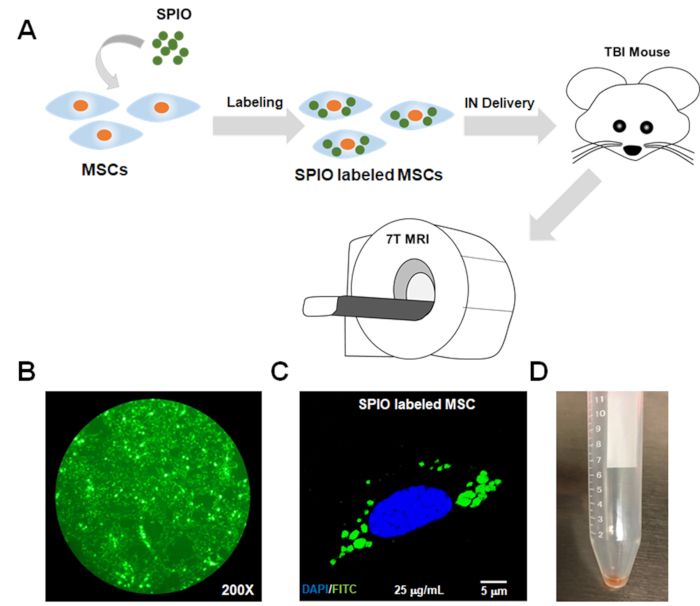
Figure 1: Schematic flowchart of the protocol and in vitro confirmation of SPIO uptake by MSCs. (A) MSCs were ...
Access restricted. Please log in or start a trial to view this content.
Materials
| Name | Company | Catalog Number | Comments |
|---|---|---|---|
| Cell culture supplies (Plastics) | ThermoFisher Scientific | Varies | Replaceable with any source |
| Disposable microtome blade | VWR | 95057-832 | |
| D-MEM/F-12 (1X) with GlutaMAX | GIBCO | 10565-018 | |
| Embedding medium for frozen tissue specimens (O. C. T.) | Sakura Finetek | 4583 | |
| Fetal bovine serum (FBS) | GIBCO | 12662-029 | |
| Fluorescence wild field microscope | Olympus | Olympus BX43 | |
| Forcep | Fine Science Tools | 11293-00 | Surgery |
| Gentamicin (10 mg/mL) | GIBCO | 15710-064 | |
| Hair clipper | Pet Club | PC-400 | |
| Head trauma contusion device | Precision Systems and Instrumentation | Model TBI-0310 | |
| Hyaluronidase from bovine testes | MilliporeSigma | H3506 | |
| Ketamine (Ketavet) | Pfizer | 778-551 | |
| Mice | National Laboratory Animal Center, Taiwan | C57BL6 | Wild type mice strain used in the study |
| Microdrill | Nakanishi | NE50 | Combine with Burrs for generating the bone window |
| Microtome | Leica | RM2265 | |
| Mouse (C57BL/6) mesenchymal stem cells | GIBCO | S1502-100 | |
| MRI scanner | Bruker Biospec | ||
| Phosphate buffer saline (PBS) | Corning Cellgro/ThermoFisher | 21-031-CV | |
| Povidone-iodine 7.5% | Purdue product L.P. | Surgical scrub | |
| Scissor | Fine Science Tools | 14084-08 | Surgery |
| Stereotaxic frame | Kopf Instruments | Model 900 | |
| Superparamagnetic iron oxide (SPIO) nanoparticles | BioPAL | Molday ION EverGreen, CL-50Q02-6A-51 | Stem cells labeling for in vivo tracking using MRI |
| Suture monofilament | Ethicon | G697 | Suture |
| Timer | Wisewind | Replaceable with any source | |
| TrypLE | GIBCO | 12604-013 | |
| Xylazine (Rompun) | Bayer | QN05 cm92 |
