Method Article

Microfluidic-Based Microinjectrode System for Combined Drug Infusion and Electrophysiology

August 7th, 2025

In This Article

Abstract

Loading...
$$\rightleftharpoonup{xx}$$ $$\longleftharp{xx}$$, $$\longrightharp{xx}$$,

Source: Vanegas, M. I., et al. Microinjectrode System for Combined Drug Infusion and Electrophysiology. J. Vis. Exp. (2019)

This video demonstrates a microelectrode-based microfluidic device that delivers drug solution through a capillary tube, using an oil-based marker solution for precise volume tracking and enabling simultaneous neural recording and drug infusion.

Protocol

Loading...
$$\rightleftharpoonup{xx}$$ $$\longleftharp{xx}$$, $$\longrightharp{xx}$$,

All procedures involving animal models have been reviewed by the local institutional animal care committee and the JoVE veterinary review board.

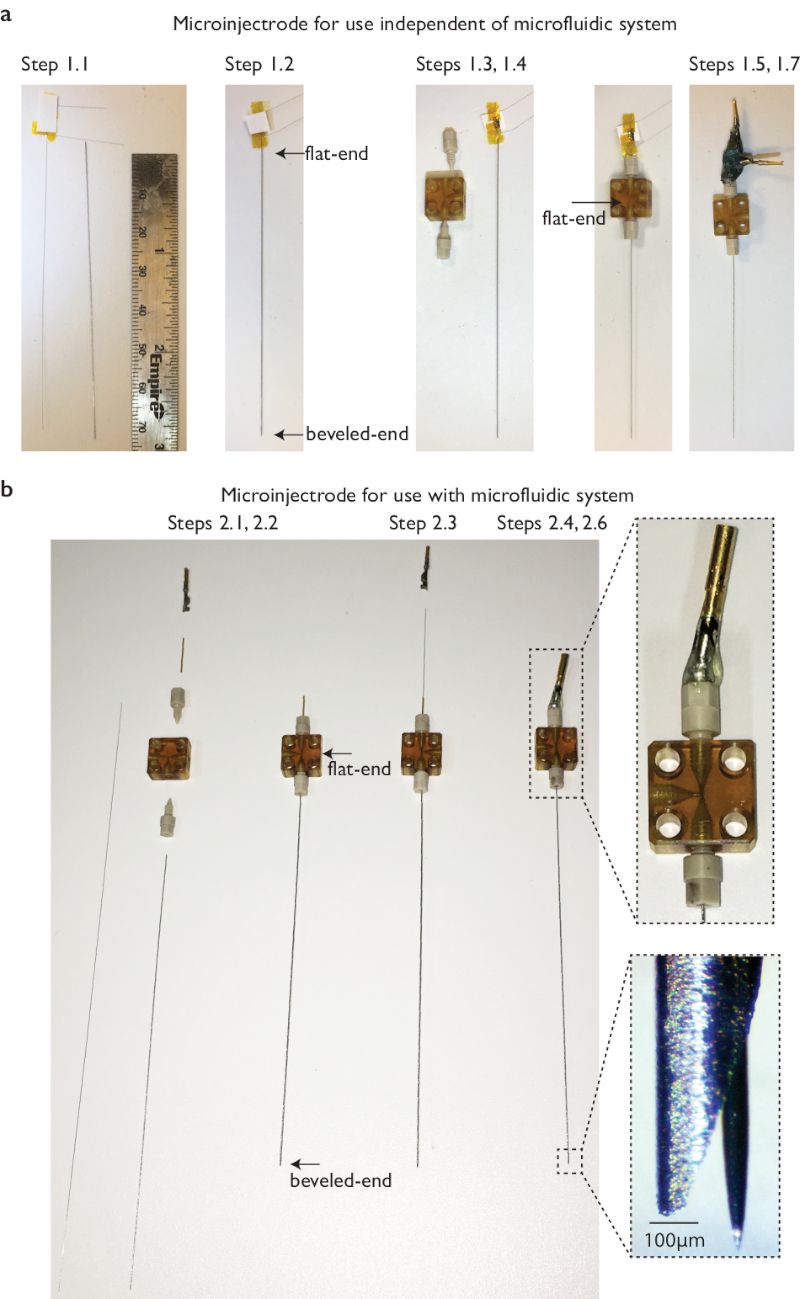
1. Construction of the Microinjectrode for Stimulation and Recording (Figure 1a)

  1. Measure the length of the cannula and the probe (in this example, a nanosensor). The probe must be longer than the cannula by the length it is to protrude from the cannula tip (depending on the probe design), plus approximately 2 cm.
  2. Under a magnifier or a microscope (~10x magnification), load the probe into the cannula; if possible a back-loading is preferable to protect the tip of the probe.
    NOTE: This step, performed manually, is challenging. It is recommended to practice with a microelectrode under a magnifying glass before attempting with an actual experimental probe.
  3. Pass the cannula (containing the probe) through the top ferrule, T-junction, and bottom ferrule.
    1. If the probe is just a single wire without any attachments, back-load it into the canula and insert the assembly into the T-junction from the bottom ferrule. The top of the cannula (flat-end side) should be positioned in the middle of the T-junction, within the bottom but not the top ferrule. The experimental probe or biosensor should protrude above the top of the ferrule.
      NOTE: Custom-made ferrules can also be made by drilling a hole in the ferrule plugs using micro drill bits, the size of the hole being based upon the diameter needed for tightening the cannula to the T-junction.
  4. Use the ferrule wrench to tighten the ferrules on the top and bottom of the T-junction. Do not over-tighten. A small piece of tubing can be added to strengthen the electrode support within the top ferrule.
  5. Solder gold pins to each of the probe terminals (signal, ground, etc.), according to the specifications of the probe.
  6. Adjust relative position of probe and cannula. Measure the distance that the probe is protruding from cannula under magnification, and adjust manually from the top end (probe can slide freely within ferrules).
  7. Add epoxy glue between the gold pins and the top ferrule to attach the probe to the ferrule.
  8. Unscrew the top ferrule to retract the probe inside the cannula. Visually confirm that the probe is fully within the cannula under magnification.
  9. Attach the injectrode to the microdrive.

2. Construction of the Microinjectrode for Drug Infusion (Figure 1b)

  1. Attach the "non-beveled" or flat-end of the cannula to the bottom of the T-junction using a ferrule. Use the ferrule wrench to tighten the ferrule.
  2. Attach a small piece of capillary tubing (~1.5 cm) to the top of the T-junction by passing it through the standard ferrule. Tighten with a ferrule wrench.
  3. Back-load the microelectrode through the capillary tubing, T-junction, cannula, and corresponding ferrules.
  4. Make sure that the back-end of the electrode protrudes less than 1 cm from the back of the capillary tubing, and the tip of the electrode protrudes from the cannula at the desired distance on the bottom side. Electrode position can be manually adjusted from the top-end.
  5. Solder a gold pin to the microelectrode terminal.
  6. Add epoxy glue between the gold pin and the top ferrule to attach the microelectrode to the ferrule.
  7. Unscrew the top ferrule to retract the probe inside the cannula. Visually confirm that the microelectrode is fully retracted into the cannula.

3. Construction of the Microfluidic Circuit (Figure 2)

  1. Place a breadboard on a stable surface. Place the two three-way valves parallel to the longest sides of the breadboard, about 6 in. apart, with one port (the one that is always open) facing each other. Use screws to fix the valves to the breadboard.
  2. Place a ruler next to the valves (to measure and track the movement of fluids inside the capillary tubing).
  3. Load a mixture of 1:1 low viscosity oil and food coloring (marker) into the gastight syringe and place in the Marker pump. Cut one piece of capillary tubing, and use standard ferrules and Luer-lock connectors to connect the syringe to one of the ports on the Input valve. This is the "marker line".
  4. Cut a short piece of capillary tubing for the "ruler line". Use standard ferrules to tighten to the facing ports of the valves.
  5. Cut two longer pieces of capillary tubing to connect the Output valve to the microinjectrode, and to connect the Drug pump to the Input valve (use standard ferrules).
    NOTE: The length of these two lines depends on the experimental setup, one must be long enough to reach from the infusion apparatus to the animal, and the other one from the Drug pump to the Input valve. Use a cleaving stone to cut the capillary tubing.

4. Mounting the Microinjectrode to the Microdrive (Figure 3)

  1. Make sure the microelectrode/experimental probe is retracted in the cannula prior to mounting.
    NOTE: The guide tube should be in a position in the microdrive.
  2. Attach a custom-made adapter to the microinjectrode.
  3. Top-load the microinjectrode through the guide tube and secure it to the adapter using screws.
  4. Measure the microdrive position (depth) at which the microinjectrode protrudes from the guide tube, then retract it ~1 cm to prepare for insertion.
  5. For microinfusion experiments, connect the "brain line" to the unused T-junction opening of the microelectrode. Use a standard ferrule and tighten it with a ferrule wrench.

5. Flushing and Preparation of the Microfluidic System

  1. Position the microdrive with the microinjectrode over a waste beaker.
  2. Load chlorhexidine (e.g., nolvasan, dissolved at 20 g/L) into the 1 mL gastight syringe and place it in the Drug pump. Turn the flow direction of the valves such that fluid goes from the Drug pump through the valve to the valve line and out the "brain line".
  3. Flush the circuit with chlorhexidine using a low flow rate (50-200 µL/min) for a minimum of 10 min. Repeat steps 5.2 through 5.3 with sterile saline and then air.
    NOTE: It is important to check for leaks at this stage. Gently apply lint-free wipes at the junctions to help reveal any liquid leaks through the ferrules.
  4. Load the drug in the 500 µL gastight syringe, compress the air and then place in the Drug pump. Flow at 50 µL/min until a few drops flow from the microinjectrode.
  5. Soak the guide tube in chlorhexidine (dissolved at 20 g/L) for 15 min.
  6. Turn the direction of the Output valve towards the "flushing line". Advance the Marker pump until a clear edge of color and oil is observed on the ruler line. Make sure there is always oil between the drug and the color in order to not mix the two water-soluble materials and lose the sharp edge between them. Mark the starting position of this oil/dye line (with a piece of tape or marker).
  7. Turn the direction of the Output valve towards the brain line.

6. Performing Recording or an Infusion Experiment

NOTE: Animal handling steps will vary depending on the lab and experiment. The following steps are to be performed after the necessary surgical set-up and preparation to expose the dura. Following the experiment, all necessary post-procedure steps must be performed in accordance with institutionally approved protocols.

  1. Attach the microdrive to the recording chamber. Lower the guide tube to penetrate the dura.
    NOTE: The guide tube should not penetrate any further than the dura in order to avoid damaging the cortex.
  2. Lower the microinjectrode to about 2 mm above the site for recording/injection in the brain.
  3. Tighten the top ferrule (protruding microelectrode/biosensor) and connect the gold pins to the recording system. Keep advancing the microinjectrode to the target site.
    NOTE: Remember to include the distance that the microelectrode extends beyond the cannula in the calculations.
  4. For infusion experiments, use the manual microsyringe pump to move the column of oil by 1 cm every 3 min (~60 nL/min). Once the desired volume has been infused, switch the Output valve towards the flushing line.
    NOTE: The volume infused will vary based on model species and brain area targeted. Faster flow rates may damage neural tissue.
  5. When the experiments are complete, retract the microinjectrode within the guide tube (leave the probe protruded). Then remove the microdrive for flushing. Flush the microfluidic system to prepare for reuse.NOTE: In our experience, the microinjectrode will last for several uses if proper care is taken. Electrophysiological recording quality drops faster than the capability of injection.

Access restricted. Please log in or start a trial to view this content.

Results
Loading...
$$\rightleftharpoonup{xx}$$ $$\longleftharp{xx}$$, $$\longrightharp{xx}$$,
Microinjection setup with microelectrode assembly steps for microfluidic system; flat and beveled ends.

Figure 1: Step by step fabrication of microinjectrode. (a) Configuration f...

Access restricted. Please log in or start a trial to view this content.

Materials

List of materials used in this article
NameCompanyCatalog NumberComments
3-port manual valvesLabSmithManual 3-Port Selector Valve (MV201-C360)https://products.labsmith.com/mv201-manual-3-port-selector-valve/#.XNYEC9NKh26
CannulaeVita Needle Company304 Stainless steel tubing, Outer Diameter 228μm, Inner Diameter 165μmhttps://www.vitaneedle.com/assets/files/Vita_Needle_Master_Tubing_Gauge_Chart.pdf
Cleaving stoneMolexCleaving stone 1" x 1" (part No. 1068680064)Highly recommended to follow method for cleaving capillary tubing: https://www.cmscientific.com/info_sheets/cleaving_procedure.pdf
Clorhexidine diacetateWalmartNolvasan solution disinfectant (AAP311)Used for microfluidic circuit flushing, dissolved at 20 g/L
Custom adapterCustom provider-Custom machined adapter to connect microinjectrode to hydraulic microdrive
DriverLabSmithT7 TORX driver for installing breadboard screws (LS-TORX Driver)https://products.labsmith.com/ls-torx-driver/#.XO8sndNKh25
Epoxy glueLabSmithTwo-part high-strength epoxy adhesive (LS-EPOXY) for metal and plastic bondinghttps://products.labsmith.com/ls-epoxy-12ml-epoxy-adhesive/#.XO8t89NKh24
FerruleLabSmithOne-Piece Fitting (C360-100) for connecting capillary, thru hole sized for 360μm OD capillaryhttps://products.labsmith.com/one-piece-fitting#.XNYEaNNKh24
Ferrule plugLabSmithOne-Piece Plug (C360-101) for use in any -C360 porthttps://products.labsmith.com/one-piece-fitting-plug/#.XNYFl9NKh24
Ferrule wrenchLabSmith1/8" hex wrench for installing one-piece fittings and plugs (LS-HEX 1/8" Hex Wrench)https://products.labsmith.com/ls-hex-1-8-hex-wrench/#.XO8sqtNKh24
Gastight syringeHamilton Company500μL gastight syringe model 1750 (81220) and 1mL gastight syringe model 1001 (81320)https://www.hamiltoncompany.com/laboratory-products/syringes/81220#top
Gold pinsAim-CambridgeMale gold plated crimp-on connector pin (40-9856M)https://www.masterelectronics.com/aim-cambridge-cinch-connectivity-solutions/409856m-10109145.html
Lint-free wipesKimberly ClarkKimtech Science Kimwipes Delicate TaskLint-free wipes, used to identify leaks in the system
Liquid food colorMcCormick & Co.Water based, black liquid food color (52100581873)https://www.mccormick.com/spices-and-flavors/extracts-and-food-colors/food-colors/black-food-color
Low viscosity oilClearco Products Co.Pure Silicone Fluid Octamethyltrisiloxane with a viscosity of 1cSt at 25°C (PSF-1cSt)http://www.clearcoproducts.com/pure-silicone-super-low-viscosity.html
Luer-Lock connectorLabSmithLuer-Lock Adapter (C360-300), female fitting for connecting Luer Lock syringe to 360μm capillary tubinghttps://products.labsmith.com/luer-lock-adapter-assembly#.XO81MtNKh24
Micro drill bitsGraingerMicro drill bit, 0.23mm (414H85)https://www.grainger.com/category/machining/drilling-and-holemaking/drill-bits/machining-drill-bits/micro-drill-bits
MicroelectrodeFHCMetal microelectrode, tungsten with epoxy insulationhttps://www.fh-co.com/category/metal-microelectrodes
Oil hydraulic micromanipulatorNarishige GroupOil Hydraulic Micromanipulator with guide tube attached (MO-96)http://products.narishige-group.com/group1/MO-96/chronic/english.html
Polymicro Capillary TubingMolexPolymicro Flexible Fused Silica Capillary Tubing (TSP150375), Outer Diameter 375µm, Inner Diameter 150µmhttps://www.molex.com/webdocs/datasheets/pdf/en-us/1068150024_CAPILLARY_TUBING.pdf
Programmable syringe pumpHarvard ApparatusStandard Infuse/Withdraw Pump, programmable (70-2213)https://www.harvardapparatus.com/standard-infuse-withdraw-pump-11-pico-plus-elite-programmable-syringe-pump.html
RulerEmpireStainless steel 6" Stiff ruler (27303)http://www.empirelevel.com/rulers.php
Screw setLabSmithValve mounting screw set (LS-SCREWS .25), thread-forming screws (2-28 x 1/4”) to mount valves to breadboardhttps://products.labsmith.com/ls-screws-25#.XO8widNKh24
Standard BreadboardLabSmith4" x 6" platform (LS600), with 0.25" hole spacing for mounting fluid circuithttps://products.labsmith.com/standard-breadboard/#.XO8xDdNKh24
Sterile saline (sodium chloride) 0.9%.Baxter0.9% Sodium Chloride sterileSterile Intravenous Infusion
Sterile syringe filtersMillipore SigmaMilliporeSigma™ Millex™-GP Sterile Syringe Filters with PES Membrane (SLGPM33RS)https://www.fishersci.com/shop/products/emd-millipore-millex-sterile-syringe-filters-pes-membrane-green-4/slgpm33rs
Stoelting manual microsyringe pumpStoelting CompanyManual infusion/withdrawal pump (51222)https://www.stoeltingco.com/manual-infusion-withdrawal-pump-2649.html
T-junctionLabSmithInterconnect tee (C360-203) for combining flow streams, for use with 360μm OD capillary tubinghttps://products.labsmith.com/interconnect-tee#.XO8z8dNKh24

Reprints and Permissions

Request permission to reuse the text or figures of this JoVE article

Request Permission

Tags

Microfluidic DeviceElectrophysiology RecordingOil Based MarkerCapillary TubeNeural Signal RecordingMicrodrive AttachmentBrain PenetrationVolume Tracking

Related Articles