This surgical protocol is a step-by-step guide to insert an intrathecal catheter into the spinal subdural space of a rodent to deliver targeted treatment.
Method Article
Accessing the Subdural Space of the Rodent Spinal Cord for Treatment Delivery
In This Article
Summary
Abstract
Treating spinal cord diseases or injuries is challenging, in part, due to difficulties in developing effective treatments that can be directly applied to the cord. Current treatments for spinal cord injury (SCI), for example, are primarily epidural. However, epidural therapies do not allow for direct interaction with the spinal cord, reducing the potential treatment effect. Here, a method is proposed for accessing the subdural space in a rodent model for a more direct effect of a given treatment. Using the protocol described, a successful subdural implantation of a bioelectronic device for spinal cord recording/stimulation, as well as safe insertion of a neurotrophin-3 loaded hydrogel, was performed. Animals exposed to this protocol in both applications showed no change in hindlimb or forelimb function following the procedure, and no dysfunction developed for up to 12 weeks post-procedure. While the examples presented here are highly specific, the proposed protocol can be used in a variety of applications to allow for more effective localized treatment of neurological disorders of the spinal cord.
Introduction
Diseases and injuries of the spinal cord can have devastating effects on millions worldwide, resulting in significant social, economic, and healthcare burdens1,2. Injuries to the spinal cord and neurodegenerative diseases can lead to chronic motor, sensory, and autonomic dysfunctions that reduce quality of life and independence for affected individuals. Current treatments, such as surgical intervention and pharmacotherapy, focus on mitigating initial trauma and managing secondary complications3. However, these approaches rarely achieve substantial neural regeneration or functional recovery, leaving an urgent need for more effective interventions that target the underlying mechanisms.
A primary concern for current treatment strategies is the location and delivery of a desired treatment. Treatments such as neuromodulation or pharmaceutical intervention have the ability to influence neuronal activity, facilitate functional recovery, and potentially reestablish connections in damaged spinal circuitry4. Spinal cord stimulation can lead to improvements in motor control and reduced pain5. However, these strategies are currently limited to indirect delivery to the injured tissue, focused on the epidural space, not considering the dura mater barrier of the spinal cord6,7,8. While epidural treatments have shown clinical benefits, they are limited due to indirect access to target neuronal populations, leading to potentially reduced effects of therapeutic agents.
Our group has worked to overcome these limitations associated with epidural-focused strategies and explore the potential for direct subdural treatment delivery in spinal cord injury (SCI) models. Insertion of catheters into the subdural space allows treatment to be applied directly to the spinal cord, providing enhanced interaction with affected neural tissue9,10. Subdural administration also reduces the barrier effects of the dura mater, improving the efficacy of electrical stimulation and targeted drug delivery systems11,12. This method could improve the precision and effectiveness of treatment, potentially leading to better outcomes in functional recovery.
This article describes a step-by-step protocol for safe access to the subdural space of the rodent spinal cord. This procedure is focused on the thoracic region of the spine (T10-T12), however, it can be implemented at different locations on the cord as necessary. Anatomical landmarks are specified, allowing for region identification, and detailed instructions on the laminectomy, durotomy, and dura mater penetration are presented. Two applications of this protocol are also presented, including implantation of an electrical stimulation device as well as delivery of a hydrogel drug delivery system (Figure 1). The outlined steps are easily reproducible by researchers with experience in rodent surgery. This protocol is written in the context of a contusion model of SCI; however, the specific model of injury can be modified depending on the desired experimental outcomes. The technique described here, not only holds promise for advancing SCI treatment, but may also provide a platform for future research on spinal cord repair and regeneration through precise, localized interventions.
Protocol
All procedures were conducted in accordance with ethical guidelines at the University of Auckland and were approved by the institution's Animal Ethics Committee (AEC) and university Animal Welfare Officers (AWO). Female Sprague-Dawley rats weighing 240-260 g were used and group-housed (21 °C; 12 h:12 h, light: dark cycle) and given ad libitum access to standard rodent diet prior to and after the surgery. It is recommended to first try this protocol in the absence of an injury model, as the intention is to provide safe access to the subdural space of the rodent spinal cord. This is an important first step to demonstrate that the protocol can be applied without causing injury, allowing for more accurate examination of a desired injury model. The protocol is suitable for being combined with the many different injury models used by research groups. Therefore, the protocol does not describe specific injury delivery steps as these will vary based on the application. The reagents and the equipment used are listed in the Table of Materials.
1. Pre-operative preparation
- Sterilize all instruments (Supplementary Figure 1) and the relevant consumables.
- Weigh the rat(s) to be undergoing surgery the following day.
- Calculate the appropriate doses of drugs to be administered; bupivacaine (analgesic) @ 2 mg/kg, dose - 0.08 mL/100 g; meloxicam (analgesic) @ 2 mg/kg, dose - 0.04 mL/100 g; buprenorphine (analgesic) @ 0.03 mg/kg, dose - 0.1 mL/100 g; enrofloxacin (antibiotic) @ 10 mg/kg, dose - 0.08 mL/100 g12,13.
NOTE: Bupivacaine was subcutaneously administered at 3-4 sites along the surgical site prior to the initial incision.
2. Surgical preparation
- Ensure the anaesthesia system is properly set up (check whether all tubing associated with the oxygen and anaesthesia system is setup correctly).
- Prepare the required injections based on rats' weight as well as a 3 mL injection of saline to be administered prior to the start.
- Ensure that the heat pad (maintenance temperature 37 °C), lamp, microscope, and shaver, are all set up and functional.
NOTE: No specific magnification for the dissecting microscope is required, as magnification will vary depending on user preference and visibility during the procedure.
CAUTION: Ensure the animal's temperature does not drop below 35°C or exceed 40°C during the procedure
3. Animal preparation
- Ensure all tubing associated with the anaesthesia system and oxygen tank is connected. If using the anaesthesia system used in this study(see Table of Materials), set the isoflurane induction to 3% and input the weight of the animal into the anaesthesia system to set the oxygen flow rate for maintenance anaesthesia (Supplementary Figure 1A).
NOTE: Keep the anaesthesia at a maintenance level suitable for each individual animal. This can vary between 1.3%-2% depending on the animal. - Place the rat into the induction chamber until it's unable to right itself, switch to the desired isoflurane maintenance level, and move the rat to the nose cone.
- Administer 3 mL of saline and required drug injections, subcutaneously, prior to shaving.
NOTE: Following saline injections and shaving, inject the bupivacaine into several spots along the intended incision site - While monitoring the animal's level of anaesthesia, prepare all instruments (microscope, tools, sterile drapes) in the surgical area. Place a sterile drape for the tools in the desired area, and organize the tools on the drape, maintaining the sterile field.
- Shave the fur along the back of the animal, from the base of the neck to the top of the hips.
- Disinfect the area with chlorhex scrub (chlorhexidine gluconate 4% w/v), followed by chlorhex tincture (chlorhexidine gluconate 0.5% w/v and ethanol 70% v/v), using a circular motion moving out from the centre of the shaved area (3x), and apply lubricant to the eyes to prevent drying out.
- Transfer the rat to the heating pad under the microscope, place a press and seal drape over the shaved area, and cut a hole large enough to expose the surgical field but not so large as to expose any unshaved fur.
- Place a rectal temperature probe to monitor the animal's temperature and maintain ~37 °C with the heating pad. Administer animal welfare checks every 5-10 min.
- Administer pedal reflex to confirm the surgical plane of anaesthesia and begin the procedure.
4. Tissue dissection of the spine
- Using a scalpel blade, make a linear incision (~6-8 cm) in a rostral to caudal direction (Figure 2A), starting below the base of the neck and extending over the thoracic hump, exposing T9-T13 vertebrae.
- Gently pair back connective tissue under the incision site with Graefe forceps or micro spring scissors, to directly expose the muscle tissue on the spine.
- Identify the T13 process by locating the two white V-shaped tendons near the caudal half of the incision. The spinous process directly rostral to the V on the tail side of the animal is T13 (Figure 2B).
- Starting at T13 and moving up to T9, make small incisions in the connective tissues between each process to separate them before clearing the muscle, to help maintain location as the procedure progresses (Figure 2C). Then, cut channels in the muscle that run parallel to both sides of the spinous processes using microscripers. Do this on both sides of the spine to expose the lamina of each spinal segment (Figure 2D).
- Attach serrefine clamps on both sides of the muscle walls to maintain an open field of view to the spine. Attach one pair at the sides of T13, another at T11/T12 border, and another at T11/T10 (Figure 2E).
- Once clear channels are formed, cut away the connective tissue in between each process using either microscissors or rongeurs (Figure 2F).
- Clear the channels until connective tissue and muscle are cleanly dissected from each lamina, from the rostral part of T13 to the caudal part of T9, exposing the T10-12 segments for the laminectomy procedure. Successful completion is indicated by clearly visible lamina on either side of the processes.
NOTE: A microscope is not required for step 4, but is highly recommended.
5. Laminectomy
- Locate the caudal portion of the T12 lamina that overlaps the rostral portion of T13, position the tip of the rongeurs underneath, and gently start removing pieces of lamina, as recommended in standard JoVE protocols14,15 (Figure 2G).
NOTE: Use forceps to grip the spinous process of each lamina to maintain stability and to gently "lift" the plates during each cut with the rongeurs (Figure 2G). When sliding the tip of the rongeurs underneath the lamina, maintain outward pressure away from the spinal cord to minimize potential damage.
CAUTION: Be careful not to push rongeurs too far underneath when making cuts, as it may damage the dura mater and/or spinal cord itself. - Moving from one side to the other, continue cutting away pieces of bone from the T12 lamina until there is enough room to extend the cut into the midline of the process, exposing the spinal cord, with a hole approximately 5mm across (Figure 2H).
NOTE: Removal of bone from the spinal column can result in bleeding that can reduce visibility during the procedure. Use cotton swabs or rolled lint-free wipes (Supplementary Figure 1B) to manage this while performing the laminectomy. - Work the rongeurs underneath the lamina on either side and then clear an even channel to the cranial portion of T12 (Figure 2I).
NOTE: The spinal cord will become visible as pieces of the laminar plate are removed for each spinal segment. - Repeat steps 5.1 to 5.3 to remove both T11 and T10.
- Continue laminectomy, maintaining even cuts on both sides, moving rostrally up to T9 (Figure 2J).
NOTE: For contusion SCI procedures (see Representative Results section), the lamina above the desired spinal cord segment/segments needs to be cleared wide enough to allow for the use of a contusion injury device (see widened area in the middle of Figure 2K). For drug delivery, the laminectomy can be just wide enough to visualize the application of the desired compound. - Gently flush the thecal sac with saline and prep the desired area for the durotomy once the laminectomy is complete, and a sufficient area of T10-T12 has been removed (Figure 2K).
NOTE: This procedure is specific for accessing the spinal segments (T10-T12), however, these methods can be used to perform laminectomies at various segments along the spine.
6. Durotomy for treatment application
- Perform the durotomy (incision of dura mater) using the dissection scope to access the subdural space of the spinal cord (Figure 3A).
NOTE: Adjust the magnification of the scope based on the surgeon's preference for visibility of the dura mater. - Bend a 27-G needle into a 90-degree angle with the bevel facing up (Figure 3B).
NOTE: Use a pair of needle drivers or haemostats to grasp the needle when bending. - Gently pierce the dura mater with the tip of the needle at the desired entry point on the spinal cord (Figure 3B).
CAUTION: Be careful not to damage the underlying spinal cord or its median blood vessel. - Once the dura mater is punctured, gently lift the needle dorsally to tear a circular hole in the dura mater, no more than 2 mm, on either side of the midline blood vessel. A successful durotomy is indicated by a small amount of cerebrospinal fluid (CSF) leakage from either hole.
NOTE: Keep a distance of at least a few mm from the end of the laminectomy to allow for easier access to the subdural space. If necessary, carefully re-insert the needle tip into the initial hole to increase its size. - Ensure that the position selected for the durotomy incision and that the position immediately in front is clear of branching blood vessels from the midline blood vessel.
CAUTION: DO NOT damage the midline blood vessel, as this will cause excessive bleeding, preventing the completion of the procedure. - Using the holes made in the dura, deliver the desired treatment or implant a device into the subdural space. For this protocol, intrathecal catheters are used for treatment delivery to either guide the stimulation device into position or inject the hydrogel (Figure 3C).
NOTE: Maintain a clear field of view by continuously clearing any blood and/or CSF following durotomies. - Ensure the tips of the catheters are visible underneath the dura before progressing into the spinal cord. A successful application is indicated by catheters smoothly moving across the small spinal blood vessels while underneath the dural membrane.
- After the desired treatment is delivered (Figure 3D,E), place a piece of sterile surgical gelfoam in the space created by the laminectomy to aid in haemostasis, wound healing, and maintaining the structure of the spine.
- After the placement of gel foam, use 4-0 polydioxanone absorbable suture to close the muscle and skin layer above the spine.
7. Post-operative care
- Check the animals daily and give the required post-op drugs (buprenorphine as needed; enrofloxacin and meloxicam for up to 5 days). Administer 1-3 mL of saline subcutaneously as needed (if <10% body weight of water is consumed over 24 h during the post-operative period).
- Depending on the procedure, monitor bladder function, motor function, grimace scale, and any other signs of animal welfare.
- Remove the skin sutures approximately 10-14 days post-surgery.
Results
The proposed protocol was applied in two different experimental settings. The data shown is representative of non-injured groups because the intention was to demonstrate that the subdural manipulations described in the procedure (in the absence of an injury model) do not impair function. A bioelectronic device was implanted (Figure 1A) or a hydrogel was delivered (Figure 1B) in 6-8-week-old Sprague-Dawley rats. The motor function of these animals was compared to that of control animals that underwent sham surgery without a subdural procedure using the BBB motor function scale. Several groups of animals are represented here, showing the viability of each procedure and its safety. Following each procedure, all animals maintained normal motor function with no difference in BBB score between groups 7 days post-procedure, indicating the safe implementation of the described protocol. In addition, a group of animals (Figure 4C) demonstrating impaired hindlimb motor function is represented for comparison to the subdural procedure groups, to further demonstrate that no adverse effects were noted in the experimental groups. This group received a contusion SCI procedure with a force of 175 kdyn impact device, as described in previous literature12,13.
Bioelectronic implant
For device implantation, the protocol includes creating two durotomy sites-one for catheter entry and another for exit-to facilitate movement of the guide catheters under the dura and controlled placement of the device. The bioelectronic device consisted of two bifurcated arms attached to a PCB interface that is encapsulated by a biocompatible housing. The arms are temporarily connected to small intrathecal catheters via 7-0 silk suture to assist in positioning of the implant. The catheters are slowly pulled through the rostral durotomy holes, slid under the dura, and through the exit durotomy holes caudal to the treatment location. The attached implant arms were then pulled through and positioned on each hemi-section of the spinal cord. The tail end of the implant is sutured to the muscle attached to the T13 process. The housing is sutured to the trapezius/latissimus muscle rostral to the laminectomy. The skin is then closed around the base of the housing unit to provide external access.
Hydrogel treatment
For hydrogel delivery, only an entry point is required. The hydrogel was delivered via similar intrathecal catheters positioned at the same location as the stimulation device. The catheters were loaded with 10 µL of a poloxamer hydrogel12 and were inserted into the subdural space in the same way as the device implantation steps. Once in place, the catheters were slowly retracted while the hydrogel was continuously released underneath the dura (Figure1B) onto each hemi-cord. Following each procedure, animals were monitored for 7 days to ensure adequate recovery.
The 21-point Basso-Beattie-Bresnahan (BBB) scale was used for motor function assessment16. Animals in both groups were assessed before the procedure (baseline) and at 1-day, 3-day, and 7-day post-surgery. Open field behaviour was assessed directly and via blinded video recordings. Motor function scores for both left and right hindlimbs for each group were compared to unoperated control animals and a separate SCI group to determine the extent of any adverse effects of the surgery. Animals in either the implant or hydrogel group showed no deficit in motor function following either procedure, when compared to unoperated controls or injured SCI animals. To note, histological analysis confirming the absence of spinal cord damage has already been published in our previous work. That study demonstrated that using this method to implant a device does not produce additional spinal cord trauma up to 7 days post-procedure11. Minimal changes in both astrocyte (GFAP) and microglia/macrophage (Iba1) activity were seen post-implantation of a device compared with control animals. The surface area and roundness of coronal spinal cord sections directly under the implant were also examined, showing no change in morphology.

Figure 1: Subdural treatment strategies. (A) Example of the implant device and (B) catheter/syringe used for injecting the hydrogel. (C) Representative models of both the implant and hydrogel insertion into the spinal cord of a rat. Please click here to view a larger version of this figure.
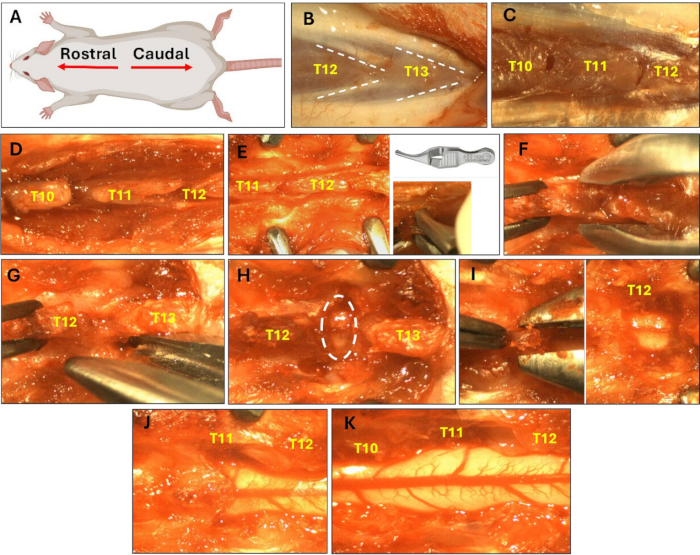
Figure 2: Images of the laminectomy, representing the surgical field. (A) Orientation of the animal for surgical images in Figure 2 and Figure 3. (B) Muscle tendon landmarks for the location of process T13 to guide start of muscle dissection. (C) Perpendicular cuts to identify each process to be removed via laminectomy. (D) Muscle channels cut parallel to the spinal processes to allow for access to the bone plates for removal. (E) Bulldog serrefine clips used to hold back the muscle/skin on either side of the spine to provide adequate surgical space. (F) Removal of white tendons interconnecting each process before start of laminectomy. (G) Surgical field at the start of the laminectomy as rongeurs are slid underneath the T12 plate to begin cutting away the bone. (H) The first half of T12 process removed to expose the spinal cord and allow adequate space for the surgeon to move rostrally and begin removing the remaining processes (T11/T10). (I) Removal of the cranial portion of T12, with complete removal of the segment. (J) Laminectomy halfway complete at T11 using wider cuts for application of an example contusion SCI. (K) Complete laminectomy following removal of T10-T12 segments, fully exposing the dorsal surface of the spinal cord. Please click here to view a larger version of this figure.
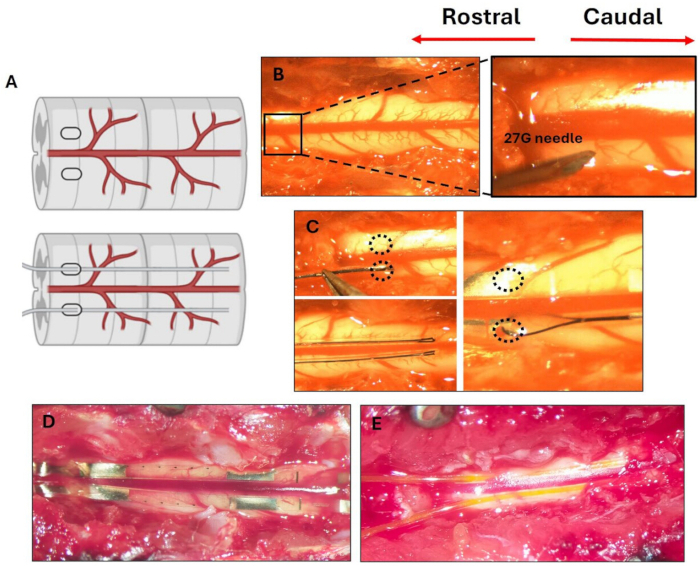
Figure 3: Steps for performing the durotomy and applying targeted treatment. (A) Schematic of the location of holes in the dura mater of the spinal cord. (B) Surgical field showing a 27 G needle penetrating the dura to create the durotomy; this is done on both sides of the central blood vessel as seen in (A). (C) Initial insertion of a catheter used for treatment application. (D) Electrical stimulation device in place on the spinal cord. (E) Catheters loaded with hydrogel for injection on the spinal cord surface. Please click here to view a larger version of this figure.
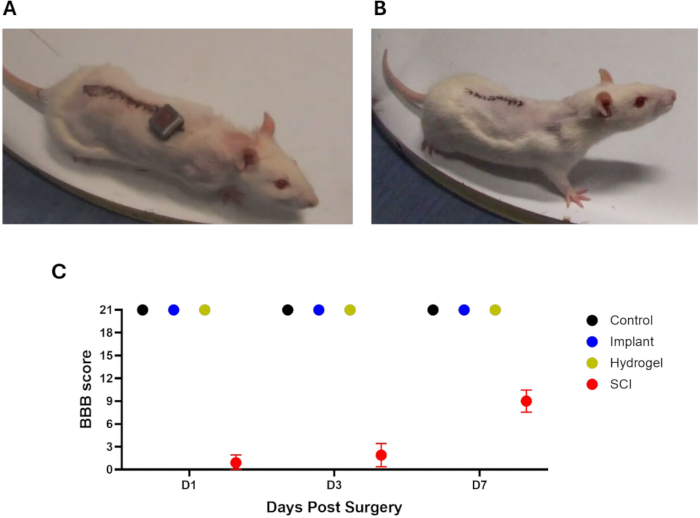
Figure 4: Post-operative condition and motor function. (A) Representative images of animals following device implantation and hydrogel delivery. (B) Representative BBB scores of animals with a spinal contusion injury compared to animals that either underwent a subdural procedure (Implant or Hydrogel) or control animals that had no manipulation. The control (unoperated), SCI, and Implant group sample sizes were n = 5, and the Hydrogel group sample size was n = 3. Error bars represent standard error. Please click here to view a larger version of this figure.
Supplementary Figure 1: Surgery tools. Photograph of surgery tools used. (1) #10 blade scalpel. (2) Vannas micro scissors. (3) Graefe forceps. (4) Serrefine bulldog clips. (5) Rongeurs. (6) 27 G needle for durotomy. (7) Fine forceps. (8) 1 mL syringe for as-needed saline application. (9) Dissection scissors. (10) Haemostats for suturing. (11) Pointed cotton swabs. (12) Sterilized cotton balls. (13) Rolled lint-free wipes. Please click here to download this figure.
Supplementary Figure 2: Subdural vs. epidural space. Schematic representation of the spine and spinal cord, demonstrating the epidural vs. subdural space. Please click here to download this figure.
Discussion
The methodology presented here provides step-by-step instructions for accessing the spinal subdural space and demonstrates its safety and feasibility through two examples of treatment delivery to the thoracic region of the spinal cord11,12. Numerous research groups have developed approaches in an attempt to treat spinal cord injury (SCI) through electrical or chemical interventions. Current strategies, including implantable devices for optogenetics17 or electrical stimulation18, as well as pharmaceutical therapies utilizing hydrogels19,20, have demonstrated varying degrees of success in facilitating recovery and rehabilitation. However, precise targeting remains a critical challenge, as most current treatments are delivered outside the subdural space. The technique described here offers a promising approach for delivering interventions directly to the spinal cord, including a means of long-term access to the subdural space (Supplementary Figure 2), supporting sustained and targeted delivery of therapeutic agents for SCI and neurodegenerative conditions. This has important implications for bypassing the blood-spinal cord barrier, a major challenge in developing effective treatments for spinal cord disorders.
Laminectomy
While laminectomy procedures in rodents are widely used17,21,22, there are several critical aspects of the protocol that must be noted. The anatomical landmarks used in the above protocol (step 4.3; Figure 2A) allow for access to the lower thoracic region of the spinal cord and are specific to our group's work. If the procedure is to be applied to a different spinal region, one can count segments either rostral or caudal to the initial vertebrae to determine location. Another crucial consideration is the extent of removal of the lamina. To minimize the risk of unwanted injury to the spinal cord during the procedure, at least two contiguous levels should be removed. Doing so provides sufficient space for the durotomy and ensures proper visualization. This precaution reduces the risk of injuring small blood vessels during the catheter insertion. Excessive bone removal from the sidewall of the spine should also be avoided to prevent unnecessary bleeding or instability of the spinal column post-surgery. By maintaining a balance between adequate access and minimal disruption, the procedure ensures safer and more precise treatment delivery.
Durotomy and catheter insertion
Performing the durotomy requires precision to avoid penetrating the spinal cord. Improper insertion can result in bruising or lacerations to the spinal cord or subdural blood vessels. The openings created in the dura should be just large enough to accommodate the desired treatment strategy, in this case, the diameter of the intrathecal catheters, without compromising the membrane's integrity. When performing the durotomy, cerebrospinal fluid may leak when the dura mater is punctured; however, the quantity is minimal. While large tears in dura can result in complications, previous literature suggests that small punctures such as those used in the described protocol (step 6.4) are able to self-heal via collagen deposition/vascularization23, resulting in no measurable adverse effect following the procedure. When placing the catheters, they must be inserted as parallel as possible to the spinal cord to minimize the risk of injury from direct force. Careful handling is necessary to prevent bending or crimping, ensuring smooth insertion and proper positioning.
Post-operative care
Post-operative care following the procedure is an important consideration given that rodents are typically group-housed in standard conditions. Aggressive behaviour or social interactions after this procedure may affect experimental outcomes, depending on the type of treatment applied. This protocol results in a 6-8 cm line of skin sutures along the back of the animal. It is recommended to keep single-house animals for 7-10 days post-op to allow for wound healing and prevent potential removal of sutures by a cage mate. In the case of a drug delivery application, once the incision heals, they can be re-housed into previous groups with no overtly aggressive behaviour or complications related to the procedure. In the case of implantable devices, animals should only be housed in groups of 2. We have found that housing animals in groups of 3 or more can result in aggression-related complications with treatment outcomes.
Treatment applications
Although the procedure described here focuses on the thoracic spinal cord and two specific treatment strategies, it is adaptable for other regions of the spine and additional therapeutic applications. Similar laminectomy procedures have been successfully performed at various spinal levels in rodent models. However, the small subdural space in rodents presents a challenge, leaving minimal room for error during treatment delivery. While the laminectomy and durotomy steps can be easily performed by those experienced in rodent surgeries, precise placement of a device or drug under the dura without causing injury may require additional training time. In addition to surgical training, there are several factors that can aid in treatment application. Maintaining a clear field of view while applying treatment is crucial. Ensure, when using intrathecal catheters as described in this study, that there are no jagged or rough spots on the catheters before inserting them under the dura. As mentioned above, the durotomy location is extremely important. The further away the catheter entry point is from the remaining rostral lamina, the easier it is for the catheters to be lined up and remain parallel to the spinal cord during insertion. The timing of treatment strategies in relation to an injury should also be taken into consideration. Future work will involve establishing these procedures in animals at various timepoints post-injury to subsequently allow for evaluation of treatments intended to address chronic injuries. This protocol represents a significant advancement in treatment application for neurological diseases of the spinal cord and provides a versatile and precise approach to delivering therapies directly to spinal cord tissue.
Disclosures
The authors have nothing to disclose.
Acknowledgements
This work is funded by CatWalk Spinal Cord Injury Trust and an HRC Sir Charles Hercus Research Fellowship (BH). This work was also supported by the Assistant Secretary of Defense for Health Affairs, endorsed by the Department of Defense, in the amount of US$534,258, through the Spinal Cord Injury Research Program under Award No. HT9425-23-1-0492. The schematics in Figure 2A and Figure 3A were generated using Biorender.com. The bioelectronic devices used in this publication were designed and provided by Dr. Maria Asplund and Lukas Matter at Chalmers University of Technology.
Materials
| Name | Company | Catalog Number | Comments |
|---|---|---|---|
| 1 mL and 3 mL syringes | Amtech | ||
| 1ml Tuberculin syringes | BD | 302100 | |
| 2 x Graefe Forceps | FST | 11051-10 | |
| 25G needles for drug admin | Nipro | SH811 | |
| 27G needles for dural incision | Nipro | SH816 | |
| 6 x Tissue bulldog clamps | FST | 18051-28 | |
| 70 % Ethanol | |||
| Baytril 5 mg/kg | Elanco | KV04UHU | |
| Biogel Surgeons Latex gloves | Molnlycke | 822775-01 | |
| Bupivicaine 2 mg/kg | Aspen New Zealand | 2023-02 | |
| Buprenorphine 0.05 mg/kg | Ceva (Vetergesic) | 9000320 | |
| Chlorhex and ehtanol tincture | Perrigo | K076A | |
| Chlorhex scrub | Schulke | LBL11258 | |
| Curved rongeurs | FST | 16021-14 | |
| Dumont #4 forceps | FST | 11294-00 | |
| Gelfoam, sterile absorbable gelatin sponge | GELFOAM | 09-0342-04-015 | |
| Hamilton syringe | Hamilton | 80314 | |
| Heating pad (37 oC) | Kent scientific | SF-01 | |
| Hemostat | FST | 13004-14 | |
| Infinite Horizon impactor and software | Precision systems and instrumentation (PSI) | IH-0400 | |
| Isoflurane | Medsource | unknown | |
| Metacam 2 mg/kg | Boehringer Ingelheim | D02818 | |
| Nonabsorbable sutures (Ethilon 4-0, P-3) | Ethicon | 1603G | |
| O2 tank | |||
| Omax Surgical Microscope | Jacobs Digital | W43DPT | |
| Press and Seal plastic wrap for draping | Glad | N/A | |
| Scalpel handle | Fine Science Tools (FST) | 10004-13 | |
| Size 10 scalpel blades | Amtech Medical | SH070 | |
| Somnoflow Induction Suite | Kent Scientific | SF-01 | Low flow anaesthesia system |
| Sterile absorbent pads and cotton wool | Swisspers | N/A | |
| Sterile cotton buds (standard + pointed) | help@hand | N/A | |
| Sterile saline 0.9% | made and autoclaved in lab | N/A | |
| Sterile sections of rolled up Kim Wipe | Kimtech Science | 34155 | |
| Temperature Probe | Kent scientific | SF-01 | |
| Vannas Spring Scissors | FST | 15903-08 | |
| Water-based lubricant | |||
| Weigh scales | Any | N/A |
References
- Ahuja, C. S., et al. Traumatic spinal cord injury. Nat Rev Dis Primers. 3, 17018(2017).
- Lee, B. B., Cripps, R. A., Fitzharris, M., Wing, P. C. The global map for traumatic spinal cord injury epidemiology: Update 2011, global incidence rate. Spinal Cord. 52 (2), 110-116 (2014).
- Alizadeh, A., Dyck, S. M., Karimi-Abdolrezaee, S. Traumatic spinal cord injury: An overview of pathophysiology, models and acute injury mechanisms. Front Neurol. 10, 282(2019).
- Chari, A., Hentall, I. D., Papadopoulos, M. C., Pereira, E. A. Surgical neurostimulation for spinal cord injury. Brain Sci. 7 (2), 18(2017).
- Krucoff, M. O., et al. Spinal cord stimulation and rehabilitation in an individual with chronic complete L1 paraplegia due to a conus medullaris injury: Motor and functional outcomes at 18 months. Spinal Cord Ser Cases. 6 (1), 96(2020).
- Chalif, J. I., et al. Epidural spinal cord stimulation for spinal cord injury in humans: A systematic review. J Clin Med. 13 (4), 1090(2024).
- Powell, M. P., et al. Epidural stimulation of the cervical spinal cord for post-stroke upper-limb paresis. Nat Med. 29 (3), 689-699 (2023).
- Calvert, J. S., Grahn, P. J., Zhao, K. D., Lee, K. H. Emergence of epidural electrical stimulation to facilitate sensorimotor network functionality after spinal cord injury. Neuromodulation. 22 (3), 244-252 (2019).
- Capogrosso, M., et al. Advantages of soft subdural implants for the delivery of electrochemical neuromodulation therapies to the spinal cord. J Neural Eng. 15 (2), 026024(2018).
- Kwiecien, J. M., et al. Neuroprotective effect of subdural infusion of serp-1 in spinal cord trauma. Biomedicines. 8 (10), 372(2020).
- Harland, B., et al. A subdural bioelectronic implant to record electrical activity from the spinal cord in freely moving rats. Adv Sci (Weinh). 9 (20), e2105913(2022).
- Meissner, S., et al. Safe subdural administration and retention of a neurotrophin-3-delivering hydrogel in a rat model of spinal cord injury. Sci Rep. 14 (1), 25424(2024).
- Harland, B., et al. Daily electric field treatment improves functional outcomes after thoracic contusion spinal cord injury in rats. bioRxiv. , (2024).
- Krishna, V., et al. A contusion model of severe spinal cord injury in rats. J Vis Exp. 78, e50111(2013).
- Donsante, A., Rasmussen, S. A., Fridovich-Keil, J. L. Intrathecal vector delivery in juvenile rats via lumbar cistern injection. J Vis Exp. (205), e66463(2024).
- Basso, D. M., Beattie, M. S., Bresnahan, J. C. A sensitive and reliable locomotor rating scale for open field testing in rats. J Neurotrauma. 12 (1), 1-21 (1995).
- Shalileh, S., Moallemi, A., Tsuyuki, B., Simard, A. A. P., Shahriari, D. Implantation of optoelectronic devices in the rodent spinal cord. J Vis Exp. (209), e66992(2024).
- Hachmann, J. T., et al. Epidural spinal cord stimulation as an intervention for motor recovery after motor complete spinal cord injury. J Neurophysiol. 126 (6), 1843-1859 (2021).
- Ye, J., et al. Rationally designed, self-assembling, multifunctional hydrogel depot repairs severe spinal cord injury. Adv Healthc Mater. 10 (13), e2100242(2021).
- Wu, W., et al. Supramolecular hydrogel microspheres of platelet-derived growth factor mimetic peptide promote recovery from spinal cord injury. ACS Nano. 17 (4), 3818-3837 (2023).
- Pietruczyk, E. A., Stephen, T. K. L., Alford, S., Lutz, S. E. Laminectomy and spinal cord window implantation in the mouse. J Vis Exp. (152), e58330(2019).
- Zhou, X. H., et al. Design and evaluation of a novel laminectomy auxiliary device based on rats. IEEE Trans Neural Syst Rehabil Eng. 28 (3), 621-628 (2020).
- Ahmadi, S. A., et al. The effect of L-arginine on dural healing after experimentally induced dural defect in a rat model. World Neurosurg. 97, 98-103 (2017).
Reprints and Permissions
