Rodent Identification I

Source: Kay Stewart, RVT, RLATG, CMAR; Valerie A. Schroeder, RVT, RLATG. University of Notre Dame, IN
A fundamental requirement of biomedical research…
All animal procedures described here must be conducted in accordance with institutional animal ethics guidelines and approved by IACUC. All procedures must follow the principles of the 3Rs—Replacement, Reduction, and Refinement—and must be performed by trained personnel.
1. Ear punch identification
Ear punch codes have been developed as a quick and inexpensive method to label individual animals. There are three styles of ear punches: the scissor punch, the thumb punch, and the lever punch. The animal's right ear is used for single digits, the left ear for tens, and the middle of the ears for hundreds.
- Restrain the animal so that the ears are easily accessible. Most mice are ear tagged for individual identification at weaning. This requires gentle handling due to their smaller, more fragile size. Some mice are less likely to struggle if the hind limbs can rest on a surface such as a cage top or a counter top.
- Determine the ear punches needed to correspond to the animal's experimental number or to identify it within a cage.
- Punches will be notches or holes depending on the code used.
- The last number on the ear tag is often used as the ear punch identifier when it is the secondary method of identification.
- If animals are on a short-term study in stable cage groups, they can be given sequential numbers. This is often done when there are no ear tags present.
- Make the ear punch.
- To make a notch, the punch is placed on the edge of the ear pinna.
- To make a hole, place the ear in the punch so that the hole of the punch is positioned away from the pinna margin in the desired position.
- Apply pressure to the thumb or lever punch, or close the scissor punch quickly and firmly to cut through the skin of the ear.
- Gently lift the punch away from the ear when using the thumb or lever punches. Open the scissor punch to remove it from the ear.
- Avoid pulling or twisting the punch to prevent tearing the ear.
- Punches do dull after time. Should a punch fail to cut through the ear, release the punch and select a new ear punch. Reposition the new punch in the same spot.
- Clean the punches after each use.
- All punch types will dull if autoclaved. It is recommended that they be cleaned with a disinfectant and rinsed with alcohol. Dry them thoroughly to prevent rusting.
- Ear punches to be used for PCR are routinely soaked for 3 minutes in a solution to remove residual DNA or RNA. Before use they are rinsed in alcohol and wiped dry.
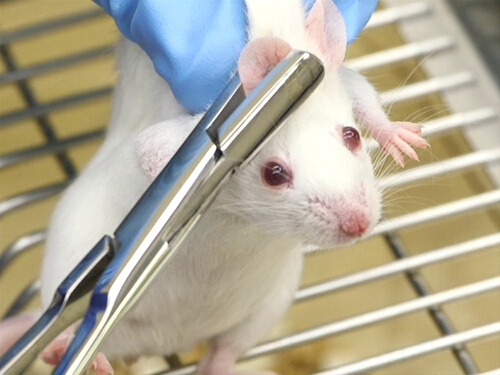
Figure 1. Ear punching in mice using scissor punch.
2. Ear tag identification
Customized ear tags can be ordered from manufacturers with alphabetical and/or numerical codes, which allows for the differentiation of mouse strains or investigators. Ear tags can be made of metal or plastic. Some plastic tags have QR codes which require the use of a compatible scanner or reader to access the encoded information. Unlike visual identification methods, QR codes cannot be interpreted without external devices such as smartphones or dedicated scanners. This reliance on external scanning devices represents a practical limitation, as access to appropriate equipment may not always be immediate in all facility settings and can impact workflow efficiency during routine procedures.
- Select the ear tags appropriate for the animals to be identified. There are several styles of appliers available from ear tag manufacturers. Be sure to order the applier that is for the specific size and style of ear tags being used.
- Gently remove a tag from the cardboard holder, and orient it into the applier so that the end with the hole is positioned over the notched area of the applier. The pointed end of the tag should be opposite the notch.
- Restrain the animal so that the ears are easily accessible. Animals may be less likely to struggle if the hind limbs can rest on a surface, such as a cage top or a counter top.
- Properly position the ear tag for placement.
- Position the point of the ear tag as deeply in the concha of the ear as possible, so the tag numbers face the back of the animal.
- To have the ear tag numbers facing the nose of the animal, place the point of the tag at the base of the pinna on the back of the ear.
- Apply the tag.
- Firmly squeeze the applier closed. The ear tag will pierce the ear and lock together.
- Release the applier, and the tagged ear will fall out of the applier.
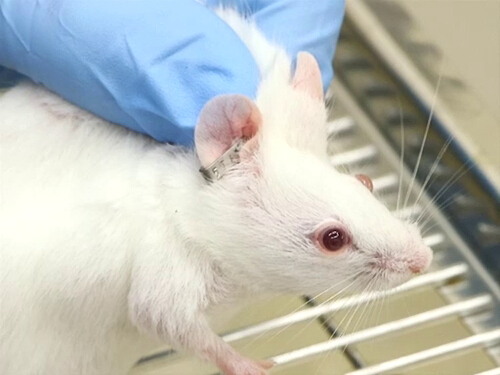
Figure 2. A mouse with an ear tag that is properly positioned on the pinna.
- Remove the metal ear tags.
NOTE: On occasion, metal ear tags can cause irritation and swelling of the ear. The swelling and irritation often leads to infections of the pinna. Treatment should include the removal of the tag; however, in cases of severe irritation or infection, the animal may need to be anesthetized.- Remove debris from around the tag with a cotton-tipped applicator moistened with an antiseptic solution.
- Cut across the top of the tag loop from edge-to-edge with wire cutters. Do not cut across the flat surface, as this will compress the tag, pinch the ear, and cause further damage.
- Avoid applying torque while cutting to prevent tearing the ear.
- Use hemostats to spread the cut ends of the ear tag apart.
- Gently guide the ear tag through-and out of-the ear using hemostats. Reduce trauma by avoiding the enlargement of the piercing hole and slipping the tag out so that the crimped end does not pass through the ear.
- Once the tag is gone, wipe the ear with an antiseptic-soaked cotton applicator stick.
- If there is a purulent discharge from the ear, follow-up treatment may be necessary and consultation with the veterinary staff for assessment is recommended.
Key Terms and Definitions
Ear tags are inexpensive and easy to perform, and as a result are commonly used for the identification of individual mice and rats. Tags can be custom-made with a series of numbers and/or letters. Assigning specific codes to a mouse/rat strain, or to a Principle Investigator (PI), aides in recordkeeping and database management, especially in large breeding colonies where there are multiple strains and PIs. In addition, there are a variety of tags commercially available. Metal tags have characters etched on them. Although this etching is clear, when working with a mouse it is often necessary to pick it up in order to read the code on the tags due to the small size of the tags. Other options are plastic tags with either numbers and/or letters on brightly colored backgrounds, or plastic tags with a barcode on the front surface. Both of these options allow the tags to be read without having to handle the animals. Another advantage to plastic tags is their compatibility with MRI imaging.
The positioning of the tag on the ear is critical, as improper positioning can have several unfortunate consequences. Tags must be placed such that they do not cause a bend in the pinna, interfere with the animal's mobility, or catch on any part of the caging. If the tag is placed too close to the edge of the ear it can easily be torn from the pinna tissue. If positioned too close to the head, the skin of the neck area can catch in the tag, which will create irritation, pain, and restricted movement. This can then lead to self-trauma from the animal scratching at the tag, ripping it from the ear, or getting a foot caught in the tag. Training for proper placement and technique is essential.
While tags provide individual identifiers for mice or rats, they are not infallible. Tags can be lost due to fighting, over-grooming, dermatitis in susceptible strains, infection, or self-trauma. Adult rats in particular are less tolerant of ear tags and often remove them, inflicting self-trauma. The more aggressive breeding behavior in rats can also lead to an ear tag being torn from the pinna. If mice or rats are paired or group-housed, the loss of an ear tag on more than one animal can be troublesome. To circumvent this problem, a secondary form of identification-such as a punch code used on the ear opposite of the tag, or a tail or toe tattoo-should be utilized. A facility should standardize both the choice of ear to be tagged and the code to be used on the other ear or on the toes. All codes should be indicated on the cage card.
The use of ear punch codes allows for a quick and simple method of identification, but the technique has limitations. Commonly used codes have an upper limit for numbers available for use, usually a maximum of 100 to 399. To read the ear punch codes, most animals must be grasped at the scruff. The punches can double as tissue samples for PCR genotyping, which allows for animal identification and genotype sampling to be accomplished simultaneously. This results in less stress to the animals from repeated handling.
There are three styles of ear punches: the scissor punch, the thumb punch, and the lever punch. Although all are equally effective, there are advantages and disadvantages to each. For example, as rats age, the skin of their ears thickens. It is best to perform the ear punches on young rats as they are weaned. For adult rats that require identification, the use of inhalant anesthesia should be considered. Ergonomically, the level punch is easier to use than a thumb punch, especially for the thicker ears of older rats. However, both of these punches require a pinching motion of the fingers. The scissor punch has the ergonomic advantage of not requiring a pinching motion, thus avoiding carpal tunnel fatigue and injury. In contrast, the thumb punch is advantageous for collecting genotyping samples, as the tips with the tissue material will fit into an Eppendorf tube. The style of punch to use should be determined by the individuals performing the task and the age of the rats.
For rats, although metal tags are most often used, studies have shown that there are consequences to using them. Inflammation, neoplastic changes, and even chronic pain have been observed in animals that have worn metal ear tags for several months.The tags should be promptly removed from the ear if there is an adverse reaction, and the subsequent injury should be examined and treated, if necessary, by the veterinary staff.
Proper care and maintenance of punches will extend their usage. All types of punches will dull if autoclaved, so it is recommended to clean them with a disinfectant and rinse them with alcohol. Then, they must be thoroughly dried to prevent rusting. If the punches are used for PCR, they should be soaked for 3 minutes in a solution that removes residual DNA or RNA. Before use they are rinsed in alcohol and wiped dry.
Questions that this video will help you answer
When choosing the appropriate identification method, many factors must be deliberated. Each technique has advantages and disadvantages that must be considered in relation to the experimental needs. While the costs must be weighed along with other factors, the ease of the technique and the level of discomfort to the animals should be the primary considerations.
Ear punching/notching is commonly used in mice and rats because there is little cost, and the procedure is easily done. To read the ear punch codes, most animals must be grasped at the scruff. However, the punches can double as tissue samples for PCR genotyping, which allows for identification and genotype sampling to be accomplished simultaneously, thus resulting in less stress to the animals from repeat handling.
Accurate identification of lab animals is essential to ensure the correct animal is used for experimental procedures and reliable data collection.
Several invasive and non-invasive methods exist to identify lab animals; common invasive methods include ear tagging and ear punching, which require institutional approval.
However, non-invasive methods are preferred whenever feasible, as they reduce animal discomfort and improve welfare.
Before performing ear punching, it’s important to understand the coding system, punch types, and their benefits and disadvantages.
Ear punching involves creating holes or notches in the external ear (pinna) to uniquely identify animals.
Many facilities use an institution-approved ear-punch or ear-notch coding system. In commonly used systems, markings on the right ear represent unit values, while markings on the left ear represent tens, and central punches represent hundreds.
In these systems, single punches or notches, double notches, and combinations of these markings at designated positions are used to assign numerical values.
For example, if you want to label the animal as 39, make a hole in the right ear at the designated place to indicate the number 30, and a double notch in the left ear at the designated place to indicate the number 9.
When assigning codes, it is important to use the simplest pattern necessary, minimizing the number and size of punches or notches to reduce tissue damage. It is highly recommended to use the excised tissue for genotyping.
There are three styles of commercially available ear punches: the scissor punch, the thumb punch, and the lever punch. Each of these has its advantages and disadvantages.
The thumb punch requires a pinching motion, but is small enough to fit into an Eppendorf tube so that the ear tissue can be more easily collected.
Ergonomically, the lever punch is easier to use than the thumb punch, especially for the thicker ears of the older rats.
The scissor punch does not require a pinching motion, thus avoiding carpal tunnel fatigue and injury.
Although ear punching is a quick and simple identification method, it has limitations such as a restricted identification range and potential welfare concerns, making it less suitable for large-scale or refinement-focused studies.
Another limitation is that as animals age, the skin of their ears thickens, and it is difficult to perform an ear punch without causing significant distress to the animal.
Therefore, it is best to perform the ear punches on young rats as they are weaned. For adult animals that require identification, the use of inhalant anesthesia should be considered as per institutionally approved guidelines.
Before ear punching, clean the punching tools with a disinfectant solution, rinse with alcohol, dry thoroughly, and avoid autoclaving.
First, restrain the animal by grasping it at the scruff so that the ears are easily accessible.
To make a hole in the ear, place the right ear in the punch, ensuring the hole is positioned away from the pinna margin.
Next, apply pressure to close the scissor quickly and firmly to cut through the skin. Then, release the pressure and remove it from the ear.
Avoid pulling or twisting the punch to prevent tearing. For a notch, place the punch at the ear pinna edge and apply quick, firm pressure, then open the scissors to remove it.
Confirm that the correct code was punched before adding the animal back to the cage.
Then clean the punch with disinfectant, rinse with alcohol, and dry thoroughly to prevent rusting.
Ear tagging is another method for the identification of mice and rats.
There are a variety of commercially available ear tags. These include: metal tags that have a series of numbers and/or letters etched on them, and plastic tags with characters or barcodes.
One disadvantage of metal tags is that it is often necessary to pick up the animal in order to read the code. In contrast, plastic tags are easy to read without having to handle the animals.
Another advantage of plastic tags or non-metal tags is their compatibility with MRI imaging. While the tags provide an individual identifier for a mouse or rat, they are not infallible. Tags can be lost due to over-grooming, infection, fighting, and aggressive breeding behavior.
If several animals are housed in the same cage, the loss of an ear tag can be troublesome. Ear selection and identification codes should follow institutionally approved protocols, and all information should be clearly recorded on the cage card.
Now, let's learn how to apply an ear tag, as incorrect positioning can have several unfortunate consequences.
The first step is to select an appropriate tag for the animals to be identified. Here, we will use a metal tag to demonstrate the procedure on mice. Be sure to order the applier that is appropriate for the specific size and style of ear tags being used.
Gently remove the tag and orient it into the applier so that the end with the hole is positioned over the notched area of the applier. The pointed end of the tag should be opposite the notch.
Restrain the animal so that the ears are easily accessible.
Position the tag in the lower third of the pinna, avoiding the ear margin and base. Then, firmly squeeze the applier closed; the ear tag will pierce the ear and lock together.
When you release, the tagged ear will fall out of the applier. Confirm that the tag has been properly positioned and applied.
All procedures should be performed by trained personnel and in accordance with the approved IACUC or institutional protocol. Animals should be monitored following tagging for any signs of irritation, swelling, or self-trauma, and appropriate action should be taken if complications arise.
Tags must be placed such that they do not cause a bend in the ear, interfere with the animal's mobility, or catch on any part of the caging. If the tag is placed too close to the edge of the ear, it can easily be torn.
In order to remove the tag, moisten a cotton-tipped applicator with an antiseptic solution and use it to remove any debris from around the tag. In severe cases of infection, anesthesia or analgesia should be used in accordance with institutional veterinary guidance.
Then, using wire cutters, cut across the top of the tag loop from edge to edge. Importantly, do not cut across the flat surface as that will compress the tag, pinch the ear, and cause damage to the ear. Using hemostats, gently guide the ear tag through and out of the ear.
Slip the tag out so that the crimped end does not pass through, causing trauma and enlargement of the piercing hole. Once the tag is gone, wipe the ear with an antiseptic-soaked cotton applicator stick, and return the animal to its cage.
All procedures should be performed by trained personnel following approved institutional protocols to minimize animal distress.
If there is a purulent discharge from the ear, follow-up treatment may be necessary, and consultation with the veterinary staff for assessment is recommended. The same precautions apply while removing the plastic tag.
Let's review some experiments in which the ear tags and punches can be useful. One major advantage of using ear punch code is that the punches can double as tissue samples for genotyping, thus reducing stress to the animals caused due to repeat handling.
However, if you plan to use the punches for collecting PCR samples, remember to first soak the apparatus in a surface decontaminant solution to remove residual DNA or RNA, followed by appropriate rinsing prior to use, in accordance with institutionally approved guidelines.
Identification technique's importance increases further if the experiment is lasting over several days. For example, in this experiment, the scientists first labeled the animals using a metal tag, and then they injected the sciatic nerve with a suspension of transgenic tumor cells expressing luciferase protein.
Next, in order to quantify cancer progression, they imaged the animals using bioluminescence at one, ten, and eighteen days post-injection.
You've just watched JoVE's presentation demonstrating the two commonly used methods of identification in rodents: ear tags and ear punches. You should now understand the ear punch code, know the different types of commercially available rodent ear tags, and should be able to accurately perform these procedures without causing significant animal discomfort.
Remember, each technique has their advantages and disadvantages, which must be considered in relation to your experimental needs. In addition to considering cost, the ease of the technique, and the level of pain to the animals should be some of the primary considerations when choosing the appropriate identification method.
View the full transcript and gain access to JoVE Science Education videos
Q1: How does the ear punch code system work for identifying rodents?
The ear punch code uses standardized notch positions on both ears to create unique animal identifiers. Right ear notches represent single digits (1, 3, 5 for units; double notch for 2), while left ear notches represent tens (10-90). Center holes represent 100 (right ear) and 200 (left ear), with both holes indicating 300. This system allows labeling animals from 1 through 399 by combining notch values.
Q2: What are the main differences between scissor, thumb, and lever ear punches?
Scissor punches avoid pinching motions, reducing carpal tunnel fatigue and injury. Thumb punches are small enough to fit in an Eppendorf tube for easier tissue collection but require a pinching motion. Lever punches are ergonomically superior for thicker ears of older rats. Each design offers distinct advantages depending on your specific research needs and animal age.
Q3: Why is ear punching best performed on young rats rather than adults?
As rats age, their ear skin thickens, making ear punching difficult and causing significant distress without anesthesia. Young rats, ideally when weaned, have thinner, more pliable ears that tolerate the procedure better. For adult rats requiring identification, inhalant anesthesia induction and maintenance laboratory animals should be considered to minimize animal discomfort during ear punching.
Q4: What are the advantages and disadvantages of metal versus plastic ear tags?
Metal tags require picking up the animal to read the code, while plastic tags are easily readable without handling. Plastic tags are compatible with MRI imaging and reduce animal stress from repeated handling. However, both tag types can be lost due to over-grooming, infection, fighting, or self-trauma. Using a secondary identification method like punch codes on the opposite ear prevents identification loss.
Q5: What positioning errors should be avoided when applying ear tags to rodents?
Tags placed too close to the ear edge risk tearing; tags positioned too close to the head can catch neck skin, causing irritation and restricted movement. Tags must not bend the ear, interfere with mobility, or catch on caging. Incorrect positioning leads to self-trauma, infection, and swelling, potentially requiring tag removal and veterinary treatment.
Q6: How should ear punch tissue samples be prepared for PCR genotyping?
Before collecting punch tissue for PCR samples, soak the apparatus in a surface decontaminant solution for at least 3 minutes to remove residual DNA or RNA, then rinse with alcohol. This preparation prevents contamination and ensures accurate genotyping results. Using punches for tissue collection reduces animal stress by eliminating repeat handling for separate sampling procedures.
Q7: What is the proper procedure for removing an infected ear tag from a rodent?
First, moisten a cotton-tipped applicator with antiseptic solution and remove debris around the tag. For severe infections, anesthetize the animal. Using wire cutters, cut across the tag loop edge-to-edge, never the flat surface. Gently guide the tag out with hemostats, avoiding the crimped end to prevent hole enlargement. Wipe the ear with antiseptic and monitor for purulent discharge requiring veterinary follow-up.