Diagnostic Necropsy and Tissue Harvest

All animal procedures described here must be conducted in accordance with institutional animal ethics guidelines and approved by IACUC. All procedures must follow the principles of the 3Rs—Replacement, Reduction, and Refinement—and must be performed by trained personnel.
1. External examination
A gross external examination of the body, which includes visual inspection of the body for lesions and masses, should be performed as the initial step in a necropsy. The hair coat should be examined for areas of hair loss. The teeth and nails are evaluated for excessive growth or wear. Any staining of the fur at the mouth, nares, eyes, anal, and genital openings should be noted. Tape tests, skin scraping, and pelt exams should be performed to detect external parasites (see procedures below).
- Tape test
- Equipment required for a tape test includes gloves, a strip of clear cellophane tape, a glass microscope slide, and scissors.
- Gloves are always worn when handling the tape, as the adhesive will lift oils and skin cells from the fingers, obscuring findings or causing confusion when evaluating the slide.
- Cut a piece of tape that is slightly narrower than the width, and shorter than the length, of the microscope slide.
- Carefully press the sticky side of the tape to the anus and surrounding area, and quickly remove it.
- Using the opposite end of the tape, press it between the shoulder blades and quickly remove it.
- Apply the tape to the microscope slide.
- The tape test is ready for microscopic examination. Parasite eggs are visible at 4X magnification but should then be examined at 10X magnification to properly identify the species.
- It is important to avoid touching the adhesive side of the tape. The tape will lift debris from the gloved hands and make reading the slide difficult.
- Skin scraping
- The skin-scraping test is performed on any areas of alopecia, skin lesions, or excoriation.
- The equipment required for skin scraping is a clean glass microscope slide, mineral oil, and a metal spatula or scalpel blade.
- Place a few drops of mineral oil onto the microscope slide.
- Pinch the skin into a fold at the edge of the lesion or area of interest.
- Place a small amount of mineral oil on the skin.
- Place the edge of the spatula or scalpel blade on the skin, and scrape against the direction of the hair growth.
- Continue scraping until a small amount of redness is visible on the skin.
- Place the hair and tissue scraped from the skin surface into the oil on the microscope slide. If needed, spread the material so that it is distributed evenly in the oil.
- The slide is now ready to be examined under the microscope. If desired, a coverslip may be applied to the oil drop on the slide. Examine the slide at 4X and 10X magnification.
- Pelt exam
- The pelt exam is the last external examination performed; however, it is actually done after the internal examination is completed.
- The animal is placed in a glass or plastic Petri dish after all internal organ samples have been collected.
- The dish is placed in a refrigerator for 15 minutes.
- After 15 minutes, the dish is placed under a dissecting microscope and the pelt is examined for external parasites. Most fur mites will move to the ends of the hairs and are easily observed.
2. Internal gross examination of the abdominal cavity
- Excising the skin
- A small cut is made just anterior to the pelvis in females and above the prepuce in males.
- The skin cut is extended to the chin.
- Blunt dissection is used to loosen the skin from the fascia and muscle.
- Transverse cuts are made anterior to the hind limbs and posterior to the fore limbs. Care should be taken not to sever the blood vessels in the axillary area.
- Use blunt dissection to expose the cervical area and chest. Extra care should be exercised to avoid rupture of the jugular and carotid vessels in the neck.
- Mammary glands
- In females, examine the mammary tissue to look for masses, discoloration, or abnormalities.
- Lactating or pregnant females will have increased mammary tissue volume, and milk may be present.
- Mammary tissue is found from the top of the sternum at the manubrium to the genital opening on the ventral surface, and extends laterally up both sides nearly touching on the dorsal surface at the hips and shoulders.
- Excision of the mammary glands requires grasping the edge of the gland with thumb forceps and using blunt dissection to loosen attachments to the skin. Once the gland has been separated from the skin, iris scissors can be used to cut any remaining attachments before placing the gland in a fixative solution.
- Subcutaneous glands
- Preputial glands are paired and located just anterior to the prepuce in the male rat. They appear large and are a gray to yellowish color with a foamy appearance.
- Submandibular salivary glands are paired, located at the mandible, and extend along the neck to the manubrium sternum. They have a tough covering and are tightly adhered to the muscles.
- Removal of these glands requires blunt dissection and extra care when working in the cervical region to prevent rupture of blood vessels. Blunt dissection is a technique in anatomical dissection in which tissues are separated and underlying structures exposed without cutting.
- For blunt dissection, the scissors are used to spread tissues apart, rather than to cut them apart. The closed tips are pushed into tissue and then opened to split tissue along natural planes. This process requires patience and a delicate touch, as the stretching of the tissue can result in damage to adjacent organs and blood vessels.
- The glands, once freed from the underlying muscles, are lifted and any residual attachments are severed.
- The glands require at least one cut to allow penetration of the fixative.
- Subcutaneous fat is evaluated for quantity and deposition. An obese animal may have a large amount of fat with the skin feeling thickened. Animals that are dehydrated will have reduced elasticity of the skin, and it will feel thinner.
- Muscle
- Observe the abdominal, intercostal, and exposed muscles of the neck and limbs. Note any abnormal thickening, masses, or discoloration.
- If muscle is needed for analysis, select and cut away the sample prior to taking any abdominal organs to reduce blood contamination.
- Opening the body cavity
- A small transverse cut is made at the most caudal point of the exposed abdominal muscle.
- Lifting the muscle away from the organs, cut along the linea alba to the xiphoid.
- Cut the abdominal muscles from the midline laterally, just above the hind limbs on both sides.
- Cut the abdominal muscle along the curve of the ribs on both sides.
- Abdominal fat
- Evaluate the quantity and accumulation of body fat. A healthy animal will have abdominal fat pads and some fat along the dorsal surface in the abdominal cavity. An excessively thin animal, or a very young animal, will not have appreciable amounts of fat surrounding the kidneys.
- Observe the color of the body fat and note any abnormalities.
3. Abdominal organs
- Liver
- Normally, the liver color should be a dark red. The margins should be smooth and have a crisp edge. An abnormal liver will have a thickened edge and can have notches or scalloped edges.
- Care should be taken when handling the liver, as it is a friable tissue. Any disruption to the integrity of the organ will result in blood leaking into the body cavity and obscuring the organs.
- Gently reflect the liver away from the diaphragm, and make a cut through the blood vessels anterior to the liver.
- Reflect the liver back toward the diaphragm and grasp the fibrous node that connects all the lobes of the liver centrally. Lift the liver while severing all attachments to the intestinal tract and stomach.
- Remove the liver in one piece and blot excess blood from the surface of the organ. It may be placed in a saline bath, or rinsed in sterile saline, prior to cutting into thinner sections to allow penetration of fixative solutions.
- Gall bladder
- The gall bladder is a small transparent sac that often appears yellow due to the accumulation of bile. It is present in mice, but not in rats.
- The gall bladder is located between the top most lobes of the liver along the midline. It is generally connected to the diaphragm by a thin frenulum that can accidentally be torn, causing the gall bladder to rupture.
- The gall bladder can be removed with the liver and separated later for examination.
- Spleen
- The spleen is dark red and located along the lower curvature of the stomach. It should be regular in shape, with a slightly matte surface.
- It is generally larger in males than females. Animals with internal parasitic infections, bacterial infections, or blood diseases may have enlarged spleens.
- As the spleen filters damaged red blood cells from the circulation, it is filled with blood. When removing the spleen, avoid puncturing the organ.
- To remove it, the spleen is lifted and the attachments cut between the stomach and the spleen.
- Intestinal tract
- Postmortem changes occur rapidly and include pooling of blood in tissues, resulting in the appearance of bruising and the ballooning of the intestines with gas-often produced by bacterial overgrowth. The intestinal tract is thoroughly examined after it has been removed from the body.
- Stomach
- The stomach is located at the distal end of the esophagus. It appears to be two-toned, differentiating the muscular and glandular portions.
- The stomach should be evaluated for the presence of food by feel. Rodents generally eat constantly due to a high metabolic rate. An empty stomach should be noted, as it can be indicative of illness.
- Do not cut the stomach, as the contents will contaminate the organs in the abdominal cavity.
- To remove the stomach from the intestinal tract, the esophagus is severed just anterior to the stomach. If the stomach is to be placed into a common container of fixative, a piece of suture can be tied around the esophagus to prevent spillage of stomach contents prior to cutting.
- Small intestine
- The small intestine is composed of three sections: the duodenum, the jejunum, and the ileum. It will not contain fecal pellets.
- The duodenum is a shorter section from the posterior stomach sphincter to the start of the jejunum. The bile duct enters the small intestine at the duodenum, and the pancreatic tissue is more firmly attached to this portion of the small intestine.
- The jejunum is the central portion of the small intestine.
- Peyer's Patches-composed of lymphoid tissue in small oval patches-are present on the nonmesenteric surface of the jejunum and ileum in the rat.3 These are part of the immune system and can be helpful in the diagnosis of immune diseases.
- The ileum is the distal portion of the small intestine and is the longest part, terminating at the cecum.
- Cecum
- The cecum is a greenish color and very soft.
- It is located at the junction of the small and large intestines.
- Fermentation occurs in the cecum, so puncture of the organ will result in a foul smell and contamination of the organs with bacteria.
- Large intestine
- The large intestine begins at the cecum and continues to the anus. It is readily identifiable, as fecal pellets can be visualized within the lumen of the intestine.
- There should not be any areas of hemorrhage or discoloration immediately after euthanasia.
- Mesentery
- The small and large intestines are anchored to the body by the mesentery, a membrane containing blood vessels, fat, and lymph nodes.
- It should be examined for enlarged lymph nodes and any masses prior to removal of the intestinal tract.
- Pancreas
- The pancreas is a diffuse organ located below the stomach and between the first folds of the duodenum. It is a light tan to gray color and composed of multiple small lobes with irregular edges.
- It may not be possible to remove the pancreas in one piece.
- If the pancreatic tissue is to be harvested, it must be done prior to removal of the intestinal tract.
- Tissue identified as pancreatic must be carefully teased away from the mesenteric tissue surrounding it.
- Removing the intestinal tract
- The intestinal tract is removed as one piece, beginning with the stomach and extending to the anus.
- A cut is made through the large intestine, just anterior to the anus. The entire intestinal tract can be lifted and any membranous attachments severed. The intestinal tract can then be removed from the mesentery, cut into sections, and fixed.
- When placing sections of the intestine into jars containing other organs, it is imperative that the ends be tied to prevent contamination of tissues with intestinal bacteria.
- The lumen of the intestinal tract can be exposed by cutting down its length using small, fine-tipped scissors. The interior can be rinsed after exposing the lumen.
- Some studies may require that a portion of intestine be removed and flushed rather than cut. By securing a blunt needle into one end of the excised tissue, saline or fixative solution can be forced into the intestine to flush the contents.
- Kidney
- The kidneys are paired organs located against the muscles of the back. The right kidney is higher than the left. The kidneys in older animals may be surrounded by fat deposits, making them difficult to visualize.
- It is approximately the size and color of a dark kidney bean, and its surfaces should be smooth.
- Immediately anterior to the kidney is the adrenal gland, appearing as a small, light-pink nodule.
- To remove the kidney, isolate it using a forceps, and cut between the kidney and the ureter.
- The kidneys have a tough outer capsule that may be peeled off to better visualize the surfaces. Cut one kidney in half along the long axis and the other kidney transversely. Note any grit within the kidney could indicate the presence of crystals or mineral deposits.
- Female reproductive system
- The uterus is a Y-shaped structure. The body of the uterus is short with the paired horns on the left and right. The horns terminate at the fallopian tubes and the ovaries. In a nonpregnant female, the horns will be pale pink and thin. In a pregnant animal, the horns will appear darker and have pronounced blood vessels running adjacent to the uterine horns. As gestation proceeds, the uterine horns will have a "string of pearls" appearance. The developing embryos will create a pale area within the horn, and as they develop, the uterus will stretch and the tissue will become thinner, allowing visualization.
- The ovaries will be located just below the kidneys. They will have a rough surface due to different maturation stages of the follicles. Cystic ovaries will have fluid-filled vesicles. This fluid can range from straw colored to sanguineous.
- To remove the ovaries, cut the arterial attachments anteriorly and the fallopian tube posteriorly. If desired, the ovaries can be taken out attached to the uterus.
- To remove the uterus, it has to be gently grasped and traction applied to be able to cut below the cervix. After the cut, lift the body and horns of the uterus, breaking any attachment in the body cavity.
- Male reproductive system
- The seminal vesicles are white, ram's horn-shaped, paired structures located anteriorly to the urinary bladder and attached on the midline at the prostate gland. The size varies, but they can be as large as the cecum.
- The prostate gland is located surrounding the urinary bladder at the base. This tissue is generally a light tan. In older animals, it may exhibit hyperplasia. Older animals generally will have more body fat that may make visualization of the prostate gland difficult.
- Testes are paired and located in the scrotal sacs. The surface should be smooth with fine vascularization evident on the surface. Mice and rats lack an inguinal ring or sphincter, which allows the animal to withdraw the testes into the abdominal cavity. To visualize these, grasp the abdominal fat pads located in the lower abdomen and pull them anteriorly. This will pull the testes from the scrotum to allow examination. The epididymis is along the lower margin of the testis and tapers toward the top. The vas deferens is attached to the end of the epididymis and leads back to the prostate.
- Removal of the testes can be accomplished by cutting the attachment at the scrotum and cutting the vas deferens.
- Removing the prostate and seminal vesicles requires grasping the base of the urinary bladder and lifting, while severing the attachments beneath the prostate.
4. Thoracic cavity
- Lungs
- The lungs are normally a bright pink color, and spongy in texture with a smooth surface. However, euthanasia with CO2 can cause pulmonary hemorrhages, resulting in dark red splotches that can cover the entire lung surface.
- Heart
- The heart is dark red with four chambers. The ventricles are muscular and feel firm to the touch. The atria are darker red in color and sit at the top of the ventricles. They are much less muscular and appear flaccid.
- The pericardial sac is a thin, translucent membrane surrounding the heart.
- Thymus
- The thymus is located anteriorly to the heart and sits over the trachea. It should be smooth in texture.
- In young animals, it appears as tan with a fatty texture.
- Older animals will have infiltration of adipose tissue into the thymus, enlarging it and giving the thymus a white color.
- Trachea
- The trachea extends from the epiglottis to the bifurcation of the bronchi. It is a ridged, cartilaginous tube that is flexible.
- It should be clear and not have any fluid or foamy liquid in the lumen. Euthanasia with CO2 can cause fluid (serosanguinous and/or foamy) accumulation in the lungs and trachea due to hemorrhage.
- Esophagus
- The esophagus extends from the oral cavity to the stomach. It is a very thin tube that lies directly behind the trachea and behind the heart, and passes through the diaphragm to the stomach.
- The esophagus is difficult to remove, as it is easily torn even though the tissue is stretchy. Removal of the esophagus is most easily done by dissecting it away from the trachea after removal of the heart and lungs.
- Removing the thoracic organs
- The heart and lungs are most easily removed together.
- Place the forceps perpendicular to the trachea and grasp the trachea firmly, just above the thymus.
- Using the scissors, make a cut perpendicular to the trachea just anterior to the forceps. This cut should sever the trachea and esophagus.
- Without loosening the grip on the trachea, lift the trachea up caudally, and snip any attachments of the lungs to the spinal surface in the rib cage.
- The esophagus may need to be cut to be able to lift the heart and lungs free of the chest cavity.
- After the heart is removed from the body, it can be flushed with saline to remove residual blood and clots, or it can be filled with fixative through the aorta.
- Once the lungs are excised, they are inflated with fixative. A ligature is placed loosely around the trachea. A needle that is attached to a syringe containing the fixative of choice is threaded into the lumen of the trachea. The ligature is tightened around the needle, and the fixative is injected until the lungs are inflated. Upon removal of the needle, the ligature is tightened to prevent leakage.
- Oral cavity
- Tongue
- The tongue of rodents is smooth.
- Examine the surface for lesions, including the underside.
- The tongue is seldom harvested except for specialized investigations such as oral cancer studies.
- To remove the tongue, cut through the buccal surfaces on each side of the oral cavity to the temporal-mandibular joint.
- Dislocate the mandible and reflect the maxilla to reveal the epiglottis and the base of the tongue.
- Using forceps to extend the tongue, cut the attachments beneath caudally to the base of the tongue.
- Maintaining traction, cut horizontally at the base of the tongue to free it from the oral cavity.
- Teeth
- Rat dentation consists of three molars and one incisor in each quadrant that is separated by a toothless diastema. They are covered by enamel only on the labial side; on the interior surface of the tooth is dentin.
- Rat teeth are normally a yellow/orange color. This color is most pronounced on the incisor enamel and is due to the presence of an iron-containing pigment. The color begins at about 21 days after birth and deepens with age.
- Examine the teeth for overgrowth or malocclusion.
- Tongue
5. Head
- Eyes
- The eyes should be equal in size and clear of exudate. The conjunctiva should be smooth.
- To remove the eyes, apply pressure on the skin surrounding the eye backward and downward to protrude the eye from the orbit. Using a curved-tip forceps, isolate the globe and cut the attachments holding it in the socket.
- Ears
- Observe the ears for identification. Some investigators request that ear tags be included with organ samples for confirmation of animal identity.
- The ear canals are examined for any lesions, masses, or exudate.
- Nose
- The nose is observed for fluid or exudate.
- The nares should be symmetrical and clear.
Key Terms and Definitions
The most commonly used euthanasia method for mice and rats is an overdose of carbon dioxide (CO2) gas. In accordance with the American Veterinary Medical Association (AVMA), the use of CO2 is acceptable with conditions that minimize aversion and distress. The animals are left in their home cage, which is placed into a chamber. CO2 is gradually introduced into the chamber at a displacement rate from 10% to 30% of the chamber volume/min, which causes the animals to lose consciousness prior to pain perception associated with nociceptor activation by carbonic acid. The flow is then maintained in the chamber once respiratory arrest has occurred to ensure that the animal is dead. An overdose of an inhalant anesthesia is also acceptable, especially for projects that require the use of lung tissue, as CO2 causes damage to the lung tissue. Exsanguination of the animal may also be required for some experiments to reduce the volume of blood in the tissues.
Accurate recording of all findings is essential during a necropsy. A form should be initiated that records a complete history of the animal, including animal identification, gender, housing conditions, date of birth, date of death, study number/protocol number, and the name of the Principle Investigator. A gross internal examination is conducted as the body cavities are exposed to reveal the internal organs. Any obvious abnormalities should be noted.
Necropsy and tissue harvest must be started immediately after euthanasia of the animal, as bacterial leakage from the intestinal tract can confound some assays. The internal organs should be observed beginning in the abdominal cavity and moving to the thoracic cavity. Before removing any tissue samples, it is important to observe the organs in situ. Organ and tissue harvest for histological examination require that the tissues are properly prepared. Tissue samples for histology should be 0.5-1 cm in thickness to allow sufficient penetration of the fixative solution. Fixation preserves biological tissues preventing decay, autolysis, and putrefaction. It also stops any ongoing biochemical reactions and may increase the mechanical strength or stability of the treated tissues. The broad objective of tissue fixation is to preserve cells and tissue components to allow for the preparation of thin, stained sections. Unless otherwise specified, the fixative most commonly used is 10% neutral-buffered formalin. Ready-to-use 10% neutral-buffered formalin is commercially available from major suppliers.
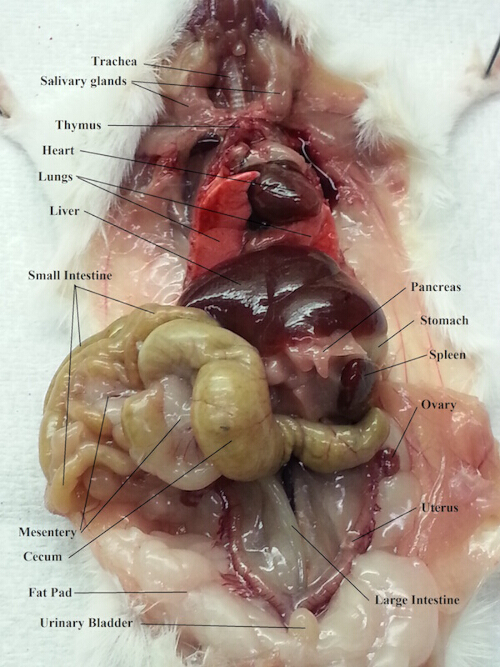
Figure 1. Abdominal and thoracic organs of a female rat.
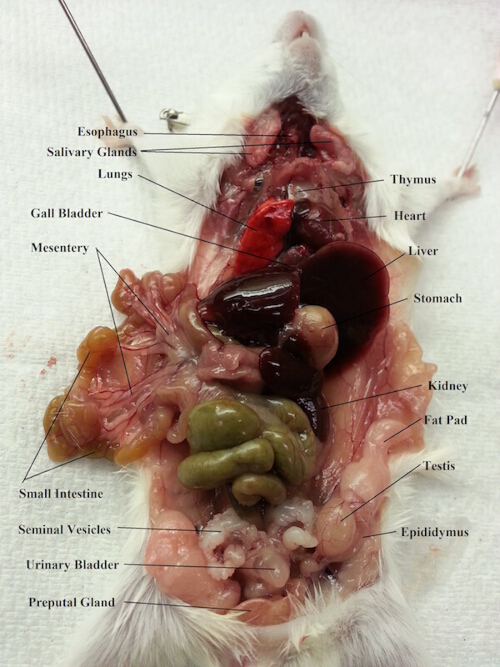
Figure 2. Abdominal and thoracic organs of a male rat.
Questions that this video will help you answer
The final step in many research projects is the necropsy of the experimental animals. A detailed observation of external and internal structures followed by the collection of tissues for further analysis provides a great amount of research data. Proper techniques for tissue removal and preservation with the appropriate fixative solutions are essential for the correct interpretation of findings.
Source: Kay Stewart, RVT, RLATG, CMAR; Valerie A. Schroeder, RVT, RLATG. University of Notre Dame, IN
Many animal experiments rely on final data colle…
Chapters in this video
0:00
Overview
0:53
Preparatory Steps
3:52
External and Internal Gross Examination
9:13
Abdominal Organs
14:20
Reproductive System
16:56
Thoracic Organs
19:54
Applications
20:53
Summary
Copyright © 2026 MyJoVE Corporation. All rights reserved.