Here we describe a basic protocol for fluorescent labeling of different elements of heart tubes from larva and adult Drosophila melanogaster. These specimens are well-suited for imaging via fluorescent or confocal microscopy. This technique permits detailed structural analysis of the features of the hearts from a powerful model organism.
A subscription to JoVE is required to view this content. Sign in or start your free trial.
Method Article
Fluorescent Labeling of Drosophila Heart Structures
In This Article
Summary
Abstract
The Drosophila melanogaster dorsal vessel, or heart, is a tubular structure comprised of a single layer of contractile cardiomyocytes, pericardial cells that align along each side of the heart wall, supportive alary muscles and, in adults, a layer of ventral longitudinal muscle cells. The contractile fibers house conserved constituents of the muscle cytoarchitecture including densely packed bundles of myofibrils and cytoskeletal/submembranous protein complexes, which interact with homologous components of the extracellular matrix. Here we describe a protocol for the fixation and the fluorescent labeling of particular myocardial elements from the hearts of dissected larvae and semi-intact adult Drosophila. Specifically, we demonstrate the labeling of sarcomeric F-actin and of α-actinin in larval hearts. Additionally, we perform labeling of F-actin and α-actinin in myosin-GFP expressing adult flies and of α-actinin and pericardin, a type IV extracellular matrix collagen, in wild type adult hearts. Particular attention is given to a mounting strategy for semi-intact adult hearts that minimizes handling and optimizes the opportunity for maintaining the integrity of the cardiac tubes and the associated tissues. These preparations are suitable for imaging via fluorescent and confocal microscopy. Overall, this procedure allows for careful and detailed analysis of the structural characteristics of the heart from a powerful genetically tractable model system.
Protocol
Before you start
- Prepare the following solutions:
- relaxing buffer (artificial Drosophila hemolymph (ADH) (see “Visualizing the beating heart in Drosophila”) that contains 10 mM EGTA)
- fixative (4% formaldehyde in 1x PBS)
- PBSTx (PBS containing 0.1% Triton-X-100)
- Appropriately diluted primary and species-specific fluorescently labeled secondary antibodies in PBSTx
- Dissect Drosophila to expose the cardiac tubes (of adult flies and/or larvae) following
- the semi-intact Drosophila heart preparation protocol in "Visualizing the beating heart in Drosophila", or
- Drosophila Larval NMJ Dissection protocol1 with the following modifications: Use oxygenated ADH during larval dissection and displace the posterior pin slightly from the ventral midline. Larvae are cut along the ventral midline. Do not remove any tissue prior to fixation.
Fluorescent Staining
- Check that all hearts are rhythmically beating in oxygenated ADH. Quickly replace ADH with relaxing buffer. Examine each cardiac tube to ensure contractions are inhibited.
- Fix the hearts by replacing the relaxing buffer with fixative. Incubate at room temperature for 20 minutes with gentle shaking. (For larval preparation shaking is not necessary at any step, and may be considered detrimental to cardiac tissue integrity).
- Wash specimens three times for ten minutes with PBSTx at room temperature with continual shaking.
- For adults, carefully trim back the ventral edges of the abdominal cuticle such that what remains is more elliptical and less rounded. Additionally, with a single cut between the abdomen and thorax, carefully and cleanly separate both body segments and ensure minimal damage to the anterior region of the heart. For larval hearts, carefully remove the fat body using fine forceps. The fat removal must be executed with extreme caution, since the larval heart is especially fragile and has very little support from other muscles or connective tissue. Do not remove the tracheal branches as this may damage the heart.
- Transfer the trimmed dorsal region of the abdominal cuticle by the edges, avoiding contact with the centrally located cardiac tube, into a 96 well plate with wells that contain 50-100 μl of primary antibody diluted in PBSTx. Place no more than 12 specimens per well. Incubate at room temperature for 2 hours with continual agitation. Incubation may also be done overnight at 4° C.
- Remove primary antibody solution. Wash the hearts three times for ten minutes with 100 μl PBSTx at room temperature with continual shaking.
- Following removal of final wash buffer, add 100 μl of secondary antibody in PBSTx, supplemented with Alexa594-phalloidin (1:1000). Incubate for one hour with continual shaking at room temperature. Keep samples covered to prevent fluorophore bleaching.
- Following secondary incubation, wash the hearts three times for ten minutes with 100 μl of PBSTx at room temperature with continual shaking. Keep the samples covered throughout the washing steps.
- For removal of Triton-X-100, rinse the hearts a final time in 100 μl of PBS for 10 minutes. The specimens can be stored in the dark at 4°C for several days before mounting.
Mounting for Adult Hearts
- Adhere two 18 x 18 mm cover slips to a microscope slide with 10 μl of Vectashield mounting medium. The coverslips should be spaced ~10-15 mm apart. Place a small third drop of mounting medium in-between the two coverslips.
- Place 20 μl of Vectashield in the center of a third coverslip.
- Carefully remove each of the hearts from the PBS wash solution by the extreme edges of the cuticle, and gently place them heart-side down onto the drop of mounting medium on the third coverslip. Place no more than five hearts per drop on the coverslip.
- Check under a microscope to ensure all hearts are facing down.
- Carefully invert the coverslip containing the hearts and quickly place it on the slide containing the pair of coverslips such that the droplet with cardiac tubes fuses with the Vectashield droplet between the coverslip pair. A “bridge” should be formed by the coverslips. The hearts will be suspended between a coverslip and the microscope slide.
- Check under a microscope to ensure that hearts are now facing upward.
- Fix coverslips at their edges with nail polish.
- The hearts are now ready to be imaged via fluorescent or confocal microscopy.
Mounting for Larval Hearts
- Place a drop (~20 μl) Vectashield on a microscope slide.
- Carefully transfer up to two larval specimens into the Vectashield and orient them dorsal side down using tungsten needles.
- Individually drag the specimens out of the mounting medium and align each in parallel.
- Place a coverslip on opposing sides of the specimen. Using forceps, place a third coverslip on top, first by laying one side on the posterior coverslip and lowering it down to the anterior coverslip thus forming a bridge. Capillary forces will cause a flow of Vectashield from posterior to anterior which helps proper alignment of the larval heart.
- Fix all coverslips in place, at their edges, with nail polish and carefully fill the space between the coverslips with 20-30 μl Vectashield.
- Seal with nail polish and store at 4°C, or for long-term storage at -20°C.
Representative Results
When executed correctly, all components and associated tissues of the dorsal vessel should remain intact and be readily visualized. The background fluorescence should be minimal. For adults, the ventral longitudinal muscle layer stains very well and produces a substantial signal (Figure 1 and Figure 2). The underlying circular cardiomyocytes however, tend not to produce as intense a signal as that of the overlying ventral layer. The myocytes of the anterior “conical chamber” of the adult heart contain a substantial amount of contractile material and, consequently, this region appears as the most robust relative to the remainder of the cardiac tube. The larval heart shows a spiraling myofibrillar arrangement similar to that of the adult contractile cardiomyocytes (Figure 3).


Figure 1: Top. A fluorescent micrograph showing the entire cardiac tube of an adult Drosophila melanogaster that expresses myosin-GFP. The image was taken with a Zeiss Imager Z1 fluorescent microscope equipped with an Apotome sliding module. Myosin-GFP is shown in green, actin is stained with AlexaFluor® 594 phalloidin (red) and α-actinin is labeled with anti-α-actinin antibody (blue). Note the preparative procedure permits recovery of heart samples with well-preserved structures. CC = conical chamber; AM = alary muscle; V = internal valve; VLL = ventral longitudinal muscle layer. Bottom. A region of the adult cardiac tube from the CC through the 3rd abdominal segment of the heart just beneath the ventral longitudinal layer showing the spiraling myofibril arrangement of the contractile cardiomyocytes. Please click here for a larger version of Figure 1a, and here for a larger version of figure 1b
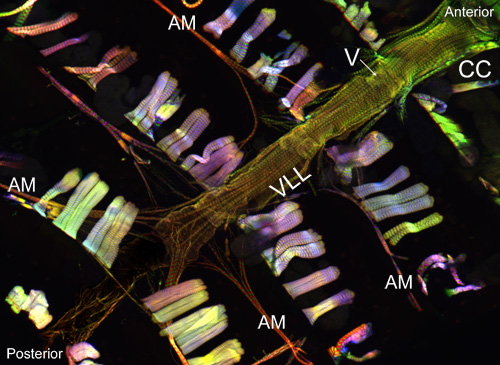


Figure 2: Representative confocal stacks of an anterior portion of the adult heart stained with AlexaFluor® 594 phalloidin (red) and an anti-Pericardin (collagen type IV) (green) antibody. Pericardin is associated with the heart along the ventral surface, likely originating from the longitudinally oriented myofibrils of the ventral muscle layer. Please click here for a larger version of figure 2.


Figure 3: A fluorescent micrograph of segment A7 of the heart proper of a stage three Drosophila larva. The image was taken with a Zeiss Imager Z1 fluorescent microscope equipped with an Apotome sliding module. Actin is labeled with AlexaFluor® 594 phalloidin (green) and α-actinin is stained with anti-α-actinin antibody (red). Please click here for a larger version of figure 3.

Access restricted. Please log in or start a trial to view this content.
Discussion
Here we present a protocol useful for preparing and staining the Drosophila melanogaster dorsal vessel and associated tissues for imaging via fluorescent or confocal microscopy. We provide a concise account of the steps refined by and commonly employed in our lab for effective staining that permits well-resolved in situ imaging of larval and adult Drosophila heart tubes. Others have described similar methods in abbreviated form2, 3, 4.
Important additiona...
Access restricted. Please log in or start a trial to view this content.
Acknowledgements
The authors thank S.I. Bernstein (San Diego State University) for critical reading and helpful suggestions regarding the preparation of this manuscript. This work was supported by NIH grants to S.I. Bernstein, SDSU, and to R. Bodmer, BIMR; and by a post-doctoral fellowship from the Western States Affiliate of the American Heart Association to G. Vogler and to A. Cammarato.
Access restricted. Please log in or start a trial to view this content.
Materials
| Name | Company | Catalog Number | Comments | |
|---|---|---|---|---|
| Ethylene glycol-bis (2-amino-ethylether) -N,N,N’,N’-tetra-acetic acid (EGTA) | Reagent | Sigma-Aldrich | E4378 | |
| Formaldehyde, 10%, methanol free, Ultra Pure | Reagent | Polysciences, Inc. | 50-00-0 | |
| Triton-X-100 | Reagent | Sigma-Aldrich | 9002-93-1 | |
| Alexa Fluor® 594 phalloidin | Reagent | Invitrogen | A12381 | |
| Vectashield® Mounting Medium for Fluorescence with DAPI | Reagent | Vector Laboratories | H-1200 | |
| Tungsten pins | Reagent | Fine Science Tools | 26002-10 | |
| Pin holder | Reagent | Fine Science Tools | 26018-17 |
References
- Brent, J. R., Werner, K. M., McCabe, B. D. Drosophila larval NMJ dissection. J Vis Exp. , (2009).
- Molina, M. R., Cripps, R. M. Ostia, the inflow tracts of the Drosophila heart, develop from a genetically distinct subset of cardial cells. Mech Dev. 1, 51-59 (2001).
- Dulcis, D., Levine, R. B. Glutamatergic innervation of the heart initiates retrograde contractions in adult Drosophila melanogaster. J Neurosci. 2, 271-280 (2005).
- Zeitouni, B. Signalling pathways involved in adult heart formation revealed by gene expression profiling in Drosophila. PLoS Genet. 10, 1907-1921 (2007).
- Robertson, C. W. The metamorphosis of Drosophila melanogaster, including an accurately timed account of the principal morphological change. J. Morphol. 2, 351-399 (1936).
- Miller, A. The internal anatomy and histology of the imago of Drosophila melanogaster. , Wiley. New York. (1950).
- Rizki, T. M. The circulatory system and associated cells and tissues. , Academic Press. New York. (1978).
- Cammarato, A. Myosin transducer mutations differentially affect motor function, myofibril structure, and the performance of skeletal and cardiac muscles. Mol Biol Cell. 2, 553-562 (2008).
- Taghli-Lamallem, O. Dystrophin deficiency in Drosophila reduces lifespan and causes a dilated cardiomyopathy phenotype. Aging Cell. 2, 237-249 (2008).
- Kelso, R. J. a database documenting a GFP protein-trap insertion screen in Drosophila melanogaster. Nucleic Acids Res. 32, D418-D420 (2004).
- Dietzl, G. A genome-wide transgenic RNAi library for conditional gene inactivation in Drosophila. Nature. 7150, 151-156 (2007).
- Mery, A. The Drosophila muscle LIM protein, Mlp84B, is essential for cardiac function. J Exp Biol. 211, 15-23 (2008).
Access restricted. Please log in or start a trial to view this content.
Reprints and Permissions
