This protocol describes harvesting, suturing, and monitoring fasciocutaneous flaps in rats that allow for good visualization and manipulation of blood flow through the superficial inferior epigastric vessels by means of clamping and ligating the femoral vessels. This is critical for studies involving ischemic preconditioning.
A subscription to JoVE is required to view this content. Sign in or start your free trial.
Method Article
The Superficial Inferior Epigastric Artery Axial Flap to Study Ischemic Preconditioning Effects in a Rat Model
* These authors contributed equally
In This Article
Summary
Abstract
Fasciocutaneous flaps (FCF) have become the gold standard for complex defect reconstruction in plastic and reconstructive surgery. This muscle-sparing technique allows transferring vascularized tissues to cover any large defect. FCF can be used as pedicled flaps or as free flaps; however, in the literature, failure rates for pedicled FCF and free FCF are above 5%, leaving room for improvement for these techniques and further knowledge expansion in this area. Ischemic preconditioning (I.P.) has been widely studied, but the mechanisms and the optimization of the I.P. regimen are yet to be determined. This phenomenon is indeed poorly explored in plastic and reconstructive surgery. Here, a surgical model is presented to study the I.P. regimen in a rat axial fasciocutaneous flap model, describing how to safely and reliably assess the effects of I.P. on flap survival. This article describes the complete surgical procedure, including suggestions to improve the reliability of this model. The objective is to provide researchers with a reproducible and reliable model to test various ischemic preconditioning regimens and assess their effects on flap survivability.
Introduction
Plastic and reconstructive surgery is constantly in evolution. The development of muscle, fasciocutaneous, and perforator flaps has made it possible to offer better-quality reconstructions while reducing morbidity. Combining this improved anatomical knowledge with enhanced technical skills, reconstructive surgeons can perform free flap transfers when defects are not close to any local solution. However, while perforator flap surgery is currently the most advanced technique in reconstructive surgery, the literature reports a 5% failure rate in free flap transfers1,2,3, and up to 20% for pedicled flap reconstruction4,5,6. Partial to total flap failure occurs when the flap's pedicle is compromised, therefore it is essential to continuously search for improvements to the current techniques. One of the methods to improve flap survival is to promote its neovascularization on the wound bed, thus allowing perfusion by a source other than the pedicle. Ischemic preconditioning (I.P.) has been initially described in a heart model7, demonstrating that an organ exposed to controlled ischemia survives to a higher degree after losing its primary blood supply by undergoing ischemia-induced neovascularization. Several authors have studied this cornerstone principle to optimize flap survival in preclinical and clinical models8,9,10.
The advantage of this technique over other methods to improve flap survival is its ease of implementation, consisting of clamp/declamp tests of the blood source. In the rat model, previous authors used the superficial inferior epigastric artery (SIEA) flap to study I.P. by clamping the main pedicle11,12,13. Nonetheless, several technical issues can be encountered with this model, and the literature lacks well-described protocols.
Therefore, this work aims to provide researchers with a detailed description of a rat SIEA flap procurement technique with an extended dissection of the femoral vessels to allow I.P. studies on an axial fasciocutaneous flap model. This model retains the integrity of the epigastric vessels and instead manipulates the femoral vessels, which are more resilient. We share our experience and tools to improve the study of this phenomenon and increase the replicability of this procedure.
Access restricted. Please log in or start a trial to view this content.
Protocol
The Massachusetts General Hospital Institutional Animal Care and Use Committee approved the experimental protocol (IACUC- protocol #2022N000099).The authors followed the ARRIVE (Animal Research: Reporting In Vivo Experiments) guideline checklist for this work. All animals received humane care following the National Institute of Health Guide for the Care and Use of Laboratory Animals. A total of 12 male Lewis rats (250-350 g, 8-10 weeks old) were used for all experiments.
1. Animal preparation
NOTE: Rats have a high metabolic rate and limited fat reserves; therefore, do not have them fast before surgery and never restrict water before the surgery.
- For all the procedures, sedate the animal using 3%-5% isoflurane in the chamber of the isoflurane precision vaporizer (see Table of Materials). When the animal is well sedated, lower the isoflurane dose to 1%-3% through a nose cone.
NOTE: A second researcher must continuously monitor the respiratory rate and adapt the isoflurane dose. - At 2 days before the initial surgery, place a plastic e-collar (sized for a rat; see Table of Materials) on the animal and use a 3-0 nylon suture to secure the e-collar on the dorsal and ventral sides of the animal's neck. Allow 2 days for acclimation to this e-collar; it should fit snug but not obstruct the animal's airway.
2. Preoperative care
- On the day of the initial surgery, shave the lower anterior aspect of the abdomen, clearing the area from the lateral part of the animal to slightly past the midline.
- Then, use a depilatory product (hair removal cream; see Table of Materials) to remove all remaining hair in this area (the lower anterior aspect of the abdomen as described in the previous step).
- Thoroughly wash and dry the area with surgical scrub and betadine solution (10% povidone-iodine).
- Administer 0.05 mg/kg of buprenorphine subcutaneously.
3. Intraoperative monitoring
- Ensure that the animal remains on 1%-3% isoflurane via a precision vaporizer and nose cone throughout the surgery. Monitor the animal's respiratory rate, breathing, and oxygen saturation level by visual observation and a rodent pulse oximeter made for a rat.
NOTE: The typical respiratory rate is 80-90 cycles per minute14,15. Any reaction indicating consciousness observed during the surgery requires increasing the isoflurane rate. - Place the animal on a warming pad for the entirety of the surgery, as the body temperature of rodents rapidly cools under anesthesia.
4. Epigastric flap harvesting
- Place the animal in a supine position. Shave the abdomen from below the inguinal crease to above the level of the xiphoid process.
- Using a sterile skin pen and ruler, first mark the midline of the animal's abdomen and then the inguinal crease. An incision along the inguinal crease line exposes the inferior epigastric vessels branch off the femoral vessels.
- Before the incision, draw the future flap as an oval or a rectangle up to 6 cm vertically and 3 cm horizontally, extending cranially from the inguinal crease.
- Draw five or six equidistant marks perpendicular to the flap limits. These serve as guides to better realign the skin after the flap has been lifted and is being sutured back into place (Figure 1).
- Using Ragnell scissors (see Table of Materials), make a 3-4 cm longitudinal incision on the inguinal crease.
NOTE: Researchers should use caution and pull the skin upward to avoid damaging the vessels. - Expose and identify the femoral and epigastric vessels using #4 jewelers microsurgical forceps (see Table of Materials), by opening and closing the forceps to separate the fascia and gain access to the vessels that are beneath the inguinal fat pad.
- Use the inguinal incision to start the flap incision using the Ragnell scissors. Pay attention to undermine the full thickness of the skin and the connective tissue over the abdominal muscle.
- To facilitate flap harvesting, ensure the scissors follow the right dissection plane by pushing toward the muscle and spreading the blades of the scissors. Perform this flap undermining by moving in a coordinated direction around the flap drawing.
NOTE: To determine the proper plane, no microvessels should remain present below the plane of dissection.
- To facilitate flap harvesting, ensure the scissors follow the right dissection plane by pushing toward the muscle and spreading the blades of the scissors. Perform this flap undermining by moving in a coordinated direction around the flap drawing.
- As the initial tip of the flap is freed from the surrounding skin, continue the flap procurement by undermining from the distal to the proximal part, using the Ragnell scissor tips to separate the flap from the muscle while cauterizing any perforator vessels and dermal plexus vessels around the flap. This ensures all blood flows to the flap via the epigastric vessels.
NOTE: Attention must be paid not to damage the flap vasculature by pulling too forcefully or twisting the skin as the flap is being harvested. It is suggested to place the freed portion of the flap carefully over the thumb of the surgeon's hand while working on the proximal part of the flap. - Once the flap is entirely harvested, the branches of the superficial inferior epigastric vessels are visible on the deep aspect of the skin. Aim to encapsulate the entirety of both branches of the SIEA with the flap by gently lifting the flap upward to visualize the vessels.
- Once the flap is harvested, separate the fat pads on the inferior aspect on both the medial and lateral sides of the flap. Use the bipolar cautery (see Table of Materials) to cauterize the fat pads close to the border of the incision, while paying attention not to harm the superficial inferior epigastric pedicle (Figure 2).
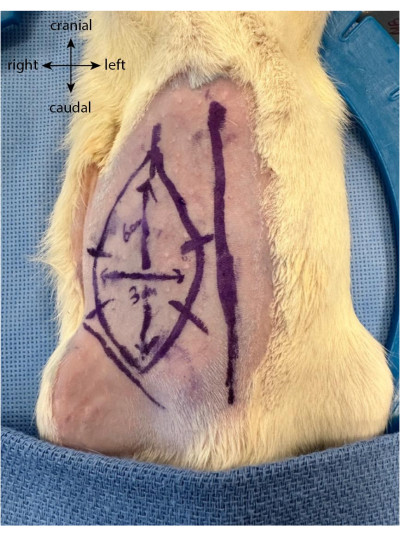
Figure 1: Flap drawing on the animal's abdomen. The midline is used as a marker to locate the epigastric flap location. Please click here to view a larger version of this figure.
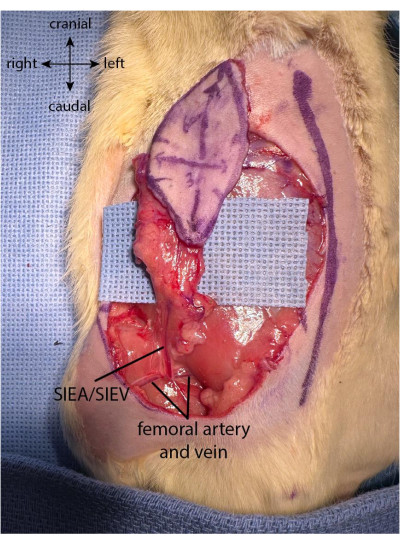
Figure 2: Flap fully elevated. The fat pad is preserved at the proximal part of the flap to preserve the vascularization coming from the superficial inferior epigastric pedicle. Please click here to view a larger version of this figure.
5. Vessel preparation and ischemia induction
NOTE: The flap is entirely harvested at this stage, but the vessels are not yet prepared for ischemic preconditioning.
- Before femoral vessel preparation, inject a single dose of 17.5 IU of sodium heparin via the penile vein.
NOTE: This injection is done by exposing the glans, holding the penis externally using atraumatic Adson forceps, identifying the penile vein, and injecting superficially and along the penile vein using a 27 G syringe. - To create a better exposure, place the animal within a Lone Star self-retaining retractor (see Table of Materials).
NOTE: Lone Star elastic stays pull the skin away from the surgical site, allowing for a better view of the vessels. The researcher must now work under a surgical microscope (40x magnification). - To expose the vessels, use two #4 microsurgical forceps to dissect the femoral vessels both proximally and distally to the emergence of the superficial epigastric vessels. Do not hold the vessels directly, but instead use the forceps to gently separate the connective tissue layer by layer by opening and closing the forceps vertically to the vessels.
- On the distal femoral vessels, clean the fascia and gently free the nerve from the artery and vein. Using an 8-0 nylon suture (see Table of Materials), ligate the distal femoral vessels by circumventing the microsurgical needle-holder under the artery and vein, clasping the suture, and tying off these vessels (Figure 3). The nerve must not be harmed nor tied to minimize postoperative morbidity.
NOTE: Surgeons can use one of the forceps to gently pull the fascia lateral to the nerve with one hand and use another pair to fully separate the nerve from the vessels. - Using an 8-0 suture, ligate the distal vessels right after the emergence of the epigastric vessels, leaving a 1 mm distance after the pedicle origin. This ensures that no reverse flow comes through the SIEA from the deep branches during the ischemic phases.
NOTE: Figure 3 shows the ligated distal femoral vessels after the emergence of the SIEA pedicle. - On the proximal femoral vessels, repeat the same process of cleaning the connective tissue. However, separate the artery and vein from each other to allow efficient clamping. This can be achieved by gently placing closed forceps in between the artery and vein and slowly opening the tforceps in the running direction of the vessels.
- To induce intermittent ischemia, place microsurgical clamps separately on each proximal femoral artery and vein (Figure 4).
- When the ischemic injuries are completed, suture the flap to its original position, lining the marks up as drawn preoperatively (step 4.2.2). Suture the flap using a running suture with 3-0 nylon (see Table of Materials), beginning at the inguinal crease medially, around the flap, and ending at the inguinal crease laterally.
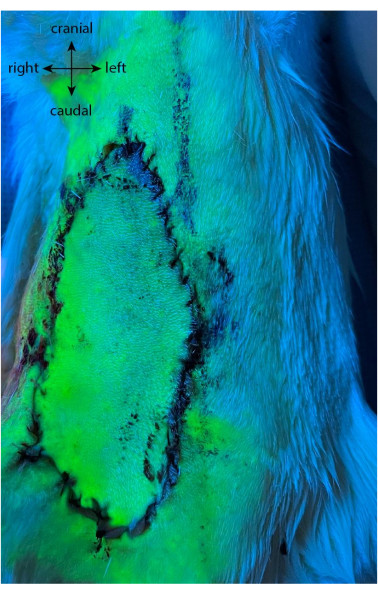
NOTE: Along the inguinal crease, the same suture can be used to place interrupted stitches. This allows researchers to open this area without affecting the flap closure. - To verify the blood supply to the flap, inject 0.25 mL of sterile fluorescein sodium (10%, see Table of Materials) into the penile vein using the same technique and tools described for the heparin saline injection (step 5.1). After 3 min, shine a long wave UV-366 nm lamp (fluorescein excitation light) to reveal the fluorescent areas corresponding to the perfused areas.
- After closure and verification, spread crushed metronidazole (see Table of Materials) along the sutures to prevent auto-mutilation, and spray liquid bandage in the same area.
- Before the animal's recovery from anesthesia, deliver Carprofen (2-5 mg/kg) subcutaneously.
- Researchers can now access the femoral vessels, the only feeding source to the flap, to test experimental ischemic preconditioning regimens for several days in a row. On every day of surgery, provide a 2-5 mg/kg dose of Carprofen subcutaneously.
- At the end of the ischemic preconditioning period, to remove the flap from the epigastric blood supply, cauterize inferior to the fat pad along the inferior border of the flap.
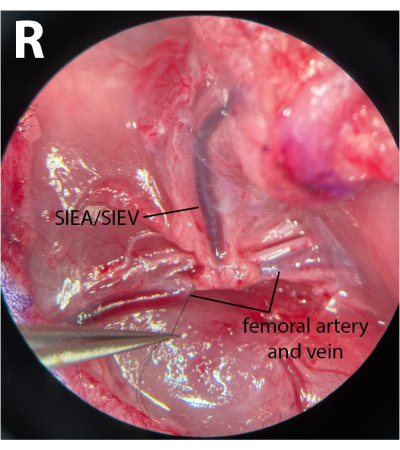
Figure 3: Microscopic view of the femoral vessels. The distal femoral vessels are tied. The nerve has been preserved. The dissection side is the right inguinal crease (R). Magnification: 40x. Please click here to view a larger version of this figure.
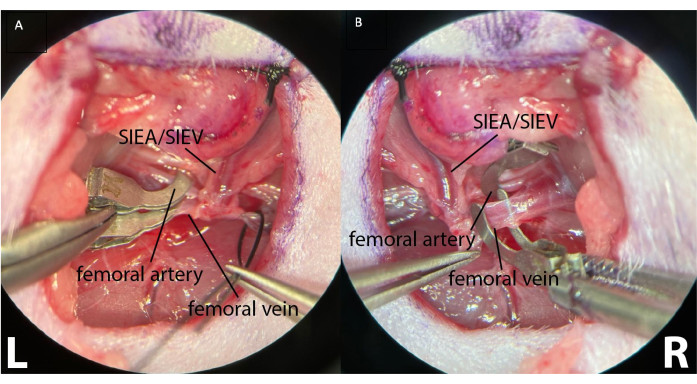
Figure 4: Clamping of the proximal femoral vessels using two separate microsurgical clamps. This allows better clamping control, ensuring the absence of arterial and retrograde venous flow. (A) shows both the left (L) femoral vessels clamped. The superficial inferior epigastric vessels are visible (SIEA/SIEV). (B) shows a clamped femoral artery and a femoral vein before clamping, on the right inguinal crease of the animal (R). Magnification: 40x. Please click here to view a larger version of this figure.
6. Postoperative care
- Administer Carprofen (2-5 mg/kg) subcutaneously once daily for 4 days postoperatively and once after any supplementary sedations.
- For the first 24 h, observe the animal twice. Then, assess the animal and the flap at least once daily until the end of the study.
NOTE: The animal must be bright, alert, and reactive. If there are signs of systemic opportunistic infections (i.e., lethargy or weight loss), the animal should be euthanized following institutional approved protocols. - Monitor the flap for early necrosis (before ligation on postoperative day 5 [POD5]), surgical site dehiscence, infection, hematoma, ischemia, and/or autophagia of the flap.
- If there is surgical site dehiscence, debride the scar margins, clean the site with 10% povidone-iodine before rinsing thoroughly with sterile water or sterile saline, and close the wound using interrupted 3-0 nylon sutures.
- At the end of the study, euthanize the animal with an IV injection of 0.1-0.2 mL of 31% sodium phenobarbital solution or with the protocol recommended by the local IACUC. Confirm death by the absence of heartbeat and respiratory movements.
Access restricted. Please log in or start a trial to view this content.
Results
All flaps were viable on POD5, showing good vascularization by the SIEA alone. Figure 5 shows the flap before and after IV fluorescein injection, showing a complete vascularization.
Access restricted. Please log in or start a trial to view this content.
Discussion
This article describes a reproducible fasciocutaneous flap model harvested in rats, allowing I.P. evaluation. This step-by-step surgical protocol gives research groups a reliable model to test different I.P. regimens. By preventing any vascularization other than the pedicle, this model allows for studying the flap's neovascularization from the wound bed and margin. This study performed the ligation on POD5, as previous studies have observed the autonomization of this flap in rats on POD5-711,...
Access restricted. Please log in or start a trial to view this content.
Disclosures
All authors have no financial interest to declare.
Acknowledgements
This work was funded by Massachusetts General Hospital (W.G.A) and Shriners Children's Boston (B.U, K.U, C.L.C). Y.B and I.F.v.R are funded by Shriners Hospitals for Children (Proposal ID: #970280 and #857829 respectively).
Access restricted. Please log in or start a trial to view this content.
Materials
| Name | Company | Catalog Number | Comments |
|---|---|---|---|
| 1 mL Syringe Luer-Lok Tip | BD | 309628 | |
| 3-0 Ethilon 18” Black Monofilament Nylon suture | Ethicon | ETH-663H | |
| 8-0 Ethilon 12” Black Monofilament Nylon suture | Ethicon | 1716G | |
| Adson Atraumatic Forceps | Aesculap Surgical Instruments | BD51R | |
| Akorn Fluorescein Injection USP 10% Single Dose Vial 5 mL | Akorn | 17478025310 | |
| Betadine Solution 5% Povidone-Iodine Antiseptic Microbicide | PBS Animal Health | 11205 | |
| Bipolar Cords | ASSI | ASSI.ATK26426 | |
| Buprenorphine Hydrochloride Injection | PAR Pharmaceutical | 3003406C | This concentration needs to be diluted for rodents. |
| Depilatory product – Nair Hair remover lotion | Nair | NC0132811 | |
| Ear tag applier | World Precision Instruments | NC0038715 | |
| Gauze Sponges | Curity | 6939 | |
| Isoflurane Auto-Flow Anesthesia Machine | E-Z Systems | EZ-190F | |
| Isoflurane, USP | Patterson Veterinary | 1403-704-06 | |
| Jewelers Bipolar Forceps Non-Stick 11 cm, straight pointed tip, 0.25 mm tip diameter | ASSI | ASSI.BPNS11223 | |
| Lone Star elastic stays | Cooper Surgical | 3311-1G | |
| Lone star Self-retaining retractor | Cooper Surgical | 3304G | |
| Metronidazole tablets USP | Teva | 500111-333-06 | |
| Micro spring handle scissors | AROSurgical | 11.603.14 | |
| Microscope (surgical) | Leica | M525 F40 | |
| Microsurgical clamp applying forceps | Ambler Surgical | 31-906 | |
| Microsurgical clamps (x2) | Millennium Surgical | 18-B1V | |
| Microsurgical Dumont #4 forceps | Dumont Swiss made | 1708-4TM-PO | |
| Microsurgical needle holder | ASSI | B-14-8 | |
| Needle holder | World Precision Instruments | 501246 | |
| Nosecone for Anesthesia | World Precision Instruments | EZ-112 | |
| Pixel analysis software | GNU Image Manipulation Program v2.10 | GIMP | GNU Open licence |
| PrecisionGlide Needle 27 G | BD | 305109 | |
| Ragnell Scissors | Roboz Surgical | RS-6015 | |
| Rimadyl (carprofen) | Zoetis | 10000319 | This concentration needs to be diluted for rodents |
| Scientific Elizabethan collar (e-collar) for Rats | Braintree Scientific | NC9263311 | |
| Small animal ear tag | National Band & Tag Company | Style 1005-1 | |
| Small Animal Heated Operating Table (Adjustable) | Peco Services Ltd | 69023 | |
| Sterile towel drape | Dynarex Corporation | 4410 | |
| Sterile water for injection and irrigation | Hospira | 0409488724-1 | |
| Surgical scrub – BD ChloraPrep Hi-Lite Orange 3 mL applicator with Sterile Solution | BD | 930415 | |
| UV lamp | UVP | UVL-56 | |
| Webcol Alcohol prep pads | Simply Medical | 5110 |
References
- Copelli, C., et al. Management of free flap failure in head and neck surgery. ACTA Otorhinolaryngologica Italica. 37 (5), 387-392 (2017).
- Lese, I., Biedermann, R., Constantinescu, M., Grobbelaar, A. O., Olariu, R. Predicting risk factors that lead to free flap failure and vascular compromise: A single unit experience with 565 free tissue transfers. Journal of Plastic, Reconstructive & Aesthetic Surgery. 74 (3), 512-522 (2021).
- Wang, W., et al. Flap failure and salvage in head and neck reconstruction. Seminars in Plastic Surgery. 34 (4), 314-320 (2020).
- Gabrysz-Forget, F., et al. Free versus pedicled flaps for reconstruction of head and neck cancer defects: a systematic review. Journal of Otolaryngology - Head & Neck Surgery. 48 (1), 13(2019).
- Sievert, M., et al. Failure of pedicled flap reconstruction in the head and neck area: A case report of a bilateral subclavian artery stenosis. International Journal of Surgery Case Reports. 76, 381-385 (2020).
- Vaienti, L., et al. Failure by congestion of pedicled and free flaps for reconstruction of lower limbs after trauma: the role of negative-pressure wound therapy. Journal of Orthopaedics and Traumatology. 14 (3), 213-217 (2013).
- Murry, C. E., Jennings, R. B., Reimer, K. A. Preconditioning with ischemia: a delay of lethal cell injury in ischemic myocardium. Circulation. 74 (5), 1124-1136 (1986).
- Akcal, A., et al. Combination of ischemic preconditioning and postconditioning can minimise skin flap loss: experimental study. Journal of Plastic Surgery and Hand Surgery. 50 (4), 233-238 (2016).
- Ulker, P., et al. Does ischemic preconditioning increase flap survival by ADORA2B receptor activation. Clinical Hemorheology and Microcirculation. 75 (2), 151-162 (2020).
- Min, S. -H., Choe, S. H., Kim, W. S., Ahn, S. -H., Cho, Y. J. Effects of ischemic conditioning on head and neck free flap oxygenation: a randomized controlled trial. Scientific Reports. 12 (1), 8130(2022).
- Dacho, A., Lyutenski, S., Aust, G., Dietz, A. Ischemic preconditioning in a rat adipocutaneous flap model. HNO. 57 (8), 829-834 (2009).
- Yildiz, K., et al. Comparison of the flap survival with ischemic preconditioning on different pedicles under varied ischemic intervals in a rat bilateral pedicled flap model. Microsurgery. 34 (2), 129-135 (2014).
- Ottomann, C., Küntscher, M., Hartmann, B., Antonic, V. Ischaemic preconditioning suppresses necrosis of adipocutaneous flaps in a diabetic rat model regardless of the manner of preischaemia induction. Dermatology Research and Practice. 2017, 4137597(2017).
- Grimaud, J., Murthy, V. N. How to monitor breathing in laboratory rodents: a review of the current methods. Journal of Neurophysiology. 120 (2), 624-632 (2018).
- Strohl, K. P., et al. Ventilation and metabolism among rat strains. Journal of Applied Physiology. 82 (1), 317-323 (1997).
- Mucke, T., et al. Autonomization of epigastric flaps in rats. Microsurgery. 31 (6), 472-478 (2011).
- Hsu, C. -E., et al. The rat groin flap model redesigned for evaluating treatment effects on ischemia-reperfusion injury. Journal of Surgical Research. 222, 160-166 (2018).
- Mücke, T., et al. Indocyanine green videoangiography-assisted prediction of flap necrosis in the rat epigastric flap using the flow® 800 tool. Microsurgery. 37 (3), 235-242 (2017).
- Wang, D., Chen, W. Indocyanine green angiography for continuously monitoring blood flow changes and predicting perfusion of deep inferior epigastric perforator flap in rats. Journal of Investigative Surgery. 34 (4), 393-400 (2021).
- Berkane, Y., et al. How to secure pedicled flaps using perioperative indocyanine green angiography: a prospective study about 10 cases. World Journal of Surgery and Surgical Research. 4 (1), 1319(2021).
- Alstrup, T., Christensen, B. O., Damsgaard, T. E. ICG angiography in immediate and delayed autologous breast reconstructions: peroperative evaluation and postoperative outcomes. Journal of Plastic Surgery and Hand Surgery. 52 (5), 307-311 (2018).
- Küntscher, M. V., et al. Ischemic preconditioning by brief extremity ischemia before flap ischemia in a rat model. Plastic and Reconstructive Surgery. 109 (7), 2398-2404 (2002).
- Liu, R. Q., et al. Cost analysis of indocyanine green fluorescence angiography for prevention of anastomotic leakage in colorectal surgery. Surgical Endoscopy. 36 (12), 9281-9287 (2022).
- Cheng, M. H., et al. Devices for ischemic preconditioning of the pedicled groin flap. The Journal of Trauma. 48 (3), 552-557 (2000).
- Xiao, W., et al. An innovative and economical device for ischemic preconditioning of the forehead flap prior to pedicle division: a comparative study. Journal of Reconstructive Microsurgery. 38 (9), 703-710 (2022).
- Küntscher, M. V., Hartmann, B., Germann, G. Remote ischemic preconditioning of flaps: a review. Microsurgery. 25 (4), 346-352 (2005).
Access restricted. Please log in or start a trial to view this content.
Reprints and Permissions
