Glioblastoma is a devastating form of primary brain cancer, and laser interstitial thermal therapy is emerging as a promising alternative to conventional surgical resection for inoperable glioblastoma. This protocol describes an optimized pre-clinical mouse model that can be used to study treatment effects or adjuvant and combinatorial treatments.
A subscription to JoVE is required to view this content. Sign in or start your free trial.
Method Article
An Immunocompetent Murine Model for Laser Interstitial Thermal Therapy of Glioblastoma
* These authors contributed equally
In This Article
Summary
Abstract
Glioblastoma (GB), the most aggressive form of primary brain cancer, accounts for approximately half of all high-grade primary brain tumors in adults and has no cure. Laser interstitial thermal therapy (LITT) is a Food and Drug Administration (FDA)-approved treatment for GB and is used in patients who may not be candidates for conventional surgical resection. While the clinical efficacy of LITT has been established, research beyond clinical case studies and case series is limited and hindered by the lack of an established animal model. This protocol uses C57BL/6 mice and syngeneic CT2A glioma cancer cell line to closely recapitulate human GB while also using a 1064 nm Neodymium-doped Yttrium Aluminum Garnet (Nd:YAG) laser, such as is used in one of the two FDA-approved LITT systems, providing excellent pre-clinical relevance. The successful establishment of this LITT murine model will provide a valuable platform for investigating the unique features of LITT ablation and its effects on the tumor microenvironment, potentially leading to improved therapeutic strategies.
Introduction
Cancer is the number one leading cause of death in Canada. Glioblastoma (GB), the most common form of aggressive brain tumor, accounts for 48% to 60% of all high-grade primary brain tumors in adults1. The prognosis for GB is especially grim with a 5-year net survival of 4.8% with conventional treatments, including surgical resection, chemo- and radiotherapy1,2.
Laser Interstitial Thermal Therapy (LITT) is an FDA-approved procedure using a laser for hyperthermic in-situ tumor ablation in patients with inoperable brain tumors and provides an attractive therapeutic alternative to conventional surgical resection3. However, a detailed and well-characterized murine model for LITT treatment of GB is lacking, hindering preclinical research.
This protocol aims to showcase an optimized preclinical murine model for GB treatment with LITT. We have chosen to use C57BL/6 mice and the syngeneic glioma cell line CT2A for this model primarily because CT2A closely recapitulates human high-grade GB with similar histological features, invasiveness, chemo- and radio-resistance, and stem-like features with self-renewal and re-establishment of tumors4. These characteristics provide an excellent platform for a variety of studies involving immune responses or novel therapeutic strategies. Moreover, the technical aspects of this LITT protocol are also easily adaptable for other allo- and xenograft murine models4,5,6, which will be further discussed.
The advantages of this protocol include consistent results with a simple yet effective LITT treatment paradigm. The 1064 nm Neodymium-doped Yttrium Aluminum Garnet (Nd:YAG) laser employed is the same as is used clinically in one of the two currently FDA-approved systems, allowing experiments that closely parallel the clinical application of LITT for the treatment of high-grade glioma. The primary disadvantage of this protocol is the extreme care that must be taken during both tumor cell implantation and LITT treatment to achieve reproducible results. Additionally, due to the aggressive nature of the CT2A cell line, the protocol is highly time-sensitive. Most experiments will need to be concluded in a maximum of 20 days, which may limit investigations of some adaptive immune responses or other cellular and molecular mechanisms occurring over a longer time course.
Access restricted. Please log in or start a trial to view this content.
Protocol
Animal ethics for this protocol was approved by the Animal Care Committee at the University of Manitoba in accordance with the ethical guidelines set by the Canadian Council for Animal Care (CCAC). This protocol used 8-12-week-old C57BL/6 immunocompetent mice and syngeneic glioma cell line CT2A for a preclinical model with a wide range of applications, including experiments focused on histological analysis, immunological changes, or combinatorial therapeutic interventions. The protocol can be easily adapted to other mouse species or cell lines based on the experimental requirements.
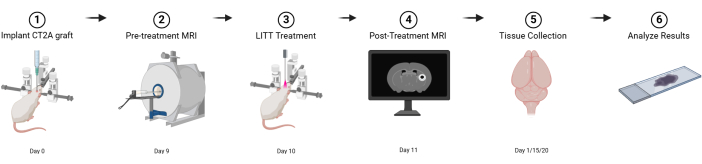
Figure 1: Graphical schematic of basic experimental design. Created with BioRender.com Please click here to view a larger version of this figure.
1. Cell preparation in brief (Day 0)
- Before starting the cell culture, make sure the cabinet and all required pipettes are completely sterilized with UV and ethanol.
- Warm the DMEM/F12 with 10% FBS media, phosphate buffered saline (PBS), and trypsin to room temperature (RT) using a water bath.
- Pipette out the media from the T25 flask and briefly rinse the cells with PBS. Add 1 mL of trypsin to the cells and incubate for 30-60 s until the cells detach from the flask.
- Confirm the detached cells under a light microscope and add 4 mL of media to stop the trypsin enzymatic activity.
- Count cells using an automated cell counter.
- Mix 10 µL of the cell suspension with 10 µL of trypan blue, then add 10 µL to the cell counting slide.
- Insert the slide into the cell-counting machine and record the total cell count, live cell count, and the percentage of live cells.
NOTE: If an automated cell counting machine is not available, a manual count can be performed using a hemocytometer.
- Calculate the cells required for all planned injections.
NOTE: For CT2A, 5000 cells per 1.5 µL in injected volume and a minimum of 100 µL total volume for each preparation is recommended. - Spin the cells at 134 x g for 5 min to pellet the cells and aspirate as much medium as possible.
- Resuspend the cell pellet with 5% basement membrane extract in PBS for the volume needed in a microcentrifuge tube. While smaller tubes will be best suited to preparing the cell suspension, a 2 mL tube is better for storage during the surgery as the cells are less likely to clump into the more rounded bottom and readily redistribute with gentle flicking.
- Keep cells on ice for injection, preparing fresh cell suspensions every 4-5 h as needed.
2. Orthotopic implantation (Day 0)
- Prepare the surgical area and ensure all required instruments are sterile and ready for use.
- Anesthetize mouse using isoflurane (3% vaporized in 1 L/min O2) in a chamber while monitoring respiration rate (target 60 bpm).
- Obtain and record animal weight for medication dosing.
- Shave the surgical area carefully to avoid the eyes, ears, and whiskers.
- Transfer the animal to a stereotactic frame.
- Place incisors in the hole of the bite bar and adjust the nosecone until snug, tightening the retaining screw to secure.
- Check the depth of anesthesia with bilateral hind-limb toe pinches and, if appropriate, secure the skull using ear-pins and adjust the animal's head to a neutral, level-plane position.
- Monitor animal core temperatures using a lubricated rectal temperature probe and provide supplementary warming at 37 °C using an under-body heating pad.
CAUTION: Take care not to overtighten the nosecone, as even moderate pressure on the nasal bone may cause respiratory arrest. If an electrical heating pad is used (e.g., a heating pad for a terrarium), make sure the temperature settings are accurate and the set temperature remains constant.
- Apply ophthalmic ointment liberally to both eyes to prevent drying.
- Administer prophylactic injections and check anesthetic depth.
- Inject subcutaneous (s.c.) meloxicam or other long-acting pain medication according to local animal facility guidelines (e.g., 5.0 mg/kg meloxicam) using a 28 G x ½" syringe.
- Administer an injection of 20 mg/kg s.c. prewarmed normal saline for prophylactic fluid support during longer procedures.
- Reduce anesthetic to 1.5%-2.0% isoflurane to maintain target respiration rate.
- Using an aseptic technique, drape the animal and prepare the surgical area.
- Using a sterile cotton swab, apply povidone-iodine or chlorhexidine disinfecting solution. Starting medially at the incision site and rotating the swab after each pass, work outwards, then using a fresh sterile cotton swab, apply 70% ethanol to the site in a similar manner.
- Repeat scrub with iodine followed by 70% ethanol two additional times (3 times total, each).
- Re-check the anesthetic depth before proceeding with the surgical exposure. Closely monitor the respiration rate throughout the procedure and adjust the anesthetic as necessary.
- Starting midline and slightly posterior to the eyes, make a 1-1.5 cm mid-sagittal incision in the caudal direction using a #15 blade scalpel. Alternatively, extend a short scalpel incision with iris scissors.
NOTE: Incisions should start at midline but, for unilateral injections, may be angled slightly laterally to facilitate simultaneous visualization and access of Bregma and the burr-hole location. - Using a sterile cotton swab, reflect wound edges to visualize the skull and gently rub away any connective tissue from the area.
- If needed, use a sterile cotton swab soaked in hydrogen peroxide to clean the skull surface and visualize the cranial sutures.
- Locate Bregma where the left and right coronal sutures meet at the midline with the sagittal suture (see Figure 2).
- Using a non-toxic colored acrylic resin and a sterile wooden toothpick or similar, make a very small mark over Bregma.
NOTE: In some instances, the left and right coronal sutures do not mirror each other; in such cases, use a 'line-of-best-fit' to approximate where they should intersect along the mid-sagittal plane.
- Using a non-toxic colored acrylic resin and a sterile wooden toothpick or similar, make a very small mark over Bregma.
- Ensure the animal's head position is not tilted or rotated (i.e., in a flat plane).
- Zero stereotactic coordinates at Bregma. The x-coordinate refers to movement in the medial-lateral (ML) plane, the y-coordinate in the anterior-posterior (AP) plane, and the z-coordinate in dorsal-ventral (DV) plane.
- Ensure Lambda is in the same DV plane as Bregma (i.e., z = 0 at both landmarks). Similarly, at +2.0 mm (x = 2) and -2.0 mm (x = -2.0) lateral to Bregma, ensure the skull is in the same plane, with the DV/z-coordinate being roughly equal. Ensure the skull is secure and does not move after any adjustments.
- Drill burr-hole at +2.0 mm (ML) and +0.5 mm (AP) from Bregma (Figure 3).
- Using a stereotactic drill attachment, carefully lower the tip of the bit until it makes contact with Bregma and zero the coordinates.
- Raise the bit slightly and adjust the drill to the appropriate AP and ML coordinates.
- Lower the drill slowly, taking care to burr only through the skull.
- Alternatively, using a microliter syringe in the stereotactic frame, lower the needlepoint until it contacts Bregma and zero the coordinates.
- Raise the needle slightly and adjust to the appropriate AP and ML coordinates.
- Lower the tip until it touches the skull and note the exact location.
- Raise the needle slightly and make a small mark at the target location with a surgical marker.
- Raise or rotate the needle carrier out of the way, and using a hand drill, burr through the skull, being careful to avoid damaging the brain beneath. CAUTION: In general, older male mice have relatively thicker skulls and require more extensive drilling. Hand drilling should be done carefully, applying minimal pressure, as sudden breaks through the skull will damage the underlying meninges and/or brain.
NOTE: An extension of the burr-hole is necessary to accommodate the thermocouple probe during the LITT procedure. This can be done more easily during the initial injection surgery and facilitates a faster and more streamlined LITT surgery. Alternatively, the burr-hole can be extended in the same fashion during the LITT surgery, which may reduce the risk of extracranial tumor growth.
- Create a second burr-hole at +3.0 mm ML and +0.5 mm AP (1.0 mm lateral to the injection site) for the thermocouple.
- Follow the drilling procedure as outlined in the previous step.
- To avoid difficulties related to bone-regrowth, remove the bone between the two holes.
NOTE: Using +2.0 mm ML, +0.5 mm AP, and -2.5 mm DV from Bregma as the coordinates for tumor implantation is recommended. This location in the upper striatum yields consistent tumor growth, which is well tolerated by the animals-however, the protocol can be adapted to other locations.
- Prepare CT2A mouse glioma cell suspension in microliter syringe (5000 cells in 1.5 µL).
- Remove the pre-prepared microcentrifuge tube of cells from the ice and gently flick with a fingertip to resuspend.
- Gently draw 2 µL into a 5 µL or 10 µL syringe taking care to avoid bubbles.
- Express 0.5 µL to remove any air and ensure the needle is primed and working correctly.
- Wipe the needle shaft with an alcohol swab to remove the expressed fluid and any cells on the exterior surface (which may cause leptomeningeal tumor growth).
- Load the syringe into a microinjector syringe pump (or manual stereotactic attachment) and slowly lower the needle.
- Lower the needle slowly to depth (z = -3.0 mm) and pause for 1 min.
- Slowly retract the needle 0.5 mm (z = -2.50 mm) and inject cells (≤ 0.5 µL/min). Keep the area around the syringe dry using a microsurgical sponge spear, being careful not to disrupt the needle.
- Wait a minimum of 2 min after injection is complete, then slowly retract the syringe over a period of 3-4 min. Ensure that the first 4-5 retraction intervals are 100 µm per retraction to avoid cells from being dislodged from their original injection site.
- Using an alcohol swab, gently wipe the exterior of the needle free of any blood or fluid and flush and clean the syringe according to the manufacturer's guidelines. Use PBS and distilled water in between injections to ensure the needle does not plug. When the injections are completed, flush the needle generously with 70% ethanol to remove any remaining cells from the needle.
CAUTION: Not flushing the needle after each injection may result in a blockage. If injecting more than one cell type, use a separate needle for each type to avoid any possible cross-contamination.
- Re-approximate the incision, taking care to slightly evert the wound edges so the underlying dermis touches. Close the wound using a wound clip or 3 interrupted stitches with a 5-0 suture. Apply povidone-iodine solution to the closed wound.
- Remove the animal from the stereotactic frame and place it in a paper-lined recovery cage on a warming pad set to 37 °C. Ensure sternal recumbency is obtained before transferring the animal back to the home cage with a small dish of wet chow located on the cage floor.
- Monitor the animal at least twice daily, beginning on the day of surgery, for the following 2 days. Readminister meloxicam after 24 h, 48 h, and 72 h, or as per the institution guidelines.
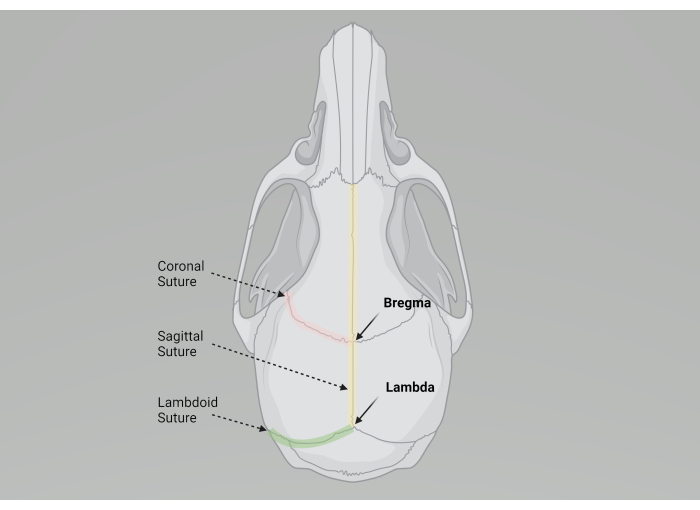
Figure 2: Graphical illustration of a mouse skull and important anatomical landmarks for stereotactic surgery. Created with BioRender.com Please click here to view a larger version of this figure.

Figure 3: Graphical illustration indicating locations of burr-holes and laser apparatus. Illustration showing the relative positions of the Bregma landmark, (A) the initial burr-hole for the (A') laser fiber, and (B) the second, or extended, burr-hole for the (B') thermocouple probe. A cut-out depiction of the laser fiber and thermocouple probes is shown to the right, illustrating how the probes are stabilized in a stereotactic end-foot with pre-drilled holes at the desired size and spacing. Created with BioRender.com Please click here to view a larger version of this figure.
3. Monitoring tumor burden pre-LITT (Day 9)
- Perform T2-weighted magnetic resonance imaging (MRI), following institutional guidelines, to assess tumor growth on the day prior to LITT.
NOTE: Tumors should be ~1.5-2.0 mm in diameter.- Obtain a suitable coronal scan of the whole mouse brain using the following parameters: fast spin echo sequence, TR = 5000 ms, TE = 45 ms, echo trains = 7, FOV = 30 x 30 mm2, matrix size = 250 x 256, total slices = 18, slice thickness = 0.3 mm, averages = 2.
NOTE: It is also recommend performing periodic MRI beginning approximately Day 6 following implantation to confirm successful allografting and to monitor tumor growth-particularly during initial experiments-as even subtle changes to the procedure may alter the timeline. CT2A is highly aggressive, and the animals need to be monitored closely. A T2-weighted coronal scan works well for this purpose. Using fluorescent-labeled or luciferin-labeled CT2A cells in conjunction with in vivo imaging system (IVIS) may also be suitable where access to a small animal MRI is not available. However, growth kinetics and other tumor characteristics will differ from this protocol.
- Obtain a suitable coronal scan of the whole mouse brain using the following parameters: fast spin echo sequence, TR = 5000 ms, TE = 45 ms, echo trains = 7, FOV = 30 x 30 mm2, matrix size = 250 x 256, total slices = 18, slice thickness = 0.3 mm, averages = 2.
4. LITT surgery (Day 10)
- As above in section 2, repeat steps 2.1-2.13 to prepare the animal for LITT.
NOTE: Wound healing from the previous surgery may be in different stages based on species and variations in the experimental timeline. Be mindful of thinner or more delicate tissue when remaking the incision. - Using a sterile cotton-tipped swab, gently clean the skull, clearing away any tissue obscuring Bregma or the previously made burr hole. If necessary, redrill the burr-hole, though due to the speed of CT2A tumor formation, little if any bone regrowth is expected.
- With the LITT attachment in place in the stereotactic frame, zero the coordinates at Bregma for the tip of the laser fiber.
CAUTION: The laser fiber is very fragile and will crack if bent. Be careful to stop as soon as the tip of the laser fiber contacts the skull. - Raise the tip slightly and move to the desired ML and AP coordinates, then slowly lower the probes to the target DV coordinate to arrive at the target (2.0 mm ML, 0.5 mm AP, -2.0 mm DV).
- Set the LITT treatment parameters: Mode: continuous; Power: 1 W
- Toggle the laser from Standby to Active and engage the laser for 60 s using the foot pedal. If the temperature increases beyond 46 °C, pause briefly, then re-engage, attempting to maintain the temperature as close to 46 °C as possible.
- Slowly retract the laser assembly and gently wipe the laser fiber and thermocouple clean with an alcohol swab. Rotate the assembly out of the way, being careful that the probes do not contact the frame.
- Close the wound and recover the animal as described in steps 2.18-2.20 following tumor implantation above.
5. Post-LITT assessment (Day 11)
- Perform post-LITT T2-weighted MRI on the day following LITT treatment to assess for successful LITT tumor ablation using the sequence and parameters from step 3.1 above.
NOTE: Additionally, a fluid-attenuated inversion recovery (FLAIR) sequence may also be helpful in assessing post-operative edema. - Perform follow-up scans prior to end-of-study to monitor post-treatment changes or tumor regrowth.
6. End-of-study (Day 11/Day 15/Day 20)
- Euthanize animals at the chosen experimental endpoints as per the institution's guidelines.
NOTE: Endpoints later than Day 20 are not feasible with CT2A, even with extremely low cell-count inoculations, as control animals (i.e., sham surgery or no treatment) and some treatment group animals may be moribund and require euthanasia. For longer experiments, consider alternative mouse glioma cell models. - Collect tissues for fixation and processing.
- Perform cardiac perfusion with 4% paraformaldehyde (PFA) and collect the tissues of interest.
- Post-fix the brain tissue by immersion in 4% PFA overnight at 4 °C.
- Process the samples using standard practices for formalin-fixed paraffin-embedded (FFPE) or fixed-frozen analysis.
7. Analysis
- Verify successful LITT ablation using T2-weighted MRI and validate using basic histological techniques such as a hematoxylin and eosin stain.
- Perform any additional analyses required for the experiments (e.g., immunohistochemistry, immunofluorescence).
Access restricted. Please log in or start a trial to view this content.
Results
Successful CT2A tumor implantation and LITT treatments can be characterized using T2-weighted MRI, as shown in Figure 4, Figure 5, and Figure 6. MR images were obtained using a 7T cryogen-free superconducting magnet with a 17 cm bore and quadrature mouse head coil using the sequence parameters outlined in the above protocol. Careful adherence to this method should result in take rates approaching 100%, consistent tu...
Access restricted. Please log in or start a trial to view this content.
Discussion
There is a fast-expanding body of literature regarding LITT; however, it is primarily limited to human clinical case studies or case series. Indeed, several potential benefits for LITT have been shown, including lower post-operative complication rates and costs while conferring comparable progression-free survival7,8,9,10,11. There is also a reduction of local...
Access restricted. Please log in or start a trial to view this content.
Disclosures
We are grateful for the support from Monteris Medical, including the in-kind donation of laser equipment.
Acknowledgements
Funding sources for this project include the Natural Sciences and Engineering Council of Canada (NSERC)-Alliance, Mitacs-Accelerate, Research Manitoba-IPOC, Canadian Institutes for Health Research (CIHR) CGS-M, and University of Manitoba Graduate Fellowship. CT2A glioma cell line generously donated by Dr. Peter Fecci at Duke University, Durham, NC. We would also like to thank the Histology Service Lab and the Small Animal and Material Imaging Core facility at the University of Manitoba for their excellent technical assistance with this project.
Access restricted. Please log in or start a trial to view this content.
Materials
| Name | Company | Catalog Number | Comments |
|---|---|---|---|
| Absorbion Spears | FST | 18105-01 | Hemostatic sponges. |
| Adson tissue forceps | FST | 11006-12 | |
| C57BL/6 mice | Jackson Laboratories | Strain #000664 | 6 to 12 week old male and female |
| Cotton Tipped Applicators (6") | Electron Microscopy Sciences | 72308 | |
| CT2A glioma cell line | Generously donated from Dr. Peter Fecci, Duke University. | ||
| Cultrex Reduced Growth Factor Basement Membrane Extract, PathClear | Biotechne, R&D systems | 3433-010-01 | |
| DMEM/F-12, HEPES | Gibco, ThermoFisher Scientific | 11330032 | |
| Dual-chamber slides | BIO-RAD | 1450003 | |
| Eppendorf Safe-Lock Tubes 2.0 mL | Eppendorf | 22363352 | |
| Ethyl Alcohol Anhydrous | Greenfield Global | P016EAAN | Dilute to 70% with ddH2O |
| Fetal Bovine Serum, qualified, Canada | Gibco, ThermoFisher Scientific | 12483020 | |
| Glad Press-n-Seal plastic wrap | Amazon.ca | 12587704417 | |
| High speed drill | Kopf Instruments | Model 1474 | |
| K & J Thermocouple temerpature meter | Omega | HH509R | |
| Metacam (meloxicam) | WDDC | 114424 | |
| Microinjection syringe pump | WPI | UMP3T-1 | |
| Microliter syringe (700 Series) | Hamilton | 87908 | Custom needles are available. A steep needle bevel helps with precise delivery, and a shorter needle length helps with stability. |
| Needle driver/Needle Holder | FST | 12500-12 | A fine tip is most suitable due to the confined working space, but many styles are suitable based on handle preference. |
| Opixcare Plus opthalmic ointment | WDDC | 135941 | |
| Phosphate Buffered Saline (10x) | Fisher bioreagents | BP399-4 | Dilute to 1x with ddH2O |
| Povidone-iodine | ThermoFisher Scientific | 3955-16 | Aliquat into into smaller tubes for use with cotton tipped applicators. |
| Saline (normal) | WDDC | 126588 | |
| Scalpel, single use (#15 Blade) | Feather | Feather NO15 | |
| Scissors, fine surgical | FST | 91460-11 | Fine student scissors, Iris, or Bonn are all suitable. |
| Stereotactic frame | Kopf Instruments | Model 940 | With digital display console and mouse nose-cone and ear-bars. |
| Stereotactic syringe holder | Kopf Instruments | Model 1772-F | If not using an injection pump. |
| Sutures (5-0 monofilament) | Ethicon | MCP463G | Monocryl violet monofilament with reverse cutting tip |
| Syringe, 28 G (0.5 mL) | BD | BD 329461 | BD Lo-Dose U-100 Insulin Syringes |
| TC20 Automated Cell Counter | BIO-RAD | 1450102 | |
| Thermocouple probe, fine diameter (Type K) | Omega | TJM-CA316-IM025G-150 | |
| Trypsin-EDTA (0.25%), phenol red | Gibco, ThermoFisher Scientific | 25200072 | |
| Vetbond by 3M, veterinary tissue glue | WDDC | 126125 | |
| Wahl Peanut Clippers | WDDC/Wahl | 100963 | Also available directly from manufacturer. |
| Warming pad | Bensen Medical | 70308/121873 | Any similar item can be used. |
| Webcol Alcohol preps | Electron Microscopy Sciences | 71005-20 | Alcohol prep wipe, 2-ply, medium size. |
References
- Canadian Cancer Society. Cancer Statistics 2023. , Canadian Cancer Statistics Advisory Committee in collaboration with the Canadian Cancer Society, Statistics Canada and the Public Health Agency of Canada. Toronto, ON. http://cancer.ca/Canadian-Cancer-Statistics-2023-EN (2023).
- Glioblastoma Research Organization. Glioblastoma Research Organization. , https://www.gbmresearch.org (2024).
- Carpentier, A., et al. Laser thermal therapy: Real-time MRI-guided and computer-controlled procedures for metastatic brain tumors. Lasers Surg Med. 43 (10), 943-950 (2011).
- Haddad, A. F., et al. Mouse models of glioblastoma for the evaluation of novel therapeutic strategies. Neurooncol Adv. 3 (1), vdab100(2021).
- Chokshi, C. R., Savage, N., Venugopal, C., Singh, S. K. A patient-derived xenograft model of glioblastoma. STAR Protoc. 1 (3), 100179(2020).
- Alcaniz, J., et al. Clinically relevant glioblastoma patient-derived xenograft models to guide drug development and identify molecular signatures. Front Oncol. 13, 1129627(2023).
- Muir, M., et al. Laser interstitial thermal therapy for newly diagnosed glioblastoma. Lasers Med Sci. 37 (3), 1811-1820 (2022).
- Muir, M., Traylor, J. I., Gadot, R., Patel, R., Prabhu, S. S. Repeat laser interstitial thermal therapy for recurrent primary and metastatic intracranial tumors. Surg Neurol Int. 13, 311(2022).
- De Groot, J. F., et al. Efficacy of laser interstitial thermal therapy (LITT) for newly diagnosed and recurrent IDH wild-type glioblastoma. Neurooncol Adv. 4 (1), vdac040(2022).
- Holste, K. G., Orringer, D. A. Laser interstitial thermal therapy. Neurooncol Adv. 2 (1), vdz035(2020).
- Leuthardt, E. C., Voigt, J., Kim, A. H., Sylvester, P. A single-center cost analysis of treating primary and metastatic brain cancers with either brain laser interstitial thermal therapy (LITT) or craniotomy. Pharmacoecon Open. 1 (1), 53-63 (2017).
- Bastos, D. C. D. A., et al. Predictors of local control of brain metastasis treated with laser interstitial thermal therapy. Neurosurgery. 87 (1), 112-122 (2020).
- Darbinyan, A., Leelatian, N., Fomchenko, E. I. Histological changes associated with laser interstitial thermal therapy for radiation necrosis: illustrative cases. J Neurosurg Case Lessons. 4 (1), CASE21373(2022).
- Grant, G. A., Porter, B. E., Li, D., Barros Guinle, M. I., Kaur, H. Approach, complications, and outcomes for 37 consecutive pediatric patients undergoing laser ablation for medically refractory epilepsy at Stanford Children's Health. J Neurosurg Pediatr. 33 (1), 1-11 (2023).
- Ogasawara, C., et al. Laser interstitial thermal therapy for cerebral cavernous malformations: A systematic review of indications, safety, and outcomes. World Neurosurg. 166, 279-287.e1 (2022).
- Satzer, D., Mahavadi, A., Lacy, M., Grant, J. E., Warnke, P. Interstitial laser anterior capsulotomy for obsessive-compulsive disorder: lesion size and tractography correlate with outcome. J Neurol Neurosurg Psychiatry. 93 (3), 317-323 (2022).
- Salehi, A., et al. Therapeutic enhancement of blood-brain and blood-tumor barriers permeability by laser interstitial thermal therapy. Neurooncol Adv. 2 (1), vdaa071(2020).
- Navarro, K. L., Huss, M., Smith, J. C., Sharp, P., Marx, J. O., Pacharinsak, C. Mouse anesthesia: The art and science. ILAR J. 62 (1-2), 238-273 (2021).
Access restricted. Please log in or start a trial to view this content.
Reprints and Permissions
