Following antigen exposure, subpopulations of activated B cells undergo a process known as class switch recombination (CSR) to produce antibody isotypes with distinct effector functions. The protocol outlined in this report explains how CSR can be induced and analyzed in vitro for the purposes of studying B cell function.
A subscription to JoVE is required to view this content. Sign in or start your free trial.
Method Article
Induction and Assessment of Class Switch Recombination in Purified Murine B Cells
In This Article
Summary
Abstract
Humoral immunity is the branch of the immune system maintained by B cells and mediated through the secretion of antibodies. Upon B cell activation, the immunoglobulin locus undergoes a series of genetic modifications to alter the binding capacity and effector function of secreted antibodies. This process is highlighted by a genomic recombination event known as class switch recombination (CSR) in which the default IgM antibody isotype is substituted for one of IgG, IgA, or IgE. Each isotype possesses distinct effector functions thereby making CSR crucial to the maintenance of immunity.
Diversification of the immunoglobulin locus is mediated by the enzyme activation-induced cytidine deaminase (AID). A schematic video describing this process in detail is available online (http://video.med.utoronto.ca/videoprojects/immunology/aam.html). AID's activity and the CSR pathway are commonly studied in the assessment of B cell function and humoral immunity in mice. The protocol outlined in this report presents a method of B cell isolation from murine spleens and subsequent stimulation with bacterial lipopolysaccharide (LPS) to induce class switching to IgG3 (for other antibody isotypes see Table 1). In addition, the fluorescent cell staining dye Carboxyfluorescein succinimidyl ester (CFSE) is used to monitor cell division of stimulated cells, a process crucial to isotype switching 1, 2.
The regulation of AID and the mechanism by which CSR occurs are still unclear and thus in vitro class switch assays provide a reliable method for testing these processes in various mouse models. These assays have been previously used in the context of gene deficiency using knockout mice 3. Furthermore, in vitro switching of B cells can be preceded by viral transduction to modulate gene expression by RNA knockdown or transgene expression 4-6. The data from these types of experiments have impacted our understanding of AID activity, resolution of the CSR reaction, and antibody-mediated immunity in the mouse.
Protocol
Step I: Isolation of splenic B cells via magnetic enrichment
- Experimental mice should be aged 8-12 weeks to ensure full maturation of the immune system.
- Euthanize the mouse by cervical dislocation and soak in 70% ethanol. Surgically remove the spleen by making an incision through the skin and muscle of the left hypochondrium of the abdomen and cut it into three large pieces in phosphate buffered saline (PBS). Ensure all tools and reagents are sterile.
- Using the rubber end of a 1 mL syringe plunger, gently mash the spleen through a 70 μm cell strainer into PBS. Be sure to use a pushing motion rather than a grinding motion as grinding may lead to rupture of larger (i.e. proliferating) cells.
- Spin down the cells at no more than 350 g for 5 minutes and resuspend the pellet in PBS. Count the resuspended cells using a hemocytometer.
- Prepare a suspension of 1x10⁸ cells/mL in PBS with 5% normal rat serum in a sterile 5 mL polystyrene tube with a cap (maximum volume of 2 mL per tube).
- Add 50 μL of EasySep Negative Selection Mouse B Cell Enrichment cocktail for every mL of cells. Pipette the mixture, cap the tubes, and place in the fridge for 15 minutes.
- Add 100 μL EasySep Biotin Selection Cocktail for every mL of cells. Pipette the mixture, cap the tubes, and place in the fridge for 15 minutes.
- Add 100 μL of EasySep Magnetic Nanoparticles (ensure nanoparticles are mixed well and the solution is homogenous) for every mL of cells. Pipette the mixture, cap the tubes, and place in the fridge for 5 minutes.
- Top the solution to 2.5mL with PBS and place in an EasySep magnet for 5 minutes. Invert the magnet and tube and pour quickly into a new polystyrene tube. Do not shake the tube as negatively selected cells will be magnetically bound to the tube walls.
- To further increase the purity of the cell suspension, the tube may be reinserted into the magnet for an additional 5 minutes and poured into a new tube. This may reduce overall cell recovery.
- B cell purity can be assessed by flow cytometric analysis of B cell surface markers. Following enrichment, we consistently see a purity of >95% B220 positive cells.
Step II: CFSE cell staining
- Resuspend the isolated cells in warm PBS supplemented with 0.1% bovine serum albumin at a final concentration of 1 x 10⁶ cells per mL.
- Prepare a 5mM stock solution of CFSE (diluted in sterile dimethyl sulfoxide) and add 2μL for every mL of cells in the tube. The final concentration of 10μM is optimal for the staining of primary B cells.
- Incubate at 37°C for 10 minutes in the dark (note: CFSE is light sensitive and should be kept in the dark when possible).
- Quench the stain by adding an equal volume of bovine calf serum to your cells and incubating on ice for 5 minutes.
- Wash the cells by topping up the tubes with culture medium (see step III for recipe) and centrifuging at 350 g. Note that at least 5 times the volume equivalent of media must be added to counteract the viscosity of the bovine calf serum and for the cells to produce a pellet.
- Wash the cells twice more in culture medium. The cells are now ready for stimulation.
Step III: Cell stimulation with LPS
- Prepare your in vitro B cell culture medium by supplementing RPMI 1640 with 10% fetal calf serum and 50 μM β-mercaptoethanol/.
- Prepare your stimulation medium by adding LPS at a final concentration of 50μg/mL. Aliquot 125 μL of the stimulation medium into each well of a flat bottom 96-well tissue culture plate.
- Prepare your CFSE-stained B cells in culture medium without LPS at a final concentration of 3.2 x 10⁶ cells/mL. Add 125 μL of the cell suspension to the wells containing your stimulation medium and mix by pipetting gently.
- Each well now contains 4 x 10⁵ cells in a final LPS concentration of 25 μg/mL. This provides optimal levels of cell proliferation and class switching, although alterations to these values may be made as desired.
- Incubate the cells at 37°C and 5% CO2 for 72 to 96 hours. After 48 hours, clusters of large proliferating B cells will be clearly visible under a microscope.
Step IV: Flow cytometric analysis of class switching
- When you are ready to look at class switching, remove your cells from their culture conditions and wash them twice in 1 mL of staining buffer (PBS with 2% bovine calf serum).
- To prevent non-specific antibody staining of your cells, pellet the cells by spinning them down at 350 g and incubate them in 100μL of staining buffer with 5% normal mouse serum and 1μg of FcBlock per106 cells for 15 minutes on ice. Cell blocking should be performed on ice.
- Without washing your cells, add 1μg per 106 cells of a fluorescently tagged anti mouse IgG3 antibody and allow the cells to stain for 30 minutes on ice.
- Wash the cells twice by centrifugation and resuspend in 200-300 μL of staining buffer. The cells are now ready for assessment by flow cytometry.
- CFSE is optimally excited at 492 nm (by an argon-ion laser) and emits at 517 nm. The excitation and emission spectrum of the IgG3 antibody is dependent on its conjugate fluorescent dye.
Representative Results
Following magnetic enrichment, the cell suspension should look like a homogenous population of indistinguishable small circular cells (Figure 1A). After 48-72 hours of stimulation, isolated clusters of enlarged proliferating cells will be clearly visible (Figure 1B). A large proportion of the non-proliferating cells will appear small and granular as they undergo apoptosis.
CSR can normally be detected at the highest levels between 72 and 96 hours after stimulation before most of the cells begin to die 7. At this stage, the cells should have undergone a number of cell divisions with switched cells appearing in the later daughter cell population. A representative flow cytometric plot of CFSE dilution and surface expression of IgG3 after 96 hours of LPS stimulation can be seen in Figure 2.
Table 1. Isotype switching cocktails. Note: Stimulant concentration values are recommendations only. Titrations may be necessary.
| Desired Isotype | Stimulation Cocktail |
| IgG1and IgE | LPS (25μg/mL) and IL-4 (10 ng/mL) |
| IgG1and IgE | Anti-CD40 (10μg/mL) and IL-4 (10 ng/mL) |
| IgG2a | LPS (25μg/mL) and IFN-γ(10 ng/mL) |
| IgG2b and IgG3 | LPS (25μg/mL) |
| IgA | LPS (25μg/mL), TGF-β(2 ng/mL) and IL-5 (1.5 ng/mL) |
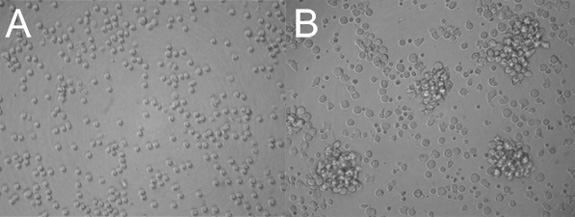
Figure 1. Isolation and LPS stimulation of splenic B cells. (a) Magnetically enriched splenic B cells before LPS stimulation. (b) 48 hours after stimulation with 25 μg/mL of LPS. Proliferating cells are seen as clusters in a background of blasting and apoptotic cells.
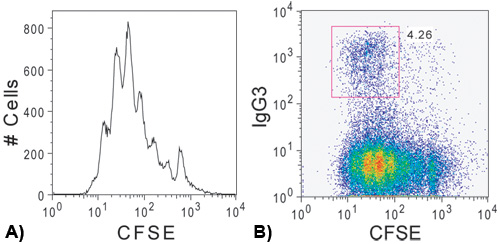
Figure 2. Proliferation and class switch recombination after 96 hours. (a) CFSE dilution for LPS stimulated cells after 96 hours in culture. Each independent peak represents a dilution in CFSE fluorescence corresponding to an independent cell division. (b) IgG3 expression showing the emergence of an IgG3 positive population following several rounds of cell division.
Access restricted. Please log in or start a trial to view this content.
Discussion
The protocol outlined above provides a standard assay to analyze AID expression and function during the class switching of primary murine B cells. This protocol uses bacterial LPS to induce switching from IgM to IgG3, although modifications to the stimulation media can be made to induce switching to other isotypes (summarized in Table 1 8, 9).
We have noted that, for as yet unknown reasons, fetal calf serum can affect the level of class switching observed in vitro. It is crucial th...
Access restricted. Please log in or start a trial to view this content.
Disclosures
No conflicts of interest declared.
Acknowledgements
We are grateful to the Martin laboratory for helpful discussions. This publication is supported by a grant from the Canadian Institute of Health Research (MOP-89783). A.M. is supported by a Canada Research Chair Tier II Award.
Access restricted. Please log in or start a trial to view this content.
Materials
| Name | Company | Catalog Number | Comments |
|---|---|---|---|
| Phosphate Buffered Saline | GIBCO, by Life Technologies | 14190 | |
| EasySep Mouse B Cell Enrichment Kit | Stem Cell Technologies | 19754 | |
| Polystyrene tubes | BD Biosciences | 352058 | |
| Bovine Serum Albumin | Sigma-Aldrich | A7030 | |
| CellTrace CFSE Cell Proliferation Kit | Invitrogen | C34554 | |
| Bovine Calf Serum | Hyclone | SH30072.03 | |
| RPMI 1640 Culture Medium | GIBCO, by Life Technologies | 11875 | |
| Lipopolysaccharides from Escherichia coli | Sigma-Aldrich | L6529 | |
| β-mercapt–thanol | GIBCO, by Life Technologies | 21985 | |
| Fetal Bovine Serum | Hyclone | SH30396.03 | |
| Normal Mouse Serum | Jackson ImmunoResearch | 011-000 | |
| Purified Rat Anti-Mouse CD16/CD32 (Mouse BD Fc Block) | BD Biosciences | 553141 | |
| Rat Anti-Mouse IgG3 | BD Biosciences | 553401 |
References
- Hodgkin, P. D., Lee, J. H., Lyons, A. B. B cell differentiation and isotype switching is related to division cycle number. J Exp Med. 184, 277-281 (1996).
- McCall, M. N., Hodgkin, P. D. Switch recombination and germ-line transcription are division-regulated events in B lymphocytes. Biochim Biophys Acta. 1447, 43-50 (1999).
- Manis, J. P. 53BP1 links DNA damage-response pathways to immunoglobulin heavy chain class-switch recombination. Nat Immunol. 5, 481-487 (2004).
- de Yebenes, V. G. miR-181b negatively regulates activation-induced cytidine deaminase in B cells. J Exp Med. 205, 2199-2206 (2008).
- McBride, K. M. Regulation of class switch recombination and somatic mutation by AID phosphorylation. J Exp Med. 205, 2585-2594 (2008).
- Ramachandran, S. The RNF8/RNF168 ubiquitin ligase cascade facilitates class switch recombination. Proc Natl Acad Sci U S A. 107, 809-8014 (2010).
- Zaheen, A. AID constrains germinal center size by rendering B cells susceptible to apoptosis. Blood. 114, 547-554 (2009).
- Chaudhuri, J., Alt, F. W. Class-switch recombination: interplay of transcription, DNA deamination and DNA repair. Nat Rev Immunol. 4, 541-552 (2004).
- Kaminski, D. A., Stavnezer, J. Stimuli that enhance IgA class switching increase histone 3 acetylation at S alpha, but poorly stimulate sequential switching from IgG2b. Eur J Immunol. 37, 240-251 (2007).
- Kaminski, D. A., Stavnezer, J. Antibody class switching differs among SJL, C57BL/6 and 129 mice. Int Immunol. 19, 545-556 (2007).
Access restricted. Please log in or start a trial to view this content.
Reprints and Permissions
