眼科检查
English
Share
Overview
资料来源: 公共卫生与社会医学系助理教授理查德 · 格利克曼-西蒙,MD,塔夫斯大学医学院马
适当的评价,眼中的一般做法设置涉及到视觉测试、 轨道检查和眼底检查。在开始之前的考试,它至关重要的是熟悉的解剖和生理的眼睛。上眼睑应略超过虹膜,但它不应该包括瞳孔时开放;下眼睑位于下方虹膜。巩膜通常出现白色或稍浅黄色颜色。结膜,涵盖前部巩膜和内在的眼睑,透明膜的外观是敏感的眼部疾病,如感染和炎症指标。催泪的泪腺在于上面和侧面到眼球。泪水蔓延下来,在内侧流入两个泪点之前到鼻泪囊和鼻泪管进入眼睛。
虹膜划分前从后房型。光圈控制瞳孔,大小肌肉和它背后睫状体肌肉控制透镜的焦距。睫状体还生产水幽默,很大程度上决定了眼压 (图 1)。第二和第三的颅神经控制瞳孔反应和镜头的住宿;颅神经三控制上眼睑抬高;第三、 第四和第六的颅神经控制眼球运动。由六眼外肌 (图 2) 由第三、 第四和第六的颅神经支配控制六个基本方向的目光。
视觉测试是眼科考试的重要组成部分,也作为在神经学检查颅神经二评估的一部分执行。它的光经过角膜、 瞳孔、 晶状体和玻璃体后聚焦的图像投射到视网膜。投影是颠倒和扭转右到左,这意味着从较低的时空视野进入的光照射视网膜上的鼻象限。视网膜的感光细胞反应的生成,并转达给视神经,透过光纤束传递到视觉皮层的电脉冲。左、 右的视觉皮质处理图像分别从左和右的视觉领域,进入。
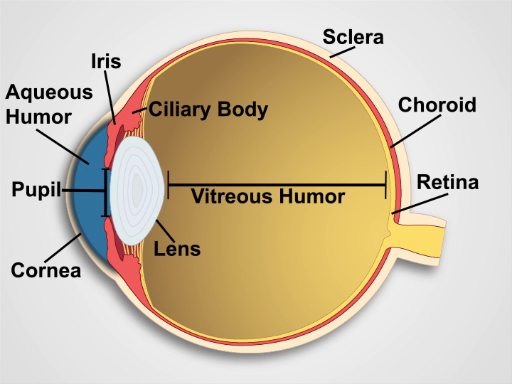
图 1。眼睛的解剖。图人眼的矢状面观与标记的结构。
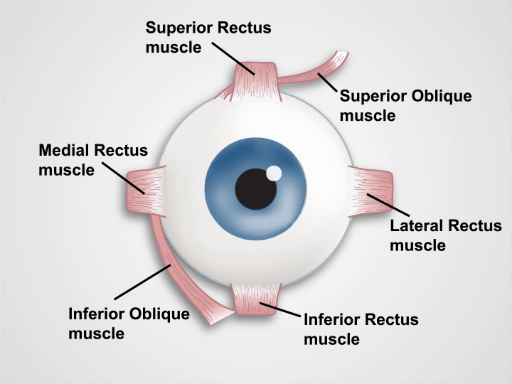
图 2。眼睛肌肉。一幅漫画正面观人眼与眼外肌 (标记)。
Procedure
Applications and Summary
Many systemic and ocular pathologies have manifestations that can be identified during an eye examination. Simple visual acuity testing with a Snellen chart, or an adequate substitute, allows screening for myopia and presbyopia – impaired far and near vision, respectively. Limitations in peripheral vision raise the possibility of glaucoma, as well as other serious conditions, and should always prompt further ophthalmologic evaluation. Localized swelling of the eyelids commonly results from infected sties or nodular chalazions caused by obstructed glands. Conjunctival paleness may be a sign of anemia, whereas hyperemia and discharge suggest conjunctivitis. A painless, localized, homogenous area of scleral redness suggests a subconjunctival hemorrhage. An acutely painful, red eye with ciliary injection around the iris may indicate corneal injury or infection, acute iritis, or acute angle closure glaucoma, all requiring urgent ophthalmologic evaluation. Jaundice first presents as a yellowing of the sclera. Eye protrusion and lid lag are late signs of long-standing hyperthyroidism. Anisocoria, or unequal pupils, may be caused by blunt trauma, glaucoma, or disruptions in the sympathetic or parasympathetic nerve supply to the irises through cranial nerve III. Development disorders usually account for dysconjugate gaze in childhood, whereas acquired cranial nerve palsies from infections, neurologic diseases, or trauma tend to be the cause in adults. Ptosis usually results from a cranial nerve III palsy, and nystagmus is seen in cerebellar and vestibular disorders.
Transcript
Periodic eye examinations-as a part of preventive healthcare-allow for an early diagnosis of various eye conditions, and it is useful for monitoring eye development in children. Many systemic diseases and pathological processes in the nervous system have ocular manifestations. A thorough eye examination can reveal signs of potentially blinding emergent conditions that require immediate treatment.
In this video, we will first briefly review the anatomy and physiology of an eye, which will be followed by a demonstration of the first two aspects of eye evaluation-vision testing and orbital inspection. The third aspect-ophthalmoscopic examination-will be covered in a separate video of this collection.
Let’s begin by briefly reviewing anatomy and physiology of an eye. The human eye has a complex structure. Anteriorly, eyelids protect an eyeball. Normally, when the eye is open, the upper lid rests slightly above the iris and does not cover the pupil, whereas the lower lid lies below the iris. The outer layer of the eye, the sclera, normally appears white or slightly buff in color. The appearance of conjunctiva-a transparent membrane covering the anterior sclera and the inner eyelids-is a sensitive indicator of ocular disease, such as infections and inflammation. The tear-producing lacrimal gland lies above and lateral to the eye.
A sagittal section through the eye reveals the cornea; the iris, which surrounds the pupil; the lens; the ciliary body; the outer layers including the sclera and the choroid; the innermost retina; and the aqueous and vitreous humor. As light sequentially passes through the cornea, pupil, lens, and vitreous body, a focused image is projected onto the retina. The projection is upside down and reversed right to left. Photosensitive cells of the retina respond by generating electrical impulses, which are relayed to cranial nerve II, the optic nerve, and passed through the optic tracts to the visual cortex in the occipital lobes of the brain.
The optic nerve also constitutes the afferent limbs of the circuits for pupillary light reflex and lens accommodation. The efferent signals for these responses are transmitted to the muscles of the iris and ciliary body by cranial nerve III, the oculomotor nerve. Cranial nerve III also innervates the levator palpebrae superioris muscle that raises the upper eyelid. The dysfunction of the eyelid muscles or their nerve supply can lead to blepharoptosis or “drooping eyelid”, also referred to as ptosis.
Eye stability and movements in the six cardinal directions of gaze result from coordinated action of the six extraocular muscles: the superior and inferior oblique muscles, and the superior, inferior, lateral and medial rectus muscles, which are innervated by the cranial nerves III, IV and VI. Thus, evaluation of the pupillary responses and extraocular movements provides the clinician the clues about the functioning and integrity of the ocular components, the extraocular muscles, and the neuronal pathways that control these structures.
Now that we have briefly reviewed basic anatomy and physiology of the eye, let’s discuss the steps involved in testing visual acuity and peripheral vision.
Visual acuity is best tested using a well-lit, wall-mounted Snellen chart. Position the patient about 20 ft from the chart. Request them to wear non-reading glasses if normally used. Ask the patient to cover one eye with a card and then read the smallest line of print possible. Give credit for correctly identifying half or more of the letters and record the visual acuity as the two numbers located to the side of the line of print, and note whether it was with the correction or not. The top number indicates the distance in ft the patient stood from the chart and the bottom number indicates the distance from which a person with normal vision could read the corresponding line of print accurately. Repeat the test with the other eye.
If a wall-mounted chart is unavailable, conduct the same procedure with a specially designed card that the patient can hold 14 inches away. This card simulates the view of a Snellen chart from 20 ft away and it is frequently used to test for presbyopia, or impaired near vision, which is common in people as they reach middle age. Age associated changes of the lens cause the eyes to gradually lose their ability to focus on nearby objects. In presbyopia, vision may improve when the card is held further away.
Next perform testing of peripheral vision. Begin by asking the patient to stare at your eyes with both of theirs without looking anywhere else. Place your hands, each with two fingers raised, lateral to the patient’s ears about 2 ft apart. Wiggle your fingers and bring them slowly forward, curving slightly inward toward the center of vision and ask the patient to tell you when they see the movement of your fingers in their periphery. Normally, this occurs when your fingers are even with the patient’s temples or about 90° from the center of gaze on either side. One can increase the accuracy of this exam with the help of red-topped pen. Beginning at a spot out of patient’s vision, slowly move it inward, following an arc toward the patient’s nose. Sequentially, repeat this from the four corners of the patient’s visual field. Note when they can first see the color, which is normally at 90 degrees from the center of gaze.
Next, we will discuss how to perform inspection and palpation of external eye structures, how to evaluate pupillary responses, and finally, how to test for normal and pathological eye movements.
Wash your hands thoroughly before making any contact with the patient’s eyes. Stand in front of the patient and ask them to stare directly at you. Inspect the eyes for asymmetry and protrusions. Inspect the eyebrows for sparseness or scaliness. Then have the patient gently close their eyes and inspect their eyelids for adequate closure, ptosis, lesions, swelling, masses, or discharge. With the eyes reopened, carefully observe for dryness or excessive tearing. Inspect and palpate the lateral lacrimal glands and medial lacrimal sacs for swelling or tenderness. Next, gently pull downward on the lower lids with your thumbs and ask the patient to look upward to expose the conjunctiva and sclera. Note color and check for vascular dilations, nodules, swelling, or discharge. Remember, jaundice first presents as a yellowing of the sclera.
Shine a penlight obliquely across the cornea, noting any surface irregularities or opacities. Simultaneously, inspect the iris for rings, shadows, or ciliary injection, and the lens for opacities. Also, inspect the pupils for their size, shape, and symmetry. Pupils are normally 3-4 mm in diameter. In anisocoria, the pupil diameters are unequal by at least 4 mm. In myosis, they are abnormally constricted, whereas in mydriasis, they are significantly dilated. Next, have the patient stare at a penlight held about 20 cm away. Note the position of the corneal reflections, which should be symmetrically located just nasally to the center of the pupils.
To test pupillary reaction, the room needs to be slightly darkened. Ask the patient to stare off into the distance. Swing the penlight nasally across the patient’s right eye while observing the right pupil. Normally, it should constrict. Now, repeat the same maneuver while observing both eyes, taking care not to allow any light to fall on the patient’s left eye. Both pupils should consensually constrict. Repeat this testing for the left eye. Turn the lights in the room back on for the rest of the examination.
Examine extraocular motion by asking the patient to keep their head still and follow your index finger with their eyes as it traces the shape of a large “H” at a comfortable distance. Observe the patient’s eyes moving in the six cardinal directions, noting any asymmetry. Abnormal eye movement can indicate lesions affecting cranial nerves III, IV and VI, which innervate the extraocular muscles. Then, have the patient stare at your finger as it moves toward the bridge of their nose, and watch for equal pupillary constriction and convergence of the eyes medially. If the pupils don’t react, hold your finger about 10 cm away and ask the patient to alternately stare at your finger and into the distance beyond it. The pupils should constrict while focused on your finger.
Next, move your finger in horizontal and vertical direction and momentarily hold the patient’s gaze at the extreme upper, and lateral positions. While doing so, observe for nystagmus-an involuntary rhythmic oscillation of the eyes-which can be seen in cerebellar and vestibular disorders. A few beating movements laterally is normal. Lastly, check for “lid lag”. Ask the patient to look down and look for an abnormal rim of sclera over the iris on downward gaze. This can be seen in uncontrolled hyperthyroidism along with the visible eye protrusion.
You’ve just watched JoVE’s video on the eye examination. You should now have a basic understanding of the anatomy and physiology of the eye as well as of the essential steps of the visual testing and eye inspection. As always, thanks for watching!