


Overview
Source: Tilde Andersson1, Rolf Lood1
1 Department of Clinical Sciences Lund, Division of Infection Medicine, Biomedical Center, Lund University, 221 00 Lund, Sweden
Viruses that infect prokaryotic organisms, called bacteriophages or simply phages, were identified in the early 20th century by Twort (1) and d'Hérelle (2) independently. Phages have since been widely recognized for their therapeutic value (3) and their influence on human (4), as well as global, ecosystems (5). Current concerns have fueled a renewed interest in the use of phages as an alternative to modern antibiotics in treatment of infectious disease (6). Essentially all phage research relies on the ability to purify and quantify viruses, also known as a viral titer. Initially described in 1952, this was the purpose of the plaque assay (7). Decades and multiple technological advancements later, the plaque assay remains one of the most reliable methods for determination of viral titer (8).
Bacteriophages subsist by injecting their genetic material into host cells, hijacking the machineries for production of new phage particles, and eventually causing the host to release numerous progeny virions through cell lysis. Because of their minute size, bacteriophages cannot be observed using solely light microscopy; therefore, scanning electron microscopy is required (Figure 1). Additionally, phages cannot be cultivated on nutritional agar plates like bacteria, as they need host cells to prey on.
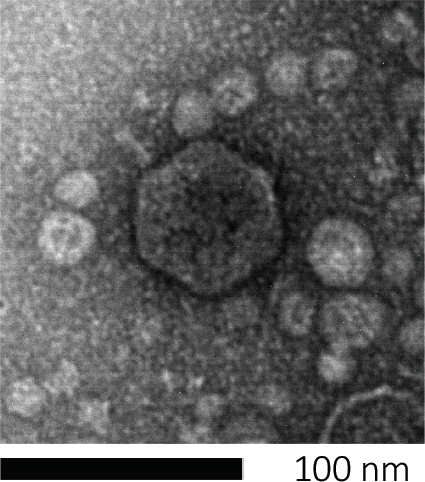
Figure 1: The morphology of a bacteriophage, here exemplified by an E. coli phage, can be studied using scanning electron microscopy. Most bacteriophages belong to Caudovirales (tailed bacteriophages). This particular phage has a very short tail structure and an icosahedral head, placing it in the family of Podoviruses.
The plaque assay (Figure 2) is based on incorporation of host cells, preferentially in log-phase growth, into the medium. This creates a dense, turbid layer of bacteria able to sustain viral growth. An isolated phage can subsequently infect, replicate within, and lyse one cell. With each lysed cell, multiple adjacent ones become immediately infected. Several cycles in, a clear zone (a plaque) can be observed in the otherwise turbid plate (Figure 2B/Figure 3A), indicating the presence of what was initially a single bacteriophage particle. The number of plaque forming units per volume (i.e. PFU/mL) of a sample, can thus be determined from the number of plaques generated.
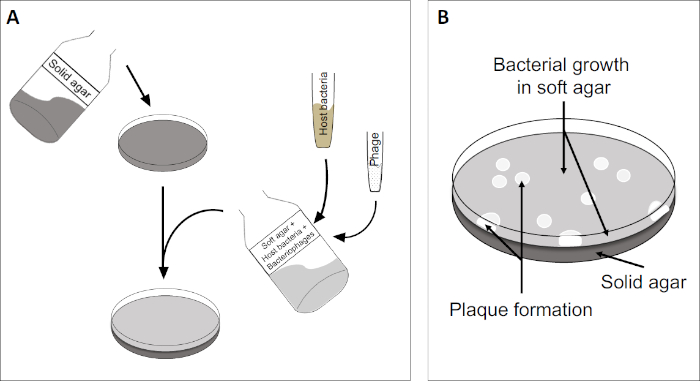
Figure 2: Testing for plaque forming units (PFU) is a common method for determining the number of bacteriophages in a sample. (A) The base of a sterile Petri dish is covered with an appropriate solid nutrient medium, followed by a mixture of soft media, susceptible host cells and a dilution of the original bacteriophage sample. Note that the phage-suspension could, in some cases, also be evenly spread-out across the surface of already solidified soft agar. (B) Growth of the host bacteria forms a lawn of cells in the top agar layer. Bacteriophage replication generates clear zones, or plaques, caused by host cell lysis.
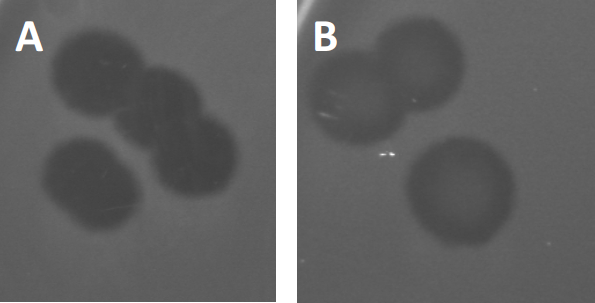
Figure 3: Results from PFU-testing show multiple plaques generated by bacteriophages. Due to lysis of susceptible host cells, plaques can be seen as clearing zones in the bacterial lawn, either with (A) full clearance, or (B) partial re-growth caused by generation of resistant bacteria (or possibly by temperate phages in the lysogenic cycle).
Certain temperate phages can adopt what is referred to as a lysogenic lifecycle, in addition to the formerly described lytic growth. In lysogeny, the virus assumes a latent state through incorporation of its genetic material into the genome of the host cell (9), often conferring resistance to further phage infections. This is sometimes revealed through a slight clouding of the plaque (Figure 3B). It is worth noting however, that plaques can also appear blurred due to re-growth of bacteria that have evolved resistance to the phage independent of previous phage infections.
Viruses can attach, or adsorb, to only a limited range of host bacteria (10). Host ranges are further limited by intracellular anti-viral strategies such as the CRISPR-Cas system (11). The resistance/sensitivity towards specific phages displayed by bacterial subgroups has historically been used to categorize bacterial strains into different phage types (Figure 4). Although the effectiveness of this method has now been surpassed by novel sequencing techniques, phage typing can still provide valuable information about bacteria-phage interactions, for instance, facilitating the design of a phage cocktail for clinical usage.
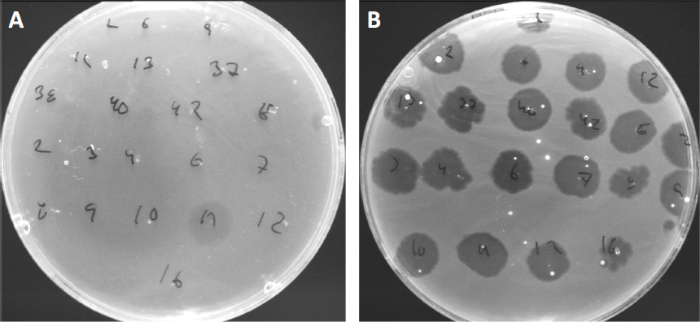
Figure 4: Phage sensitivity of different bacterial strains. Soft agar plates with Cutibacterium acnes strain (A) AD27 and (B) AD35, were spotted with 21 different C. acnes bacteriophages. Only phage 11 were able to infect and kill AD27 while strain AD35 showed sensitivity towards all phages. This technique, termed phage typing, can be used to divide bacterial species and strains into different subgroups based on phage susceptibility.
Procedure
1. Set-up
- Before commencing any work involving microbes, make sure that the work space is sterilized (e.g. wiped with 70% ethanol). Always wear a lab coat and gloves, keep long hair tied back, and ensure that any wounds are particularly well protected.
- When finished, sterilize all surfaces and thoroughly wash/sterilize hands and wrists.
2. Protocol
- LB Media preparation
Note: Depending on the host bacterial strain and the bacteriophage, a different a liquid medium may be more suitable for the initial culturing of the host bacterial strain or a different solid medium may be more suitable for subsequent growth. Lysogeny broth (LB) is used in this protocol for the broth and the agar.- Mix 4 g LB in 200 mL distilled water, in triplicate, for the LB broth, the solid bottom agar, and the soft top agar. All solutions should be prepared in containers able to hold twice the final volume to prevent overflow while autoclaving.
Note: If performing the assay in triplicate, prepare double the amount of LB bottom agar. - Adjust the pH of all three solutions to 7.4 using NaOH or HCl as appropriate.
- Add 3 g of agar power to the bottom agar bottle to make a 1.5% agar solution for the solid agar
- Add 1.2 g of agar power to the top agar bottle to make a 0.6% agar solution for soft agar.
- Place the bottles, with semi-tightened caps, in an autoclave set to 121°C for 20 min to sterilize the solutions. Close the caps as soon the run is finished to prevent contamination.
- When the LB media has reached a temperature of approximately 45-50°C, add 450 μL of sterile 1 M CaCl2 to all three of the 200 mL LB solutions to make a final concentration of 2.25 mM.
- Pour 15 mL aliquots of the solid agar medium into sterile Petri dishes (avoid shaking to prevent foaming) and allow the agar to solidify for a few hours or overnight at room temperature (Figure 4A). Plates can be stored upside down at 4°C for several days.
- Mix 4 g LB in 200 mL distilled water, in triplicate, for the LB broth, the solid bottom agar, and the soft top agar. All solutions should be prepared in containers able to hold twice the final volume to prevent overflow while autoclaving.
- Culturing of host cells
- One day prior to the assay, add 10 μL of E. coli culture to 10 mL of LB broth.
- Incubate the bacteria at 37°C overnight at 160 rpm in a shaking incubator.
- The morning of the assay, add 0.5 mL of the overnight culture to 10 mL of fresh LB.
Note: If you are performing the assay in triplicate, prepare double the amount of this culture. - Incubate the at 37°C at 160 rpm in a shaking incubator until the bacterial culture is in log-phase growth. This can be determined spectrophotometrically by an OD600 of 0.5-0.7.
- Keep the culture at room temperature until the bacteria are to be added to the top LB agar.
- 10-fold Serial dilution of bacteriophage
- Add 180μL of LB broth to seven wells in the first row of a to a 96-well plate
Note: It is suggested to perform the dilution in triplicate in order to increase its statistical reliability. To do this, prepare additional dilutions of the bacteriophage in the second and third rows of the plate. - Carefully vortex the original bacteriophage sample to ensure homogeneity and transfer 20 μL into the first well.
- Mix the sample well by pipetting and down.
- Transfer 20 μL of the resulting suspension into the second well.
- Continue the serial dilution by transferring 20 μL of the solution in the second well into the third well, and so on, until sixth well, leaving the seventh well as a negative control to which no phage-suspension will be added. This will create a dilution range of 10-1-10-6.
- Add 180μL of LB broth to seven wells in the first row of a to a 96-well plate
- Plating
- Label the base of the Petri dishes (previously prepared in step 2.1.7) with name, date and a short sample description (including the phage sample dilution factor). Pre-heat the Petri dishes in 37°C incubator one hour before the assay.
- Melt the solidified soft agar-medium (typically done using a microwave; solidified agar melts at 85°C), and let it come to around 45°C. The heated media can be placed in a 45°C water bath for ~1h to reach an appropriate temperature. It should be hot enough to remain in liquid form, but cool enough to not kill added bacteria.
- Mix 4 mL bacterial culture (from step 2.2) with 35 mL LB soft agar (at 45°C). Swirl to evenly distribute the cells but avoid shaking to prevent foaming (Figure 4A).
- Label one sterile test tube for each of the serial dilution steps and one for the control sample, for a total of 7 labeled test tubes. Place 5 mL aliquots of the bacterial culture/soft agar mixture from step 2.4.3 into the 7 tubes. Work quickly through step 2.4.6 because such small volumes of agar-based media will quickly solidify at room temperature.
- Add 100 μL of the control sample (from step 2.3) to the control test-tube and swirl carefully. Discard the used pipette tip and transfer the same volume from each of the serially diluted bacteriophage samples (step 2.3) to their respective test tubes, swirling to mix.
- Immediately transfer the 5 mL mixtures onto the labelled, pre-heated, solid agar plates (Figure 4A). Gently swirl the plates to even spread the mixtures.
Note: If you are performing the assay in triplicate, repeat steps 2.4.3-6 two more times. - Seal each plate with laboratory film, and allow both layers to solidify properly at room temperature (approximately 15 minutes) before placing them up-side-down a 37°C incubator, stimulating growth of both the bacteria and the phage, for 24 hours or until plaques develop, It typically takes about 1-5 days for plaques to appear (Figure 4B), but the timing varies considerably depending on incubation conditions, medium, and the bacterial species.
3. Data Analysis and Results
- Counting plaques
- Ensure that no plaques are visible in the plates marked "control", as this would indicate viral contamination.
- Begin with the plates labelled 10-6, containing the most diluted bacteriophage sample. Count the plaques without removing the lid, marking them with a pen as you go to indicate which plaques have already been counted.
- Count the remaining plates. Some plates may have too few or too many plaques to count. Use the plates with 10-150 plaques for further analysis.
- Calculating PFU
- Divide the number of plaques by the dilution factor, (ex. 10-6 for the most diluted sample) toobtain the number of Plaque Forming Units (PFU) in 100 μL of phage mixture.
Note: If performing the assay in triplicate, use the average number of plaques from the three plates. - To determine the concentration (in PFU/mL) of the original sample, multiply by an additional dilution factor of 10, since only 100 μL of sample was plated. (ie
 )
) - Calculate the mean value of the PFU/mL for all dilutions that had between 10 and 150 plaques to attain a more reliable result.
- Divide the number of plaques by the dilution factor, (ex. 10-6 for the most diluted sample) toobtain the number of Plaque Forming Units (PFU) in 100 μL of phage mixture.
 )
)Bacteriophages, also called phages, are viruses that specifically infect bacteria and we can confirm their presence and quantify them using a tool called the plaque assay. Bacteriophages infect their susceptible hosts by first attaching to the bacterial cell wall and injecting their genetic material. Then, they hijack the cell's biosynthetic machinery to replicate their DNA and produce numerous progeny phage particles, which they then release by lysing and killing the host cell.
This lytic activity is the basis of a widely used phage enumerating technique known as the plaque assay or double agar layer assay. Here, a bacteriophage mix is first prepared in a molten nutrient broth containing low concentration agar. All bacteria used in the mix should be alive and actively dividing in the log phase of their growth, which will ensure that a large percentage of the bacteria are viable and able to form a dense lawn around the plaques. Next, this molten bacterial-phage agar mix is spread over a more solid, concentrated agar nutrient medium which is already solidified on a Petri dish. On incubation at room temperature, the low concentration agar-phage-bacteria broth also solidifies to form a soft agar overlay.
Here, the bacterial cells can derive additional nutrients from the bottom layer and should rapidly multiply to produce a confluent lawn of bacteria. However, as phage particles are also present in the soft layer, these will infect and replicate their genetic material within the bacteria, culminating in cell lysis, which releases multiple progeny. These phage progeny then infect the neighboring cells, as the semi-solid state of the bacteria-phage layer restricts their movement to more distantly located host cells. This cycle of infection and lysis continues over multiple rounds, killing a large number of bacteria in a localized area. The effect of the neighboring cells being destroyed, is to produce a single circular clear zone, called a plaque, which can be seen by the naked eye, effectively amplifying the bacteria lytic activity of the phage and enabling their enumeration.
The number of plaques on a Petri dish are referred to as Plaque-Forming Units, or PFUs, and, providing the initial bacteriophage concentration was sufficiently dilute, should directly correspond to the number of infective phage particles in the original sample. This technique can also be used for characterization of plaque morphology, to aid in identification of phage types, or to isolate phage mutants. In this lab, you will learn how to perform the plaque assay for enumerating phages, using the T7 phage of E. coli as an example.
First, identify a suitable medium for the culturing of the host bacterial cells and the bacteriophage. Here lysogeny broth, or LB medium, was used to culture E. coli and the T7 phage. Next, take three clean glass bottles and label them with media, name, and then the first as LB-Broth, the second as LB-Bottom Agar, and the third as LB-Top Agar. Now, weigh out four grams of pre-formulated LB powder in three sets and then transfer one set of weighed dried media into each bottle. Add 200 milliliters of water to the first bottle. Mix the contents using a magnetic stir bar.
Then, using a pH meter and constant stirring, bring the final pH to 7.4 through the addition of sodium hydroxide or hydrochloric acid. Repeat the water addition and pH adjustment for the other two remaining bottles, as well. Now, weigh out three grams of agar powder and add it to the second bottle to make a 1.5 % bottom agar. Finally, weigh 1. 2 grams of agar and add it to the third bottle to make the .6 % LB top agar. The broth condition in bottle one does not need an agar addition. Cap the bottle semi-tightly and then, sterilize the media by autoclaving at 121 degrees Celsius for 20 minutes. Once complete, remove the media bottles from the autoclave and immediately twist the bottle caps to close them fully to prevent contamination. Keep the LB-Broth and LB-Top Agar media on the bench for later use. Place the LB-Bottom Agar to cool in a water bath that is preset to approximately 45 degrees Celsius.
When the LB-Bottom agar reaches approximately 45 degrees Celsius, transfer it to the work bench. Next, sterilize the workspace using 70 % ethenol. Next, add 450 microliters of sterile one molar calcium chloride to the molten bottom agar to make a final concentration of 2.25 millimolar. Gently swirl the bottle to mix. Then, set out seven clean Petri dishes. Label each dish on the bottom with the media name and preparation date. Then, pour 15 milliliters of the bottom agar into each of the seven Petri dishes. Allow the plates to set for a few hours or overnight at room temperature. Once set, the culture plates can be stored at four degrees Celsius for several days if needed, upside down to minimize condensation. Transfer the Petri dishes from the four degrees Celsius refrigerator to a 37 degrees Celsius incubator one hour before the assay.
The day before the assay is to be preformed, the E. coli should be cultured. Here, 10 microliters of E. coli culture was inoculated into 10 milliliters of LB-Broth. Place the bacteria to grow overnight in a shaking incubator set to 37 degrees Celsius at 160 RPM. Then, on the day of the assay, remove the bacterial culture from the incubator. Seed a fresh 10 milliliters of fresh LB broth with 0.5 milliliters of the overnight culture. Place these cells to grow into a shaking incubator set to 37 degrees Celsius at 160 RPM. Next, use a spectrophotometer to check when this culture reaches log phase growth, indicated by an optical density of 0.5 to 0.7. Once the OD reaches this level, stop the incubation by transferring the cell culture to the bench. They are now ready to be used for phage overlay assay.
Phage titers can vary exponentially across different phage types and samples. So in order to count them effectively, they should be diluted to generate a wide range of phage concentrations. On the day of the assay, generate a series of phage dilutions ranging from one tenth to one millionth concentrations, following a 10-fold dilution technique. To obtain statistically significant and accurate data, perform the serial dilution in triplicate.
Next, melt the solidified LB-top agar using a microwave. Then, place it in a water bath that is preset at 45 degrees Celsius for one hour. After one hour, collect the Petri dishes containing the bottom agar layer from the incubator. Label the plates with phage concentration and assay date. Then, set out seven clean test tubes. Label each test tube with the serial phage dilution number and designate one as control.
When the LB-top agar reaches 45 degrees Celsius, transfer it to the working bench. Now, add 450 microliters of one molar calcium chloride to the 200 milliliter agar to make a final concentration of 2.25 millimolar. Gently swirl the bottle to mix. Next, add 35 milliliters of LB-top agar and four milliliters of bacterial suspension to a sterile conical tube. Gently swirl to evenly distribute the cells but avoid shaking to prevent foaming.
Now, aliquot five milliliters of this bacteria- top agar mix to each of the seven test tubes. Then, transfer 100 microliters of the serially diluted bacteriophage samples and control media, which should be simply media with no bacteriophage, to the respectfully labeled test tubes. Swirl the mixture gently to ensure proper mixing. Gently transfer five milliliters of bacteriophage mix onto the respective Petri plate. Evenly spread the mix throughout the whole surface by gently swirling the Petri plate.
Once all of the Petri plates are layered with the mix, allow solidification of the top layer by incubating at room temperature for 15 minutes. After completion of these steps, repeat the process for the second and then the third sets of the Petri dishes using the remaining two sets of phage dilutions. Seal each dish with parafilm and incubate at room temperature for 15 minutes. Place the culture plate upside down at a suitable temperature for 24 hours or until plaques develop. Here, plates were placed in a 37 degrees Celsius incubator for one day, a stimulating growth condition for E. coli and the T7 phage.
Plaques will appear after one to five days of incubation, depending on the bacterial species, incubation conditions, and the choice of medium. Here, plaques were visible after one day of incubation at 37 degrees Celsius. Begin by checking the plates marked control and ensure that no plaques were formed in these plates, as this would indicate viral contamination. To determine the phage titer in the original sample, start with the plates containing the most diluted phage sample first and count the plaques without removing the lids, marking them to indicate which ones have already been counted. Repeat the counting for each plate in every set. Some plates might have too many or too few plaques to be counted. Consider 10 to 150 as an ideal plaque count.
Next, generate a table listing the plaque number values for the different dilutions and replicates. Then, calculate the mean plaque number values for the dilution plates that contained the ideal number of plaque counts. In this example, these were the average number of plaques formed in the 10 to the minus three and 10 to the minus four dilution plates. Now, adjust for phage dilution factor by dividing the obtained mean plaque values by the respective phage dilution factors. Here, the average number of plaques formed to the 10 to the minus three and 10 to the minus four dilution plates, were divided by their respective dilution factors to obtain the number of plaque forming units, or PFUs, in 100 microliters of phage mixture. To convert the value to PFU per milliliter, multiply the generated values by 10, as only 100 microliters of phage dilution mix was used during the bacteriophage overlay preparation step, producing an additional dilution factor of 10. Finally, calculate the average of the values obtained from the different dilution plates. This will give the average number of PFUs per milliliter. The number of PFUs corresponds to the number of infective phage particles in the original sample.
Subscription Required. Please recommend JoVE to your librarian.
Applications and Summary
Despite multiple technological advances, plaque assays remain the gold standard for determination of viral titer (as PFU) and essential for isolation of pure bacteriophage populations. Susceptible host cells are cultivated in the top coat of a two layered agar-plate, forming a homogenous bed enabling viral replication. The initial event where an isolated bacteriophage in lytic lifecycle infects a cell, replicates within it, and eventually lyses it, is too small to observe. However, the virions released will infect adjacent cells, subsequently giving rise to a clearing zone, or plaque, denoting the presence of a single PFU.
Subscription Required. Please recommend JoVE to your librarian.
References
- Twort, F. An investigation on the nature of ultra-microscopic viruses. Lancet. 186 (4814): 1241-1243. (1915)
- d'Hérelle, F. An invisible antagonist microbe of dysentery bacillus. Comptes Rendus Hebdomadaires Des Seances De L Academie Des Sciences. 165: 373-375. (1917)
- Cisek AA, Dąbrowska I, Gregorczyk KP, Wyżewski Z. Phage Therapy in Bacterial Infections Treatment: One Hundred Years After the Discovery of Bacteriophages. Current Microbiology. 74 (2):277-283. (2017)
- Mirzaei MK, Maurice CF. Ménage à trois in the human gut: interactions between host, bacteria and phages. Nature Reviews Microbiology. 15 (7):397. (2017)
- Breitbart M, Bonnain C, Malki K, Sawaya NA. Phage puppet masters of the marine microbial realm. Nature Microbiology. 3 (7):754-766. (2018)
- Leung CY, Weitz JS. Modeling the synergistic elimination of bacteria by phage and the innate immune system. Journal of Theoretical Biology. 429:241-252. (2017)
- Dulbecco R. Production of Plaques in Monolayer Tissue Cultures by Single Particles of an Animal Virus. Proceedings of the National Academy of Sciences of the United States of America. 38 (8):747-752. (1952)
- Juarez D, Long KC, Aguilar P, Kochel TJ, Halsey ES. Assessment of plaque assay methods for alphaviruses. J Virol Methods. 187 (1):185-9. (2013)
- Clokie MRJ, Millard AD, Letarov AV, Heaphy S. 2011. Phages in nature. Bacteriophage. 1 (1):31-45. (2011)
- Moldovan R, Chapman-McQuiston E, Wu XL. On kinetics of phage adsorption. Biophys J. 93 (1):303-15. (2007)
- Garneau JE, Dupuis M-È, Villion M, Romero DA, Barrangou R, Boyaval P, Fremaux C, Horvath P, Magadán AH, Moineau S.. The CRISPR/Cas bacterial immune system cleaves bacteriophage and plasmid DNA. Nature. 468 (7320):67. (2010)