1. Collection of the Necessary Materials
- Extract samples. Samples (in this case, sediment) are frozen, freeze-dried, crushed, and homogenized prior to extraction, and extracted in groups to maximize efficiency.
- Depending on the size of the sample, use collection vials with volumes of 40 or 60 mL. For this experiment, borosilicate glass vials (40 mL) and solvent safe caps are used. Combust vials, borosilicate glass pipettes, and weighing tins at 550 °C for 6 h prior to ensure removal of possible organic contaminants.
- Dichloromethane (DCM) and methanol are common in most organic geochemistry laboratories. Use them individually, (methanol first, followed by DCM) to rinse lab tools and glassware before use. A mixture of dichloromethane to methanol (MeOH; 9:1) is used in many labs to efficiently extract biomarkers with a wide range of polarities. Solvents should be free of organic contaminants.
- Obtain an Accelerated Solvent Extractor to use for this experiment.
2. Preparation of Sample Cells
- Assemble a sample cell for each sample to be extracted, plus one blank.
- For each cell, screw an end cap onto one end of the cell body.
- Place a combusted glass fiber filter on top of each cell using solvent-rinsed tweezers. Then, gently and slowly press the filter down into the cell using the filter plunger.
- Label the cell bodies by number (e.g. 1 - 22) for each sample and write "blank" on the blank cell.
- Fill the blank with diatomaceous earth (or sand) and cap with a second end cap. Tighten by hand.
3. Preparation of Samples
- Place a combusted weighing tin on the lab scale and then tare.
- Rinse the lab spatula with solvent, then use it to transfer an appropriate mass of sample into the weighing tin, and record the mass.
- The mass of the sample varies depending on its organic matter content. Relatively organic matter lean material (marine mud) may require several grams, while organic matter rich material (leaf tissue) may require much less.
- Transfer all of the material in the weighing tin into a prepared ASE cell.
- Place another glass fiber filter onto the top of the cell, then slowly and gently press down until it reaches the top of the sample using the filter plunger.
- Add diatomaceous earth (or sand) to the cell until it is almost full. Be careful to remove any debris from the cell body threads.
- Cap the top of the cell with another end cap.
- Repeat steps 3.1 - 3.6 for each sample.
4. Preparation of Collection Vials
- Label each vial with the number of a corresponding cell (e.g. 1 - 22 or blank) and cap with ASE collection vial cap.
5. Extraction
- Place each sample cell into a numbered slot on the upper ASE tray.
- Place the corresponding collection vial in the same number slot on the lower ASE tray.
- Create the extraction method using the keypad on the ASE. Extract at 100 °C and 1,200 psi. Extract each sample 3x with a static hold of 10 min and flush the cell body with 50% of its total volume between static holds.
- Make sure the solvent bottle contains enough solvent to extract all of the samples.
- Rinse the ASE 3x before starting the run by pushing the "rinse" button on the ASE control pad.
- Press start.
Source: Laboratory of Jeff Salacup - University of Massachusetts Amherst
The distribution of a group of organic biomarkers called glycerol-dialkyl glycerol-tetraethers (GDGTs), produced by a suite of archaea and bacteria, were found in modern sediments to change in a predictable manner in response to air or water temperature1,2. Therefore, the distribution of these biomarkers in a sequence of sediments of known age can be used to reconstruct the evolution of air and/or water temperature on decadal to millennial timescales (Figure 1). The production of long high-resolution records of past climates, called paleoclimatology, depends on the rapid analysis of hundreds, possibly thousands of samples. Older extraction techniques, such as sonication or Soxhlet, are too slow. However, the newer Accelerated Solvent Extraction technique was designed with efficiency in mind.
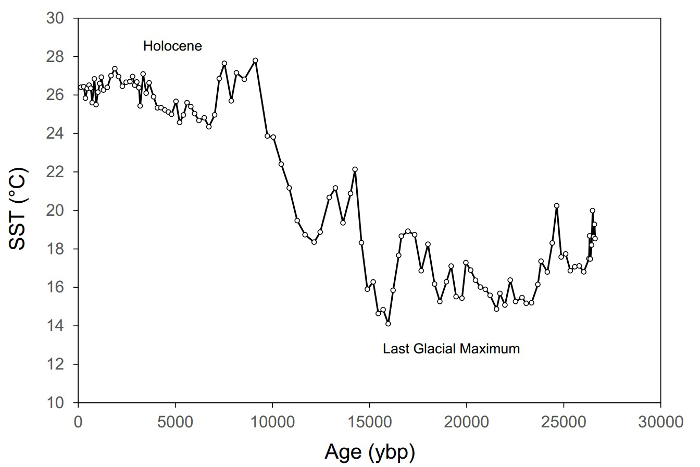
Figure 1. An example of a paleoclimate record showing changes in sea surface temperature (SST) in the eastern Mediterranean Sea during the past ~27,000 years3. This record comprises ~115 samples and is based on the isoprenoidal GDGT-based TEX86 SST proxy.
1. Collection of the Necessary Materials
- Extract samples. Samples (in this case, sediment) are frozen, freeze-dried, crushed, and homogenized prior to extraction, and extracted in groups to maximize efficiency.
- Depending on the size of the sample, use collection vials with volumes of 40 or 60 mL. For this experiment, borosilicate glass vials (40 mL) and solvent safe caps are used. Combust vials, borosilicate glass pipettes, and weighing tins at 550 °C for 6 h prior to ensure removal of possible organic contaminants.
- Dichloromethane (DCM) and methanol are common in most organic geochemistry laboratories. Use them individually, (methanol first, followed by DCM) to rinse lab tools and glassware before use. A mixture of dichloromethane to methanol (MeOH; 9:1) is used in many labs to efficiently extract biomarkers with a wide range of polarities. Solvents should be free of organic contaminants.
- Obtain an Accelerated Solvent Extractor to use for this experiment.
2. Preparation of Sample Cells
- Assemble a sample cell for each sample to be extracted, plus one blank.
- For each cell, screw an end cap onto one end of the cell body.
- Place a combusted glass fiber filter on top of each cell using solvent-rinsed tweezers. Then, gently and slowly press the filter down into the cell using the filter plunger.
- Label the cell bodies by number (e.g. 1 - 22) for each sample and write "blank" on the blank cell.
- Fill the blank with diatomaceous earth (or sand) and cap with a second end cap. Tighten by hand.
3. Preparation of Samples
- Place a combusted weighing tin on the lab scale and then tare.
- Rinse the lab spatula with solvent, then use it to transfer an appropriate mass of sample into the weighing tin, and record the mass.
- The mass of the sample varies depending on its organic matter content. Relatively organic matter lean material (marine mud) may require several grams, while organic matter rich material (leaf tissue) may require much less.
- Transfer all of the material in the weighing tin into a prepared ASE cell.
- Place another glass fiber filter onto the top of the cell, then slowly and gently press down until it reaches the top of the sample using the filter plunger.
- Add diatomaceous earth (or sand) to the cell until it is almost full. Be careful to remove any debris from the cell body threads.
- Cap the top of the cell with another end cap.
- Repeat steps 3.1 - 3.6 for each sample.
4. Preparation of Collection Vials
- Label each vial with the number of a corresponding cell (e.g. 1 - 22 or blank) and cap with ASE collection vial cap.
5. Extraction
- Place each sample cell into a numbered slot on the upper ASE tray.
- Place the corresponding collection vial in the same number slot on the lower ASE tray.
- Create the extraction method using the keypad on the ASE. Extract at 100 °C and 1,200 psi. Extract each sample 3x with a static hold of 10 min and flush the cell body with 50% of its total volume between static holds.
- Make sure the solvent bottle contains enough solvent to extract all of the samples.
- Rinse the ASE 3x before starting the run by pushing the "rinse" button on the ASE control pad.
- Press start.
Accelerated solvent extraction is a fast, efficient, and high-throughput technique used to separate organic biomarkers from large numbers of geological sediment samples.
Traditionally, extraction methods such as sonication or Soxhlet are used, however, the drawback with these protocols is that they are too slow to process enough material for detailed paleoclimate reconstruction. A newer technique, the Accelerated Solvent Extraction, or ASE method, was developed with efficiency and high throughput in mind.
The ASE method uses a combination of high temperatures and high pressure to extract samples and can carry out multiple samples in a single, relatively fast preparation run.
This video is the third in a series detailing how to extract biomarkers from sediment. It will cover the procedure and provide insight into merits of ASE over sonication or Soxhlet extraction.
In accelerated solvent extraction, samples are loaded into steel cells that are then loaded onto a carousel. Collection vials for each sample cell are also loaded onto a separate carousel. The instrument loads a sample cell into an internal oven. Solvent is pumped from a solvent bottle through a series of valves until a sufficient pressure is reached.
This pressure is held for an amount of time dictated by the sample and analyte. Then, the solvent is flushed from the sample cell through a steel line into the corresponding collection vial. The process can be repeated a number of times. The temperature, pressure, and duration can all be customized for the sample.
The high temperature used increases the kinetics of the extraction while the high pressure keeps the solvent from volatizing. The collection vial now contains a total lipid extract, and what's left in the sample cell is called a residue. It comprises non-organic material as well as organic material that is not solvent-extractable, called kerogen.
Now that we are familiar with the principles behind accelerated solvent extraction, let's take a look at how this is carried out in the laboratory.
After collecting samples of interest; freeze-dry, homogenize, and decontaminate as demonstrated in another video in this series.
Once all samples have been prepared, assemble a cell for each one to be extracted, and one extra for a blank. To do this, screw an end cap onto the cell body. Using solvent-rinsed tweezers, place a combusted glass fiber filter on top of each one. Slowly and gently press the filter down?with the plunger.
Label the cell bodies by number for each sample, and label the blank separately.?Place a combusted weighing tin onto a laboratory scale and tare. Rinse a spatula with solvent, then use it to transfer 5 to 10 g of sample to the weighing tin, and record the mass.
Transfer all the material in the weighing tin to its corresponding cell. Place another glass fiber filter on top, and gently tamp until it reaches the top of the sample.
Add a dispersant, such as diatomaceous earth or sand, until it is almost full, being careful to avoid getting any debris into the cell body threads. Cap the top of the cell with another end cap. Repeat these steps for each sample and the blank.
Label each collection vial with the number of a corresponding sample cell or blank, and cap with a vial cap. Place each cell into a numbered slot on the upper ASE tray. Set the parameters for the extraction method using the keypad on the ASE to extract at 100 ?C?and 1,200 psi. Extract each sample 3 times with a static hold of 10 min and flush the cell body with 50% of its total volume between static holds.
Next, ensure that the solvent bottle contains enough to extract all of the samples. Rinse the instrument lines?3 times before starting the run. Finally, press start.
Remove the vial from the ASE. Now that the biomarkers have been extracted, they must be purified before analysis.
Accelerated Solvent Extraction is a versatile technique, which can be utilized for a variety of applications, some of which are explored here.
Accelerated solvent extraction can also be used on other types of sample, including food. Residue analysis to test for pesticide contamination is frequently carried out in regulatory and industrial facilities to ascertain the safety and quality of food products like fruit or vegetables. ASE can be used to extract organochlorine pesticides from food samples, and determine the types or levels of residue present in the produce. This information can then be used to establish whether produce is fit for human or animal consumption. For instance, dieldrin should be found within 0 to 0.1 parts per million on food, depending on the product.
Food nutritional components can also be extracted using ASE. For example, products like chocolate, which may have high gravimetric fat content, can be extracted. Using ASE with petroleum ether as a solvent, fat can be separated from chocolate samples and subjected to quantitative analysis to determine an accurate percentage fat content per known quantity of chocolate. Using this information, regulatory bodies can verify claims made by chocolate manufacturers, or manufacturers can obtain information to create accurate food labels.
You've just watched JoVE's introduction to the extraction of lipid biomarkers using accelerated solvent extraction, or ASE. Methods for further processing and analysis can be found in subsequent videos.
Thanks for watching!
At the end of the extraction, there is a total lipid extract (TLE) for each sample. Each vial now contains the extractable organic matter from a sediment, soil, or plant tissue. These TLEs can be analyzed, and their chemical constituents identified and quantified.
The TLEs of the extracted samples contain a wide spectrum of different organic compounds, including the GDGTs to be used to reconstruct ancient temperatures. Glycerol-dialkyl glycerol-tetraethers are a large suite of biomarkers that show sensitivity to growth temperatures. There are two groups of GDGTs, branched and isoprenoid, which differ in the character of the branching patterns on the core alkyl groups (Figure 3). In the ocean, a cosmopolitan group of archaea, called Thaumarchaeota,...
Chapters in this video
0:00
Overview
1:05
Principles of Accelerated Solvent Extraction
2:23
Collection of Sample Materials and Preparation of ASE Cells
3:48
Preparation of Collection Vials and Extraction
4:49
Applications
6:18
Summary
Videos from this collection:
Copyright © 2026 MyJoVE Corporation. All rights reserved