By running the Pathway Association Study Tool (PAST), either through the Shiny application or through the R console, researchers can gain a deeper understanding of the biological meaning of their genome-wide association study (GWAS) results by investigating the metabolic pathways involved.
Method Article
A Pathway Association Study Tool for GWAS Analyses of Metabolic Pathway Information
In This Article
Erratum Notice
Important: There has been an erratum issued for this article. View Erratum Notice
Summary
Abstract
Recently, a new implementation of a previously described method for interpreting genome-wide association study (GWAS) data using metabolic pathway analysis has been developed and released. The Pathway Association Study Tool (PAST) was developed to address concerns with user-friendliness and slow-running analyses. This new user-friendly tool has been released on Bioconductor and Github. In testing, PAST ran analyses in less than one hour that previously required twenty-four or more hours. In this article, we present the protocol for using either the Shiny application or the R console to run PAST.
Introduction
Genome-wide association studies (GWAS) are a popular method of studying complex traits and the genomic regions associated with them1,2,3. In this type of study, hundreds of thousands of single nucleotide polymorphism (SNP) markers are tested for their association with the trait, and the significance of the associations is assessed. Marker-trait associations that meet the false discovery rate (FDR) threshold (or some other type of significance threshold) are retained for the study, but true associations may be filtered out. For complex, polygenic traits, the effect of each gene might be small (and thus filtered out), and some alleles are only expressed in specific conditions that might not be present in the study3. Thus, while many SNPs may be retained as associated with the trait, each may have a very small effect. Too many SNP calls will be missing, and an interpretation of the biological meaning and genetic architecture of the trait may be incomplete and confusing. Metabolic pathway analysis can help to address some of these issues by focusing on the combined effects of genes grouped according to their biological function4,5,6.
Several studies were completed using a previous implementation of the method described in this article. Aflatoxin accumulation7, corn earworm resistance8, and oil biosynthesis9 were all studied with the previous implementation. While these analyses were successful, the process of analysis was complicated, time-consuming, and cumbersome, because the analysis tools were written in a combination of R, Perl, and Bash, and the pipeline was not automated. Because of the specialized knowledge required to modify this method for each analysis, a new method has now been developed that can be shared with other researchers.
The Pathway Association Study Tool (PAST)10 was designed to address the shortcomings of the previous method by requiring less knowledge of programming languages and by running analyses in a shorter period. While the method was tested with maize, PAST makes no species-specific assumptions. PAST can be run through the R console, as a Shiny app, and an online version is expected to soon be available on MaizeGDB.
Protocol
1. Setup
- Install R, if it is not already installed.
NOTE: PAST is written in R and, therefore, requires that its users have R installed. At the time of this writing, installing PAST directly from Bioconductor requires R4.0. Older versions of PAST can be installed from Bioconductor for R3.6, and PAST can be installed from Github for users with R3.5. R installation instructions can be downloaded from the following link: https://www.r-project.org/. - Install the latest version of RStudio Desktop or update RStudio (optional).
NOTE: RStudio is a helpful environment for working with the R language. Its installation is recommended, especially for those who choose to run PAST in the command line rather than through the Shiny GUI application. RStudio and its installation instructions can be found at the following link: https://rstudio.com/products/rstudio/. - Install PAST from Bioconductor11 by following the instructions on Bioconductor.
NOTE: Installation through Bioconductor should handle the installation of PAST's dependencies. Additionally, PAST can be installed from Github12, but installing from Github will not install dependencies automatically. - Install PAST Shiny (optional). Download the file "app.R" from the Releases page of the Github repository: https://github.com/IGBB/PAST/releases/, and remember where the downloaded file is located.
NOTE: PAST can be used by calling its methods directly with R, but users who are less familiar with R can run the PAST Shiny application, which provides a guided user interface. PAST Shiny is an R script available in the shiny_app branch of the PAST Github repository. PAST Shiny will attempt to install its dependencies during the first run. - Begin analysis by starting the application in one of the three ways described below.
- PAST Shiny with RStudio
- Using RStudio, create a new project in the folder where app.R is located. Click File | New Project and select that folder.
- Once a new project has been created, open the app.R file downloaded earlier. RStudio recognizes that app.R is a Shiny app and creates a Run App button on the bar above the displayed source code. Click Run App. RStudio will then launch a window that displays the PAST Shiny application.
- PAST Shiny with R Console
- Launch R and run the following code to start the PAST Shiny application: shiny::runApp('path/to/folder/with/shiny/app.R'. Replace the text in quotes with the folder to which app.R was downloaded, and keep the quotes.
- PAST without R Shiny
- Run library(PAST) in an R Console to load PAST.
- PAST Shiny with RStudio
2. Customize Shiny analysis (optional)
- Change the analysis title from "New Analysis" to something that better reflects the type of analysis being run which helps to keep track of multiple analyses (see Figure 1).
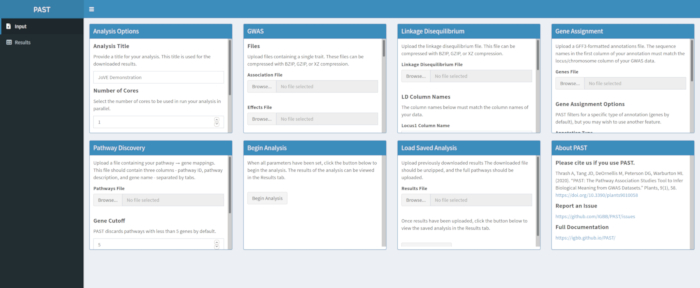
Figure 1. Please click here to view a larger version of this figure.
- Modify the number of cores and the mode. Set the number of cores to any number between 1 and the total number on the machine but be aware that devoting more resources to PAST may slow down other operations on the machine. Set the mode based on the description in section 6.
3. Load GWAS data
NOTE: Verify that the GWAS data is tab delimited. Ensure that the association file contains the following columns: trait, marker name, locus or chromosome, position on the chromosome, p-value, and R2 value for the marker. Ensure that the effects file contains the following columns: trait, marker name, locus or chromosome, position on the chromosome, and effect. The order of these columns is not important, as the user can specify the names of the columns when loading the data. Any additional columns are ignored. TASSEL13 can be used to produce these files.
- Load GWAS data with PAST Shiny.
- Select an association file and an effects file by using the Association File and Effects File selection boxes. Change the column names in the Association Column Name and Effects Columns Name input boxes below the file selection boxes to reflect the column names in the data.
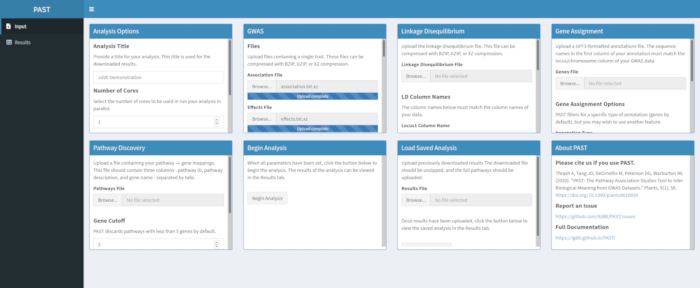
Figure 2. Please click here to view a larger version of this figure.
- Load GWAS data with PAST in the R Console.
- Modify and run the following code:
gwas_data = load_GWAS_data("path/to/association_file.tsv", "path/to/effects_file.tsv", association_columns = c("Trait", "Marker", "Locus", "Site", "p", "marker_R2"), effects_columns = c("Trait", "Marker", "Locus", "Site", "Effect")
- Modify and run the following code:
- NOTE: Change the paths to the actual location of the GWAS files. The values provided for association_columns and effects_columns are the default values. If the names do not match the default values, specify the column names. Otherwise, these can be omitted.
4. Load linkage disequilibrium (LD) data
NOTE: Verify that the linkage disequilibrium (LD) data is tab delimited and contains the following types of data: Locus, Position1, Site1, Position2, Site2, Distance in base pairs between Position1 and Position2, and R2 value.
- Load LD data with PAST Shiny.
- Select the file containing LD data. Change the column names in the LD Column Names input boxes below the file selection box to match the column names in the LD data if necessary.
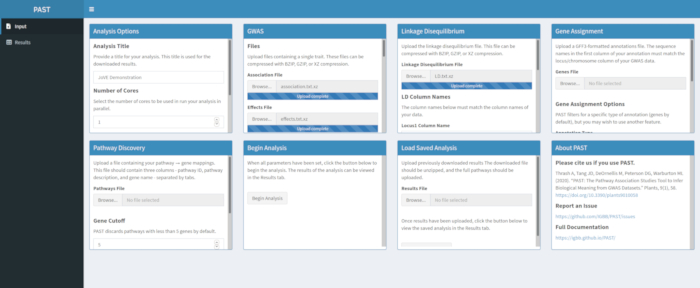
Figure 3. Please click here to view a larger version of this figure.
- Load LD Data with PAST in the R Console.
- Modify and run the following code to load LD data:
LD = load_LD("path/to/LD.tsv", LD_columns = c("Locus1", "Position1", "Site1", "Position2", "Site2", "Dist_bp", "R.2")
NOTE: Change the path to the actual location of the LD file. The values provided for LD_columns are the default values. If the names do not match these defaults, specify the correct names of the columns; otherwise, these can be omitted.
- Modify and run the following code to load LD data:
5. Assign SNPs to genes
NOTE: Download or otherwise locate annotations in GFF format. These annotations can often be found in online databases for specific organisms. Be cautious about low quality annotations, as the quality of the annotations data will affect the quality of the pathway analysis. Confirm that the first column of these annotations (the chromosome) matches the format of the locus/chromosome in the association, effects, and LD data. For example, the annotations should not call the first chromosome "chr1" if the GWAS and LD data files call the first chromosome "1".
- Assign SNPs to genes with PAST Shiny.
NOTE: More information about determining an appropriate R2 cutoff can be found in Tang et al.6, in the section called "SNP to gene algorithm for the pathway analysis".- Select the file containing GFF annotations. Consider what window size and R2 cutoff are most suitable for the species being considered and modify if the defaults do not suit the uploaded data.
NOTE: Default values in PAST primarily reflect values appropriate for maize. The number of cores set at the beginning of the PAST Shiny analysis (Step 2.2) is used in this step.
- Select the file containing GFF annotations. Consider what window size and R2 cutoff are most suitable for the species being considered and modify if the defaults do not suit the uploaded data.
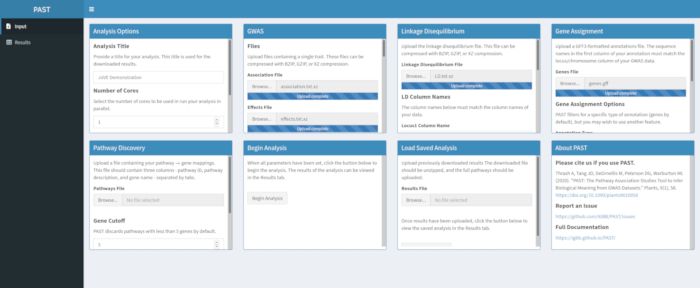
Figure 4. Please click here to view a larger version of this figure.
- Assign SNPs to genes with PAST in the R Console.
- Modify and run the following code to assign SNPs to genes:
genes = assign_SNPs_to_genes(gwas_data, LD, "path/to/annotations.gff", c("gene"), 1000, 0.8, 2)
NOTE: In this sample code, several default suggestions are provided: 1000 is the size of the window around the SNP to search for genes; 0.8 is the cutoff value for R2; 2 is the number of cores used for parallel processing. The path to the annotations should also be changed to the actual location of the annotations file.
- Modify and run the following code to assign SNPs to genes:
6. Discover significant pathways
NOTE: Verify that the pathways file contains the following data in tab delimited format, with one line for every gene in each pathway: pathway ID - an identifier such as "PWY-6475-1"; pathway description - a lengthier description of what the pathways do such as "trans-lycopene biosynthesis"; gene - a gene in the pathway, which should match the names provided in the annotations. Pathway information can likely be found in online databases for specific organisms, such as MaizeGDB. The second user-specified option is the mode. "Increasing" refers to phenotypes that reflect when an increasing value of the measured trait is desirable, such as yield, while "decreasing" refers to a trait where a decrease in the measured values is beneficial, such as insect damage ratings. The significance of pathways is tested using previously described methods4,6,14.
- Discover significant pathways with PAST Shiny.
- Select the file containing pathways data and be sure that the mode is selected in the analysis options. If necessary, change the number of genes that must be in a pathway to retain it for the analysis and the number of permutations used to create the null distribution to test significance of effect.
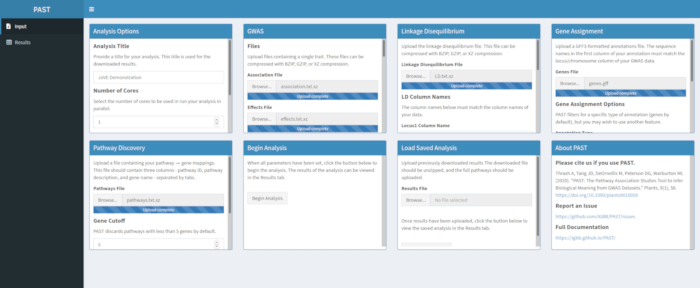
Figure 5. Please click here to view a larger version of this figure.
NOTE: The number of cores and the mode set at the beginning of the PAST Shiny analysis (Step 2.2) is used in this step. The default number of genes is currently set at 5 genes, so pathways with fewer known genes will be removed. The user can lower this value to 4 or 3, to include shorter pathways, but doing so will risk false positive results. Increasing this value can increase the power of the analysis but will remove more pathways from the analysis. Changing the number of permutations used increases and decreases the power of the test.
- Discover significant pathways with PAST in the R Console.
- Modify and run the following code to discover significant pathways:
rugplots_data <- find_pathway_significance(genes, "path/to/pathways.tsv", 5, "increasing", 1000, 2)
NOTE: In this sample code, several suggested defaults are provided. 5 is the minimum number of genes that must be in a pathway in order to keep the pathway in the analysis, increasing refers to an increasing amount of the measured trait (it is recommended that the user run both increasing and decreasing, regardless of trait; data interpretation will differ for the two, however), 1000 is the number of times to sample the effects to determine the null distribution, and 2 is the number of cores used for parallel processing. Change the path to the actual location of the pathways file.
- Modify and run the following code to discover significant pathways:
7. View Rugplots
- View Rugplots with PAST Shiny.
- Once all inputs are uploaded and set, click Begin Analysis. A progress bar will appear and indicate which step of the analysis was last completed. When the analysis completes, PAST Shiny will switch to the Results tab. A table of results will be displayed in the left column (labeled "pathways") and the Rugplots will be displayed in the right column (labeled "plots").
- Use the slider to control the filtering parameters. When the filtering level is satisfactory, click the Download Results button at the bottom left to download all images and tables individually to a ZIP file that is named with the analysis title. This ZIP file contains the filtered table, the unfiltered table, and one image per pathway in the filtered table.
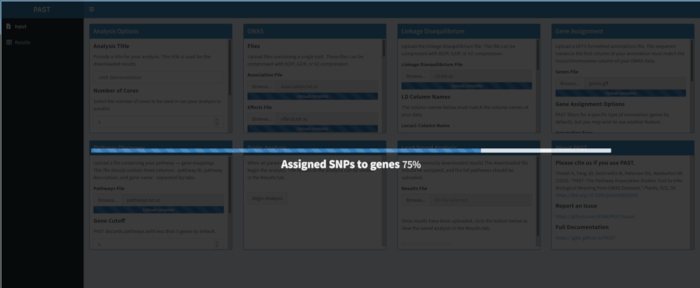
Figure 6. Please click here to view a larger version of this figure.
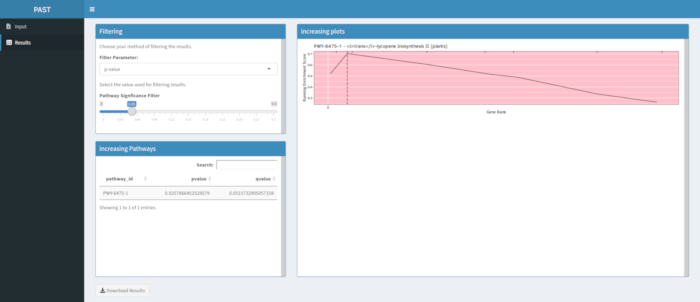
Figure 7. Please click here to view a larger version of this figure.
- View Rugplots with PAST in the R Console
- Modify and run the following code to save the results:
plot_pathways(rugplots_data, "pvalue", 0.02, "increasing", "output_folder")
NOTE: In this sample code, several suggested defaults are provided. pvalue provides the data that can be used for filtering insignificant pathways after a significance threshold is chosen by the user; 0.02 is the default value used in filtering, and increasing refers to an increasing amount of the measured trait (it is recommended that the user run both increasing and decreasing, regardless of trait; data interpretation will differ for the two, however); output_folder is the folder where the images and tables will be written (this folder must exist prior to running the function). A table of filtered results, the unfiltered results, and individual images for every pathway in the filtered results are written to this folder.
- Modify and run the following code to save the results:
Results
If results are not produced following a run of the PAST software tool, check to be sure that all input files are correctly formatted. A successful run using the example data in the PAST package, which are based on a maize GWAS of grain color, is shown in Figure 8. This table and the resulting image can be downloaded using the Download Results button. An example of the downloaded image is shown in Figure 210. Incorrect settings might lead to results that do not make biological sense, but determining incorrectness must be up to the researcher, who should double check the validity of the chosen settings and consider all known evidence regarding the trait of interest.
Figure 910 shows the rugplot produced from the pathway analysis of GWAS results created with a maize panel of 288 inbred lines that had been phenotyped for grain color. This simplistic example, where the phenotypes were either "white" or "yellow", was used because the pathway responsible for creating the bright yellow carotenoid pigments is known and should be responsible for most of the phenotype. Thus, we expected to see the trans-lycopene biosynthesis pathway (which produce carotenoids) to be significantly associated with grain color, which it is. Pathway ID and name are listed at the top of the graph. The horizontal axis of the graph ranks all genes that were included in the analysis, arranged from left to right in order of largest effect on the trait to smallest. However, only the genes in the trans-lycopene biosynthesis pathway are marked (at the top of the graph, as hatch marks, appearing in the gene rank of their effect as compared to all other genes in the analysis). There are 7 genes in this pathway. The running enrichment score (ES) is plotted along the vertical axis. The ES for each gene is added into the running total in order of effect and the total is adjusted to the number of genes analyzed. Thus, the score changes as one moves right along the horizontal axis and tends to increase as the larger effect genes are included, but at some point, the increase in the effect is smaller than the adjustment for having added another gene, and the entire score begins to decrease. The apex of the running ES line is marked with a dotted vertical line; this is the ES for the entire pathway and is used by the program to determine if the pathway is chosen and presented as a rugplot.
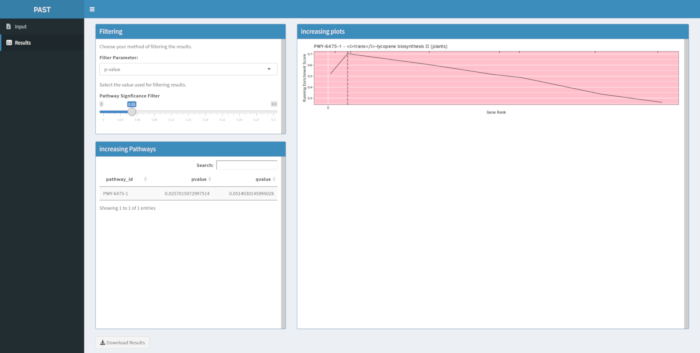
Figure 8: Completed run of PAST Shiny. Please click here to view a larger version of this figure.
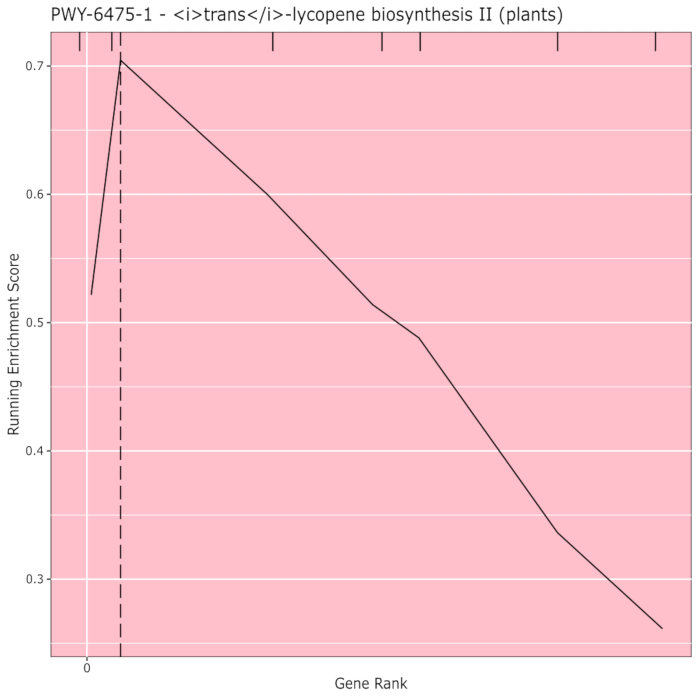
Figure 9: Pathway image from completed run of PAST (or downloaded from Shiny). This figure has been cited from Thrash et al.10. Please click here to view a larger version of this figure.
Discussion
A primary goal of PAST is to bring metabolic pathway analyses of GWAS data to a wider audience, especially for non-human and non-animal organisms. Alternative methods to PAST are often command-line programs that focus on humans or animals. User-friendliness was a primary goal in the development of PAST, both in choosing to develop a Shiny application and in choosing to use R and Bioconductor to release the application. Users do not need to learn how to compile programs in order to use PAST.
As with most types of analysis software, the results of PAST are only as good as the input data; if the input data has errors or is incorrectly formatted, PAST will fail to run or produce uninformative results. Ensuring that the GWAS data, LD data, annotations, and pathways files are correctly formatted is critical to receiving correct output from PAST. PAST only analyzes bi-allelic markers and can run only one trait for each set of input data. In addition, GWAS data produced by poor genotyping or incorrect or imprecise phenotyping is not likely to produce clear or repeatable results either. PAST can aid in the biological interpretation of GWAS results but is unlikely to clarify chaotic data sets if environmental variation, experimental error, or population structure was not properly accounted for.
Users can choose to change some parameters of the analysis, both in the Shiny application and by passing those parameters to PAST's functions in the R console. These parameters can change the results reported by PAST, and users should take care when modifying these from the defaults. Because LD is measured by the users, typically using the same marker data set that was also used in the GWAS, the LD measurements are specific to the population. For all studies, especially for species other than maize, (particularly self-pollinating, polyploid, or highly heterogenous species), changes in the defaults may be warranted.
Disclosures
The authors have nothing to disclose.
Materials
| Name | Company | Catalog Number | Comments |
|---|---|---|---|
| Computer | NA | NA | Any computer with 8GB RAM should be sufficient |
| R | R Project | NA | R 4.0 or greater is required to install from Bioconductor 3.11 |
References
- Rafalski, J. Association genetics in crop improvement. Current Opinion in Plant Biology. 13 (2), 174-180 (2010).
- Yan, J., Warburton, M., Crouch, J. Association Mapping for Enhancing Maize (Zea mays L.) Genetic Improvement. Crop Science. 51 (2), 433-449 (2011).
- Xiao, Y., Liu, H., Wu, L., Warburton, M., Yan, J. Genome-wide Association Studies in Maize: Praise and Stargaze. Molecular Plant. 10 (3), 359-374 (2017).
- Wang, K., Li, M., Bucan, M. Pathway-Based Approaches for Analysis of Genomewide Association Studies. The American Journal of Human Genetics. 81 (6), 1278-1283 (2007).
- Weng, L., et al. SNP-based pathway enrichment analysis for genome-wide association studies. BMC Bioinformatics. 12 (1), 99(2011).
- Tang, J., Perkins, A., Williams, W., Warburton, M. Using genome-wide associations to identify metabolic pathways involved in maize aflatoxin accumulation resistance. BMC Genomics. 16 (1), 673(2015).
- Warburton, M., et al. Genome-Wide Association Mapping of Aspergillus flavus and Aflatoxin Accumulation Resistance in Maize. Crop Science. 55 (5), 1857-1867 (2015).
- Warburton, M., et al. Genome-Wide Association and Metabolic Pathway Analysis of Corn Earworm Resistance in Maize. The Plant Genome. 11 (1), 170069(2018).
- Li, H., Thrash, A., Tang, J., He, L., Yan, J., Warburton, M. Leveraging GWAS data to identify metabolic pathways and networks involved in maize lipid biosynthesis. The Plant Journal. 98 (5), 853-863 (2019).
- Thrash, A., Tang, J., DeOrnellis, M., Peterson, D., Warburton, M. PAST: The Pathway Association Studies Tool to Infer Biological Meaning from GWAS Datasets. Plants. 9 (1), 58(2020).
- Adam, T., Mason, D. PAST: Pathway Association Study Tool (PAST). Bioconductor version: Release (3.10). , (2020).
- Thrash, A., DeOrnellis, M. IGBB/PAST. , at https://github.com/IGBB/PAST (2019).
- Bradbury, P., et al. TASSEL: software for association mapping of complex traits in diverse samples. Bioinformatics. 23 (19), 2633-2635 (2007).
- Subramanian, A., et al. Gene set enrichment analysis: A knowledge-based approach for interpreting genome-wide expression profiles. Proceedings of the National Academy of Sciences U.S.A. 102, 15545-15550 (2005).
Reprints and Permissions
Erratum
Formal Correction: Erratum: A Pathway Association Study Tool for GWAS Analyses of Metabolic Pathway Information
Posted by JoVE Editors on 10/08/2021. Citeable Link.
An erratum was issued for: A Pathway Association Study Tool for GWAS Analyses of Metabolic Pathway Information. One of the affiliations was updated.
The second affiliation was updated from:
USDA-ARS Corn Host Plant Resistance Research Unit, Mississippi State University
to:
Corn Host Plant Resistance Research Unit, USDA-ARS
