

Summary
This video demonstrates a method to dissect and culture commissural neurons from E13 rat dorsal spinal cord. Dissociated commissural neurons are useful to study the cellular and molecular mechanisms of axon growth and guidance.
Abstract
Commissural neurons have been widely used to investigate the mechanisms underlying axon guidance during embryonic spinal cord development. The cell bodies of these neurons are located in the dorsal spinal cord and their axons follow stereotyped trajectories during embryonic development. Commissural axons initially project ventrally towards the floorplate. After crossing the midline, these axons turn anteriorly and project towards the brain. Each of these steps is regulated by the action of several guidance cues. Cultures highly enriched in commissural neurons are ideally suited for many experiments addressing the mechanisms of axon pathfinding, including turning assays, immunochemistry and biochemistry. Here, we describe a method to dissect and culture commissural neurons from E13 rat dorsal spinal cord. First, the spinal cord is isolated and dorsal strips are dissected out. The dorsal tissue is then dissociated into a cell suspension by trypsinization and mechanical disruption. Neurons are plated onto poly-L-lysine-coated glass coverslips or tissue-culture dishes. After 30 hours in vitro, most neurons have extended an axon. The purity of the culture (Yam et al. 2009), typically over 90%, can be assessed by immunolabeling with the commissural neuron markers DCC, LH2 and TAG1 (Helms and Johnson, 1998). This neuronal preparation is a useful tool for in vitro studies of the cellular and molecular mechanisms of commissural axon growth and guidance during spinal cord development.Protocol
1. Dissection of embryonic rat dorsal spinal cord
General recommendations
Keep L-15 medium on ice and frequently change the medium in the dissection dish to keep the embryos cool. This helps preserve tissue integrity. All steps are performed with two pairs of Dumont #5 forceps unless stated. To avoid contamination, spray all tools and working surfaces with 70% ethanol and keep dissection medium bottle closed. To transfer embryos between dishes, use a cut plastic pipette or a perforated spoon. It is critical not to damage the spinal cord (nicking, stretching) to successfully complete the dissection.
Preparation
- Cold L-15 medium
- 50 mL of L-15 + 10% heat-inactivated horse serum (HiHS). Keep on ice.
Spinal cord dissection
- Euthanize an E13 pregnancy-staged rat (E0 = first day following mating day) with a CO2 chamber according to institutional guidelines.
- Spray 70% ethanol on the abdomen. Pinch and pull up the skin of the lower abdominal region with forceps and cut with surgical scissors. Repeat to cut through the muscle and peritoneal layers to reach the abdominal cavity. Create a V-shape incision by cutting tissue along the sides of the abdomen, up to the thorax. Lift and pull back the tissue to expose the abdominal cavity.
- The uterus is attached at three locations: at the lower center abdomen, and at both upper lateral corners. Lift the uterus by grabbing on tissue between embryonic sacs. Cut the connective tissue to remove the uterus and place in a Petri dish filled with L-15 on ice.
- The next steps are done under a dissection microscope. To separate an embryo from extraembryonic tissues and embryonic membranes, grab the tissue between uterine sacs with one pair of forceps,. With the other pair, pinch the more transparent side of the sac to cut through the superficial membranes (the darker side is the placenta). Squeeze out the embryo by gently pressing the placenta side of the sac. Remove all embryos and place in a Petri dish filled with L-15 on ice.
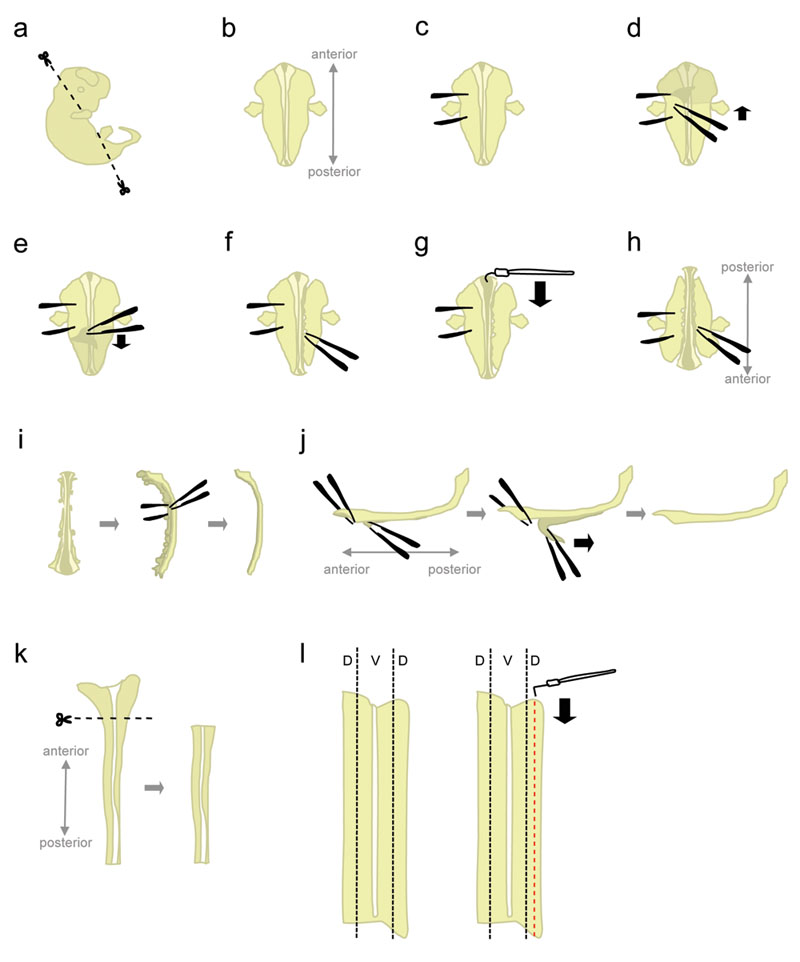
- Place one embryo in a 10 cm Petri dish filled with ice-cold L-15. Using microscissors, cut away the head and posterior parts at angles shown in figure 1a.
Cutting at these angles will help position the embryo when placed "ventral face down". - Position the embryo "ventral face down" (anterior pointing away, posterior pointing towards the experimenter) (fig. 1b).
- Firmly hold the embryo from one side, using the forceps to "pin down" the embryo (fig. 1c). Do not move the forceps, as it will tear the tissue. With the other pair of forceps, peel off the skin covering the back of the embryo starting from the region in between the "holding" forceps (fig 1d-e). This will expose the spinal cord which, at this point, is wrapped by membranes (the meninges).
Grab the skin from the sides rather than from above the spinal cord to avoid nicking the spinal cord. - Partially detach the tissue to the right side of the spinal cord (fig. 1f). Starting at the level of the holding forceps, poke the tissue with closed forceps, as close as possible to the spinal cord. Then, slowly open the forceps to tear the tissue. This should detach the dorsal root ganglia (DRGs) from the spinal cord, and should also disrupt ventral organs. Leave some tissue attached at the anterior and posterior ends. Leaving tissue attached adds weight to the embryo, thus preventing it from being pulled upward during the next step. In addition, that tissue is used to hold on to the embryo in later steps.
- Starting from the anterior end, use the hook-shaped tungsten needle to cut the meninges and open the spinal cord along the roofplate (fig. 1g).
- Rotate the embryo 180 degrees (posterior pointing away, anterior pointing towards the experimenter) (fig. 1h).
This allows the experimenter to use the same hand to detach the tissue from the other side of the embryo. - Hold the embryo by grabbing onto the previously detached side, and disrupt the tissue from the remaining side using the same method (see 1.8.). When done, completely detach the tissue on both sides of the spinal cord.
Alternative: Completely detach the tissue remaining on the left side, but leave some tissue attached at the anterior and posterior end on the right side. This can sometimes help maintain the spinal cord in position in step 1.12. - Place the spinal cord on its side and remove most of the remaining mesenchymal tissue and DRGs (fig. 1i).
- At this step, the meninges and the spinal cord are two "sheets" of tissue apposed onto each other. Pin down the larger, anterior-most portion of the spinal cord, and peel off a short segment of meninges from the spinal cord (fig. 1j, left). Now, hold the two separated segments by grabbing across with forceps, and peel off the meninges with a smooth, constant movement (fig. 1j).
Uneven "peeling" will lead to breakage of the spinal cord and/or the meninges layer. It is usually not possible to recover the portion of the spinal cord still attached to meninges. - Using a plastic pipette, transfer the isolated spinal cord to a Petri dish containing L-15 + 10% HiHS and leave on ice. Typically, spinal cords of all embryos are collected before dissecting the dorsal portions.
Dorsal spinal cord dissection
- Place one spinal cord in a Petri dish containing L-15+10% HiHS, lying flat in an "open-book" configuration. Cut away the wider, anterior portion (which includes part of the hindbrain) (fig. 1k).
- The dorsal tissue is located in the lateral-most parts of the spinal cord (fig 1l, left). While pinning the cord with a straight tungsten needle, use the L-shaped tungsten needle to cut out a strip that is 1/5th the width of half the spinal cord. (fig. 1l, right). Place the dorsal strips in a 15 mL plastic tube containing L-15 + 10% HiHS on ice.
Dorsal neural tube sections of ~12 E13 embryos will yield ~3.5-4 million cells for plating after dissociation. More cells can be obtained by performing a coarse dissection of the dorsal spinal cord (cutting wider dorsal strips), but commissural neuron purity will be reduced.
2. Commissural neuron culture
General recommendations
All steps should be performed under sterile conditions in a tissue culture hood unless otherwise stated. Use fresh medium and freshly-thawed supplements and reagents. The dissociation and trituration steps are performed in Ca2+/Mg2+-free HBSS to minimize Ca2+/Mg2+-dependent adhesion.
Preparation
- coated coverslips (use German Desag glass) or tissue culture plates (see coating procedure below).
- warm Neurobasal Plating Media (see below), in tissue culture dishes and CO2 equilibrated in the tissue culture incubator for at least 1.5 h before plating.
- 2.5% trypsin in the 37 °C waterbath
- 2 bottles of HBSS Ca2+/Mg2+-free, one at 4 °C, one at 37 °C.
- two fire-polished glass Pasteur pipettes one with a diameter half the usual size, and one with a diameter slightly smaller than half. Use sterilized Pasteur pipettes. To fire-polish the pipettes, use a Bunsen burner (the top of the light blue flame) to melt the tip to slightly decrease the diameter. Because this step is performed outside the tissue culture hood, spray the pipettes with 70% ethanol before placing under the tissue culture hood. For more efficient recovery of neurons, coat the Pasteur pipettes with media containing serum before the beginning of the dissociation or just before the trituration step (fill pipettes with media and keep for 30 seconds). This will prevent cells from sticking to the inside of the Pasteur pipette during the trituration.
- sterile milliQ water for washing PLL-coated dishes or coverslips
- 12.5% MgSO4 solution in HBSS
Poly-L-lysine coating
If using glass coverslips, acid-wash for 24 hours and sterilize prior to plating (see Kaech and Banker, 2006). Use German Desag glass coverslips.
To coat poly-L-lysine on glass coverslips or plastic tissue culture dishes:
- under a tissue culture hood, cover surfaces with a small dome of 100 ug/ml PLL solution for 1.75-2 hours.
- wash twice with milliQ water, at least 5 minutes per wash (can be performed during the cell dissociation step below).
- store in water until use. Do not let the PLL-coated surface dry.
To reduce PLL wastage for coverslips coating, place the coverslips in sterile bacterial Petri dishes. Coat and wash the coverslips by placing a dome of liquid on the coverslips. The bacterial Petri dishes are hydrophobic, so the liquid should remain on the glass coverslips. Transfer the coverslips to tissue culture dishes just before plating the cells.
For neurons plated on plastic tissue culture dishes, adhesion is normally higher, thus neurite elongation might be diminished.
Dissociation and plating
- Verify that the dorsal strips have settled down to the bottom of the tube. Remove most of the L-15+10% HiHS with a Pasteur pipette. Quickly wash the dorsal neural tube strips once by adding 3 ml of cold (4 °C) HBSS.
- Let the dorsal neural tube strips settle for 2 minutes, then remove the HBSS with a Pasteur pipette.
- Add warm (37 °C) HBSS to a volume of 4.7 ml. Then add 0.3 ml of 2.5 % trypsin to give a final concentration of 0.15% trypsin.
- Incubate at 37 °C in the waterbath for 7 min. Mix once gently half-way through the incubation.
- Add 30 μl DNAse (25 000 U/mL) for a final concentration of 150 U/mL. Add 60 μl of MgSO4 and mix briefly, for a final concentration of 0.15%.
For tissue from coarse dissections, incubate for an extra 1 minute at 37 °C in the waterbath.
At this stage, the dorsal neural tube sections should be fragmented. If the dorsal neural tube sections have not begun to fragment, it usually means that the 2.5% trypsin stock is old, and new stock should be thawed, or the wash with cold HBSS did not effectively remove the HiHS from the sample. - Centrifuge the tissue fragments at 200 g for 4 min.
- Remove the supernatant with a Pasteur pipette, leaving ~50-100 μl of liquid at the bottom of the tube.
- Flick the tube gently to loosen the pellet, then wash the cells by adding 5 ml of warm HBSS. Let settle at room temperature for 2 min.
- Centrifuge at 200 g for 5 min.
- Remove the supernatant with a Pasteur pipette, leaving ~50-100 μl of liquid at the bottom of the tube.
- Flick the tube gently to loosen the pellet and partially resuspend the cells. Then add 2 ml of warm HBSS.
- Use the small (half-diameter) fire-polished glass Pasteur pipette to dissociate the cells by slowly pipetting up-and-down 4-6 times. Avoid making bubbles, and pipette the liquid against the side of the tube. Do not over-triturate.
- Use the smallest fire-polished glass Pasteur pipette to further dissociate the cells by slowly pipetting up-and-down 3-4 times. Avoid making bubbles, and pipette the liquid against the side of the tube. Do not over-triturate.
For tissue from coarse dissections, add an extra 1 ml of warm HBSS to the tube at the end of the dissociation.
When dissociating the cells, it is not necessary to dissociate all the cell clumps and aggregates. Stop pipetting up-and-down or change to a Pasteur pipette with a smaller diameter if you see no further decrease in the size of the cell aggregates with further pipetting. - Let any remaining tissue fragments settle in the tube for 1 min. It is not necessary to transfer the cells to a new tube.
- Take 20 μl of cell suspension and add 5 μl of trypan blue. Count cells on a haemocytometer.
Neurons should be ≥95% viable by trypan blue exclusion. - Plate the neurons in Neurobasal Plating Media (see Recipes below).
- Suggested plating densities for obtaining isolated neurons (low-density cultures to avoid neurons clumping or overlapping each other):
- 120 000 - 180 000 cells/well for a 6 well plate
- 60 000 - 75 000 cells/well for a 12 well plate
- 16-18 hours later, change the media to Neurobasal Growth Media (see Recipes below)
Do not use a vacuum pump to aspirate the media from the culture dish when changing media; gently use a pipette. This avoids dislodging the neurons.
Representative Results:
Four hours after plating, neurons should have adhered to the poly-L-lysine (PLL)-coated surface. Under phase contrast illumination, adhered cell bodies are typically relatively flat and oval-shaped (fig. 2a). Cells that have not well adhered appear as spheres that move slightly when the dish is very gently tapped on the side. Many factors can potentially impede the adhesion of cells (see discussion).
After 30 hours in vitro, most neurons have extended an axon with a visible growth cone (fig 2c,d). If poor axonal growth is observed, verify that the Neurobasal Growth Media has been made with fresh medium and supplements. Neurons remain healthy for at least 6 days in these conditions. This procedure has proven to reliably yield preparations highly enriched in commissural neurons, with ~90% of neurons expressing DCC (Yam et al. 2009). The width of the dorsal spinal cord strip that is used for preparing the cell suspension will affect the purity of the culture, with greater purity when thinner strips are used. An example application is shown in figure 3 (immunofluorescence). See the article by Yam et al. (2009) for more examples.

Figure 1. Schematics of spinal cord dissection steps. D = Dorsal, V =Ventral. Click here to see a larger figure.

Figure 2.Representative result of isolated commissural neurons plated on a PLL-coated glass coverslip. a,b) 4 hours after plating, neurons have adhered to the surface. Bar = 20 μm. c,d) 30 hours after plating, most neurons have extended an axon with a visible growth cone. Bar = 20 μm.

Figure 3. A commissural neuron immunostained for gamma-tubulin (green), with F-actin labeled by phalloidin (F-actin, red) and the nucleus by DAPI (blue).
Recipes and comments
Neurobasal Plating Media
- Neurobasal
- 10% Heat-inactivated FBS (HiFBS)
- 2 mM L-glutamine (from 200 mM stock solution)
Optional: Penicillin/Streptomycin antibiotics (use half the normal concentration)
Neurobasal Growth Media
- Neurobasal
- B27 (1/50 dilution from stock)
- 2 mM L-glutamine (from 200 mM stock solution)
- Optional: Penicillin/Streptomycin antibiotics (use half the normal concentration)
Once the media is made, it can be kept at 4 °C for two weeks. To equilibrate the temperature and the pH of media before plating the cells, place media in tissue culture Petri dishes and place in a tissue culture incubator for at least 1.5 hours.
Neurobasal
After a bottle of Neurobasal medium has been opened, it can be kept for one month at 4 °C in the dark. Dispose of Neurobasal which has been opened for more than one month otherwise cell survival will be lower.
Heat-inactivated fetal bovine serum (HiFBS) or horse serum (HiHS)
To heat-inactivate FBS or HS, heat at 56 °C in a water bath for 30 minutes. Swirl the bottle approximately every 10 minutes or so. (For accuracy use a bottle of similar size filled with water. Place a thermometer in the water bottle to see when 56 °C is reached. Begin timing at this point.) Heat-inactivated FBS may need to be centrifuged to clear precipitates, and can be aliquoted and re-frozen at -20 °C.
L-Glutamine
Always thaw a fresh aliquot of L-glutamine for each experiment.
B27
Aliquots of B27 can be kept at 20 °C for long term storage, or at 4 °C for up to one month.
Subscription Required. Please recommend JoVE to your librarian.
Discussion
We have described a method to dissect and culture commissural neurons from embryonic rat spinal cord. This procedure has been routinely used in our lab to reliably prepare neurons to study the cellular and molecular mechanisms of axon guidance. For cell biology and immunochemistry experiments, dissection of one litter produces sufficient neurons. When more cells are needed, such as in many biochemistry experiments, dissection of two litters may be required. For a trained person, dissection and dissociation of ~20 embryos can be performed in less than 4 hours. Longer timescales will result in a more difficult dissection of spinal cords due to changes in tissue integrity, and can also compromise effective recovery of viable neurons.
When performing the procedure for the first time, plate cells on various PLL-coated surfaces (acid-washed glass coverslips, tissue culture dishes) for comparison. Normally, cells should attach robustly to PLL-coated plastic tissue culture dishes or multi-well plates. This can be used as a general check for cell viability and maintenance if there are problems with cell adhesion and growth on glass coverslips. The main factor responsible for poor cell adhesion to glass is the quality of the glass and coverslip cleaning (acid-washing and sterilizing). This will affect cell adhesion in part by reducing the PLL-coating efficiency. Other common factors include bad PLL-coating (coating time too short or PLL solution too old), bacterial or fungal contamination, or the use of media or supplements that are old or expired.
We have used commissural neuron cultures prepared according to this procedure in several type of experiments, including immunochemistry, biochemistry, and turning assays (Yam et al. 2009). Remarkably, commissural neurons plated on PLL-coated glass retain the ability to respond to guidance cues, i.e., they will change their direction of growth in response to an applied chemotropic factor, such as Sonic Hedgehog, previously shown to be an axon guidance cue (Charron et al, 2003; Okada et al, 2006; Yam et al 2009; Fabre et al., 2010). Therefore, this is a powerful system to study the effect of axon guidance cues in vitro and allows for experiments that are not possible in vivo.
Subscription Required. Please recommend JoVE to your librarian.
Acknowledgments
This work was supported by grants from the Canadian Institutes of Health Research (CIHR), the Peter Lougheed Medical Research Foundation, the McGill Program in Neuroengineering, the Fonds de Recherche en Santé du Québec (FRSQ), and the Canada Foundation for Innovation (CFI). Sébastien D. Langlois was supported by a Master's Training Award from the Fonds de la recherché en santé du Québec (FRSQ) and by a Frederick Banting and Charles Best Canada Graduate Scholarships Master's Award from the Canadian Institutes of Health Research (CIHR). We are thankful to Jessica M.T. Pham for assistance with figures.
Materials
| Name | Company | Catalog Number | Comments |
| Neurobasal medium, liquid | Invitrogen | 21103-049 | See Recipes and Comments |
| B27 supplement 50X | Invitrogen | 17504 | See Recipes and Comments |
| Poly-L-lysine 0.01% solution | Sigma-Aldrich | P4707 | |
| L-15 medium, powder | Invitrogen | 41300-070 | |
| Trypsin 2.5% (10X) | Invitrogen | 15090-046 | |
| DNAse I, 25000 U/mL | Worthington Biochemical | ||
| MgSO4 | Sigma-Aldrich | M2643 | |
| HBSS, Ca2+/Mg2+-free | Invitrogen | 14170-112 | |
| L-glutamine 200mM, liquid | Invitrogen | 25030-081 | See Recipes and Comments |
Dissection of embryonic rat dorsal spinal cord (see also Table I)
Commissural neuron culture (see also Table I)
|
|||
References
- Charron, F., Stein, E., Jeong, J., McMahon, A. P., Tessier-Lavigne, M. The morphogen sonic hedgehog is an axonal chemoattractant that collaborates with netrin-1 in midline axon guidance. Cell. , 113-1111 (2003).
- Fabre, P., Shimogori, T., Charron, F. Segregation of ipsilateral retinal ganglion cell axons at the optic chiasm requires the Shh Receptor Boc. Journal of Neuroscience. 30, 266-275 (2010).
- Helms, A. W., Johnson, J. E. Progenitors of dorsal commissural interneurons are defined by MATH1 expression. Development. 125, 919-928 (1998).
- Kaech, S., Banker, G. Culturing hippocampal neurons. Nature Protocols. 1, 2406-2415 (2006).
- Okada, A., Charron, F., Morin, S., Shin, D. S., Wong, K., Fabre, P. J., Tessier-Lavigne, M., McConnell, S. K. Boc is a receptor for sonic hedgehog in the guidance of commissural axons. Nature. 444, 369-373 (2006).
- Yam, P. T., Langlois, S. D., Morin, S., Charron, F. Sonic hedgehog guides axons through a noncanonical, Src-family-kinase-dependent signaling pathway. Neuron. 62, 349-362 (2009).
