Transgenic manipulations and genome editing are critical for functionally testing the roles of genes and cis-regulatory elements. Here a detailed microinjection protocol for the generation of genomic modifications (including Tol2-mediated fluorescent reporter transgene constructs, TALENs, and CRISPRs) is presented for the emergent model fish, the threespine stickleback.
A subscription to JoVE is required to view this content. Sign in or start your free trial.
Method Article
Microinjection for Transgenesis and Genome Editing in Threespine Sticklebacks
In This Article
Summary
Abstract
The threespine stickleback fish has emerged as a powerful system to study the genetic basis of a wide variety of morphological, physiological, and behavioral phenotypes. The remarkably diverse phenotypes that have evolved as marine populations adapt to countless freshwater environments, combined with the ability to cross marine and freshwater forms, provide a rare vertebrate system in which genetics can be used to map genomic regions controlling evolved traits. Excellent genomic resources are now available, facilitating molecular genetic dissection of evolved changes. While mapping experiments generate lists of interesting candidate genes, functional genetic manipulations are required to test the roles of these genes. Gene regulation can be studied with transgenic reporter plasmids and BACs integrated into the genome using the Tol2 transposase system. Functions of specific candidate genes and cis-regulatory elements can be assessed by inducing targeted mutations with TALEN and CRISPR/Cas9 genome editing reagents. All methods require introducing nucleic acids into fertilized one-cell stickleback embryos, a task made challenging by the thick chorion of stickleback embryos and the relatively small and thin blastomere. Here, a detailed protocol for microinjection of nucleic acids into stickleback embryos is described for transgenic and genome editing applications to study gene expression and function, as well as techniques to assess the success of transgenesis and recover stable lines.
Introduction
One fundamental component of understanding how biodiversity arises is determining the genetic and developmental bases of evolved phenotypic changes in nature. The threespine stickleback fish, Gasterosteus aculeatus, has emerged as an excellent model for studying the genetic basis of evolution. Sticklebacks have undergone many adaptive evolutionary changes as marine fish have colonized countless freshwater environments around the northern hemisphere, resulting in dramatic morphological, physiological, and behavioral changes1. The genomes of individuals from twenty-one stickleback populations have been sequenced and assembled, and a high density linkage map has been generated to further improve the assembly2,3. Genetic mapping experiments have identified genomic regions underlying evolved phenotypes4-6, and in a few cases, the functional roles of specific candidate genes have been tested7,8. A number of genomic regions underlying morphological changes have been identified with promising candidate genes, but these candidates have not yet been functionally tested9-12. In addition, sticklebacks are common models for studies of population genetics/genomics13,14, speciation15, behavior1, endocrinology16, ecotoxicology17, immunology18 and parasitology19. Future studies in each of these fields will benefit from the ability to perform functional genetic manipulations in sticklebacks. In addition to manipulating their coding sequences, the roles of candidate genes can be assessed by studying their cis-regulatory sequences and by functionally increasing, decreasing, or eliminating expression of the candidate gene. Microinjection and transgenesis methods in sticklebacks are well established7,8,20 and were initially developed using a meganuclease-mediated method21 first described in medaka22. The modified microinjection method presented here has been optimized for both Tol2-mediated transgenesis and recently developed genome editing reagents including TALENs and CRISPRs.
Changes to cis-regulatory elements are thought to be critical to morphological evolution, as cis-regulatory changes can avoid the negative pleiotropic consequences of coding mutations23. Therefore, testing and comparing putative cis-regulatory sequences has become a central goal of an increasing number of evolutionary studies. In addition, most human disease variants are regulatory variants24,25, and model vertebrate systems are sorely needed to study cis-regulatory element function and logic. Fish that fertilize their embryos externally in large numbers offer powerful vertebrate systems to study cis-regulation. The Tol2 transposon system, in which foreign DNA to be integrated in the genome is flanked by Tol2 transposase binding sites and co-injected with Tol2 transposase mRNA, works with high efficiency for successfully integrating plasmid constructs into fish genomes26-28. Typically, a potential enhancer is cloned upstream of a basal promoter (such as hsp70l29) and fluorescent reporter gene such as EGFP (enhanced green fluorescent protein) or mCherry in a Tol2 backbone and injected with transposase mRNA26. Observation of expression of the fluorescent reporter, either in injected embryos or offspring with stably integrated transgenes, provides information about the spatiotemporal regulation of gene expression driven by the putative enhancer. In further experiments, validated enhancers can be used to drive tissue-specific overexpression of genes of interest.
For analysis of larger cis-regulatory regions, high quality large-insert genomic libraries using bacterial artificial chromosomes (BACs) have been constructed for both marine and freshwater sticklebacks30. These BACs can be recombineered to replace a gene with a fluorescent reporter gene in the context of a large (150-200 kb) genomic region31. The fluorescent reporter is then expressed in a spatiotemporal pattern as determined by regulatory sequences within the BAC. For studies in fish, Tol2 sites can be added to the BAC to facilitate genomic integration32,33. In later stages of development when in situ hybridization is technically challenging, the fluorescent readout of the BAC can be used to study patterns of gene expression, as has been shown for stickleback Bone morphogenetic protein 6 (Bmp6)20. Additionally, fluorescent expression patterns in an individual can be tracked over time, which cannot be accomplished with in situ hybridization. BACs can also be used to add an additional copy of a genomic region to increase dosage of a gene of interest.
For the study of gene function, genome editing is an explosively expanding field that can be used to produce targeted changes to genomic sequences in a wide variety of organisms34. Transcription activator-like effector nucleases (TALENs) are modular, sequence-specific nucleases originally isolated from plant pathogens that can be precisely engineered to bind directly to a genomic sequence of choice and generate a double strand break35,36. Clustered regularly interspaced short palindromic repeats (CRISPR)/CAS systems were originally found in bacteria and use a guide RNA and the Cas9 protein to generate a break in a target DNA sequence complementary to the guide37. The subsequent repair of the double strand break created by both TALENs and CRISPRs often leaves behind a small insertion or deletion, which can disrupt the function of the target sequence35-37. In sticklebacks, TALENs have been used to disrupt gene expression by targeting an enhancer20, and both TALENs and CRISPRs have successfully produced mutations in coding sequences (unpublished data). A detailed protocol for the generation of CRISPRs for use in zebrafish can be used as a guideline to develop CRISPRs for sticklebacks38.
Transgenic and genome editing experiments require introduction of nucleic acids into a newly fertilized one-cell embryo. By introducing the transgene or genome-editing tool early in development, the number of genetically manipulated daughter cells in the embryo is maximized. Injected embryos are then visually screened for fluorescence or molecularly screened for genome modifications. If cells contributing to the germline are successfully targeted, the transgene or mutation can be passed on to a subset of offspring, even when post-injection lethality is high. The mosaic fish can be outcrossed or intercrossed and their offspring screened to recover the mutant alleles or a stably integrated transgene of interest. This protocol describes methods for introducing transgenes and genome editing reagents into one-cell stickleback embryos and monitoring for successful genomic modifications.
Access restricted. Please log in or start a trial to view this content.
Protocol
All fish work was approved by the Institutional Animal Care and Use Committee of the University of California-Berkeley (protocol number R330).
1. Prepare Nucleic Acids for Injection
- Tol2 Plasmid Transgenesis (Adapted from Fisher26).
- Cut 10 µg transposase plasmid (pCS-Tp)39 with 10 U NotI in supplied buffer for 1 hr at 37 °C to linearize.
Note: Material Transfer Agreements may be required to obtain Tol2 plasmids. - Extract the cut plasmid with a 25:24:1 mixture of phenol:chloroform:isoamyl alcohol and ethanol precipitate with sodium acetate according to standard protocols40. Resuspend plasmid in 50 µl RNase-free water.
Note: Phenol-chloroform should be used in a hood and the waste must be properly disposed according to institutional guidelines. - Set up a Sp6 transcription reaction according to manufacturer's instructions.
- Use a RNA isolation kit to clean up transcription reaction according to manufacturer's instructions; resuspend RNA in 50 µL RNase-free water.
- Remove a 1 µl aliquot of RNA. Heat to 65 °C for 5 min to denature secondary structures then immediately chill on ice. Freeze remaining transcription reaction at -80 °C.
- Run the RNA aliquot on a 1% agarose gel in 0.5x TAE (Tris base, Acetic acid, Ethylenediaminetetraacetic acid) running buffer with an RNA size standard in one lane. The expected product is 2,200 bp; discard if >5% of the total RNA appears in a smear smaller than 2,200 bp, which indicates extensive degradation (Figure 1).
- Quantify RNA using a spectrophotometer at 260 nm. Dilute to 350 ng/µl in RNase-free water and store 1 µl aliquots at -80 °C (good for at least two years).
- Clone Tol2 reporter plasmid (for example, using pT2HE8 or plasmids from the Tol2 kit41) with cis-regulatory element of interest. Briefly, PCR amplify a genomic DNA sequence of interest with primers containing restriction sites found in the plasmid, digest the PCR product and vector with the enzyme(s), ligate the insert into the vector, and transform resulting plasmid into competent E. coli40. Isolate plasmid with a kit that includes an endotoxin rinse according to manufacturer's protocol.
- Perform a second purification of the Tol2 plasmid with a PCR purification kit according to manufacturer's protocol. Elute in 30 µl RNase-free water.
Note: the yield from this step may be low (sometimes under 50% of the input plasmid). - Dilute plasmid to ~125 ng/µl in RNase-free water.
- Cut 10 µg transposase plasmid (pCS-Tp)39 with 10 U NotI in supplied buffer for 1 hr at 37 °C to linearize.

Figure 1. Transposase mRNA gel. Purified transcription reaction product (1 µl) was heated to 65 °C, chilled on ice, and run on a 1% agarose gel with 0.5x TAE running buffer at 100 V. The sizes of the RNA ladder in kilobases (kb) are indicated to the left. The full length transposase mRNA is a bright band at ~2.2 kb. A small but acceptable amount of degraded or incomplete mRNA is seen below 2.2 kb. Please click here to view a larger version of this figure.
- BAC Transgenesis (See Suster32,33 for BAC Recombineering Techniques)
- Prepare BAC from E. coli using BAC purification kit according to manufacturer's protocol. Use ethanol precipitation to recover DNA with a standard sodium acetate-ethanol extraction40 and resuspend DNA at ~250 ng/µl in RNase-free water.
- Prepare transposase mRNA as in section 1.1.
- Mutation Induction with TALENs (See Cermak35 for Design of TALENs)
- Use the web-based application to design TALENs for the gene of interest42. If possible, design TALENs to disrupt a restriction enzyme cut site to facilitate molecular analysis.
- Clone TALENs and prepare plasmids for transcription following published protocol35.
- Transcribe TALEN mRNA with a Sp6 transcription reaction according to manufacturer's instructions and clean up mRNA as described for transposase in section 1.1.4. Quantify with a spectrophotometer and dilute to 200 ng/µl in RNase free water. Run TALEN mRNA on a gel to ensure it is the proper size and not degraded as described in step 1.1.6.
- Design a pair of PCR primers to amplify approximately 100-200 bp surrounding the TALEN target sequence using a primer design tool and the target DNA sequence43. Order the appropriate restriction enzyme to test for lesions at the target site based on step 1.3.1.
- CRISPR Transgenesis (See Talbot and Amacher38 for Design and Preparation of CRISPRs):
- Design and prepare CRISPRs and Cas9 mRNA according to protocol38, and order appropriate verification primers and restriction enzymes as described in step 1.3.4.
2. Prepare Injection Reagents
- Use Borosilicate Capillaries to Prepare Needles as Described Below.
Note: these capillaries are not the standard capillaries used for zebrafish microinjection, and are made of a thicker and stronger glass that is critical to puncture the tough stickleback chorion.- Always wear nitrile or latex gloves when pulling needles, and do not allow needles to contact skin or skin oils.
- Determine micropipette pulling parameters empirically by ramp tests following the micropipette puller's manufacturer's instructions. For example, with a box filament, the following parameters were determined to be optimal: (Heat = 515, Pull = 60, Velocity = 60, Delay = 85, Pressure = 500). These settings produce a needle that tapers steeply at approximately 12° for ~2 mm and then a long extension that tapers at approximately 2° for ~6 mm (Figure 2).
Note: The proper parameters will vary by puller and filament, and blindly using a program without determining the parameters first through ramp tests can permanently destroy the puller's filament, which is difficult and expensive to replace. - Follow manufacturer's instructions to pull at least 4 micropipette needles from borosilicate glass with the settings determined in 2.1.2.
- Store needles vertically in capillary storage jar with the sharp end facing down.
- Before injecting, place capillary storage jar on ice to chill needles. Add a piece of moist paper towel to the jar to prevent evaporation once the needles are filled.
- Fertilize Eggs (All Steps Performed at RT)
- Strip egg clutch from gravid female stickleback by gently squeezing the abdomen and stroking in an anterior to posterior direction to push the eggs out through the cloaca and into a 35 x 10 mm2 Petri dish. Add a moist piece of paper towel on one side of the Petri dish (not touching the eggs) to create humidity chamber. Place lid on Petri dish so eggs stay moist.
- Euthanize male stickleback in 0.025% Tricaine-S buffered with 0.1% sodium bicarbonate.
- Cut open the abdomen, remove testes and macerate in 250 µl Hank's solution (see Westerfield44 for full protocol for Hank's solution preparation).
- Fertilize at most 100 eggs with 50 µl sperm solution and gently stir with pipette tip to ensure all eggs are fertilized. If the clutch is >100 eggs, fertilize half of the eggs later to ensure that all embryos are at a one-cell stage at the time of injection. Eggs can be left unfertilized at RT for up to an hour, and sperm generally lasts for 1-7 days at 4 °C in Hank's solution.
- Keep embryos covered with Petri dish lid after fertilization to prevent drying. Allow 20-25 min for the first cell to emerge and swell up (prepare injection materials during this time).
- Fill a 150 mm x 15 mm Petri dish with stickleback water. (To make stickleback water, first prepare 10% sodium bicarbonate dissolved in deionized water. Then add 3.5 g artificial seawater mix and 0.217 ml of 10% sodium bicarbonate per 1 L of deionized water, and stir/shake vigorously to dissolve salt.)
- Prepare Injection Solution (While Eggs are Fertilizing)
- Prepare injection solution according to Table 1 and store on ice.
Note: the concentrations of some nucleic acids have been increased from those published for zebrafish due to the increased volume of the stickleback blastomere.
- Prepare injection solution according to Table 1 and store on ice.
| Reagent | Tol2 injection | BAC injection | TALEN injection | CRISPR injection |
| Tol2 mRNA | 350 ng | 350 ng | - | - |
| DNA | 150-200 ng plasmid | 200-300 ng BAC | - | - |
| TALEN mRNA | - | - | 200 ng each | - |
| CRISPR guide RNA | - | - | - | 200 ng |
| Cas9 mRNA | - | - | - | 400 ng |
| 0.5% phenol red inDulbecco's PBS | 0.5 µl | 0.5 µl | 0.5 µl | 0.5 µl |
| RNAse free water | to 5 µl | to 5 µl | to 5 µl | to 5 µl |
Table 1: Injection reagents. All mixtures should be prepared to a total volume on 5 µl and stored on ice.
- Fill Needles (On Ice; Allow At Least 10 Min for Needles to Fill).
- Backfill at least three needles by pipetting 0.5 µl injection solution onto the blunt top end of the needle while needles are hanging vertically in capillary storage jar. Be careful that the drop stays on top and does not drip down the side and avoid bubbles.
- After the red liquid has mostly drained to the pointed tip of the needle, add another 0.5 µl to the blunt end of the needle and allow it to drain.
3. Prepare Inject Rig and Needle for Microinjection
Note: These steps can usually be done after fertilizing the eggs.
- Turn on transillumination light for the dissecting microscope and place a ~13 cm x 13 cm glass plate on the microscope light base with 15 cm plaster saw blade on top of the glass plate7. Orient the saw perpendicular to the injection apparatus with the indentations facing towards the needle holder.
- Turn on air supply and ensure pressure is set to ~200 kPa from the regulator.
- Turn on the control box and adjust settings. Set pressure to ~150-175 kPa. Set injection duration to 180 msec.
- Loosen the needle holder, insert a filled needle into the holder until resistance of the rubber holder can be felt, and tighten until finger tight.
- Adjust the needle angle to approximately 45°.
- Use micromanipulator controls to adjust the needle so the end is centered in the field of view. Zoom in to ~40X magnification and focus on the tip of the needle, which should not be touching the glass below.
- Gently break the tip of the needle by grasping it with watchmaker's forceps. Ideally, do not break perpendicularly, but rather at a ~60° angle. Break close to the tip (not more than 2-3 forceps widths away from the end, Figure 2).

Figure 2. Unbroken and broken microinjection needles. The top needle is unbroken and the tip of the bottom needle has been broken with forceps (arrow). Needles are filled with a solution containing 0.05% phenol red. Scale bar = 1 mm. Please click here to view a larger version of this figure.
- Press the injection foot pedal several times to test whether the needle is broken. After a few taps, tiny red droplets should begin to come out of the end. If not, try breaking the needle slightly higher.
- If the needle has an air bubble, increase the back pressure unit and press the pedal several times quickly to work the bubble out.
- Adjust the Back Pressure:
- Use the disposable transfer pipette to place a few drops of stickleback water on the glass plate.
- Gently lower the needle into the water.
- Increase the back pressure until a faint stream of pink liquid emerges from the needle (indicating positive pressure).
Note: If there is not enough back pressure, the needle will draw up the cytoplasm by capillary action. If there is too much back pressure, the injection volume may be inadvertently too large. - Retract the needle as far as possible so that it will not be damaged while preparing the embryos (see below).
- Alternatively, adjust the back pressure to a higher pressure setting so that a constant strong stream of liquid exits the needle when it is submerged in water. Then, pressing the foot pedal to inject becomes unnecessary; however, the injection must be performed quickly to avoid over-injecting.
Note: Do not attempt this technique when first learning to inject.
4. Microinjection
- About 25 min after fertilization, use two 10 µl pipet tips to remove 5-10 embryos from the clutch and transfer to the glass plate.
- Still using the pipet tips, gently separate the embryos into individual indentations of the saw blade. Use caution not to puncture embryos.
- Using a transfer pipet with end cut off so stickleback embryos will fit inside, add enough stickleback water to cover the embryos, leave the water on for 3-5 sec, then remove the excess water with the pipet, leaving a small volume of water coating each embryo.
Note: Too much water will cause the chorions to harden and break the needle, but a small volume of water is necessary to lift the chorion away from the cell and yolk (Figure 3A-B). - Starting with the embryo furthest away, slide the glass plate and zoom in so that the first embryo fills approximately 25% of the field of vision.
- Lower the needle into the field of vision, then use the 10 µl pipet tip to gently rotate the embryo to identify the blastomere, a grainy, slightly yellow raised bump of cytoplasm on top of the yolk (Figure 3B), and then rotate so that the blastomere is directly perpendicular to the end of the needle (while keeping the embryo in the indentation of the saw blade, Figure 3C).
Note: the yolk droplets may move as the embryo is rotated, so do not use them as a frame of reference for the location of the blastomere. - Lower the needle into the cytoplasm but do not push through to the underlying yolk. Apply pressure slowly and evenly when piercing the chorion to avoid breaking the needle. If the needle bends severely, retract and try again in a slightly different location.
- Depress the foot pedal 3-4 times to inject so that a red bolus with slightly diffuse edges fills about ~1/8 the diameter of the cytoplasm (see Figure 3D).
- Avoid obtaining a red bolus with sharp edges that do not begin to diffuse, which indicates injection into the yolk beneath the cytoplasm (Figure 3E).
- If a bright pinkish-red spot diffuses quickly, insert the needle further to puncture the blastomere.
- If the injection bolus turns yellow instantly, rotate the embryo to ensure the blastomere has been targeted and inject again (Figure 3F).
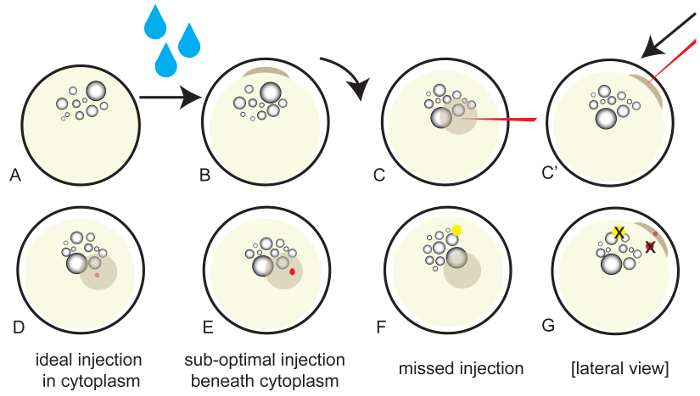
Figure 3. Appearance of stickleback embryos before and after injection. All embryos are drawn from the perspective of looking down through the microscope (except for C' and G). (A) Before adding water, fertilized embryos have a uniform appearance with oil droplets floating near the top of the yolk. (B) After adding water, the chorion swells, revealing a blastomere that protrudes from the yolk and is visible in profile. (C) Rotation of the embryo so that the needle enters perpendicularly to the chorion and blastomere. (C') Lateral view of a needle that has punctured the chorion with the tip in the cytoplasm. (D) Injection into the cytoplasm results in a red spot with diffuse edges that fade over time. (E) Injection into the yolk underlying the cytoplasm results in a red spot with defined edges. (F) Injection into the yolk opposite the cytoplasm results in a pH-induced color shift from red to yellow. (G) Lateral view of injection outcomes, with Xs over sub-ideal injection locations. Please click here to view a larger version of this figure.
- Use the micromanipulator controls to retract the needle, using the 10 µl pipet tip to hold down the embryo if it sticks to the needle.
- After retracting the needle, slide the glass plate to align the next embryo with the needle.
- After injecting all embryos, use the transfer pipet to add water to the embryos, then collect them in the transfer pipette and place in 150 mm Petri dish full of stickleback water.
- Dry off the glass plate with a paper towel to avoid accumulating too much water.
- Distribute fresh embryos onto the saw and repeat steps 4.4 through 4.10.
- Keep ~10% of embryos as uninjected controls to ensure that uninjected embryos develop normally and to use as wild-type controls for the molecular assays described below.
5. Post Injection Care
- Incubate embryos in Petri dishes at 18 °C after injection until hatching10. Following hatching, rear larvae in aquaria as described10.
- Gently pour off the stickleback water one day after injection and replace with fresh stickleback water. Replace with fresh stickleback water at least every other day after that.
- Check for dead or malformed embryos daily. Remove such embryos to prevent decay from contaminating the water.
6. Analysis of Injection Results
- For injection of fluorescent reporters, monitor embryos daily in a darkened room using a fluorescent dissecting microscope with a GFP or RFP filter (depending on fluorescent transgene). Record anatomical patterns of gene expression with digital photographs and/or written descriptions and tabulation of the number of fish with different expression domains (Figures 4 and 5).
Note: Sticklebacks have autofluorescent, stellate pigment cells that are visible under GFP filters beginning at 4 days post fertilization (dpf).- To generate stable lines, save embryos with detectable fluorescence and grow to adulthood as described10.
- Outcross injected adult fish to wild-type fish using the in vitro fertilization procedure described in section 2.2 and screen offspring for fluorescence as described in step 6.1 to look for fluorescent offspring, indicating successful transgene transmission.
- To visualize fluorescence in hatched, free-swimming larvae, add 500 µl 0.8% Tricaine to the 150 mm Petri dish to anaesthetize fish and wait until fish stop moving to image. Immediately rinse several times with fresh stickleback water following observation and imaging.
- Optionally, to preserve fluorescence for further imaging, euthanize larvae in 0.025% (250 mg/L) Tricaine buffered with 0.1% sodium bicarbonate and fix for 4 hr in 4% paraformaldehyde in 1x Phosphate Buffered Saline (PBS) at 4 °C. Store in 1x PBS for up to two weeks.
Note: background auto-fluorescence increases over time.
- Diagnostic PCR/digestion Genotyping for Mutation Induction with CRISPRs or TALENs -- Best Performed at 2 days Post Fertilization.
- Use a transfer pipet to place 10 injected embryos (2 dpf, still in chorions) into the first 10 wells of a 12-well PCR strip tube. Place uninjected control fish in the last two wells.
- Remove excess stickleback water.
- Add 50 µl lysis buffer (10 mM Tris pH 8.3, 50 mM KCl, 1.5 mM MgCl2, 0.3% Tween-20, and 0.3% NP-40) to each well.
- Place caps on tubes and incubate at 95 °C for 20 min in a thermocycler.
Note: The yolk will turn white and rubbery after the boiling step. - Remove lids and use a different clean 1,000 µl pipet tip to macerate the embryo in each tube.
Note: White debris will collect at the bottom of the tube. - Add 2.5 µl of 10 mg/ml proteinase K to each well.
- Replace lids and incubate at 55 °C for 1 hr to digest protein, followed by 95 °C for 20 min to inactivate proteinase K. Store at -20 °C to avoid mold growth.
- Perform PCR using a high-fidelity polymerase following manufacturer's instructions. Use the embryo lysate as DNA template.
Note: Be careful to remove liquid from top of tube for DNA template, avoiding any visible chorion or yolk debris at the bottom of the tube. - Mix the PCR product in equal volume with a restriction enzyme master mix containing 1x enzyme-specific buffer and 0.25 µl enzyme per sample. Always save half of the uncut PCR product to assay on a gel to confirm PCR products are the predicted size. Incubate the PCR mixed with enzyme at the appropriate conditions for the restriction enzyme.
Note: Some enzymes may require other ratios of enzyme buffer to PCR product; adjust the buffer concentration if the uninjected controls do not show complete digestion. - Following digestion, run products on a 1% agarose gel next to a DNA size ladder to confirm expected product sizes.
Note: Uncut bands in injected embryos indicate the presence of molecular lesions (Figure 6) and uninjected controls must be fully digested to interpret results. - To confirm lesions, cut out uncut bands from agarose gels and purify DNA with a gel extraction kit. Use Sanger sequencing, ideally using a sequencing primer internal to the PCR primers, to confirm lesions. In F0 injected embryos, a mix of lesions will likely be present, causing the quality of the Sanger read to degrade near the target site.
- To produce a stable line, save all injected embryos from clutches that screen positive for molecular lesions. Grow up fish, outcross, and then screen a subset of F1 embryos for molecular lesions as described in steps 6.2.1 through 6.2.11. If heterozygous carriers are identified, grow the remaining F1 embryos to adulthood and identify heterozygous individuals using DNA extracted from a caudal fin clip.
Access restricted. Please log in or start a trial to view this content.
Results
For reporter gene transgenes that have enhancer activity, successful injection will result in specific, cellular expression of the transgene (Figure 4A, 4C). Injected fish can then be outcrossed to produce stable lines (example of a BAC stable line shown in Figure 4B). Injecting DNA into stickleback embryos typically results in far higher lethality than RNA alone. It is typical to see up to 50% (sometimes even more) lethality or malformat...
Access restricted. Please log in or start a trial to view this content.
Discussion
Injecting one-cell stickleback embryos for transgenesis or genome editing presents three main challenges. First, relative to zebrafish embryos, the stickleback embryonic chorion is tough and will often break needles. This problem can be partially overcome by using thicker and stronger glass micropipettes and injecting perpendicular to the chorion (see Protocol, Figure 2). Ensuring that as little water as possible is added to the embryos (just enough to cause the chorion to swell and lift away from the ce...
Access restricted. Please log in or start a trial to view this content.
Disclosures
The authors have nothing to disclose.
Acknowledgements
This work was funded in part by NIH R01 #DE021475 (CTM), an NIH Predoctoral Training Grant 5T32GM007127 (PAE), and an NSF Graduate Research Fellowship (NAE). We thank Kevin Schwalbach for performing BAC recombineering and injections, Nick Donde for generating CRISPR Sanger sequencing data, and Katherine Lipari for helpful feedback on the injection protocol.
Access restricted. Please log in or start a trial to view this content.
Materials
| Name | Company | Catalog Number | Comments |
|---|---|---|---|
| Stereomicroscope with transillumination | Leica | S6e/ KL300 LED | |
| Manual micromanipulator | Applied Scientific Instrumentation | MM33 | Marzhauser M33 Micromanipulator |
| Pressure Injecion system | Applied Scientific Instrumentation | MPPI-3 | |
| Back pressure unit | Applied Scientific Instrumentation | BPU | |
| Micropipette holder kit | Applied Scientific Instrumentation | MPIP | |
| Magnetic base holder | Applied Scientific Instrumentation | Magnetic base | |
| Foot switch | Applied Scientific Instrumentation | FSW | |
| Iron plate (magnetic base) | Narishige | IP | |
| Flaming/Brown Micropipette Puller | Sutter Instrument | P-97 | |
| Disposable transfer pipettes | Fisher | 13-711-7M | |
| 0.5% phenol red in DPBS | Sigma | P0290 | injection tracer |
| #5 forceps, biologie dumoxel | Fine Science Tools | 11252-30 | for needle breaking |
| Micropipette Storage Jar | World Precision Instruments | E210 | holds needles |
| 6", 6 teeth per inch plaster drywall saw | Lenox | 20571 (S636RP) | hold eggs for injection |
| 13 cm x 13 cm glass plate | any hardware store | - | |
| Borosilicate glass capillaries, 1.0 mm OD/0.58 mm ID | World Precision Instruments | 1B100-F4 | *harder glass than zebrafish injection capillaries |
| 150 x 15mm Petri dish | Fisher | FB0875714 | raise stickleback embryos |
| 35 mm x 10 mm Petri dish | Fisher | 08-757-100A | store eggs pre-injection |
| Instant Ocean Salt | Instant Ocean | SS15-10 | |
| Sodium Bicarbonate | Sigma | S5761-500G | |
| Tricaine methanesulfonate/MS-222 | Western Chemical Inc | MS222 | fish anaesthesia/euthanasia |
| Sp6 transcription kit | Ambion | AM1340 | For transcription of TALENs and transposase mRNA |
| RNeasy cleanup kit | Qiagen | 74104 | purify transposase or TALEN RNA |
| QiaQuick PCR cleanup kit | Qiagen | 28104 | clean up plasmids for injection |
| Proteinase K 20 mg/ml | Ambion | AM2546 | for DNA preparation |
| Nucleobond BAC 100 kit | Clontech | 740579 | for BAC DNA preparation |
| NotI | NEB | R0189L | |
| Phusion polymerase | Fisher | F-530L | |
| Qiagen PlasmidPlus Midi kit | Qiagen | 12943 | contains endotoxin rinse buffer |
| QIAQuick Gel Extraction | Qiagen | 28704 | for sequencing induced mutations |
| Phenol:chloroform:Isoamyl alcohol | Sigma | P2069-100ML | |
| Sodium acetate | Sigma | S2889-250G | |
| Ethanol (molecular biology grade) | Sigma | E7023-500ML | |
| Agarose | Sigma | A9539 | |
| 50x Tris-acetate-EDTA buffer | ThermoFisher | B49 | |
| 0.5-10 Kb RNA ladder | ThermoFisher | 15623-200 | |
| Nanodrop Spectrophotometer | Thermo Scientific | Nanodrop 2000 | |
| Paraformaldehyde | Sigma | 158127-500G | |
| 10x PBS | ThermoFisher | 70011-044 | |
| 1 kb Plus DNA Ladder | ThermoFisher | 10787-018 | |
| Potassium Chloride | Sigma | P9541-500G | |
| Magnesium Chloride | Sigma | M8266-100G | |
| NP-40 | ThermoFisher | 28324 | |
| Tween 20 | Sigma | P1379-500ML | |
| Tris pH 8.3 | Teknova | T1083 | |
| 12-strip PCR tube | Thermo Scientific | AB-1113 |
References
- Bell, M. A., Foster, S. A. The Evolutionary Biology of the Threespine Stickleback. , Oxford University Press. (1994).
- Jones, F. C., et al. The genomic basis of adaptive evolution in threespine sticklebacks. Nature. 484 (7392), 55-61 (2012).
- Glazer, A. M., Killingbeck, E. E., Mitros, T., Rokhsar, D. S., Miller, C. T. Genome assembly improvement and mapping convergently evolved skeletal traits in sticklebacks with Genotyping-by-Sequencing. G3. 5 (7), 1463-1472 (2015).
- Miller, C. T., et al. Modular skeletal evolution in sticklebacks is controlled by additive and clustered quantitative trait Loci. Genetics. 197 (1), 405-420 (2014).
- Shapiro, M. D., et al. Genetic and developmental basis of evolutionary pelvic reduction in threespine sticklebacks. Nature. 428 (6984), 717-723 (2004).
- Colosimo, P. F., et al. Widespread parallel evolution in sticklebacks by repeated fixation of Ectodysplasin alleles. Science. 307 (5717), 1928-1933 (2005).
- Chan, Y. F., et al. Adaptive evolution of pelvic reduction in sticklebacks by recurrent deletion of a Pitx1 enhancer. Science. 327 (5963), 302-305 (2010).
- O'Brown, N. M., Summers, B. R., Jones, F. C., Brady, S. D., Kingsley, D. M. A recurrent regulatory change underlying altered expression and Wnt response of the stickleback armor plates gene EDA. eLife. , e05290(2015).
- Cleves, P. A., et al. Evolved tooth gain in sticklebacks is associated with a cis-regulatory allele of Bmp6. Proc. Natl. Acad. Sci. 111 (38), 13912-13917 (2014).
- Erickson, P. A., Glazer, A. M., Cleves, P. A., Smith, A. S., Miller, C. T. Two developmentally temporal quantitative trait loci underlie convergent evolution of increased branchial bone length in sticklebacks. Proc. R. Soc. Lond. B Biol. Sci. 281 (1788), 20140822(2014).
- Glazer, A. M., Cleves, P. A., Erickson, P. A., Lam, A. Y., Miller, C. T. Parallel developmental genetic features underlie stickleback gill raker evolution. EvoDevo. 5 (1), (2014).
- Ellis, N. A., et al. Distinct developmental and genetic mechanisms underlie convergently evolved tooth gain in sticklebacks. Development. 142, 2442-2451 (2015).
- Hohenlohe, P. A., Bassham, S., Currey, M., Cresko, W. A. Extensive linkage disequilibrium and parallel adaptive divergence across threespine stickleback genomes. Philos. Trans. R. Soc. Lond. B Biol. Sci. 367 (1587), 395-408 (2012).
- Hohenlohe, P. A., et al. Population genomics of parallel adaptation in threespine stickleback using sequenced RAD tags. PLoS Genet. 6 (2), e1000862(2010).
- McKinnon, J. S., Rundle, H. D. Speciation in nature: the threespine stickleback model systems. Trends Ecol. Evol. 17 (10), 480-488 (2002).
- Shao, Y. T., et al. Androgen feedback effects on LH and FSH, and photoperiodic control of reproduction in male three-spined sticklebacks, Gasterosteus aculeatus. Gen. Comp. Endocrinol. 182, 16-23 (2013).
- Katsiadaki, I., et al. Three-spined stickleback: an emerging model in environmental endocrine disruption. Environ. Sci. Int. J. Environ. Physiol. Toxicol. 14 (5), 263-283 (2007).
- Lenz, T. L., Eizaguirre, C., Rotter, B., Kalbe, M., Milinski, M. Exploring local immunological adaptation of two stickleback ecotypes by experimental infection and transcriptome-wide digital gene expression analysis. Mol. Ecol. 22 (3), 774-786 (2013).
- Barber, I. Sticklebacks as model hosts in ecological and evolutionary parasitology. Trends Parasitol. 29 (11), 556-566 (2013).
- Erickson, P. A., et al. A 190 base pair, TGF-β responsive tooth and fin enhancer is required for stickleback Bmp6 expression. Dev. Biol. 401 (2), 310-323 (2015).
- Hosemann, K. E., Colosimo, P. F., Summers, B. R., Kingsley, D. M. A simple and efficient microinjection protocol for making transgenic sticklebacks. Behaviour. 141 (11/12), 1345-1355 (2004).
- Thermes, V., et al. I-SceI meganuclease mediates highly efficient transgenesis in fish. Mech. Dev. 118 (1-2), 91-98 (2002).
- Carroll, S. B. Evo-Devo and an expanding evolutionary synthesis: a genetic theory of morphological evolution. Cell. 134 (1), 25-36 (2008).
- Maurano, M. T., et al. Systematic localization of common disease-associated variation in regulatory DNA. Science. 337 (6099), 1190-1195 (2012).
- Hindorff, L. A., et al. Potential etiologic and functional implications of genome-wide association loci for human diseases and traits. Proc. Natl. Acad. Sci. U. S. A. 106 (23), 9362-9367 (2009).
- Fisher, S., et al. Evaluating the biological relevance of putative enhancers using Tol2 transposon-mediated transgenesis in zebrafish. Nat. Protoc. 1 (3), 1297-1305 (2006).
- Kawakami, K., Shima, A., Kawakami, N. Identification of a functional transposase of the Tol2 element, an Ac-like element from the Japanese medaka fish, and its transposition in the zebrafish germ lineage. Proc. Natl. Acad. Sci. U.S.A. 97 (21), 11403-11408 (2000).
- Kikuta, H., Kawakami, K. Transient and stable transgenesis using Tol2 transposon vectors. Methods in Moleculario Biology: Zebrafish. , 69-84 (2009).
- Halloran, M. C., et al. Laser-induced gene expression in specific cells of transgenic zebrafish. Dev. Camb. Engl. 127 (9), 1953-1960 (2000).
- Kingsley, D. M., et al. New genomic tools for molecular studies of evolutionary change in threespine sticklebacks. Behaviour. 141 (11/12), 1331-1344 (2004).
- Mortlock, D. P., Guenther, C., Kingsley, D. M. A general approach for identifying distant regulatory elements applied to the Gdf6 gene. Genome Res. 13 (9), 2069-2081 (2003).
- Suster, M. L., Abe, G., Schouw, A., Kawakami, K. Transposon-mediated BAC transgenesis in zebrafish. Nat. Protoc. 6 (12), 1998-2021 (2011).
- Suster, M. L., Sumiyama, K., Kawakami, K. Transposon-mediated BAC transgenesis in zebrafish and mice. BMC Genomics. 10 (1), 477(2009).
- Kim, H., Kim, J. S. A guide to genome engineering with programmable nucleases. Nat. Rev. Genet. 15 (5), 321-334 (2014).
- Cermak, T., et al. Efficient design and assembly of custom TALEN and other TAL effector-based constructs for DNA targeting. Nucleic Acids Res. 39 (17), (2011).
- Miller, J. C., et al. A TALE nuclease architecture for efficient genome editing. Nat. Biotechnol. 29 (2), 143-148 (2011).
- Jinek, M., et al. A programmable dual-RNA-guided DNA endonuclease in adaptive bacterial immunity. Science. 337 (6096), 816-821 (2012).
- Talbot, J. C., Amacher, S. L. A streamlined CRISPR pipeline to reliably generate zebrafish frameshifting alleles. Zebrafish. 11 (6), 583-585 (2014).
- Kawakami, K., et al. A Transposon-Mediated Gene Trap Approach Identifies Developmentally Regulated Genes in Zebrafish. Dev. Cell. 7 (1), 133-144 (2004).
- Green, M. R., Sambrook, J. Molecular cloning a laboratory manual. , Cold Spring Harbor Laboratory Press. Cold Spring Harbor, N.Y. (2012).
- Villefranc, J. A., Amigo, J., Lawson, N. D. Gateway compatible vectors for analysis of gene function in the zebrafish. Dev. Dyn. 236 (11), 3077-3087 (2007).
- Doyle, E. L., et al. TAL Effector-Nucleotide Targeter (TALE-NT) 2.0: tools for TAL effector design and target prediction. Nucleic Acids Res. 40 (W1), W117-W122 (2012).
- Untergasser, A., et al. Primer3-new capabilities and interfaces. Nucleic Acids Res. 40 (15), e115(2012).
- Westerfield, M. The Zebrafish Book: A Guide for the Laboratory Use of Zebrafish (Danio rerio) . , 5th Edition, University of Oregon. Press: Eugene, OR. (2007).
- Dale, R. M., Topczewski, J. Identification of an evolutionarily conserved regulatory element of the zebrafish col2a1a. Dev. Biol. 357 (2), 518-531 (2011).
- Ran, F. A., et al. Genome engineering using the CRISPR-Cas9 system. Nat. Protoc. 8 (11), 2281-2308 (2013).
- Qi, L. S., et al. Repurposing CRISPR as an RNA-guided platform for sequence-specific control of Gene expression. Cell. 152 (5), 1173-1183 (2013).
Access restricted. Please log in or start a trial to view this content.
Reprints and Permissions
