Here, we present a method for the isolation of Extracellular Vesicles (EVs) derived from the platelet lysates (PL) and their use for coating titanium (Ti) implant surfaces. We describe the drop casting coating method, the EVs release profile from the surfaces, and in vitro biocompatibility of EVs coated Ti surfaces.
A subscription to JoVE is required to view this content. Sign in or start your free trial.
Method Article
Platelet-Derived Extracellular Vesicle Functionalization of Ti Implants
In This Article
Summary
Abstract
Extracellular Vesicles (EVs) are biological nanovesicles that play a key role in cell communication. Their content includes active biomolecules such as proteins and nucleic acids, which present great potential in regenerative medicine. More recently, EVs derived from Platelet Lysate (PL) have shown an osteogenic capability comparable to PL. Besides, biomaterials are frequently used in orthopedics or dental restoration. Here, we provide a method to functionalize Ti surfaces with PL-derived EVs in order to improve their osteogenic properties.
EVs are isolated from PL by size exclusion chromatography, and afterward Ti surfaces are functionalized with PL-EVs by drop casting. Functionalization is proven by EVs release and its biocompatibility by the lactate dehydrogenase (LDH) release assay.
Introduction
EVs are membrane vesicles (30-200 nm) secreted by any cell and play a key role in cell-to-cell communication by delivering their cargo. They contain a variety of active biomolecules that may include nucleic acids, growth factors, or bioactive lipids1. For these reasons, EVs have been evaluated for their potential use in therapeutics. In terms of orthopedics and bone regeneration, EVs from different sources have been tested. Among them, platelet-derived EVs have been shown to induce a differentiation effect on stem cells while maintaining a low cytotoxic profile2,3. Therefore, further research is required to explore the possibility of combining EVs with biomaterials in order to use them in daily clinical practice.
Titanium-based biomaterials are widely used as scaffolds for bone healing clinical interventions due to their mechanical properties, high biocompatibility, and long-term durability4. Nevertheless, Ti implants are a bioinert material and, therefore, present a poor capability for bonding with the surrounding bone tissue5. For this reason, titanium modifications are being studied in order to improve their performance by achieving a more functional microenvironment on its surface4,6,7. In this sense, EVs can be anchored to titanium by chemical8 or physical interactions9,10. Immobilized EVs derived from stem cells or macrophages enhance the bioactivity of Ti by promoting cellular adhesion and proliferation thereby inducing an osteogenic effect8,9,10.
This article will focus on a drop casting strategy for coating Ti surfaces with PL-derived EVs in detail. In addition, we will evaluate EVs release profile from the coated surface over time and confirm its cellular biocompatibility in vitro.
Access restricted. Please log in or start a trial to view this content.
Protocol
Platelet Lysate (PL) is obtained as previously described in compliance with institutional guidelines3 using fresh buffy coats provided by the IdISBa Biobank as starting material. Their use for the current project was approved by its Ethics Committee (IB 1995/12 BIO).
1. EVs isolation from PL
- Larger bodies removal
- Thaw PL at room temperature.
- Centrifuge PL at 1,500 x g for 15 min at 4 °C. Discard the pellet as it contains cell debris.
- Collect the supernatant and perform two consecutive centrifugations at 10,000 x g for 30 min at 4 °C.
NOTE: The pellet corresponds to larger EVs such as microvesicles, and in this case, it is discarded. - Filter the supernatant first through 0.8 µm porous membrane, and then through 0.2 µm porous membrane.
NOTE: These steps remove all non-desired EVs. - Pool the filtered PL and store at -20 °C until use.
- Size exclusion chromatography
- Equilibrate the column coupled to chromatography equipment at the desired flow rate with filtered PBS.
NOTE: The flow rate used depends on the column characteristics; in this case, it is set to 0.5 mL/min. - Load the processed PL (5 mL) with a syringe to the equipment.
- Inject the PL into the column and start collecting 5 mL fractions in 15 mL tubes.
- Collect the EVs enriched fractions and store them at -80 °C until use.
NOTE: When performing the experiment for the first time, characterize all fractions by protein quantification and immunodetection to determine the one enriched with EVs3,11. In this experiment, the 9th fraction is collected. - Wash the chromatographic column with 30 mL of 0.2% NaOH solution and store it in 20% ethanol solution once it reaches equilibrium.
- Equilibrate the column coupled to chromatography equipment at the desired flow rate with filtered PBS.
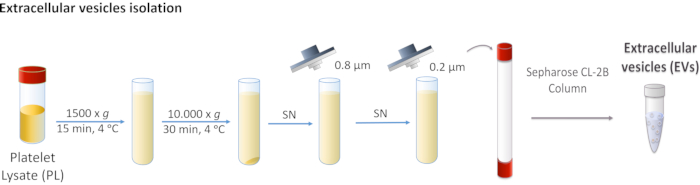
Figure 1: Schematic diagram of Platelet Lysate (PL) extracellular vesicle (EVs) isolation. PL is centrifuged first at 1,500 x g, and then at 10,000 x g to remove larger bodies. The supernatant is filtered through 0.8 and 0.2 µm filters. Processed PL is loaded onto the column, and EVs are separated by size exclusion chromatography. Please click here to view a larger version of this figure.
2. EVs characterization
NOTE: EVs characterization is necessary to perform functional studies12. Electron microscopy or western blot characterization have previously been reported13. This report will focus on the essential characterization techniques for Ti surface functionalization.
- Nanoparticle Tracking Analysis (NTA)
- Dilute the EVs (1:1000) in 0.2 µm filtered PBS.
NOTE: Too concentrated samples or too diluted samples will be out of range for NTA determination, and adjustment will be required. - Load 1 mL of the diluted EVs with a syringe to the NTA equipment and inject them into the NTA equipment.
- Follow the manufacturer's protocol for particle concentration and size distribution determination.
- Dilute the EVs (1:1000) in 0.2 µm filtered PBS.
- Protein concentration
- Determine the concentration using 1 µL of the EVs solution. Measure the absorbance with a spectrophotometer at a wavelength of 280 nm.
NOTE: EVs should present low levels of proteins compared to the number of particles. - Follow the manufacturer's instructions to obtain the absorbance reading using the spectrophotometer.
- Determine the concentration using 1 µL of the EVs solution. Measure the absorbance with a spectrophotometer at a wavelength of 280 nm.
3. Titanium surface functionalization
NOTE: In this method, machined titanium discs, c.p. grade IV, 6.2 mm diameter, and 2 mm height, are used. The discs may be manipulated with Ti tweezers, but it is important not to scratch the surface. Moreover, the machined side must face upwards during the entire process.
- Ti discs wash
NOTE: The volume of solutions used for Ti washing should be enough to cover Ti discs. Place Ti discs in a glass beaker and pour solutions onto them. Then, remove the solution by decanting.- Wash Ti implants with deionized (DI) water, and then discard the water.
- Wash Ti implants with ethanol 70%, and then decant to remove the solution.
- Place the implants in DI water and sonicate at 50 °C for 5 min. Discard the water.
- Incubate Ti implants in a 40% NaOH solution at 50 °C for 10 min with agitation. Discard the solution.
CAUTION: NaOH solution warms during preparation. The solution is corrosive and should be used inside a fume hood. - Sonicate the implants in DI water at 50 °C for 5 min, and then remove the water.
- Perform several washes with DI water (at least 5) until it reaches to neutral pH. Check pH with pH indicators.
- Sonicate the implants in DI water at 50 °C for 5 min and remove the water.
- Incubate Ti implants in a 50% HNO3 solution at 50 °C for 10 min with agitation. Remove the solution.
CAUTION: HNO3 is a corrosive and oxidizer substance, and it should be used inside a fume hood. - Sonicate the implants in DI water at 50 °C for 5 min. Remove the water.
- Perform several washes with DI water (at least 5) until neutral pH is obtained. Check the pH with pH indicators.
- Sonicate the implants in DI water at 50 °C for 5 min. Remove the water.
NOTE: At this point, the experiment can be stopped by storing Ti implants in a 70% ethanol solution.
- Ti passivation
NOTE: Ti passivation steps are performed by completely covering Ti discs with the different solutions in the order listed below. Ti discs are placed in a glass beaker and solutions are gently poured on them. Volumes used in all wash steps must completely cover the implants and are removed via decanting.- Incubate the Ti implants in a 30% HNO3 solution for 30 min at room temperature under gentle agitation. Remove the solution.
- Perform several washes with DI water (at least 5) until it reaches to neutral pH. Check the pH with pH indicators.
- Incubate Ti implants overnight at room temperature in DI water.
- Dry off the implants under vacuum conditions at 40 °C for 10 min.
- EVs drop casting
NOTE: For cell functional studies, it is important to work in a cell culture cabinet.- Place the Ti implants in a 96-well plate, with the machined side facing up.
NOTE: If the implants are turned upside-down, a needle can be used to set them back. - Thaw the EVs solution and mix them with agitation. Use a vortex to pulse for 3 s.
- Deposit the EVs on the Ti surface. In this study, drops of 40 µL of EVs solution are placed onto the Ti to immobilize a maximum of 4 x 10¹¹ EVs per implant according to the concentration determined by NTA.
- Place the plates containing the Ti under vacuum conditions at 37 °C until drops are completely dry (~2 h).
NOTE: Adjust the time depending on the number of implants and the water present in the vacuum chamber.
- Place the Ti implants in a 96-well plate, with the machined side facing up.
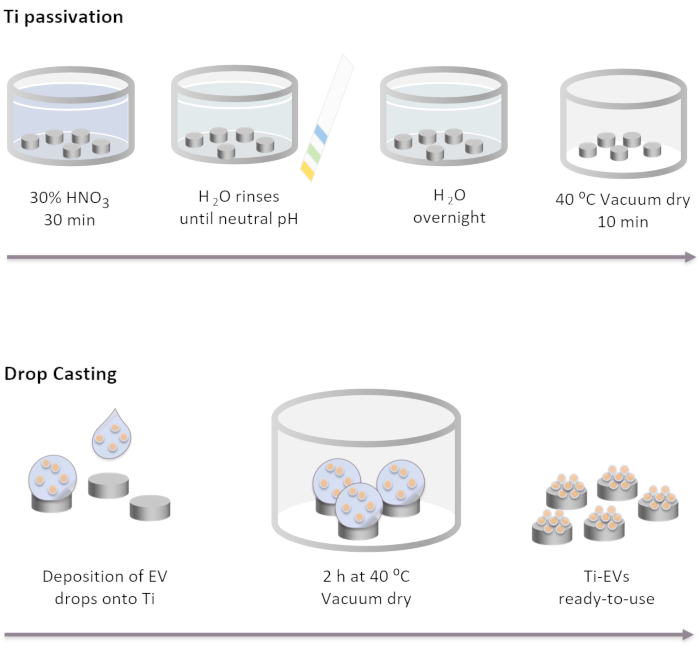
Figure 2: Schematic diagram of Ti passivation and EVs functionalization by drop casting. Ti implants are passivated first by incubation for 30 min in a 30% HNO3 solution at room temperature. After several washes with DI water, pH reaches neutral. Then, Ti implants are incubated overnight at room temperature in DI water. After that, the implants are dried off under vacuum conditions at 40 °C. For EVs immobilization, 40 µL of EVs solution are deposited onto Ti implants. Next, implants are incubated at vacuum for 2 h until EVs are physically bound to the surface. Please click here to view a larger version of this figure.
4. Ti surface characterization
- Release study
- Incubate Ti surface with 200 µL of filtered PBS at 37 °C.
NOTE: PBS is filtered to avoid interferences with the NTA measurement. - Replace the PBS at different time points and store at -80 °C.
NOTE: In this study, 2-, 6-, 10-, and 14-days' time points were analyzed. - Analyze stored PBS for particle studies by NTA according to the manufacturer's instructions.
NOTE: Particle concentration in PBS at different times is a representation of EVs release profile over time.
- Incubate Ti surface with 200 µL of filtered PBS at 37 °C.
- Biocompatibility studies
NOTE: Human umbilical cord-derived mesenchymal stem cells (hUC-MSC) are obtained from the IdISBa Biobank in compliance with institutional guidelines.- Maintain hUC-MSC in DMEM low glucose supplemented with 20% FBS until use. Change the medium twice per week.
- For cell seeding, wash the cells in flasks with 5 mL of PBS twice.
- Trypsinize hUC-MSC by adding 1 mL of trypsin solution. Ensure that it completely covers the monolayer of cells. Remove the trypsin solution and place the cell culture flask at 37 °C for 2 min approximately. View cell detachment under the microscope. Detached cells will appear round in shape and will be in suspension.
- Resuspend cells in DMEM low glucose with 1% EVs depleted FBS.
NOTE: Prepare media supplemented with 1% FBS, and then ultracentrifuge at 120,000 x g for 18 h to remove FBS-EVs. It is important to remove EVs to avoid interferences with platelet EVs. - Determine cell concentration by counting the number of cells with a Neubauer chamber14.
- Bring hUC-MSC to a concentration of 50,000 cells/mL.
- Seed 200 µL of the cell solution onto the Ti implants.
- After 48 h, collect 50 µL of media and perform the cytotoxic determination using lactate dehydrogenase (LDH) activity kit, according to the manufacturer's protocol.
Access restricted. Please log in or start a trial to view this content.
Results
The method presented in this article allows obtaining EVs functionalized titanium discs. EVs are physically bonded to the surface, which allows a sustained release over time. The amount of EVs released can be measured by NTA on Day 2, 6, 10, and 14. The first measurements, on Day 2, show that around 109 EVs are released, followed by a sustained release on day 6 (~108 EVs); day 10 (~107 EVs), and day 14 (~107 EVs). This confirms a sustained release, despite showing a decrease in...
Access restricted. Please log in or start a trial to view this content.
Discussion
This protocol aims to provide clear instructions for EVs functionalization onto Ti surfaces. The method presented is based on a drop casting strategy, which is a physisorption type of functionalization. Poor bibliography exists regarding EVs functionalization on Ti surfaces, although there are few studies showing different advantages by immobilizing EVs on Ti10. Anyway, some of the strategies explored include biochemical binding8, polymeric entrapment9
Access restricted. Please log in or start a trial to view this content.
Disclosures
The authors have nothing to disclose.
Acknowledgements
This research was funded by Instituto de Salud Carlos III, Ministerio de Economía y Competitividad, co-funded by the ESF European Social Fund and the ERDF European Regional Development Fund (MS16/00124; CP16/00124; PI17/01605), the Direcció General d'Investigació, Conselleria d'Investigació, Govern Balear (FPI/2046/2017), and PROGRAMA JUNIOR del projecte TALENT PLUS, construyendo SALUD, generando VALOR (JUNIOR01/18), financed by the sustainable tourism tax of the Balearic Islands.
Access restricted. Please log in or start a trial to view this content.
Materials
| Name | Company | Catalog Number | Comments |
|---|---|---|---|
| 0,8 µm syringe filter | Sartorius | 16592K | |
| 1.5 mL Centrifuge tube | SPL life sciences | PLC60015 | |
| 1mL syringe | BD | 303174 | |
| 96-well culture plate | SPL life sciences | PLC30096 | |
| Absolut ethanol | Scharlau | ET0006005P | Used to prepare 20 % ethanol with Milli-Q® water |
| AKTA purifier System | GE Healthcare | 8149-30-0014 | |
| Allegra X-15R Centrifuge | Beckman Coutler | 392934 | SX4750A swinging rotor |
| Centrifuge 5430 R | Eppendorf | 5428000210 | F-45-48-11 rotor |
| Conical Tube, Conical Bottom, 50ml | SPL life sciences | PLC50050 | |
| Cytotoxicity Detection Kit (LDH) | Roche | 11644793001 | |
| Disposable Syringes 10 ml | Becton Dickinson | BDH307736 | |
| DMEM Low Glucose Glutamax | GIBCO | 21885025 | |
| Dulbecco's PBS (1x) | Capricorn Scientific | PBS-1A | |
| Fetal Bovine Serum (FBS) Embrionic Certified | GIBCO | 16000044 | |
| Filtropur S 0.2 µm syringe filter | Sarstedt | 83.1826.001 | |
| HiPrep 16/60 Sephacryl S-400 HR | GE Healthcare | 28-9356-04 | Precast columns |
| human umbilical cord-derived mesenchymal stem cells (hUC-MSC) | IdISBa Biobank | ||
| Nanodrop 2000 spectrophotometer | ThermoFisher | ND-2000 | |
| NanoSight NS300 nanoparticle tracking analysis | Malvern | NS300 | Device with embedded laser at λ= 532 nm and camera sCMOS |
| Needle | Terumo | 946077135 | |
| Nitric acid 69,5% | Scharlau | AC16071000 | |
| Optima L-100 XP Ultracentrifuge | Beckman Coulter | 8043-30-1124 | SW-32Ti Rotor |
| Penicillin-Streptomycin Solution 100X | Biowest | L0022 | |
| pH Test strips 4.5-10.0 | Sigma | P-4536 | |
| Platelet Lysate (PL) | IdISBa Biobank | Obtained from buffy coats discarded after blood donation | |
| Polypropylene centrifuge tubs | Beckman Coutler | 326823 | |
| Power wave HT | BioTek | 10340763 | |
| Screw cap tube, 15 ml, (LxØ): 120 x 17 mm, PP, with print | Sarstedt | 62554502 | |
| Sodium hidroxide | Sharlau | SO04251000 | |
| Titanium implants replicas | Implantmedia, SA | NA | Titanium grade IV. Diameter: 6,2 mm. Height: 1,95 mm |
| Trypsin-EDTA 1 X | Biowest | L0930 | |
| Tryton X100 | Sigma | T8787 |
References
- Van Niel, G., D'Angelo, G., Raposo, G. Shedding light on the cell biology of extracellular vesicles. Nature Reviews. Molecular Cell Biology. 19 (4), 213-228 (2018).
- Torreggiani, E., et al. Exosomes: novel effectors of human platelet lysate activity. European Cells & Materials. 28, 137-151 (2014).
- Antich-Rosselló, M., et al. Platelet-derived extracellular vesicles promote osteoinduction of mesenchymal stromal cells. Bone and Joint Research. 9 (10), 667-674 (2020).
- Li, Y., et al. New developments of Ti-based alloys for biomedical applications. Materials. 7 (3), Basel, Switzerland. 1709-1800 (2014).
- Lan, W. C., et al. The potential of a nanostructured titanium oxide layer with self-assembled monolayers for biomedical applications: Surface properties and biomechanical behaviors. Applied Sciences. 10 (2), 590(2020).
- Jemat, A., Ghazali, M. J., Razali, M., Otsuka, Y. Surface modifications and their effects on titanium dental implants. BioMed Research International. 2015, 791725(2015).
- Damiati, L., et al. Impact of surface topography and coating on osteogenesis and bacterial attachment on titanium implants. Journal of Tissue Engineering. 9, 2041731418790694(2017).
- Chen, L., et al. Self-assembled human adipose-derived stem cell-derived extracellular vesicle-functionalized biotin-doped polypyrrole titanium with long-term stability and potential osteoinductive ability. ACS Applied Materials & Interfaces. 11 (49), 46183-46196 (2019).
- Wei, F., Li, M., Crawford, R., Zhou, Y., Xiao, Y. Exosome-integrated titanium oxide nanotubes for targeted bone regeneration. Acta Biomaterialia. 86, 480-492 (2019).
- Wang, X., et al. Exosomes influence the behavior of human mesenchymal stem cells on titanium surfaces. Biomaterials. 230, 119571(2020).
- Lozano-Ramos, I., et al. Size-exclusion chromatography-based enrichment of extracellular vesicles from urine samples. Journal of Extracellular Vesicles. 4, 27369(2015).
- Théry, C., et al. Minimal information for studies of extracellular vesicles 2018 (MISEV2018): a position statement of the International Society for Extracellular Vesicles and update of the MISEV2014 guidelines. Journal of Extracellular Vesicles. 7 (1), 1535750(2018).
- Liu, J., et al. Isolation and characterization of extracellular vesicles from adult schistosoma japonicum. Journal of Visualized Experiments: JoVE. (135), e57541(2018).
- JoVE. Basic Methods in Cellular and Molecular Biology. Using a Hemacytometer to Count Cells. JoVE Science Education Database. , JoVE. Cambridge, MA. (2021).
- Chouirfa, H., Bouloussa, H., Migonney, V., Falentin-Daudré, C. Review of titanium surface modification techniques and coatings for antibacterial applications. Acta Biomaterialia. 83, 37-54 (2019).
- Córdoba, A., Monjo, M., Hierro-Oliva, M., González-Martín, M. L., Ramis, J. M. Bioinspired quercitrin nanocoatings: A fluorescence-based method for their surface quantification, and their effect on stem cell adhesion and differentiation to the osteoblastic lineage. ACS Applied Materials and Interfaces. 7 (30), 16857-16864 (2015).
Access restricted. Please log in or start a trial to view this content.
Reprints and Permissions
