


Overview
Source: Roberto Leon, Department of Civil and Environmental Engineering, Virginia Tech, Blacksburg, VA
Hardness testing is one of the most universally valuable mechanical tests available to engineers, as it is both simple and relatively inexpensive for the wealth of information and data it produces. Hardness testing, generally in the form of a surface penetration test, is both quicker and less destructive than tensile testing. Hardness provides a linear relationship with tensile strength over a wide range of strengths for many materials, such as steel. Hardness tests are empirical, rather than derived from theory, as the results conflate effects from many different materials properties (Young's modulus, yield strength, etc.).
Hardness is a characteristic of a material used to describe how much plastic deformation (yield) that a material will undergo when a known force is applied). One can characterize hardness in three manners: scratch, indentation, and rebound hardness. A common early example of a hardness (scratch) test is the Mohs scale (1820), derived for minerals, and in which talc has a value of 1 and diamond a value of 10. In indentation testing using the Rockwell approach, small indenters are used with different loads. The most common are the Rockwell Hardness B (HRB), which uses a 1/16 in. hardened steel ball indenter along with a 100 kg weight, and the Rockwell Hardness C (HRC), which uses a diamond cone indenter along with a 150 kg weight. HRB tests are conducted for materials with low range hardness, such as aluminum, brass, and soft steels, whereas HRC tests are used for materials with high range hardness, such as harder steels. Smaller weights (15 to 45 kg) are used for the Rockwell superficial hardness test such as the HR15W, which uses a 1/8 in. steel ball with a 15 kg weight. With its lower load and shallow impression, a superficial Rockwell hardness test is ideal for very thin or brittle materials. An example of a rebound test is the Schmidt hammer, used to measure the strength of concrete. In this test, a steel mass is shot at the surface with a known force and the rebound of the ball is measured. In all types of hardness testing, it is imperative to conduct extensive calibrations if reliable results are to be obtained.
For this experiment, we will be examining the Rockwell hardness test, which measures indentation hardness of untreated and heat-treated aluminum.
Principles
There are several common methods to measure hardness, which include Brinell (HB), Vickers (V), Knoop (K), and Shore hardness tests. Each of these methods utilizes a penetrator, either in the shape of a sphere (Brinell), cone (Rockwell), or diamond pyramid (Vickers, Knoop, and Rockwell), to make an indentation into the surface of a metal, which is then measured optically or by direct reading. The Shore hardness test usually measures the penetration into the surface of plastics or other polymers. The Brinell hardness test was the first hardness test introduced and is a robust method for high-test loads utilizing rudimentary instrumentation. Vickers hardness tests are beneficial when one needs to looks at hardness over a large range of values, as it can measure from the lowest to highest recorded hardness. Knoop hardness tests are valuable for applications with very small or thin samples. Nevertheless, the Rockwell hardness test is the most popular, as it is vastly more quick and inexpensive, as well as being the only hardness test where one can directly read the hardness without the aid of an optical tool.
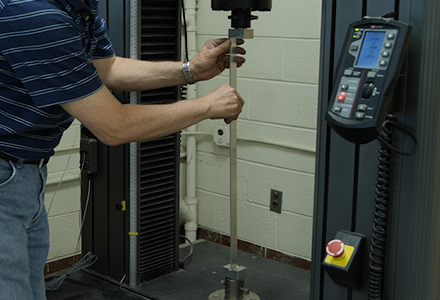
For this study, we will focus on the Rockwell hardness test, as it is defined in ASTM E-18. The typical Rockwell tester is shown in Fig. 1 and consists of a readout and a lever system to apply the loads, which is hidden to the viewer. Manual and automated versions of these machines are commonly available in testing laboratories.

Figure 1: Rockwell Testing Machine.
The harder the material, the less penetration depth, thus the corresponding Rockwell hardness value will be lower. The Rockwell B and C hardness are computed as:


The results from any hardness test can be converted to other hardness scales through best-fit equations to extensive datasets. However, there is no one discrete, linear conversion, and thus the resulting values will be approximations instead of absolute values. For example, for non-work-hardening materials under plane strain:


Fig. 2 shows typical indentations on a calibration block, which is generally furnished with the testing machine. These blocks need to be used periodically to ensure that the machine is performing properly.

Figure 2: Indentation on Calibration Block.
In general, the tensile strength of a material (σu) can be related to its Brinell hardness (HB) through equations like:

One of the ways in which the strength of material is changed is through either heat treatment or cold rolling. In general, cold rolling through successively thinner rolls will result in a stronger (and harder material). In a similar fashion, in steels, the rate of cooling significantly affects the formation of martensitic structures, which contribute to improved mechanical performance. Martensitic structures exhibit the distinct crystal structure of body-centered tetragonal (BCT), where the crystals are stretched to be square on both ends but longer on the sides, like a lens, thereby imparting great hardness to the material.
One way of characterizing heat treatment is through a Jominy end-quench test (ASTM A225). In this test a circular specimen, 4 in. long is heated uniformly in an oven. Once it has reached the desired temperature such that full austenizing has been reached (>900 °C), the specimen is cooled with a water jet at one end. Austenization is the process by which steel is heated to change the crystal structure from ferrite to austenite, a metallic, non-magnetic allotrope of iron known as gamma-phase iron.
The end subjected to the water jet will cool significantly faster than the other end, resulting in different martensitic structures, and hence different hardness, along the length of the specimen. At this point a shallow flat surface is ground along the length of the specimen to allow for hardness testing on a flat surface. The Jominy specimen is useful to demonstrate the Rockwell hardness test, but care must be taken not to confuse the hardness test results with the hardenability of a material that the Jominy end-quench test is supposed to measure. Hardenability is intended to measure how martensitic structure varies across the depth of a piece of material; hardness is one way of characterizing that variation.
In the typical Rockwell C test, a preliminary load is applied to the indenter, and an initial penetration depth is measured. This first step is to establish a zero or reference position, in order to mitigate any effects from variations in the material's surface. Next, the major load is applied to the indenter. Finally, the preload is removed, and the final penetration depth is measured. The difference of this value from the initial preload value is then calculated into a hardness value.
Subscription Required. Please recommend JoVE to your librarian.
Procedure
The following procedure is for the manual machine shown in Fig. 1. The procedure is typical for other machines as well.
- Obtain a typical Jominy end-quench test specimen that has undergone water-cooling treatment.
- Secure the specimen to the table of the testing machine so that it will not move during testing.
- Ensure selection lever is in "Unloading" position.
- Using the adjustment wheel under the support, raise the sample until contact with the indenter is established (when contact is just made, the needle on the front dial will start to move slightly).
- Adjust the dial gage, such that the initial reading is 0.
- Apply a preload by slowly continuing to turn the table adjustment until the dial gage has gone through three complete turns; stop when the needle is back to 0.
- Move the side lever to "Loading" position.
- Wait until needle stops moving (5 to 10 s) then move lever back to "Unloading".
- Record the Rockwell C hardness from dial gage reading.
- Repeat the test along the length. ASTM A255 specifies that readings should be taken at 1/16 in. interval for the first ½ inch, and at 1/8 in. intervals for the next ½ in.
Hardness testing is a simple and relatively inexpensive test. Quicker and less destructive than tensile testing, it is considered one of the most universally valuable mechanical tests available to engineers.
Hardness testing values are empirical, and yet results provide a very good correlation with material strength over a wide range of materials. When a known force is applied in a hardness test, the amount of plastic deformation the material undergoes determines the hardness value.
In Rockwell-type testing, loaded indenters of various sizes and shapes measure hardness. For this experiment, we will measure and compare the hardness of untreated and heat-treated steel using the Rockwell hardness test.
Several common methods to measure the hardness of metals include Brinell, Vickers, Knoop, and Rockwell hardness BNC. Each of these methods utilizes a penetrator, either in the shape of a sphere, a cone, or a diamond pyramid.
An indentation is made into the surface of a metal and a hardness reading is displayed. Of this list, the Rockwell hardness test is the most popular one for structural steels. A standard manual Rockwell tester consists of a lever system to apply the load and an analog readout showing the hardness number.
In the typical Rockwell test, a zero point is established to account for surface variations by applying a preliminary load and measuring an initial penetration depth. Next, the major load is applied to the indenter. Finally, the load is removed and the final penetration depth is measured. The dial gauge on the top of the machine uses the difference between these two values to display a Rockwell hardness value. The harder the material is, the less the indenter will penetrate, resulting in a higher Rockwell hardness value. Thus, the values for Rockwell B and Rockwell C hardness are based on the depth of the penetration, and therefore the test machines are calibrated often using calibration test blocks for specific hardness ranges.
Rockwell hardness testing can be used to evaluate how the strength of a material is changed through processes such as heat treatment or cold rolling. Cold rolling tends to result in stronger, harder materials. Heat treating can result in softer materials through heating but harder structures through quenching.
For example, in the Jominy End Quench Test, a cylindrical specimen is heated uniformly. One end is then quenched with a stream of water. Changes along the length of the specimen from the quenched end to the unquenched end can be seen in hardness values, which are representative of changes in the microstructure.
In the next section, we will measure the hardness along the length of a steel Jominy End Quench Test specimen to observe the transition from untreated to heat-treated steel using the Rockwell hardness test.
Before you begin, familiarize yourself with the testing machine. The anvil, which can be raised or lowered by the capstan handwheel, supports a sample underneath the interchangeable indenter.
A test load is chosen using the selector on the side of the machine and is applied by turning the load lever from the unloading position to the loading position. Correct pre-loading and final measurements are determined using the dial gauge on the top of the machine.
Before inserting your test specimen, confirm that the Rockwell C diamond cone indenter is installed and the test load is set to 150 kilograms. Secure the specimen in the machine with the flat surface against the anvil. For this demonstration, we'll use a Jominy End Quenched specimen that has undergone water cooling treatment.
Move the load lever to the unloading position, and then raise the anvil to bring the specimen close to the indenter. Adjust the specimen position so that the indenter is one-sixteenth of an inch from the end. When the position is correct, re-secure the specimen so that it will not move during testing. Now, raise the sample once again until the needle on the front dial begins to move slightly, indicating that contact with the indenter is established.
Apply the pre-load by continuing to slowly raise the specimen until the needle on the dial has completed three full turns. Stop when the needle has completed the third turn. Adjust the outside ring of the dial gauge so that the initial reading is zero. Then move the load lever to the loading position to apply the test load. The needle will settle to a new value as the load is applied. Wait until it stops moving and then move the load lever back to the unloading position.
Record the Rockwell C hardness from the dial gauge and then lower the anvil to move the sample away from the indenter. Repeat this test along the length of the specimen. The ASTM-A255 guidelines specify that readings should be taken at one-sixteenth inch intervals for the first half inch and at one-eighth inch intervals for the next half inch.
Plot the Rockwell hardness of the specimen as a function of position along the specimen. The hardness clearly decreases as distance from the quenched end increases.
The Rockwell hardness test was used to show that due to the rate of cooling, the change in internal structure of the material affected the hardness of the material, which in turn indicates the strength of the material.
Now that you appreciate the hardness test for its ease of use, let's take a look at how it is applied to assure the quality of everyday products.
Hardness values can easily be converted to strength values using charts derived from empirical equations. As expected, softer materials have lower strength values and harder materials have higher strength values. Because of this, hardness values can be used in place of more costly tensile testing to predict the strength of things we use every day.
Just looking around at a backyard barbecue, you will see many products that are deemed safe due to hardness testing. Metal lawn chairs, grates on the grill over a wide range of temperatures, hardened steel knives, and the metal pool ladder in aquatic conditions. All were likely hardness tested to assure consumer safety.
You've just watched JoVE's introduction to the Rockwell hardness test. You should now understand why hardness testing is commonly used, how to perform hardness testing, and how to analyze the results obtained.
Thanks for watching!
Subscription Required. Please recommend JoVE to your librarian.
Results
A typical result of Rockwell testing on a Jominy specimen for a HR C test is shown in the video. The hardness decrease appreciably as one moves away from the end subjected to the water jet. The hardness test value can be converted to a tensile strength through charts provided by the testing machine manufacturer. The results show that the steel varies considerably in both hardness and strength as one moves away from the quenched end.
Subscription Required. Please recommend JoVE to your librarian.
Applications and Summary
Hardness testing is one of the principal tests to garner important engineering information about a material. Rockwell hardness testing is the preferred method of hardness testing, as it eliminates the need for advanced optical equipment, but instead employs basic laboratory equipment to accurately, inexpensively, and quickly measure the hardness of a material. More importantly, this method is easily translated and reproducible between labs and testing personnel because of its relative simplicity. The procedure requires that after taking an initial reading in preloading conditions, one applies the major load and measure the change in position from the initial value. This value can then be calculated into a hardness value, which can also be transformed and approximated to other hardness scales by a series of equations. The Rockwell hardness test was used to show how the rate of cooling affect the martensitic structure of steels, and how the rate of cooling results in materials with significantly different strengths.
Hardness tests enable us to utilize proper materials that will ensure high quality of performance in their use. Every product that we use in our daily lives has been tested for hardness. Consider the following amusing scenario is just one of many daily examples as to how hardness testing allows us to enjoy materials that are both useful and safe. Imagine the plethora of times hardness testing was used in order for you to throw a backyard barbeque for your family reunion. The metal lawn chairs certainly had to be hardness tested to make sure that the metal was strong enough, so that Aunt Bessie did not go tumbling to the ground when she sat down. The metal grates on the grill also had to be hardness tested over a wide range of temperatures (given that your mother likes her steak well done on high heat) to ensure they would not fracture or give when inevitably you dropped the grilling tongs on the grill. The knives you use to cut the meat are all hardened steel also. Finally, the metal ladder in the pool had to hardness tested in aquatic conditions to make sure that when your younger cousin tried to climb out of the pool, he didn't fall back in when the metal failed. There are a lot of saved hamburgers, brats, and hotdogs, not to mention human lives, thanks to hardness testing.
Subscription Required. Please recommend JoVE to your librarian.